pyQT5 学习使用 笔记 五 opencv+Qt 在Qt UI中显示 opencv 图像。
前文中我们 了解到了 python 中 如何 使用 Qt 的 重要的 信号 与 槽的传递 和执行机制。这也是Qt的一个最重要的机制。了解了这个机制,那么我们可以做很多事情了, 其实 通过前面的种种学习我们也离目的越来越近。
我的目的就是 通过 python 实现 opencv+Qt 联合编程。 原先用c++也是可以的,但是现在发现 远远没有 python 来的方便,快捷。闲话不多说,下面我们来看如何实现 opencv+Qt 在python中的联合编程的。
首先 我们使用先前做好的External Tools QtDesigner 这个UI 设计器来设计一个简单的UI 界面。
这个界面非常简单包括一个按钮,一个label 这个lable就是用来显示 读取的图片的控件
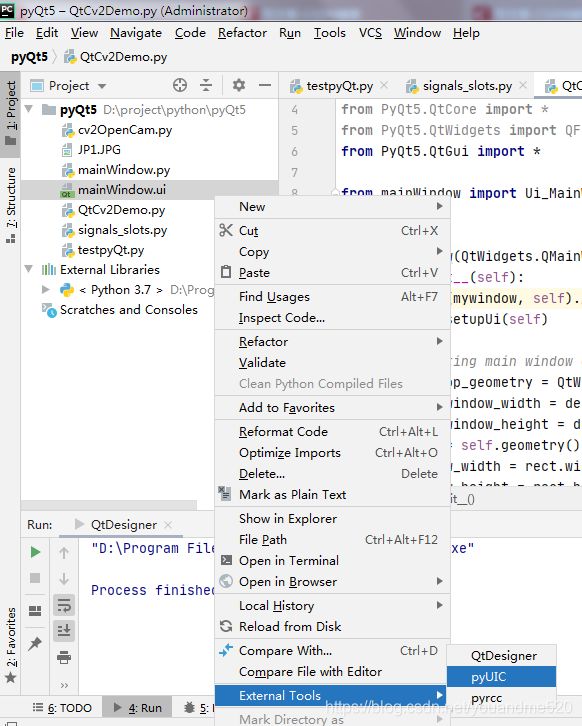
接下来用我们设置好的外部工具pyUIC 这个工具,把准备好的UI 界面 生成 响应的py 文件
生成了mainWindow.py 这个文件
![]()
这个文件 包含了 ui的 类信息。 不需要我们手动写关于窗体的代码了 ,简单方便。
# -*- coding: utf-8 -*-

# Form implementation generated from reading ui file 'mainWindow.ui'
#
# Created by: PyQt5 UI code generator 5.15.0
#
# WARNING: Any manual changes made to this file will be lost when pyuic5 is
# run again.  Do not edit this file unless you know what you are doing.


from PyQt5 import QtCore, QtGui, QtWidgets


class Ui_MainWindow(object):
    def setupUi(self, MainWindow):
        MainWindow.setObjectName("MainWindow")
        MainWindow.resize(773, 600)
        self.centralwidget = QtWidgets.QWidget(MainWindow)
        self.centralwidget.setObjectName("centralwidget")
        self.verticalLayout = QtWidgets.QVBoxLayout(self.centralwidget)
        self.verticalLayout.setObjectName("verticalLayout")
        self.label = QtWidgets.QLabel(self.centralwidget)
        self.label.setObjectName("label")
        self.verticalLayout.addWidget(self.label)
        self.showImage = QtWidgets.QPushButton(self.centralwidget)
        self.showImage.setObjectName("showImage")
        self.verticalLayout.addWidget(self.showImage)
        MainWindow.setCentralWidget(self.centralwidget)
        self.menubar = QtWidgets.QMenuBar(MainWindow)
        self.menubar.setGeometry(QtCore.QRect(0, 0, 773, 23))
        self.menubar.setObjectName("menubar")
        MainWindow.setMenuBar(self.menubar)
        self.statusbar = QtWidgets.QStatusBar(MainWindow)
        self.statusbar.setObjectName("statusbar")
        MainWindow.setStatusBar(self.statusbar)

        self.retranslateUi(MainWindow)
        QtCore.QMetaObject.connectSlotsByName(MainWindow)

    def retranslateUi(self, MainWindow):
        _translate = QtCore.QCoreApplication.translate
        MainWindow.setWindowTitle(_translate("MainWindow", "MainWindow"))
        self.label.setText(_translate("MainWindow", "TextLabel"))
        self.showImage.setText(_translate("MainWindow", "显示图像"))
看,转换器自动生成了所有窗体的代码, 方便,真香。
下面 在主程序中引用 窗体类
from mainWindow import Ui_MainWindow # 导入创建的GUI类然后在初始化时获取窗口的一些信息,给按钮连接槽函数
    def __init__(self):
        super(mywindow, self).__init__()
        self.setupUi(self)
        self.showImage.clicked.connect(self.pushbutton_function)  # 将点击事件与槽函数进行连接
        # setting main window geometry
        desktop_geometry = QtWidgets.QApplication.desktop()  # 获取屏幕大小
        main_window_width = desktop_geometry.width()  # 屏幕的宽
        main_window_height = desktop_geometry.height()  # 屏幕的高
        rect = self.geometry()  # 获取窗口界面大小
        window_width = rect.width()  # 窗口界面的宽
        window_height = rect.height()  # 窗口界面的高
        x = (main_window_width - window_width) // 2  # 计算窗口左上角点横坐标
        y = (main_window_height - window_height) // 2  # 计算窗口左上角点纵坐标
        self.setGeometry(x, y, window_width, window_height)  # 设置窗口界面在屏幕上的位置
按钮事件里面就是用opencv读取图像并显示。
    def pushbutton_function(self):
        #do some things
        Img=cv2.imread('JP1.JPG') #通过opencv读入一张图片
        image_height, image_width, image_depth=Img.shape #读取图像高宽深度
        QIm=cv2.cvtColor(Img,cv2.COLOR_BGR2RGB)
        QIm=QImage(QIm.data, image_width, image_height,  image_width * image_depth,QImage.Format_RGB888)
        self.label.setPixmap(QPixmap.fromImage(QIm))
最后效果如下
整体代码如下:
import sys
import cv2
from PyQt5 import QtCore, QtGui, QtWidgets
from PyQt5.QtCore import *
from PyQt5.QtWidgets import QFileDialog, QMessageBox, QDockWidget, QListWidget
from PyQt5.QtGui import *

from mainWindow import Ui_MainWindow  # 导入创建的GUI类


class mywindow(QtWidgets.QMainWindow, Ui_MainWindow):
    def __init__(self):
        super(mywindow, self).__init__()
        self.setupUi(self)
        self.showImage.clicked.connect(self.pushbutton_function)  # 将点击事件与槽函数进行连接
        # setting main window geometry
        desktop_geometry = QtWidgets.QApplication.desktop()  # 获取屏幕大小
        main_window_width = desktop_geometry.width()  # 屏幕的宽
        main_window_height = desktop_geometry.height()  # 屏幕的高
        rect = self.geometry()  # 获取窗口界面大小
        window_width = rect.width()  # 窗口界面的宽
        window_height = rect.height()  # 窗口界面的高
        x = (main_window_width - window_width) // 2  # 计算窗口左上角点横坐标
        y = (main_window_height - window_height) // 2  # 计算窗口左上角点纵坐标
        self.setGeometry(x, y, window_width, window_height)  # 设置窗口界面在屏幕上的位置
        # 无边框以及背景透明一般不会在主窗口中用到,一般使用在子窗口中,例如在子窗口中显示gif提示载入信息等等
       # self.setWindowFlags(Qt.FramelessWindowHint)
       # self.setAttribute(Qt.WA_TranslucentBackground)


    def pushbutton_function(self):
        #do some things
        Img=cv2.imread('JP1.JPG') #通过opencv读入一张图片
        image_height, image_width, image_depth=Img.shape #读取图像高宽深度
        QIm=cv2.cvtColor(Img,cv2.COLOR_BGR2RGB)
        QIm=QImage(QIm.data, image_width, image_height,  image_width * image_depth,QImage.Format_RGB888)
        self.label.setPixmap(QPixmap.fromImage(QIm))

if __name__ == '__main__':
    app = QtWidgets.QApplication(sys.argv)
    window = mywindow()
    window.show()
    sys.exit(app.exec_())


