Yolov5不止于目标检测,在图像分类上的落地应用!
点击下方卡片,关注“自动驾驶之心”公众号
ADAS巨卷干货,即可获取
点击进入→自动驾驶之心【目标检测】技术交流群
后台回复【2D检测综述】获取鱼眼检测、实时检测、通用2D检测等近5年内所有综述!
导读
yolov5一直作为目标检测的扛把子,训练快、效果好、易部署等优点让从入门小白到行业大佬都对其膜拜不已,而yolov5不仅限于目标检测,现在已经在分类、分割等其他任务上开始发力,这篇文章介绍下yolov5框架在分类任务上的应用以及相关代码的变动。
前言
之前听说yolov5在6版本以上会添加其他的图像任务,今天打开官方github时,发现分类和分割任务已经更新到7.0版本了。今天对分类任务大概梳理一遍。
1
Yolov5-cls的变动
仔细对比yolov5的目标检测与分类的代码框架,主要的改动点在以下几个方面:
1. 训练、测试、验证等的代码入口;
2. 数据加载和预处理;
3. 网络变动;
4. loss的变动;
5. 评价指标。
01 训练、测试、验证等的代码入口
yolov5分类任务的训练、测试以及预测的代码入口是在新建的文件夹下:
|--classify
   |--train.py
   |--val.py
   |--pred.py
三个入口的架构整理上与目标检测保持一致,主要变动在数据集、网络部分、loss和评价指标上。
02 数据加载和预处理
数据预加载上,首先需要将数据集按照imageNet的格式保存,文件夹下面有train/test/val文件夹,同时在每个文件夹下,以标签作为文件夹存储属于该标签的图片:
|--dataset
   |--train
     |--dog
       |--1.jpg
       |--2.jpg
       |--3.jpg
       ....
     |--cat
       |--1.jpg
       |--2.jpg
       |--3.jpg
       ....
     ....
   |--test
     ....
通过create_classification_dataloader处理数据集,如果选择数据缓存在disk,会将数据先缓存成npy文件。同时在数据增强方面,除了常规的torchvision.transforms外,也有albumentations提供的增强。不过先较于检测中的mixup类的增强,分类的数据增强稍显单薄:
class ClassificationDataset(torchvision.datasets.ImageFolder):
  """
    YOLOv5 Classification Dataset.
    Arguments
        root:  Dataset path
        transform:  torchvision transforms, used by default
        album_transform: Albumentations transforms, used if installed
    """

    def __init__(self, root, augment, imgsz, cache=False):
        super().__init__(root=root)
        self.torch_transforms = classify_transforms(imgsz)
        self.album_transforms = classify_albumentations(augment, imgsz) if augment else None
        self.cache_ram = cache is True or cache == 'ram'
        self.cache_disk = cache == 'disk'
        self.samples = [list(x) + [Path(x[0]).with_suffix('.npy'), None] for x in self.samples]  # file, index, npy, im

    def __getitem__(self, i):
        f, j, fn, im = self.samples[i]  # filename, index, filename.with_suffix('.npy'), image
        if self.cache_ram and im is None:
            im = self.samples[i][3] = cv2.imread(f)
        elif self.cache_disk:
            if not fn.exists():  # load npy
                np.save(fn.as_posix(), cv2.imread(f))
            im = np.load(fn)
        else:  # read image
            im = cv2.imread(f)  # BGR
        if self.album_transforms:
            sample = self.album_transforms(image=cv2.cvtColor(im, cv2.COLOR_BGR2RGB))["image"]
        else:
            sample = self.torch_transforms(im)
        return sample, j
03 网络变动
网络模型上,加载同目标检测网络加载,同时如果加载了yolo的检测模型,会通过ClassificationModel去除后面的detect head, 换成对应类别的分类器:
class ClassificationModel(BaseModel):
    # YOLOv5 classification model
    def __init__(self, cfg=None, model=None, nc=1000, cutoff=10):  # yaml, model, number of classes, cutoff index
        super().__init__()
        self._from_detection_model(model, nc, cutoff) if model is not None else self._from_yaml(cfg)

    def _from_detection_model(self, model, nc=1000, cutoff=10):
        # Create a YOLOv5 classification model from a YOLOv5 detection model
        if isinstance(model, DetectMultiBackend):
            model = model.model  # unwrap DetectMultiBackend
        model.model = model.model[:cutoff]  # 获取backbone模型其中cutoff值与对应网络的yaml文件中backbone中最后一层值对应。
        m = model.model[-1]  # backbone的最后一层
        ch = m.conv.in_channels if hasattr(m, 'conv') else m.cv1.conv.in_channels  # ch into module
        c = Classify(ch, nc)  # 在backbone后面接分类器,Classify(),分类器
        c.i, c.f, c.type = m.i, m.f, 'models.common.Classify'  # index, from, type
        model.model[-1] = c  # 将最后一层换成分类器
        self.model = model.model
        self.stride = model.stride
        self.save = []
        self.nc = nc
    def _from_yaml(self, cfg):
        # Create a YOLOv5 classification model from a *.yaml file
        self.model = None
04 loss
loss上采用了label_smoothing,当label_smothing=0时,为一般的CELoss,而分类任务中的focalLoss以及二分类的BCEloss 等还未加进去。
def smartCrossEntropyLoss(label_smoothing=0.0):
    # Returns nn.CrossEntropyLoss with label smoothing enabled for torch>=1.10.0
    if check_version(torch.__version__, '1.10.0'):
        return nn.CrossEntropyLoss(label_smoothing=label_smoothing) # torch1.10后,nn.CrossEntropyLoss自支持label_smoothing
    if label_smoothing > 0:
        LOGGER.warning(f'WARNING ⚠️ label smoothing {label_smoothing} requires torch>=1.10.0')
    return nn.CrossEntropyLoss()
05 评价指标
分类的评价指标,使用的是acc_top1和acc_top5,而实际上针对分类的模型性能指标有AUC,MAP, F1等,期待后期能将这些补全。
pred, targets = torch.cat(pred), torch.cat(targets)
    correct = (targets[:, None] == pred).float()
    acc = torch.stack((correct[:, 0], correct.max(1).values), dim=1)  # (top1, top5) accuracy
    top1, top5 = acc.mean(0).tolist()
2
Yolov5-cls训练及建议
yolov5的分类训练按照readme上的基本上已经能满足需求。
训练:
# Single-GPU
python classify/train.py --model yolov5s-cls.pt --data cifar100 --epochs 5 --img 224 --batch 128

# Multi-GPU DDP
python -m torch.distributed.run --nproc_per_node 4 --master_port 1 classify/train.py --model yolov5s-cls.pt --data imagenet --epochs 5 --img 224 --device 0,1,2,3
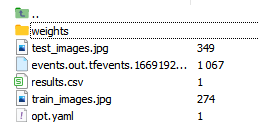
训练后的数据会保存在runs/train-cls文件夹下面:
验证:
python classify/val.py --weights yolov5m-cls.pt --data ../datasets/imagenet --img 224 # validate推理:
python classify/predict.py --weights yolov5s-cls.pt --data data/images/bus.jpg导出onnx 和 TensorRT:
python export.py --weights yolov5s-cls.pt resnet50.pt efficientnet_b0.pt --include onnx engine --img 224建议
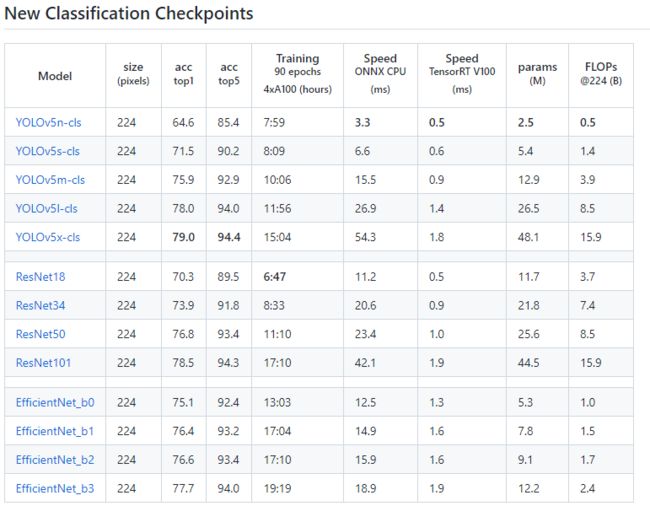
其在imageNet上与其他分类网络的效果如下:
图源:https://github.com/ultralytics/yolov5/pull/8956
Yolov5x的分类模型相比较resnet101和efficientNet_b3模型虽然其acc_top1的效果高1-2个点,但EfficientNet_b3的参数量是Yolov5x的1/4倍,其在cpu上的运行速度也差不多是其1/4,这样看如果最后模型部署在GPU上,可以考虑上Yolov5,其训练速度快,便于实际项目中的快速迭代;如果部署在cpu上,则建议使用EfficientNet系列。
结语
以上为yolov5在分类任务中的应用,期待yolov5后续trick的添加,希望对大家有帮助。
参考:
[1] https://github.com/ultralytics/yolov5
往期回顾
DETR系列大盘点 | 端到端Transformer目标检测算法汇总!
【自动驾驶之心】全栈技术交流群
自动驾驶之心是首个自动驾驶开发者社区,聚焦目标检测、语义分割、全景分割、实例分割、关键点检测、车道线、目标跟踪、3D目标检测、BEV感知、多传感器融合、SLAM、光流估计、深度估计、轨迹预测、高精地图、规划控制、模型部署落地、自动驾驶仿真测试、硬件配置、AI求职交流等方向;
添加汽车人助理微信邀请入群
备注:学校/公司+方向+昵称
自动驾驶之心【知识星球】
想要了解更多自动驾驶感知(分类、检测、分割、关键点、车道线、3D目标检测、多传感器融合、目标跟踪、光流估计、轨迹预测)、自动驾驶定位建图(SLAM、高精地图)、自动驾驶规划控制、领域技术方案、AI模型部署落地实战、行业动态、岗位发布,欢迎扫描下方二维码,加入自动驾驶之心知识星球(三天内无条件退款),日常分享论文+代码,这里汇聚行业和学术界大佬,前沿技术方向尽在掌握中,期待交流!


