文章目录
- 1 SeNet介绍
- 2 SeNet优点
- 3 Se模块的具体介绍
- 4 完整代码
1 SeNet介绍
- SENet是Squeeze-and-Excitation Networks的简称,由Momenta公司所作并发于2017CVPR,论文中的SENet赢得了ImageNet最后一届(ImageNet 2017)的图像识别冠军
- SENet主要是学习了channel之间的相关性,筛选出了针对通道的注意力,稍微增加了一点计算量,但是效果比较好。
- 通过学习的方式来自动获取到每个特征通道的重要程度,然后依照这个重要程度去提升有用的特征,并抑制对当前任务用处不大的特征。
- Se模块思想简单,易于实现,很容易加载到现有的网络模型框架中。
2 SeNet优点
- 增加少量的参数,并能够在一定程度上提高模型的准确率。
- 是在ResNet的基础上建立的策略,创新点好,很适合自己创作新模型刷高准确率。
- 很方便插入到自己的深度神经网络模型中,以提高模型的准确性。
3 Se模块的具体介绍
- Sequeeze:顺着
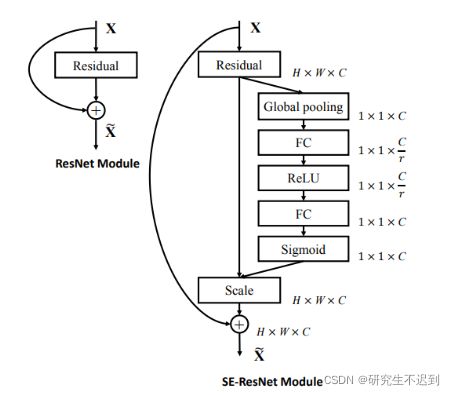
空间维度(channel)来进行特征压缩,将每个二维的特征通道变成一个实数,这个实数某种程度上具有全局的感受野,并且输出的维度和输入的特征通道数相匹配。它表征着在特征通道上响应的全局分布,且使得靠近输入的层也可以获得全局的感受野。
具体操作(和代码里面的数字是一一对应的):对原特征图50×512×7×7进行global average pooling,然后得到了一个50×512×1×1大小的特征图,这个特征图具有全局感受野。
- Excitation :输出的
50×512×1×1特征图,经过两个全连接神经网络,最后用一 个类似于循环神经网络中门的机制,通过参数来为每个特征通道生成权重,中参数被学习用来显式地建模特征通道间的相关性(论文中使用的是sigmoid)。50×512×1×1变成50×512 / 16×1×1,最后再还原回来:50×512×1×1
- 特征重标定:使用Excitation得到的结果作为权重,然后通过乘法逐通道加权到U的C个通道上(
50×512×1×1通过expand_as得到50×512×7×7), 完成在通道维度上对原始特征的重标定,并作为下一级的输入数据。
class SELayer(nn.Module):
    def __init__(self, channel, reduction=16):
        super(SELayer, self).__init__()
        self.avg_pool = nn.AdaptiveAvgPool2d(1)
        self.fc = nn.Sequential(
            nn.Linear(channel, channel // reduction, bias=False),
            nn.ReLU(inplace=True),
            nn.Linear(channel // reduction, channel, bias=False),
            nn.Sigmoid()
        )

    def forward(self, x):
        b, c, _, _ = x.size()
        y = self.avg_pool(x).view(b, c)
        y = self.fc(y).view(b, c, 1, 1)
        return x * y.expand_as(x)


4 完整代码
import numpy as np
import torch
from torch import nn
from torch.nn import init
class SEAttention(nn.Module):
def __init__(self, channel=512, reduction=16):
super().__init__()
self.avg_pool = nn.AdaptiveAvgPool2d(1)
self.fc = nn.Sequential(
nn.Linear(channel, channel // reduction, bias=False),
nn.ReLU(inplace=True),
nn.Linear(channel // reduction, channel, bias=False),
nn.Sigmoid()
)
def init_weights(self):
for m in self.modules():
print(m)
if isinstance(m, nn.Conv2d):
init.kaiming_normal_(m.weight, mode='fan_out')
if m.bias is not None:
init.constant_(m.bias, 0)
elif isinstance(m, nn.BatchNorm2d):
init.constant_(m.weight, 1)
init.constant_(m.bias, 0)
elif isinstance(m, nn.Linear):
init.normal_(m.weight, std=0.001)
if m.bias is not None:
init.constant_(m.bias, 0)
def forward(self, x):
b, c, _, _ = x.size()
y = self.avg_pool(x).view(b, c)
y = self.fc(y).view(b, c, 1, 1)
return x * y.expand_as(x)
if __name__ == '__main__':
input = torch.randn(50, 512, 7, 7)
se = SEAttention(channel=512, reduction=8)
output = se(input)
print(output.shape)


