NNDL 作业5:卷积
目录
作业1
1. 图1使用卷积核编辑,输出特征图
2. 图1使用卷积核编辑,输出特征图
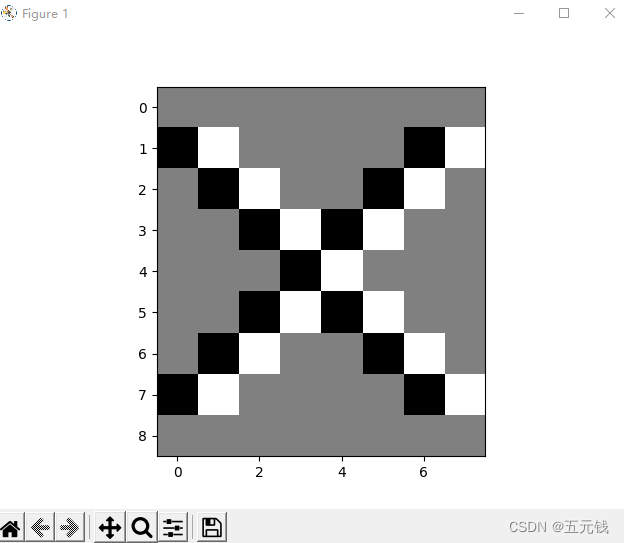
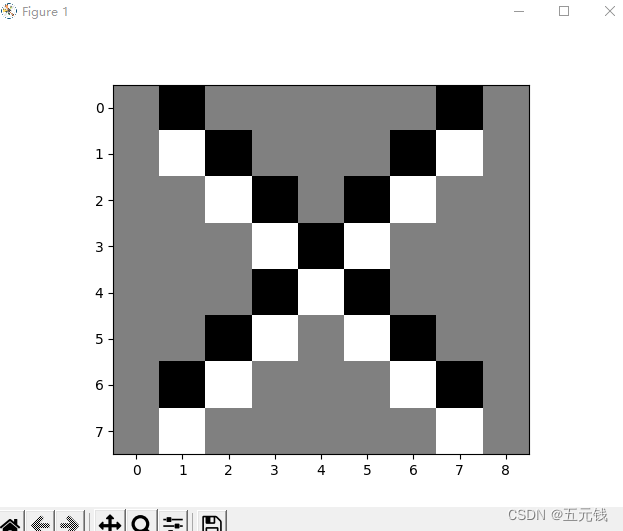
3. 图2使用卷积核编辑,输出特征图
4. 图2使用卷积核编辑,输出特征图
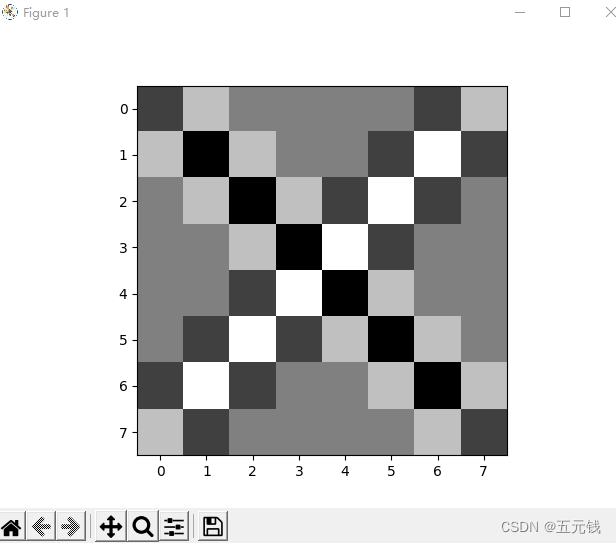
5. 图3使用卷积核编辑,编辑,编辑 ,输出特征图
作业2
一、概念
二、探究不同卷积核的作用
三、编程实现
1、实现灰度图的边缘检测、锐化、模糊。(必做)
2、调整卷积核参数,测试并总结。(必做)
3、使用不同尺寸图片,测试并总结。(必做)
总结
参考链接
作业1
通过编程实现
![]()
![]()
![]()
![]()
图1 图2 图3
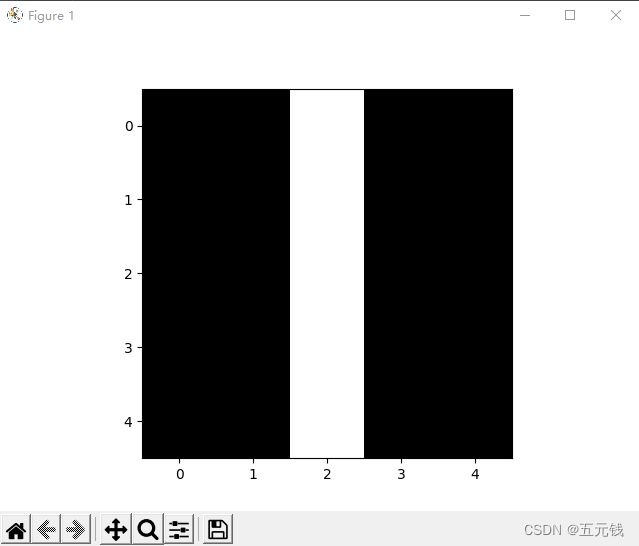
1. 图1使用卷积核 ,输出特征图
代码实现如下:
import torch
import matplotlib.pyplot as plt
import torch.nn.functional as F
import numpy as np
#生成图片
def create_pic():
    picture = torch.Tensor([[0,0,0,255,255,255],
                      [0,0,0,255,255,255],
                      [0,0,0,255,255,255],
                      [0,0,0,255,255,255],
                      [0,0,0,255,255,255]])
    return picture
#确定卷积网络
class MyNet(torch.nn.Module):
    def __init__(self,kernel,kshape):
        super(MyNet, self).__init__()
        kernel = torch.reshape(kernel,kshape)
        self.weight = torch.nn.Parameter(data=kernel, requires_grad=False)
    def forward(self, picture):
        picture = F.conv2d(picture,self.weight,stride=1,padding=0)
        return  picture
#确定卷积层
kernel = torch.tensor([-1.0,1.0])
#更改卷积层的形状适应卷积函数
kshape = (1,1,1,2)
#生成模型
model = MyNet(kernel=kernel,kshape=kshape)
#生成图片
picture = create_pic()
#更改图片的形状适应卷积层
picture = torch.reshape(picture,(1,1,5,6))
output = model(picture)
output = torch.reshape(output,(5,5))
plt.imshow(output,cmap='gray')
plt.show()
运行结果
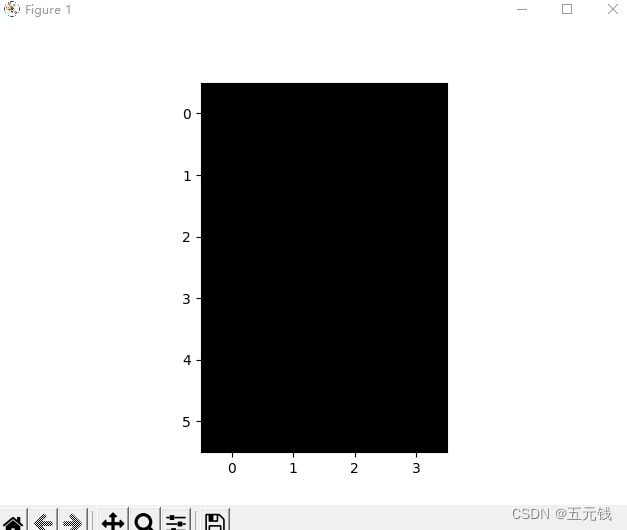
2. 图1使用卷积核 ,输出特征图
代码如下:
import torch
import matplotlib.pyplot as plt
import torch.nn.functional as F

picture = torch.Tensor([[0, 0, 0, 255, 255, 255],
                        [0, 0, 0, 255, 255, 255],
                        [0, 0, 0, 255, 255, 255],
                        [0, 0, 0, 255, 255, 255],
                        [0, 0, 0, 255, 255, 255]])


# 确定卷积网络
class GJ(torch.nn.Module):
    def __init__(self, kernel, kshape):
        super(GJ, self).__init__()
        kernel = torch.reshape(kernel, kshape)
        self.weight = torch.nn.Parameter(data=kernel, requires_grad=False)

    def forward(self, picture):
        picture = F.conv2d(picture, self.weight, stride=1, padding=0)
        return picture


kernel = torch.tensor([-1.0, 1.0])
# 更改卷积和的形状为转置
kshape = (1, 1, 2, 1)
model = GJ(kernel=kernel, kshape=kshape)

picture = torch.reshape(picture, (1,1,5,6))
#print(picture)
output = model(picture)
#print(output)
output = torch.reshape(output, (6, 4))
plt.imshow(output, cmap='gray')
plt.show()
运行结果
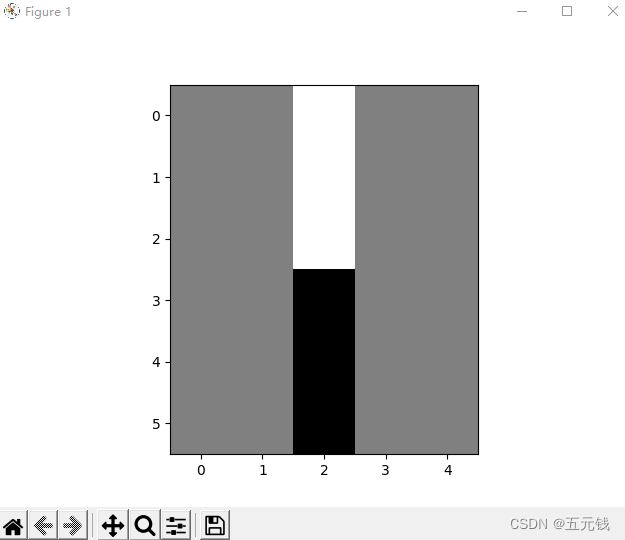
3. 图2使用卷积核 ,输出特征图
代码如下
import torch
import matplotlib.pyplot as plt
import torch.nn.functional as F


# 确定卷积网络
class GJ(torch.nn.Module):
    def __init__(self, kernel, kshape):
        super(GJ, self).__init__()
        kernel = torch.reshape(kernel, kshape)
        self.weight = torch.nn.Parameter(data=kernel, requires_grad=False)

    def forward(self, picture):
        picture = F.conv2d(picture, self.weight, stride=1, padding=0)
        return picture


picture = torch.Tensor([[0, 0, 0, 255, 255, 255],
                        [0, 0, 0, 255, 255, 255],
                        [0, 0, 0, 255, 255, 255],
                        [255, 255, 255, 0, 0, 0],
                        [255, 255, 255, 0, 0, 0],
                        [255, 255, 255, 0, 0, 0]])
# 确定卷积核
kernel = torch.tensor([-1.0, 1.0])
kshape = (1, 1, 1, 2)
# 生成模型
model = GJ(kernel=kernel, kshape=kshape)
picture = torch.reshape(picture, (1, 1, 6, 6))
#print(picture)
output = model(picture)
output = torch.reshape(output, (6, 5))
#print(output)
plt.imshow(output, cmap='gray')
plt.show()
运行结果
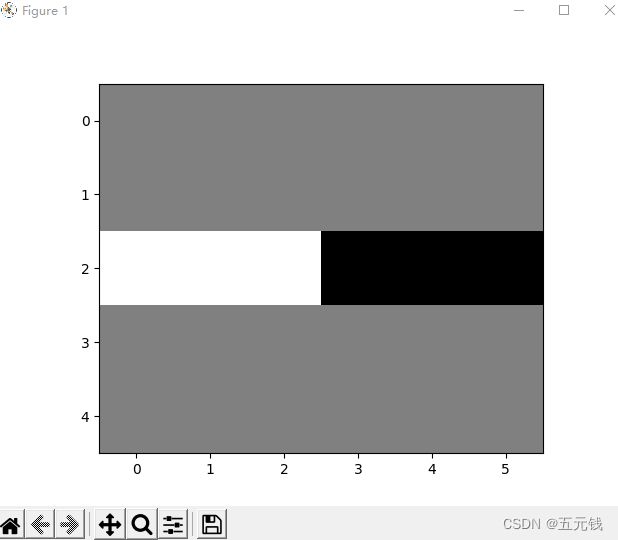
4. 图2使用卷积核 ,输出特征图
代码如下
import torch
import matplotlib.pyplot as plt
import torch.nn.functional as F


# 确定卷积网络
class GJ(torch.nn.Module):
    def __init__(self, kernel, kshape):
        super(GJ, self).__init__()
        kernel = torch.reshape(kernel, kshape)
        self.weight = torch.nn.Parameter(data=kernel, requires_grad=False)

    def forward(self, picture):
        picture = F.conv2d(picture, self.weight, stride=1, padding=0)
        return picture


picture = torch.Tensor([[0, 0, 0, 255, 255, 255],
                        [0, 0, 0, 255, 255, 255],
                        [0, 0, 0, 255, 255, 255],
                        [255, 255, 255, 0, 0, 0],
                        [255, 255, 255, 0, 0, 0],
                        [255, 255, 255, 0, 0, 0]])
kernel = torch.tensor([-1.0, 1.0])
kshape = (1, 1, 2, 1)
model = GJ(kernel=kernel, kshape=kshape)
picture = torch.reshape(picture, (1, 1, 6, 6))
#print(picture)
output = model(picture)
output = torch.reshape(output, (5, 6))
#print(output)
plt.imshow(output, cmap='gray')
plt.show()
运行结果
5. 图3使用卷积核 ,
, ,
, ,输出特征图
卷积核(1,-1)
代码如下
import torch
import matplotlib.pyplot as plt
import torch.nn.functional as F


# 确定卷积网络
class GJ(torch.nn.Module):
    def __init__(self, kernel, kshape):
        super(GJ, self).__init__()
        kernel = torch.reshape(kernel, kshape)
        self.weight = torch.nn.Parameter(data=kernel, requires_grad=False)

    def forward(self, picture):
        picture = F.conv2d(picture, self.weight, stride=1, padding=0)
        return picture


picture = torch.Tensor(
    [[255, 255, 255, 255, 255, 255, 255, 255, 255],
     [255, 0, 255, 255, 255, 255, 255, 0, 255],
     [255, 255, 0, 255, 255, 255, 0, 255, 255],
     [255, 255, 255, 0, 255, 0, 255, 255, 255],
     [255, 255, 255, 255, 0, 255, 255, 255, 255],
     [255, 255, 255, 0, 255, 0, 255, 255, 255],
     [255, 255, 0, 255, 255, 255, 0, 255, 255],
     [255, 0, 255, 255, 255, 255, 255, 0, 255],
     [255, 255, 255, 255, 255, 255, 255, 255, 255], ])

# 生成卷积核
kernel = torch.tensor([-1.0, 1.0])
# 更改卷积核的形状适应卷积函数
kshape = (1, 1, 1, 2)
model = GJ(kernel=kernel, kshape=kshape)
picture = torch.reshape(picture, (1, 1, 9, 9))
#print(picture)
output = model(picture)
output = torch.reshape(output, (9, 8))
#print(output)
plt.imshow(output, cmap='gray')
plt.show()
运行结果
代码
import torch
import matplotlib.pyplot as plt
import torch.nn.functional as F


# 确定卷积网络
class GJ(torch.nn.Module):
    def __init__(self, kernel, kshape):
        super(GJ, self).__init__()
        kernel = torch.reshape(kernel, kshape)
        self.weight = torch.nn.Parameter(data=kernel, requires_grad=False)

    def forward(self, picture):
        picture = F.conv2d(picture, self.weight, stride=1, padding=0)
        return picture


picture = torch.Tensor(
    [[255, 255, 255, 255, 255, 255, 255, 255, 255],
     [255, 0, 255, 255, 255, 255, 255, 0, 255],
     [255, 255, 0, 255, 255, 255, 0, 255, 255],
     [255, 255, 255, 0, 255, 0, 255, 255, 255],
     [255, 255, 255, 255, 0, 255, 255, 255, 255],
     [255, 255, 255, 0, 255, 0, 255, 255, 255],
     [255, 255, 0, 255, 255, 255, 0, 255, 255],
     [255, 0, 255, 255, 255, 255, 255, 0, 255],
     [255, 255, 255, 255, 255, 255, 255, 255, 255], ])

kernel = torch.tensor([-1.0, 1.0])
kshape = (1, 1, 2, 1)
model = GJ(kernel=kernel, kshape=kshape)
picture = torch.reshape(picture, (1, 1, 9, 9))
#print(picture)
output = model(picture)
output = torch.reshape(output, (8, 9))
#print(output)
plt.imshow(output, cmap='gray')
plt.show()
运行结果
卷积核 ![]()
代码
import torch
import matplotlib.pyplot as plt
import torch.nn.functional as F


# 确定卷积网络
class GJ(torch.nn.Module):
    def __init__(self, kernel, kshape):
        super(GJ, self).__init__()
        kernel = torch.reshape(kernel, kshape)
        self.weight = torch.nn.Parameter(data=kernel, requires_grad=False)

    def forward(self, picture):
        picture = F.conv2d(picture, self.weight, stride=1, padding=0)
        return picture


picture = torch.Tensor(
    [[255, 255, 255, 255, 255, 255, 255, 255, 255],
     [255, 0, 255, 255, 255, 255, 255, 0, 255],
     [255, 255, 0, 255, 255, 255, 0, 255, 255],
     [255, 255, 255, 0, 255, 0, 255, 255, 255],
     [255, 255, 255, 255, 0, 255, 255, 255, 255],
     [255, 255, 255, 0, 255, 0, 255, 255, 255],
     [255, 255, 0, 255, 255, 255, 0, 255, 255],
     [255, 0, 255, 255, 255, 255, 255, 0, 255],
     [255, 255, 255, 255, 255, 255, 255, 255, 255], ])

# 确定卷积核
kernel = torch.tensor([[1.0, -1.0],
                       [-1.0, 1.0]])
# 更改卷积核的大小适配卷积函数
kshape = (1, 1, 2, 2)
# 生成网络模型
model = GJ(kernel=kernel, kshape=kshape)
picture = torch.reshape(picture, (1, 1, 9, 9))
#print(picture)
output = model(picture)
output = torch.reshape(output, (8, 8))
#print(output)
plt.imshow(output, cmap='gray')
plt.show()
运行结果
代码来源本班大佬,主要还是自己基础不是很好,通过这些自己慢慢理解体会。
作业2
一、概念
用自己的语言描述“卷积、卷积核、特征图、特征选择、步长、填充、感受野”。
卷积:
我自己认为卷积是指在滑动中提取特征的过程,可以形象地理解为用放大镜把每步都放大并且拍下来,再把拍下来的图片拼接成一个新的大图片的过程。
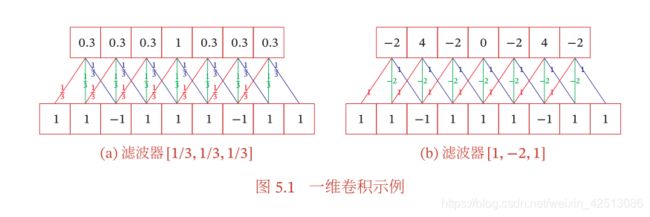
卷积的计算过程可以参考徐下面的这个动图去理解
一维卷积
二维卷积
卷积核
卷积核就是图像处理时,给定输入图像,输入图像中一个小区域中像素加权平均后成为输出图像中的每个对应像素,其中权值由一个函数定义,这个函数称为卷积核。又称滤波器。可以看作对某个局部的加权求和;它是对应局部感知,它的原理是在观察某个物体时我们既不能观察每个像素也不能一次观察整体,而是先从局部开始认识,这就对应了卷积。,通俗的来说就是我们之前学过的加权求和的权值,通过这些权值计算出新的图像和矩阵。
卷积核的大小一般有1x1,3x3和5x5的尺寸(一般是奇数x奇数)。
特征图
前面我们已经说了卷积操作,和进行卷积操作需要用到的卷积核,那么我们在进行完卷积操作后会得到什么呢,进行卷积操作后我们就得到了特征图。
所以我认为当图像像素值经过卷积后得到的东西就是特征图。
特征选择
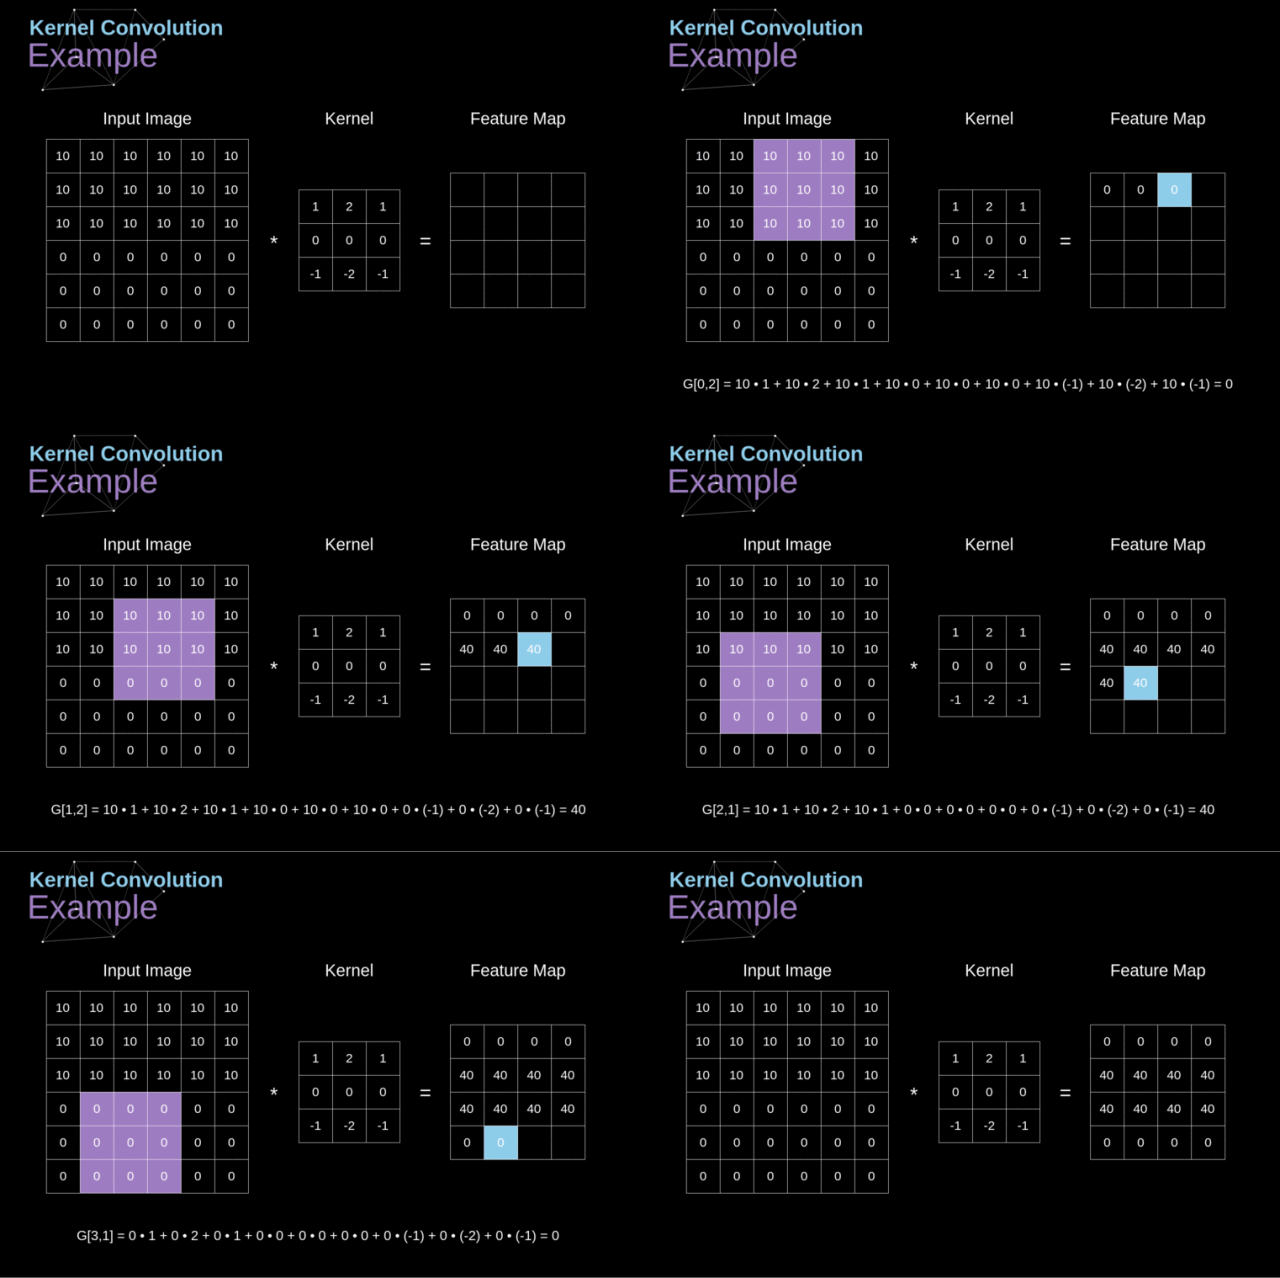
我认为特征选择是就是我们在一幅图像中按照我们要寻找的目标特征按照前面的卷积操作将其放入相应的卷积核中然后在原来的图像中卷积,最后得到我们要找的目标特征。下面给出我们老师课上给我们的一个例子,有助于帮助理解。
![]()
步长
我认为步长就是上面这个图象中在进行卷积操作时依次上下左右移动时的像素值 一般来说,步长的选择为1。
填充
从上面的二维卷积动图结果可以发现,输入图像与卷积核进行卷积后的结果中损失了部分值,输入图像的边缘被“修剪”掉了(边缘处只检测了部分像素点,丢失了图片边界处的众多信息)。这是因为边缘上的像素永远不会位于卷积核中心,而卷积核也没法扩展到边缘区域以外。
这个结果我们是不能接受的,有时我们还希望输入和输出的大小应该保持一致。为解决这个问题,可以在进行卷积操作前,对原矩阵进行边界填充(Padding),也就是在矩阵的边界上填充一些值,以增加矩阵的大小,通常都用“0”来进行填充的。
通过填充的方法,当卷积核扫描输入数据时,它能延伸到边缘以外的伪像素,从而使输出和输入size相同。
常用的两种padding:
(1)valid padding:不进行任何处理,只使用原始图像,不允许卷积核超出原始图像边界
(2)same padding:进行填充,允许卷积核超出原始图像边界,并使得卷积后结果的大小与原来的一致
感受野
感受野(Receptive Field)的定义是卷积神经网络每一层输出的特征图(feature map)上的像素点在输入图片上映射的区域大小。我觉得通俗点的解释是,特征图上的一个点对应输入图上的区域,如下图所示:
二、探究不同卷积核的作用
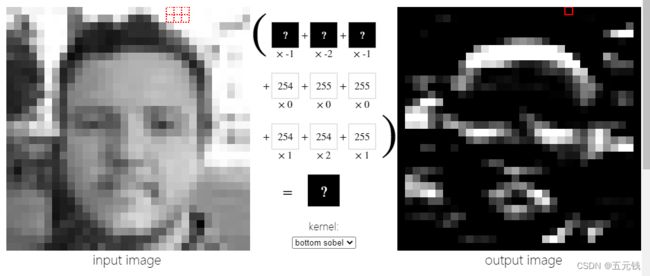
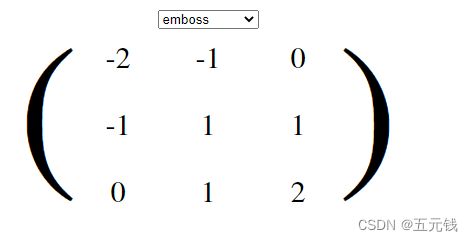
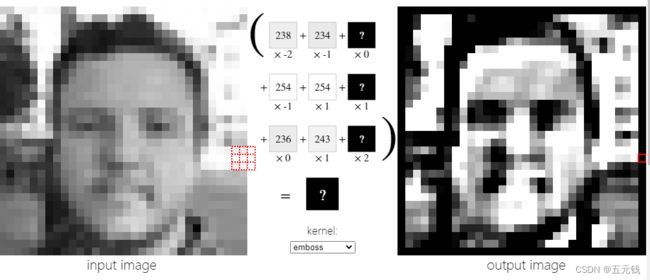
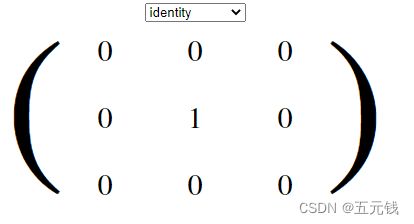
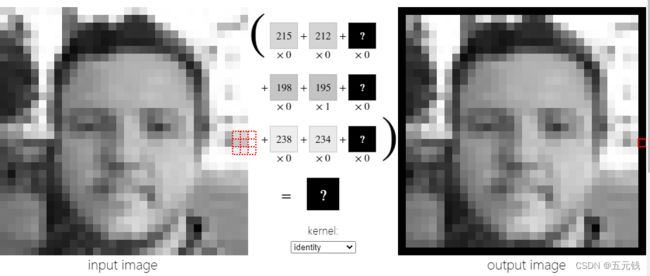
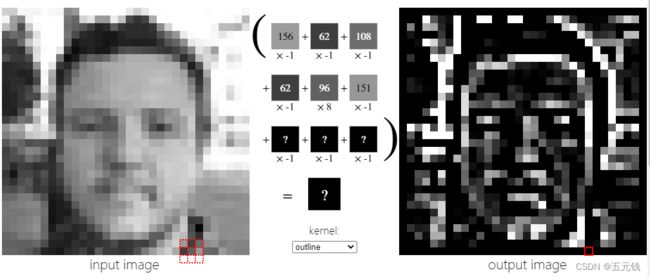
在这里我使用的是老师推荐的Image Kernels,这里有许多不同的卷积核,并且可以在这里直观的看到最后的结果。
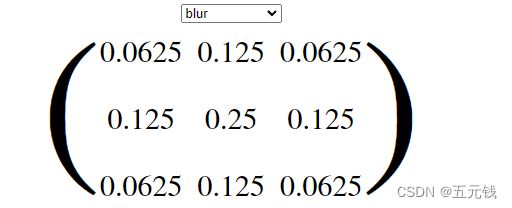
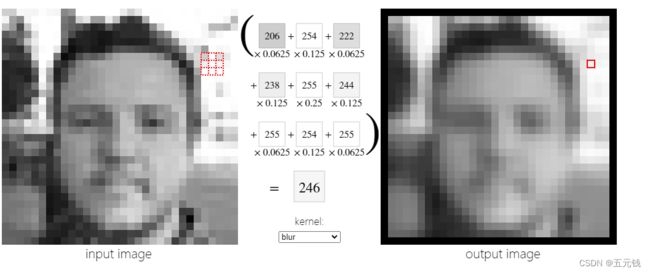
(1)模糊
进行卷积前后对比
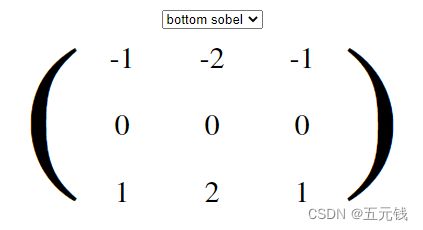
(2)底部索贝尔
进行卷积前后对比
(3)浮雕
进行卷积前后对比
(4)空卷积核
进行卷积前后对比
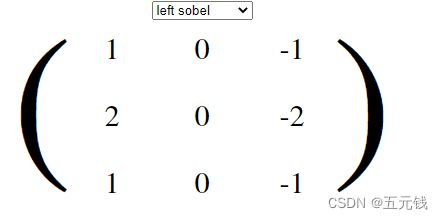
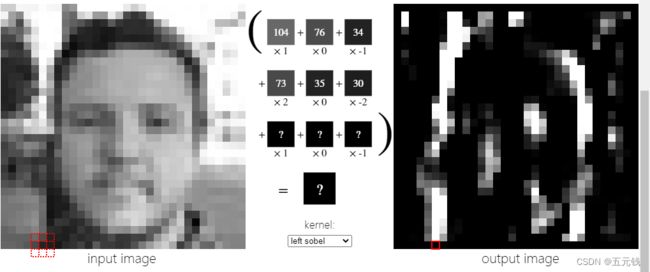
(5)左部索贝尔
进行卷积前后对比
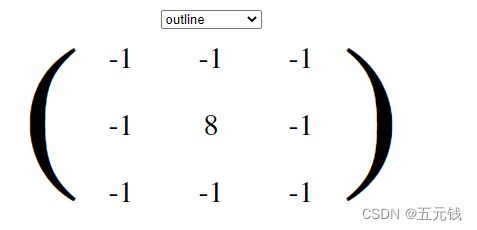
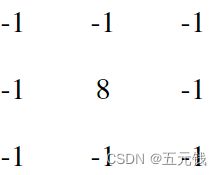
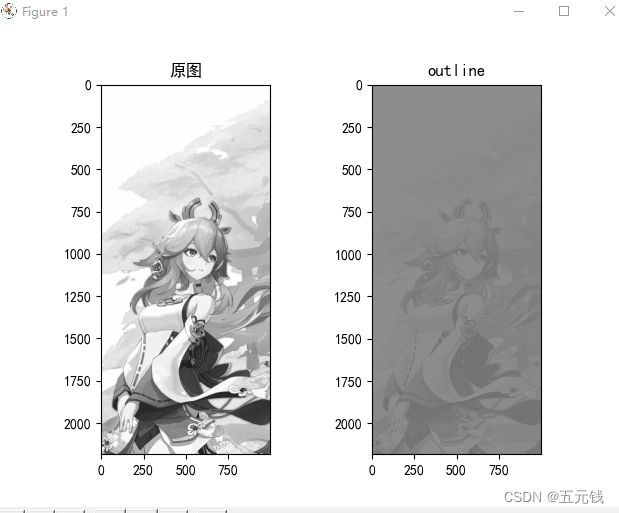
(6)边缘检测
进行卷积前后对比
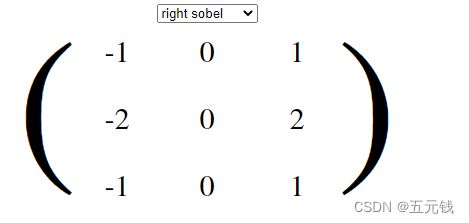
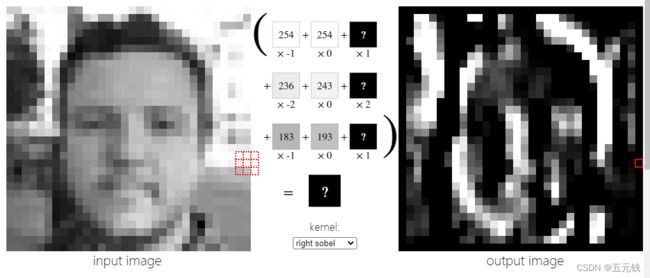
(7)右部索贝尔
进行卷积前后对比
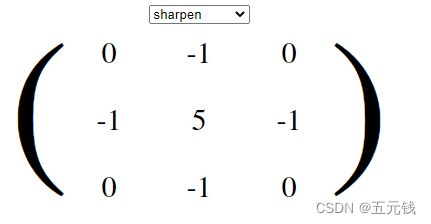
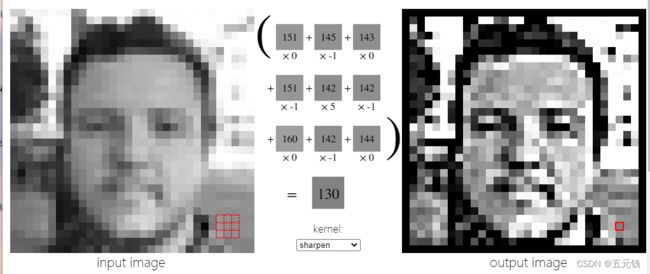
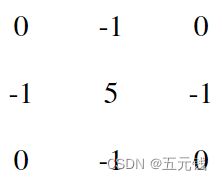
(8)锐化
进行卷积前后对比
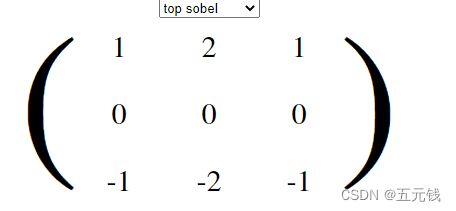
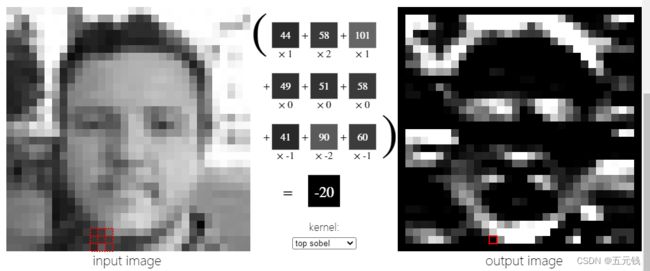
(9)顶部索贝尔
进行卷积前后对比
三、编程实现
1、实现灰度图的边缘检测、锐化、模糊。(必做)
本实验中用到的图片
实现边缘检测
卷积核使用的上面的
代码实现如下
import numpy as np
import torch
from torch import nn
from torch.autograd import Variable
from PIL import Image
import matplotlib.pyplot as plt

plt.rcParams['font.sans-serif'] = ['SimHei']  # 用来正常显示中文标签
plt.rcParams['axes.unicode_minus'] = False  # 用来正常显示负号 #有中文出现的情况,需要u'内容
file_path = '八重神子.jpg'
im = Image.open(file_path).convert('L')  # 读入一张灰度图的图片
im = np.array(im, dtype='float32')  # 将其转换为一个矩阵
print(im.shape[0], im.shape[1])
plt.subplot(1, 2, 1)
plt.imshow(im.astype('uint8'), cmap='gray')
plt.title('原图')

im = torch.from_numpy(im.reshape((1, 1, im.shape[0], im.shape[1])))
conv1 = nn.Conv2d(1, 1, 3, bias=False)  # 定义卷积

sobel_kernel = np.array([[-1, -1, -1],
                         [-1, 8, -1],
                         [-1, -1, -1]], dtype='float32')  # 定义轮廓检测算子
sobel_kernel = sobel_kernel.reshape((1, 1, 3, 3))  # 适配卷积的输入输出
conv1.weight.data = torch.from_numpy(sobel_kernel)  # 给卷积的 kernel 赋值

edge1 = conv1(Variable(im))  # 作用在图片上

x = edge1.data.squeeze().numpy()
print(x.shape)  # 输出大小


plt.subplot(1, 2, 2)
plt.imshow(x, cmap='gray')
plt.title('outline')
plt.show()
运行结果
但是这里我们可以看到在边缘化后的结果已经看不出原来图像的轮廓,被蒙上了一层灰色,结果就不是很明显,这是我们班里的大佬提出的,出现这样的原因是这个图片的边缘不明显所以导致又一层灰色,所以解决这个的方法就是修改原来的卷积核修改后的代码为
import numpy as np
import torch
from torch import nn
from torch.autograd import Variable
from PIL import Image
import matplotlib.pyplot as plt

plt.rcParams['font.sans-serif'] = ['SimHei']  # 用来正常显示中文标签
plt.rcParams['axes.unicode_minus'] = False  # 用来正常显示负号 #有中文出现的情况,需要u'内容
file_path = '八重神子.jpg'
im = Image.open(file_path).convert('L')  # 读入一张灰度图的图片
im = np.array(im, dtype='float32')  # 将其转换为一个矩阵
print(im.shape[0], im.shape[1])
plt.subplot(1, 2, 1)
plt.imshow(im.astype('uint8'), cmap='gray')
plt.title('原图')

im = torch.from_numpy(im.reshape((1, 1, im.shape[0], im.shape[1])))
conv1 = nn.Conv2d(1, 1, 3, bias=False)  # 定义卷积

sobel_kernel = np.array([[-1, -1, -1],
                         [-1, 9, -1],
                         [-1, -1, -1]], dtype='float32')  # 定义轮廓检测算子
sobel_kernel = sobel_kernel.reshape((1, 1, 3, 3))  # 适配卷积的输入输出
conv1.weight.data = torch.from_numpy(sobel_kernel)  # 给卷积的 kernel 赋值

edge1 = conv1(Variable(im))  # 作用在图片上

x = edge1.data.squeeze().numpy()
print(x.shape)  # 输出大小


plt.subplot(1, 2, 2)
plt.imshow(x, cmap='gray')
plt.title('outline')
plt.show()
修改后的运行结果
从这个结果可以看出与上面的结果相比较,效果比原来好多了。
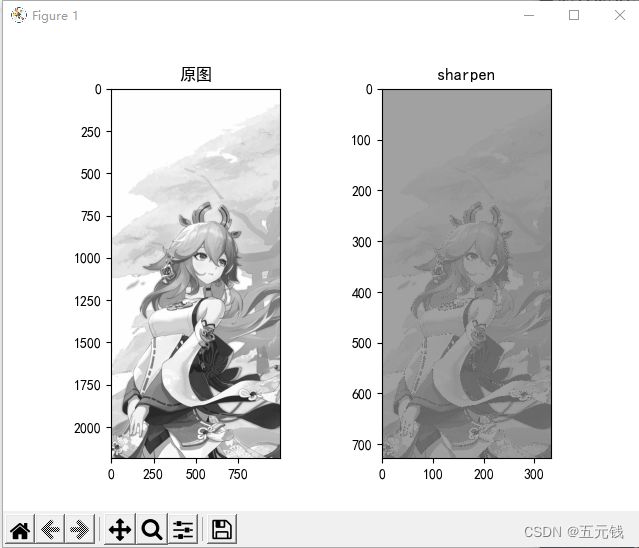
锐化
卷积核
代码实现如下
#锐化
import numpy as np
import torch
from torch import nn
from torch.autograd import Variable
from PIL import Image
import matplotlib.pyplot as plt

plt.rcParams['font.sans-serif'] = ['SimHei']  # 用来正常显示中文标签
plt.rcParams['axes.unicode_minus'] = False  # 用来正常显示负号 #有中文出现的情况,需要u'内容
file_path = '八重神子.jpg'
im = Image.open(file_path).convert('L')  # 读入一张灰度图的图片
im = np.array(im, dtype='float32')  # 将其转换为一个矩阵
print(im.shape[0], im.shape[1])
plt.subplot(1, 2, 1)
plt.imshow(im.astype('uint8'), cmap='gray')
plt.title('yuantu')

im = torch.from_numpy(im.reshape((1, 1, im.shape[0], im.shape[1])))
conv1 = nn.Conv2d(1, 1, 3, bias=False)  # 定义卷积

sobel_kernel = np.array([[0, -1, 0],
                         [-1, 5, -1],
                         [0, -1, 0]], dtype='float32')  # 定义轮廓检测算子
sobel_kernel = sobel_kernel.reshape((1, 1, 3, 3))  # 适配卷积的输入输出
conv1.weight.data = torch.from_numpy(sobel_kernel)  # 给卷积的 kernel 赋值

edge1 = conv1(Variable(im))  # 作用在图片上

x = edge1.data.squeeze().numpy()
print(x.shape)  # 输出大小


plt.subplot(1, 2, 2)
plt.imshow(x, cmap='gray')
plt.title('sharpen')
plt.show()
运行结果
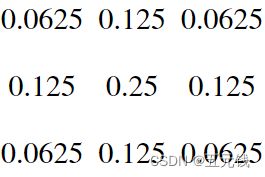
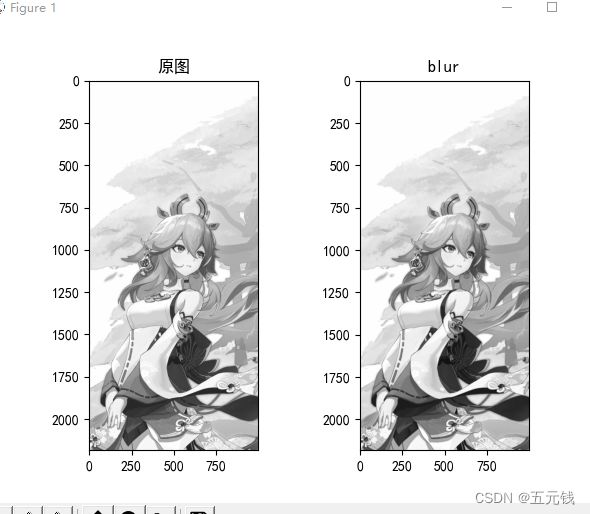
模糊
代码实现如下
#模糊
import numpy as np
import torch
from torch import nn
from torch.autograd import Variable
from PIL import Image
import matplotlib.pyplot as plt

plt.rcParams['font.sans-serif'] = ['SimHei']  # 用来正常显示中文标签
plt.rcParams['axes.unicode_minus'] = False  # 用来正常显示负号 #有中文出现的情况,需要u'内容
file_path = '八重神子.jpg'
im = Image.open(file_path).convert('L')  # 读入一张灰度图的图片
im = np.array(im, dtype='float32')  # 将其转换为一个矩阵
print(im.shape[0], im.shape[1])
plt.subplot(1, 2, 1)
plt.imshow(im.astype('uint8'), cmap='gray')
plt.title('原图')

im = torch.from_numpy(im.reshape((1, 1, im.shape[0], im.shape[1])))
conv1 = nn.Conv2d(1, 1, 3, bias=False)  # 定义卷积

sobel_kernel = np.array([[0.625, 0.125, 0.625],
                         [0.125, 0.25, 0.125],
                         [0.625, 0.125, 0.625]], dtype='float32')  # 定义轮廓检测算子
sobel_kernel = sobel_kernel.reshape((1, 1, 3, 3))  # 适配卷积的输入输出
conv1.weight.data = torch.from_numpy(sobel_kernel)  # 给卷积的 kernel 赋值

edge1 = conv1(Variable(im))  # 作用在图片上

x = edge1.data.squeeze().numpy()
print(x.shape)  # 输出大小


plt.subplot(1, 2, 2)
plt.imshow(x, cmap='gray')
plt.title('blur')
plt.show()
运行结果
2、调整卷积核参数,测试并总结。(必做)
在这里选择锐化为例。
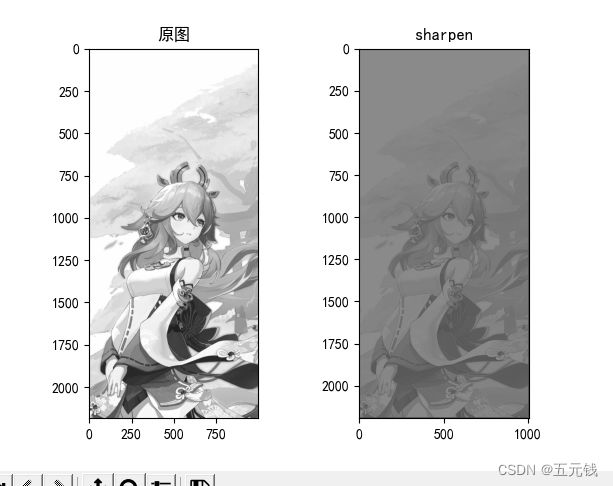
1)调整步长
修改代码为
conv1 = nn.Conv2d(1, 1, 3, stride=3, bias=False) # 定义卷积
改步长前 改步长后
看到步长增加后图像边界会变模糊
2)添加padding=5
修改的代码
conv1 = nn.Conv2d(1, 1, 3, padding=5, bias=False) # 定义卷积
运行结果
修改代码前 修改代码后
从这里我们可以看出添加padding后图像提取的特征更加全面。
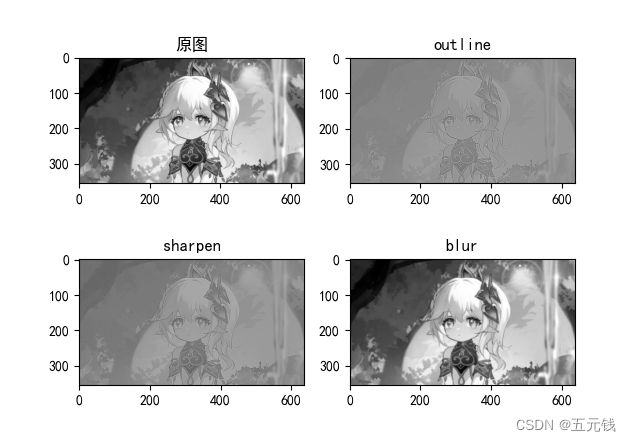
3、使用不同尺寸图片,测试并总结。(必做)
使用的图片
代码如下
import numpy as np
import torch
from torch import nn
from torch.autograd import Variable
from PIL import Image
import matplotlib.pyplot as plt

plt.rcParams['font.sans-serif'] = ['SimHei']  # 用来正常显示中文标签
plt.rcParams['axes.unicode_minus'] = False  # 用来正常显示负号 #有中文出现的情况,需要u'内容
file_path = '小草神.jpg'
im = Image.open(file_path).convert('L')  # 读入一张灰度图的图片
im = np.array(im, dtype='float32')  # 将其转换为一个矩阵
plt.subplot(2, 2, 1)
plt.imshow(im, cmap='gray')
plt.title('原图')

im = torch.from_numpy(im.reshape((1, 1, im.shape[0], im.shape[1])))
conv1 = nn.Conv2d(1, 1, 3, bias=False)  # 定义卷积

sobel_kernel = np.array([[-1, -1, -1],
                         [-1, 9, -1],
                         [-1, -1, -1]], dtype='float32')  # 定义轮廓检测算子
sobel_kernel = sobel_kernel.reshape((1, 1, 3, 3))  # 适配卷积的输入输出
conv1.weight.data = torch.from_numpy(sobel_kernel)  # 给卷积的 kernel 赋值
edge1 = conv1(Variable(im))  # 作用在图片上
x1 = edge1.data.squeeze().numpy()
sobel_kernel = np.array([[0, -1, 0],
                         [-1, 5, -1],
                         [0, -1, 0]], dtype='float32')  # 定义轮廓检测算子
sobel_kernel = sobel_kernel.reshape((1, 1, 3, 3))  # 适配卷积的输入输出
conv1.weight.data = torch.from_numpy(sobel_kernel)  # 给卷积的 kernel 赋值
edge1 = conv1(Variable(im))  # 作用在图片上
x2 = edge1.data.squeeze().numpy()
sobel_kernel = np.array([[0.0625, 0.125, 0.0625],
                         [0.125, 0.25, 0.125],
                         [0.0625, 0.125, 0.0625]], dtype='float32')  # 定义轮廓检测算子
sobel_kernel = sobel_kernel.reshape((1, 1, 3, 3))  # 适配卷积的输入输出
conv1.weight.data = torch.from_numpy(sobel_kernel)  # 给卷积的 kernel 赋值
edge1 = conv1(Variable(im))  # 作用在图片上
x3 = edge1.data.squeeze().numpy()

plt.subplot(2, 2, 2)
plt.imshow(x1, cmap='gray')
plt.title('outline')
plt.subplot(2, 2, 3)
plt.imshow(x2, cmap='gray')
plt.title('sharpen')
plt.subplot(2, 2, 4)
plt.imshow(x3, cmap='gray')
plt.title('blur')
plt.show()
运行结果如下
总结
这次作业首先第一个作业,在课上留后作业感觉并不难,可是真到自己写了,却总出错,不过在询问了本班大佬后,代码也是参考自他,确实自己还有很多不足,革命尚未成功,同志仍需努力啊!第二个作业还好,虽然课上好多概念老师都讲了,但是自己课下确实写的时候忘了不少,自己查了一遍,再写了一遍,确实记忆有所加深,也知道了许多卷积核的不同功能,对卷积操作和卷积核更加熟悉熟练。
参考链接
深度学习:卷积神经网络中的卷积核
Image Kernels
NNDL 作业5:卷积
