Unity3D中实现Player的第一人称视角
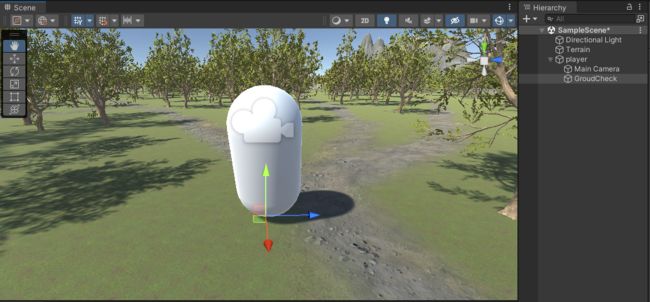
效果,上面为Scene场景,下面为Game场景
0创建地形,当然可以先简单的创建一个空白的Terrain。这里我已经对地形进行了初步的编辑和渲染。
1.在Hierarchy视图中右键创建一个胶囊体(Capsule)作为Player,添加好后重置胶囊体的位置,并且调整胶囊体在一个合适的位置。
2.将Main Camera拖拽到到player内作为子对象,重置一下Main Camera的transform,并且再调整一下它在player中的位置。大致放在player的上方位置,像眼睛一样。
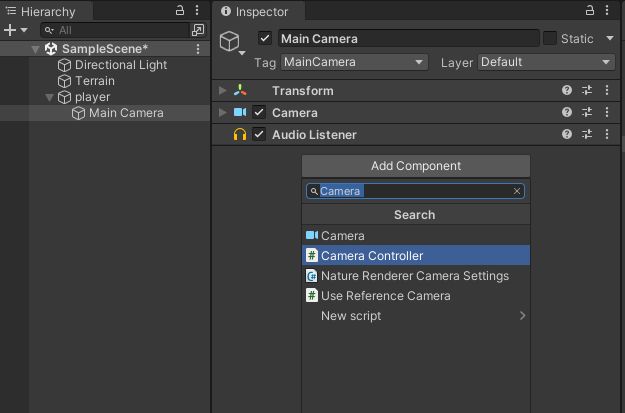
3. 在project视图中右键创建一个文件夹,命名为Player用来存放脚本,进入文件夹右键创建一个C#脚本并且命名为Camrea Controller。
Camrea Controller脚本代码如下:
using System.Collections;
using System.Collections.Generic;
using UnityEngine;

public class CameraController : MonoBehaviour
{
    //我们通过控制Player的旋转方法,来控制相机视角的左右移动,所以我们需要一个Player的Tranform
    public Transform player;


    //定义两个float变量,来获取鼠标移动的值
    private float mouseX, mouseY;
    //我们可以给鼠标增加一个灵敏度
    public float mouseSensitivity;

    //mouseY中的GetAxis方法会返回-1到1之间的浮点数,在鼠标移动的时候,数值会随着方向的变化而变化,在鼠标不动时,数值会回弹到0,所以我们就会遇到鼠标上下移动时回弹的问题
    public float xRotation;

    private void Update()
    {
        //在Update方法中,我们使用输入系统中的GetAxis方法来获取鼠标移动的值,乘以鼠标灵敏度再乘以Time.deltatime,鼠标移动的值就这样得到了
        //Input.GetAxis:它会在鼠标移动相应对应轴的过程中返回 -1 到 1 的值
        mouseX = Input.GetAxis("Mouse X") * mouseSensitivity * Time.deltaTime;
        mouseY = Input.GetAxis("Mouse Y") * mouseSensitivity * Time.deltaTime;

        xRotation -= mouseY;

        //使用数学函数Clamp限制
        xRotation = Mathf.Clamp(xRotation,-70f,70f);

        //这里使用Transform的Rotate()方法来旋转player
        //Vector3.up是向上的一个三维变量,和一个0,1,0的三维变量是一样的
        //我们需要控制player的y轴旋转才能让它左右旋转
        player.Rotate(Vector3.up * mouseX);
        //接下来我们要选转相机了,我们使用tranform.localRotation方法,让相机上下旋转,使用localRotation就可以不被父对象旋转影响,造成一些奇怪的问题
        //因为localRotation是属性,我们还要给他赋值
        transform.localRotation = Quaternion.Euler(xRotation, 0, 0);
    }
}
4. 将创建好的脚本添加到Main Camrea内用来控制相机。
并设置脚本参数
Player:就是刚刚创建的Player
Mouse Sensitivity:200 //鼠标灵敏度
xRotation:0 //定义一个浮点类型的量,记录绕X轴旋转的角度
5.在Hierachy选中Terrain,在Layer中点击 Add Layer,创建Ground层,并将Layer改为Ground。
6.在Hierarchy中,鼠标右击player,点击Greate Empty,并重命名为GroundCheck。并且将位置调整到胶囊体的底部,像腿部位一样,用来判断角色是否碰到地面图层。
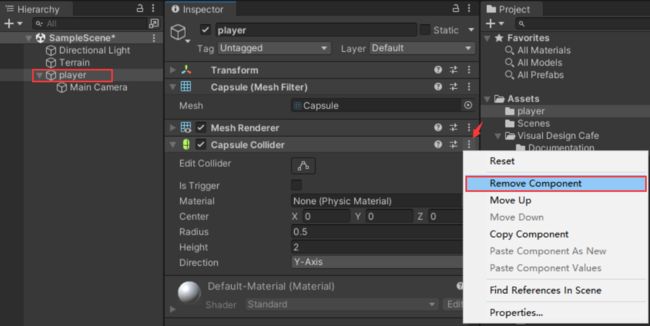
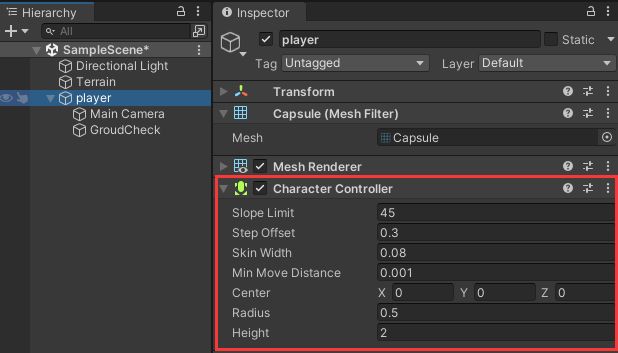
7. 将Player的 Capsule Colider 移除掉,添加 Character Controller 组件。
8. 进入player文件夹右键创建一个C#脚本并且命名为PlayerController。
PlayerController脚本代码如下:
using System.Collections;
using System.Collections.Generic;
using UnityEngine;

public class PlayerController : MonoBehaviour
{
    //获得player的CharacterController组件
    private CharacterController cc;

    public float moveSpeed;//移动速度

    public float jumpSpeed;//跳跃速度

    //定义获得按键值的两个变量
    private float horizontalMove, verticalMove;

    //定义三维变量dir控制方向
    private Vector3 dir;

    //重力
    public float gravity;

    private Vector3 velocity;//用来控制Y轴速度

    //我们只需要检测player是否在地上就可以了,这里我们可以使用Physics中的CheckSphere方法,如果定义的球体和物体发生碰撞,返回真
    //为了使用这个方法,我们需要定义几个变量
    public Transform groundCheck;//检测点的中心位置
    public float checkRedius;//检测点的半径
    public LayerMask groundLayer;//需要检测的图层
    //布尔值来存储CheckSphere的返回值
    public bool isGround;


    private void Start()
    {
        //获取player的CharacterController组件
        cc = GetComponent();

    }
    private void Update()
    {
        isGround = Physics.CheckSphere(groundCheck.position,checkRedius,groundLayer);
        if(isGround && velocity.y < 0)
        {
            velocity.y = -2f;
        }


        horizontalMove = Input.GetAxis("Horizontal") * moveSpeed;
        verticalMove = Input.GetAxis("Vertical") * moveSpeed;

        dir = transform.forward * verticalMove + transform.right * horizontalMove;
        cc.Move(dir * Time.deltaTime);

        //我们需要获取到跳跃按键的事件,使用Input中的GetButtonDown()方法,他会返回一个布尔值,当按下时才会返回真
        //Jump可以在InputManager中查看
        //在一瞬间有一个向上的速度,在过程中也会随着重力慢慢下降,如果想要让它只跳跃一次的话,加上isGround就行了
        if(Input.GetButtonDown("Jump") && isGround)
        {
            velocity.y = jumpSpeed;
        }


        velocity.y -= gravity * Time.deltaTime;//这样每秒它就会减去重力的值不断下降
        //再用CharacterController的Move方法来移动y轴
        cc.Move(velocity * Time.deltaTime);
    }
}
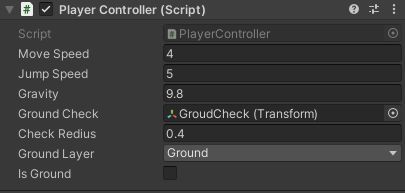
9. 将 PlayerController 脚本挂到 Player 上,设置参数。
Move Speed:4 //移动速度
Jump Speed:5 //跳跃速度
Gravity:9.8 //重力
Ground Check:就是我们刚创建的Ground Check //检测点的中心位置
Check Redius:0.4 //检测点的半径
Ground Layer:我们提前创建好的 Ground 层 //需要检测的图层
10.运行测试。
晃动鼠标为视角转变。
移动键是上下左右箭头或者WASD,跳跃键是空格。
参考链接:
unity实现第一人称漫游(保姆级教程)_温柔哥`的博客-CSDN博客_unity漫游 unity实现第一人称漫游(保姆级教程)https://blog.csdn.net/lemonzjk/article/details/126156995?spm=1001.2101.3001.6650.4&utm_medium=distribute.pc_relevant.none-task-blog-2~default~CTRLIST~Rate-4-126156995-blog-108676891.pc_relevant_multi_platform_whitelistv3&depth_1-utm_source=distribute.pc_relevant.none-task-blog-2~default~CTRLIST~Rate-4-126156995-blog-108676891.pc_relevant_multi_platform_whitelistv3&utm_relevant_index=6
