精华文章---基于Docker的一体化集成AI环境中部署机器学习/深度学习模型
关键字:IRIS,IntegratedML,Flask,FastAPI,TensorFlow Serving,HAProxy,Docker,Covid-19
目的:
过去几个月里,我们提到了一些深度学习和机器学习的快速演示,包括一个简单的 Covid-19 X 射线图像分类器和一个用于可能的 ICU 入院的 Covid-19 实验室结果分类器。 我们还介绍了 ICU 分类器的 IntegratedML 演示实现。 虽然“数据科学”远足仍在继续,但从“数据工程”的角度来看,或许也是尝试一些 AI 服务部署的好时机 - 我们能否将目前所接触到的一切都封装成一套服务 API? 我们可以利用哪些常用的工具、组件和基础架构,以最简单的方式实现这样的服务堆栈?
范围
范围内:
作为快速入门,我们可以使用 docker-compose 将以下 docker 化组件部署到 AWS Ubuntu 服务器中
- HAProxy - 负载均衡器
- Gunicorn vs. Univorn - Web 网关****服务器
- Flask vs. FastAPI - Web 应用 UI 的应用服务器、服务 API 定义和热图生成等
- TensorFlow Model Serving vs. TensorFlow-GPU Model Serving - 图像等分类的应用后端服务器
- IRIS IntegratedML - 带有 SQL 界面的统一 App+DB AutoML
- Jupyter Notebook 中模拟客户端进行基准测试的 Python3
- Docker 和 docker-compose
- 配备 Tesla T4 GPU 的 AWS Ubuntu 16.04
注:配备 GPU 的 TensorFlow Serving 仅用于演示目的 - 您只需关闭 GPU 相关镜像(在 dockerfile 中)和配置(在 docker-compose.yml 中)。
范围外或者在下一个愿望清单上:
- Nginx 或 Apache 等 Web 服务器在演示中暂时省略。
- RabbitMQ 和 Redis - 用于可靠消息传递的队列代理,可由 IRIS 或 Ensemble 替代。
- IAM (Intersystems API Manger) 或 Kong 在愿望清单上IAM (Kong 在愿望清单上
- SAM (Intersystems System Alert & Monitoring) SAM (Intersystems
- ICM (Intersystems Cloud Manager) 与 Kubernetes Operator - 诞生以来一直是我的最爱ICM (Kubernetes Operator - 诞生以来一直是我的最爱
- FHIR(基于 Intesystems IRIS 的 FHIR R4 服务器和 FHIR Sandbox,用于 FHIR 应用上的 SMART)
- CI/CD devop 工具或 Github Actions
“机器学习工程师”必然会动手遍历这些组件,在服务生命周期内提供一些生产环境。 随着时间的推移,我们可以扩大范围。
GitHub 仓库
完整源代码位于 https://github.com/zhongli1990/covid-ai-demo-deployment
integratedML-demo-template 仓库也与新仓库一同重用。
部署模式
以下为此“Docker 中的 AI 演示”测试框架的逻辑部署模式。
出于演示目的,我特意创建了 2 个独立的堆栈,用于深度学习分类以及 Web 渲染,然后使用 HAProxy 作为软负载均衡器,以无状态方式在这 2 个堆栈之间分配传入的 API 请求。
- Guniorn + Flask + TensorFlow Serving
- Univcorn + FaskAPI + TensorFlow Serving GPU
IRIS 与 IntegratedML 用于机器学习演示示例,即 ICU 预测的前一篇文章中。
在目前的演示中,我省略了一些生产服务需要或考虑的常用组件:
- Web 服务器:Nginx 或 Apache 等 HAProxy 和 Gunicorn/Uvicorn 之间需要它们,以进行正确的 HTTP 会话处理,即避免 DoS 攻击等。
- 队列管理器和数据库:RabbitMQ 和/或 Redis 等,在 Flask/FastAPI 和后端服务之间,用于可靠的异步服务和数据/配置持久性等。
- API 网关:IAM 或 Kong 集群,在 HAProxy 负载均衡器和 Web 服务器之间进行 API 管理,不创建单点故障。
- 监视和警报:SAM 很不错。
- 为 CI/CD DevOps 进行配置:云中立的部署和管理以及带有其他常见 devops 工具的 CI/CD 将需要带 K8s 的 ICM。
其实,IRIS 本身当然可以作为企业级队列管理器以及用于可靠消息传递的高性能数据库。 在模式分析中,很明显 IRIS 可以代替 RabbitMQ/Redis/MongoDB 等队列代理和数据库,得到更好的整合,大幅减少延迟,并提高整体性能。 还有,IRIS Web Gateway(先前为 CSP Gateway)当然可以代替 Gunicorn 或 Unicorn 等,对吧?
环境拓扑
在全 Docker 组件中实现上述逻辑模式有几种常见选项。 首先:
- docker-compose
- docker swarm 等
- Kubernetes 等
- 带 K8s 操作的 ICM
这个演示从功能性 PoC 和一些基准测试的“docker-compose”开始。 当然,我们很想使用 K8s,也有可能随着时间的推移使用 ICM。
如 docker-compose.yml 文件中所述,它的环境拓扑在 AWS Ubuntu 服务器上的物理实现最终将是:
上图显示了如何将所有 Docker 实例的服务端口映射并直接暴露于 Ubuntu 服务器以进行演示。 在生产中应该全部经过安全加固。 纯粹出于演示目的,所有容器都连接到同一个 Docker 网络中;而在生产中,它将被分为外部可路由和内部不可路由。
Docker 化组件
下面显示了主机中的那些存储卷如何按照这个 docker-compose.yml 文件的指示挂载到各个容器实例: 存储卷如何按照这个
ubuntu@ip-172-31-35-104:/zhong/flask-xray$ tree ./ -L 2
./
├── covid19                             (Flask+Gunicorn container and Tensorflow Serving container will mount here)
│   ├── app.py                                (Flask main app:  Both web application and API service interfaces are defined and implemented here)
│   ├── covid19_models               (Tensorflow models are published and versioned here for image classification Tensorflow Serving container with CPU)
│   ├── Dockerfile                          (Flask server with Gunicorn:      CMD ["gunicorn", "app:app", "--bind", "0.0.0.0:5000", "--workers", "4", "--threads", "2"])
│   ├── models                               (Models in .h5 format for Flask app and API demo of heatmap generation by grad-cam on X-Rays)
│   ├── __pycache__
│   ├── README.md
│   ├── requirements.txt             (Python packages needed for the full Flask+Gunicorn apps)
│   ├── scripts
│   ├── static                                  (Web static files)
│   ├── templates                         (Web rendering templates)
│   ├── tensorflow_serving        (Config file for tensorflow serving service)
│   └── test_images
├── covid-fastapi                   (FastAPI+Uvicorn container and Tensorflow Serving with GPU container will mount here)
│   ├── covid19_models            (Tensorflow serving GPU models are published and versioned here for image classification)
│   ├── Dockerfile                       (Uvicorn+FastAPI server are started here: CMD ["uvicorn", "main:app", "--host", "0.0.0.0", "--port", "8000", "--workers", "4" ])
│   ├── main.py                           (FastAPI app: both web application and API service interfaces are defined and implemented here)
│   ├── models                            (Models in .h5 format for FastAPI app and API demo of heatmap generation by grad-cam on X-Rays)
│   ├── __pycache__
│   ├── README.md
│   ├── requirements.txt
│   ├── scripts
│   ├── static
│   ├── templates
│   ├── tensorflow_serving
│   └── test_images
├── docker-compose.yml      (Full stack Docker definition file.  Version 2.3 is used to accommodate Docker GPU "nvidia runtime", otherwise can be version 3.x)
├── haproxy                             (HAProxy docker service is defined here.  Note: sticky session can be defined for backend LB. )
│   ├── Dockerfile
│   └── haproxy.cfg
└── notebooks                       (Jupyter Notebook container service with Tensorflow 2.2 and Tensorboard etc)
    ├── Dockerfile
    ├── notebooks                  (Sample notebook files to emulate external API Client apps for functional tests and API benchmark tests in Python on the load balancer etc)
└── requirements.txt
注:以上 docker-compose.yml 用于Covid-19 X 射线的深度学习演示。 它与另一个 integratedML-demo-template 的 docker-compose.yml 一起使用,形成环境拓扑中显示的完整服务堆栈。 注:以上 integratedML-demo-template 的 docker-compose.yml 一起使用,形成环境拓扑中显示的完整服务堆栈。 注:以上 docker-compose.yml 一起使用,形成环境拓扑中显示的完整服务堆栈。 注:以上
服务启动
简单的 docker-compose up -d 即可启动所有容器服务:
ubuntu@ip-172-31-35-104:~$ docker psCONTAINER ID IMAGE COMMAND CREATED STATUS PORTS NAMES31b682b6961d iris-aa-server:2020.3AA "/iris-main" 7 weeks ago Up 2 days (healthy) 2188/tcp, 53773/tcp, 54773/tcp, 0.0.0.0:8091->51773/tcp, 0.0.0.0:8092->52773/tcp iml-template-master_irisimlsvr_16a0f22ad3ffc haproxy:0.0.1 "/docker-entrypoint.…" 8 weeks ago Up 2 days 0.0.0.0:8088->8088/tcp flask-xray_lb_171b5163d8960 ai-service-fastapi:0.2.0 "uvicorn main:app --…" 8 weeks ago Up 2 days 0.0.0.0:8056->8000/tcp flask-xray_fastapi_1400e1d6c0f69 tensorflow/serving:latest-gpu "/usr/bin/tf_serving…" 8 weeks ago Up 2 days 0.0.0.0:8520->8500/tcp, 0.0.0.0:8521->8501/tcp flask-xray_tf2svg2_1eaac88e9b1a7 ai-service-flask:0.1.0 "gunicorn app:app --…" 8 weeks ago Up 2 days 0.0.0.0:8051->5000/tcp flask-xray_flask_1e07ccd30a32b tensorflow/serving "/usr/bin/tf_serving…" 8 weeks ago Up 2 days 0.0.0.0:8510->8500/tcp, 0.0.0.0:8511->8501/tcp flask-xray_tf2svg1_1390dc13023f2 tf2-jupyter:0.1.0 "/bin/sh -c '/bin/ba…" 8 weeks ago Up 2 days 0.0.0.0:8506->6006/tcp, 0.0.0.0:8586->8888/tcp flask-xray_tf2jpt_188e8709404ac tf2-jupyter-jdbc:1.0.0-iml-template "/bin/sh -c '/bin/ba…" 2 months ago Up 2 days 0.0.0.0:6026->6006/tcp, 0.0.0.0:8896->8888/tcp iml-template-master_tf2jupyter_1
CONTAINER ID IMAGE COMMAND CREATED STATUS PORTS NAMES
31b682b6961d iris-aa-server:2020.3AA "/iris-main" 7 weeks ago Up 2 days (healthy) 2188/tcp, 53773/tcp, 54773/tcp, 0.0.0.0:8091->51773/tcp, 0.0.0.0:8092->52773/tcp iml-template-master_irisimlsvr_1
6a0f22ad3ffc haproxy:0.0.1 "/docker-entrypoint.…" 8 weeks ago Up 2 days 0.0.0.0:8088->8088/tcp flask-xray_lb_1
71b5163d8960 ai-service-fastapi:0.2.0 "uvicorn main:app --…" 8 weeks ago Up 2 days 0.0.0.0:8056->8000/tcp flask-xray_fastapi_1
400e1d6c0f69 tensorflow/serving:latest-gpu "/usr/bin/tf_serving…" 8 weeks ago Up 2 days 0.0.0.0:8520->8500/tcp, 0.0.0.0:8521->8501/tcp flask-xray_tf2svg2_1
eaac88e9b1a7 ai-service-flask:0.1.0 "gunicorn app:app --…" 8 weeks ago Up 2 days 0.0.0.0:8051->5000/tcp flask-xray_flask_1
e07ccd30a32b tensorflow/serving "/usr/bin/tf_serving…" 8 weeks ago Up 2 days 0.0.0.0:8510->8500/tcp, 0.0.0.0:8511->8501/tcp flask-xray_tf2svg1_1
390dc13023f2 tf2-jupyter:0.1.0 "/bin/sh -c '/bin/ba…" 8 weeks ago Up 2 days 0.0.0.0:8506->6006/tcp, 0.0.0.0:8586->8888/tcp flask-xray_tf2jpt_1
88e8709404ac tf2-jupyter-jdbc:1.0.0-iml-template "/bin/sh -c '/bin/ba…" 2 months ago Up 2 days 0.0.0.0:6026->6006/tcp, 0.0.0.0:8896->8888/tcp iml-template-master_tf2jupyter_1
以 docker-compose up --scale fastapi=2 --scale flask=2 -d 为例,将水平扩展到 2 个 Gunicorn+Flask 容器和 2 个 Univcorn+FastAPI 容器:
ubuntu@ip-172-31-35-104:/zhong/flask-xray$ docker psCONTAINER ID IMAGE COMMAND CREATED STATUS PORTS NAMESdbee3c20ea95 ai-service-fastapi:0.2.0 "uvicorn main:app --…" 4 minutes ago Up 4 minutes 0.0.0.0:8057->8000/tcp flask-xray_fastapi_295bcd8535aa6 ai-service-flask:0.1.0 "gunicorn app:app --…" 4 minutes ago Up 4 minutes 0.0.0.0:8052->5000/tcp flask-xray_flask_2
CONTAINER ID IMAGE COMMAND CREATED STATUS PORTS NAMES
dbee3c20ea95 ai-service-fastapi:0.2.0 "uvicorn main:app --…" 4 minutes ago Up 4 minutes 0.0.0.0:8057->8000/tcp flask-xray_fastapi_2
95bcd8535aa6 ai-service-flask:0.1.0 "gunicorn app:app --…" 4 minutes ago Up 4 minutes 0.0.0.0:8052->5000/tcp flask-xray_flask_2
... ...
在“integrtedML-demo-template”的工作目录下再运行一个“docker-compose up -d”,就出现了上面列表中的 irisimlsvr 和 tf2jupyter 容器。
测试
1. 带有简单 UI 的 AI 演示 Web 应用
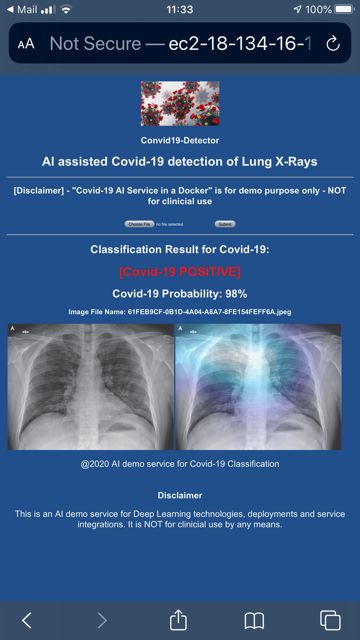
启动上述 docker 服务后,我们可以访问 AWS EC2 实例中托管的 Covid-19 肺部 X 射线检测演示 Web 应用,临时地址为
http://ec2-18-134-16-118.eu-west-2.compute.amazonaws.com:8056/0>
以下是从我的手机截取的屏幕。 它有一个非常简单的演示 UI:基本上只需要点击“Choose File”,然后点击“Submit”按钮,上传 X 射线图像,然后应用就会显示分类报告。 如果图像被分类为 Covid-19 X 射线图像,则会显示热图,通过 DL 模拟“检测到的”病变区域;如果未被分类为 Covid-19 X 射线图像,分类报告将仅显示上传的 X 射线图像。显示热图,通过 DL 模拟“检测到的”病变区域;如果未被分类为 Covid-19 X 射线图像,分类报告将仅显示上传的 X 射线图像。
该 Web 应用是一个 Python 服务器页面,其逻辑主要在 FastAPI 的 main.py 文件以及 Flask 的 app.py 文件中进行编码。Flask 的 app.py 文件中进行编码。
如果有更多的空闲时间,我可能会详细说明 Flask 和 FastAPI 之间的编码和惯例差异。 其实我希望可以为 AI 演示托管对比 Flask、FastAPI 与 IRIS。
2. 测试演示 API
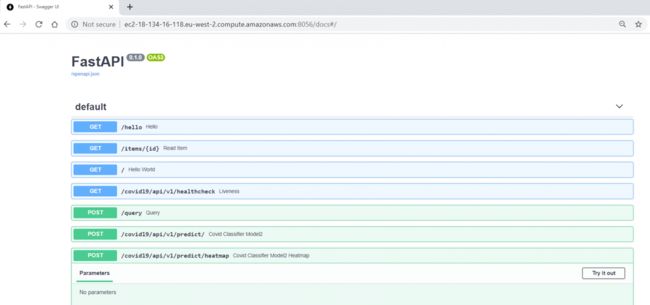
FastAPI(在端口 8056 处公开)内置 Swagger API 文档,如下所示。 这非常好用。 我需要做的就是在其 URL 中使用“/docs”,例如:
我内置了一些占位符(如 /hello 和 /items)和一些真正的演示 API 接口(如 /healthcheck、/predict 和 predict/heatmap)。
来对这些 API 进行一个快速测试,在我为这个 AI 演示服务准备的一个 Jupyter Notebook 示例文件中运行一些 Python 行(作为 API 客户端应用模拟器)。 来对这些 API 进行一个快速测试,在我为这个 AI 演示服务准备的一个
下面我以运行这个文件为例:https://github.com/zhongli1990/covid-ai-demo-deployment/blob/master/notebooks/notebooks/Covid19-3class-Heatmap-Flask-FastAPI-TF-serving-all-in-one-HAProxy2.ipynb
首先测试后端 TF-Serving(端口 8511)和 TF-Serving-GPU(端口 8521)是否正常运行:
!curl http://172.17.0.1:8511/v1/models/covid19  # tensorflow serving
!curl http://172.17.0.1:8521/v1/models/covid19  # tensorflow-gpu serving
{
"model_version_status": [
{
"version": "2",
"state": "AVAILABLE",
"status": {
"error_code": "OK",
"error_message": ""
}
}
]
}
{
"model_version_status": [
{
"version": "2",
"state": "AVAILABLE",
"status": {
"error_code": "OK",
"error_message": ""
}
}
]
}然后测试以下服务 API 是否正常运行:
- Gunicorn+Flask+TF-Serving
- Unicorn+FastAPI+TF-Serving-GPU
- 以上麻烦服务之前的负载均衡器 HAProxy
r = requests.get('http://172.17.0.1:8051/covid19/api/v1/healthcheck')  # tf srving docker with cpu
print(r.status_code, r.text)
r = requests.get('http://172.17.0.1:8056/covid19/api/v1/healthcheck')  # tf-serving docker with gpu
print(r.status_code, r.text)
r = requests.get('http://172.17.0.1:8088/covid19/api/v1/healthcheck')  # tf-serving docker with HAproxy
print(r.status_code, r.text)
结果应为:
200 Covid19 detector API is live!
200 "Covid19 detector API is live!\n\n"
200 "Covid19 detector API is live!\n\n"
测试一些功能性 API 接口(例如 /predict/heatmap)来返回输入 X 射线图像的分类和热图结果。 根据 API 定义,在通过 HTTP POST 发送之前,入站图像为 based64 编码:
%%time# importing the requests library
import argparse
import base64import requests# defining the api-endpoint
API_ENDPOINT = "http://172.17.0.1:8051/covid19/api/v1/predict/heatmap"image_path = './Covid_M/all/test/covid/nejmoa2001191_f3-PA.jpeg'
#image_path = './Covid_M/all/test/normal/NORMAL2-IM-1400-0001.jpeg'
#image_path = './Covid_M/all/test/pneumonia_bac/person1940_bacteria_4859.jpeg'
b64_image = ""
# Encoding the JPG,PNG,etc. image to base64 format
with open(image_path, "rb") as imageFile:
    b64_image = base64.b64encode(imageFile.read())# data to be sent to api
data = {'b64': b64_image}# sending post request and saving response as response object
r = requests.post(url=API_ENDPOINT, data=data)print(r.status_code, r.text)# extracting the response
print("{}".format(r.text))
所有此类测试图像也已上传到 GitHub。 以上代码的结果将为:
200 {"Input_Image":"http://localhost:8051/static/source/0198f0ae-85a0-470b-bc31-dc1918c15b9620200906-170443.png","Output_Heatmap":"http://localhost:8051/static/result/Covid19_98_0198f0ae-85a0-470b-bc31-dc1918c15b9620200906-170443.png.png","X-Ray_Classfication_Raw_Result":[[0.805902302,0.15601939,0.038078323]],"X-Ray_Classification_Covid19_Probability":0.98,"X-Ray_Classification_Result":"Covid-19 POSITIVE","model_name":"Customised Incpetion V3"}

{"Input_Image":"http://localhost:8051/static/source/0198f0ae-85a0-470b-bc31-dc1918c15b9620200906-170443.png","Output_Heatmap":"http://localhost:8051/static/result/Covid19_98_0198f0ae-85a0-470b-bc31-dc1918c15b9620200906-170443.png.png","X-Ray_Classfication_Raw_Result":[[0.805902302,0.15601939,0.038078323]],"X-Ray_Classification_Covid19_Probability":0.98,"X-Ray_Classification_Result":"Covid-19 POSITIVE","model_name":"Customised Incpetion V3"}

CPU times: user 16 ms, sys: 0 ns, total: 16 ms
Wall time: 946 ms
3. 基准测试演示服务 API
我们设置了一个 HAProxy 负载均衡器实例。 我们还启动了一个有 4 个工作进程的 Flask 服务,以及一个也有 4 个工作进程的 FastAPI 服务。
为什么不直接在 Notebook 文件中创建 8 个 Pyhon 进程,模拟 8 个并发 API 客户端向演示服务 API 发送请求,看看会发生什么
#from concurrent.futures import ThreadPoolExecutor as PoolExecutor
from concurrent.futures import ProcessPoolExecutor as PoolExecutor
import http.client
import socket
import timestart = time.time()#laodbalancer:
API_ENDPOINT_LB = "http://172.17.0.1:8088/covid19/api/v1/predict/heatmap"
API_ENDPOINT_FLASK = "http://172.17.0.1:8052/covid19/api/v1/predict/heatmap"
API_ENDPOINT_FastAPI = "http://172.17.0.1:8057/covid19/api/v1/predict/heatmap"
def get_it(url):
    try:
        # loop over the images
        for imagePathTest in imagePathsTest:
            b64_image = ""
            with open(imagePathTest, "rb") as imageFile:
                b64_image = base64.b64encode(imageFile.read())

            data = {'b64': b64_image}
            r = requests.post(url, data=data)
            #print(imagePathTest, r.status_code, r.text)
        return r
    except socket.timeout:
        # in a real world scenario you would probably do stuff if the
        # socket goes into timeout
        passurls = [API_ENDPOINT_LB, API_ENDPOINT_LB,
        API_ENDPOINT_LB, API_ENDPOINT_LB,
        API_ENDPOINT_LB, API_ENDPOINT_LB,
        API_ENDPOINT_LB, API_ENDPOINT_LB]with PoolExecutor(max_workers=16) as executor:
    for _ in executor.map(get_it, urls):
        pass

print("--- %s seconds ---" % (time.time() - start))
因此,处理 8x27 = 216 张测试图像花了 74s。 这个负载均衡的演示堆栈每秒能够处理 3 张图像(通过将分类和热图结果返回客户端):
--- 74.37691688537598 seconds ---从 Putty 会话的 Top 命令中,我们可以看到在上述基准脚本开始运行后,8 个服务器进程(4 个 gunicorn + 4 个 unicorn/python)开始加速
未来计划
这篇帖子只是将“All-in-Docker AI 演示”部署堆栈组合为测试框架的起点。 接下来,我希望根据 FHIR R4 等添加更多的 API 演示接口(例如 Covid-19 ICU 预测接口等),并添加一些支持 DICOM 输入格式。 这也可以成为一个测试台,用于探索与 IRIS 托管的 ML 功能更紧密的集成。 未来它也可以用作测试框架(也是一个非常简单的框架),随着我们在医疗影像、人群健康或个性化预测以及 NLP 等各个 AI 领域的发展,截取越来越多的 ML 或 DL 专业模型。 我还在上一篇帖子的末尾(在“未来计划”部分)列出了一个愿望清单。


