【笔记】Opencv Sift 和 Surf 特征实现图像无缝拼接生成全景图像
环境: OpenCV2.4.13+VS2012
Sift和Surf算法实现两幅图像拼接的过程是一样的,主要分为4大部分:
1. 特征点提取和描述
2. 特征点配对,找到两幅图像中匹配点的位置
3. 通过配对点,生成变换矩阵,并对图像1应用变换矩阵生成对图像2的映射图像
4. 图像2拼接到映射图像上,完成拼接
过程1、2、3没啥好说的了,关键看看步骤4中的拼接部分。这里先采用比较简单一点的拼接方式来实现:
1. 找到图像1和图像2中最强的匹配点所在的位置
2. 通过映射矩阵变换,得到图像1的最强匹配点经过映射后投影到新图像上的位置坐标
3. 在新图像上的最强匹配点的映射坐标处,衔接两幅图像,该点左侧图像完全是图像1,右侧完全是图像2
这里拼接的正确与否完全取决于特征点的选取,如果选取的是错误匹配的特征点,拼接一定失败,所以这里选了排在第一个的最强的匹配点,作为拼接点。
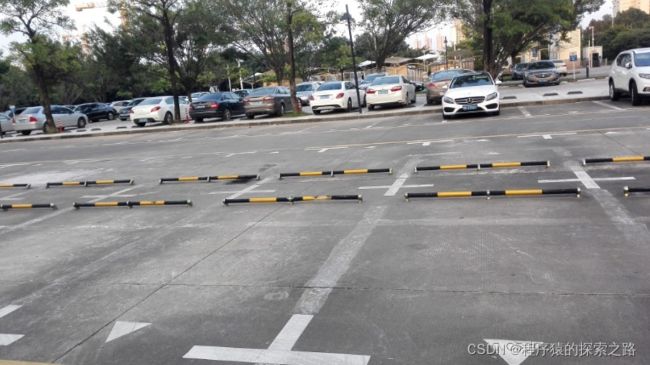
测试用例一原图1:
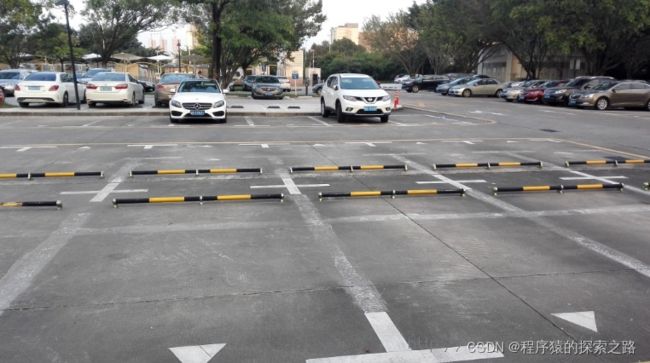
测试用例一原图2:
Sift拼接效果:
Surf拼接效果:
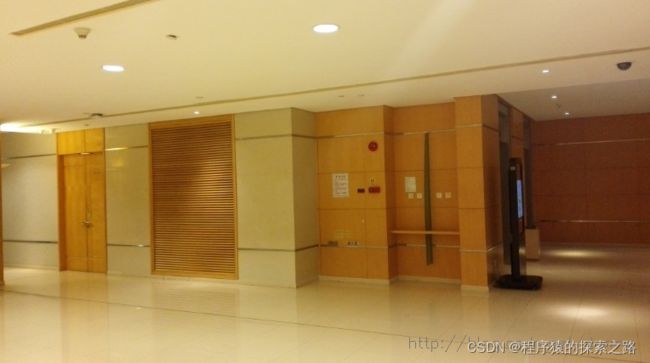
测试用例二原图2:
Sift拼接效果:
Surf拼接效果:
以下是Opencv实现:
#include "highgui/highgui.hpp"
#include "opencv2/nonfree/nonfree.hpp"
#include "opencv2/legacy/legacy.hpp"

using namespace cv;

//计算原始图像点位在经过矩阵变换后在目标图像上对应位置
Point2f getTransformPoint(const Point2f originalPoint,const Mat &transformMaxtri);

int main(int argc,char *argv[])
{
	Mat image01=imread(argv[1]);
	Mat image02=imread(argv[2]);
	imshow("拼接图像1",image01);
	imshow("拼接图像2",image02);

	//灰度图转换
	Mat image1,image2;
	cvtColor(image01,image1,CV_RGB2GRAY);
	cvtColor(image02,image2,CV_RGB2GRAY);

	//提取特征点
	SiftFeatureDetector siftDetector(800);  // 海塞矩阵阈值
	vector keyPoint1,keyPoint2;
	siftDetector.detect(image1,keyPoint1);
	siftDetector.detect(image2,keyPoint2);

	//特征点描述,为下边的特征点匹配做准备
	SiftDescriptorExtractor siftDescriptor;
	Mat imageDesc1,imageDesc2;
	siftDescriptor.compute(image1,keyPoint1,imageDesc1);
	siftDescriptor.compute(image2,keyPoint2,imageDesc2);

	//获得匹配特征点,并提取最优配对
	FlannBasedMatcher matcher;
	vector matchePoints;
	matcher.match(imageDesc1,imageDesc2,matchePoints,Mat());
	sort(matchePoints.begin(),matchePoints.end()); //特征点排序
	//获取排在前N个的最优匹配特征点
	vector imagePoints1,imagePoints2;
	for(int i=0;i<10;i++)
	{
		imagePoints1.push_back(keyPoint1[matchePoints[i].queryIdx].pt);
		imagePoints2.push_back(keyPoint2[matchePoints[i].trainIdx].pt);
	}

	//获取图像1到图像2的投影映射矩阵,尺寸为3*3
	Mat homo=findHomography(imagePoints1,imagePoints2,CV_RANSAC);
	Mat adjustMat=(Mat_(3,3)<<1.0,0,image01.cols,0,1.0,0,0,0,1.0);
	Mat adjustHomo=adjustMat*homo;

	//获取最强配对点在原始图像和矩阵变换后图像上的对应位置,用于图像拼接点的定位
	Point2f originalLinkPoint,targetLinkPoint,basedImagePoint;
	originalLinkPoint=keyPoint1[matchePoints[0].queryIdx].pt;
	targetLinkPoint=getTransformPoint(originalLinkPoint,adjustHomo);
	basedImagePoint=keyPoint2[matchePoints[0].trainIdx].pt;

	//图像配准
	Mat imageTransform1;
	warpPerspective(image01,imageTransform1,adjustMat*homo,Size(image02.cols+image01.cols+10,image02.rows));

	//在最强匹配点的位置处衔接,最强匹配点左侧是图1,右侧是图2,这样直接替换图像衔接不好,光线有突变
	Mat ROIMat=image02(Rect(Point(basedImagePoint.x,0),Point(image02.cols,image02.rows)));
	ROIMat.copyTo(Mat(imageTransform1,Rect(targetLinkPoint.x,0,image02.cols-basedImagePoint.x+1,image02.rows)));

	namedWindow("拼接结果",0);
	imshow("拼接结果",imageTransform1);
	waitKey();
	return 0;
}

//计算原始图像点位在经过矩阵变换后在目标图像上对应位置
Point2f getTransformPoint(const Point2f originalPoint,const Mat &transformMaxtri)
{
	Mat originelP,targetP;
	originelP=(Mat_(3,1)<(0,0)/targetP.at(2,0);
	float y=targetP.at(1,0)/targetP.at(2,0);
	return Point2f(x,y);
} 对于衔接处存在的缝隙问题,有一个解决办法是按一定权重叠加图1和图2的重叠部分,在重叠处图2的比重是1,向着图1的方向,越远离衔接处,图1的权重越来越大,图2的权重越来越低,实现平稳过渡。按照这个思路优化过的代码如下:
#include "highgui/highgui.hpp"
#include "opencv2/nonfree/nonfree.hpp"
#include "opencv2/legacy/legacy.hpp"

using namespace cv;

//计算原始图像点位在经过矩阵变换后在目标图像上对应位置
Point2f getTransformPoint(const Point2f originalPoint,const Mat &transformMaxtri);

int main(int argc,char *argv[])
{
	Mat image01=imread(argv[1]);
	Mat image02=imread(argv[2]);
	imshow("拼接图像1",image01);
	imshow("拼接图像2",image02);

	//灰度图转换
	Mat image1,image2;
	cvtColor(image01,image1,CV_RGB2GRAY);
	cvtColor(image02,image2,CV_RGB2GRAY);

	//提取特征点
	SiftFeatureDetector siftDetector(800);  // 海塞矩阵阈值
	vector keyPoint1,keyPoint2;
	siftDetector.detect(image1,keyPoint1);
	siftDetector.detect(image2,keyPoint2);

	//特征点描述,为下边的特征点匹配做准备
	SiftDescriptorExtractor siftDescriptor;
	Mat imageDesc1,imageDesc2;
	siftDescriptor.compute(image1,keyPoint1,imageDesc1);
	siftDescriptor.compute(image2,keyPoint2,imageDesc2);

	//获得匹配特征点,并提取最优配对
	FlannBasedMatcher matcher;
	vector matchePoints;
	matcher.match(imageDesc1,imageDesc2,matchePoints,Mat());
	sort(matchePoints.begin(),matchePoints.end()); //特征点排序
	//获取排在前N个的最优匹配特征点
	vector imagePoints1,imagePoints2;
	for(int i=0;i<10;i++)
	{
		imagePoints1.push_back(keyPoint1[matchePoints[i].queryIdx].pt);
		imagePoints2.push_back(keyPoint2[matchePoints[i].trainIdx].pt);
	}

	//获取图像1到图像2的投影映射矩阵,尺寸为3*3
	Mat homo=findHomography(imagePoints1,imagePoints2,CV_RANSAC);
	Mat adjustMat=(Mat_(3,3)<<1.0,0,image01.cols,0,1.0,0,0,0,1.0);
	Mat adjustHomo=adjustMat*homo;

	//获取最强配对点在原始图像和矩阵变换后图像上的对应位置,用于图像拼接点的定位
	Point2f originalLinkPoint,targetLinkPoint,basedImagePoint;
	originalLinkPoint=keyPoint1[matchePoints[0].queryIdx].pt;
	targetLinkPoint=getTransformPoint(originalLinkPoint,adjustHomo);
	basedImagePoint=keyPoint2[matchePoints[0].trainIdx].pt;

	//图像配准
	Mat imageTransform1;
	warpPerspective(image01,imageTransform1,adjustMat*homo,Size(image02.cols+image01.cols+110,image02.rows));

	//在最强匹配点左侧的重叠区域进行累加,是衔接稳定过渡,消除突变
	Mat image1Overlap,image2Overlap; //图1和图2的重叠部分
	image1Overlap=imageTransform1(Rect(Point(targetLinkPoint.x-basedImagePoint.x,0),Point(targetLinkPoint.x,image02.rows)));
	image2Overlap=image02(Rect(0,0,image1Overlap.cols,image1Overlap.rows));
	Mat image1ROICopy=image1Overlap.clone();  //复制一份图1的重叠部分
	for(int i=0;i(i,j)[0]=(1-weight)*image1ROICopy.at(i,j)[0]+weight*image2Overlap.at(i,j)[0];
			image1Overlap.at(i,j)[1]=(1-weight)*image1ROICopy.at(i,j)[1]+weight*image2Overlap.at(i,j)[1];
			image1Overlap.at(i,j)[2]=(1-weight)*image1ROICopy.at(i,j)[2]+weight*image2Overlap.at(i,j)[2];
		}
	}
	Mat ROIMat=image02(Rect(Point(image1Overlap.cols,0),Point(image02.cols,image02.rows)));	 //图2中不重合的部分
	ROIMat.copyTo(Mat(imageTransform1,Rect(targetLinkPoint.x,0, ROIMat.cols,image02.rows))); //不重合的部分直接衔接上去
	namedWindow("拼接结果",0);
	imshow("拼接结果",imageTransform1);
	imwrite("D:\\拼接结果.jpg",imageTransform1);
	waitKey();
	return 0;
}

//计算原始图像点位在经过矩阵变换后在目标图像上对应位置
Point2f getTransformPoint(const Point2f originalPoint,const Mat &transformMaxtri)
{
	Mat originelP,targetP;
	originelP=(Mat_(3,1)<(0,0)/targetP.at(2,0);
	float y=targetP.at(1,0)/targetP.at(2,0);
	return Point2f(x,y);
}
Sift拼接效果:
Surf拼接效果:
拼接处的线条消失了,也没有见突兀的光线变化,基本实现了无缝拼接。
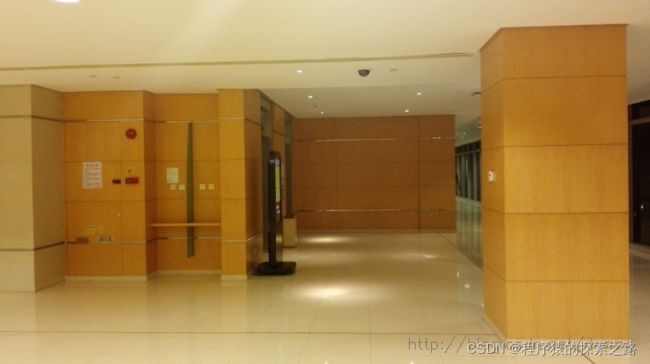
测试用例三原图1:
测试用例三原图2:
拼接效果:


