李宏毅机器学习作业11——Transfer Learning,Domain Adversarial Training
Domain Adversarial Training见:
李宏毅机器学习——领域适应Domain Adaptation_iwill323的博客-CSDN博客_领域适应
迁移学习参见2022CS231n PPT笔记 - 迁移学习_iwill323的博客-CSDN博客_cs231n ppt
目录
任务和数据集
任务
数据集
方法论:DaNN
导包
数据处理
显示图片
Canny Edge Detection
transforms
dataset和数据加载
模型
训练
训练函数
Gradient Reversal Layer
一个问题
lambda
推断
可视化
解答
lambda = 0.1
lambda = 0.7
adaptive lambda
利用DANN模型生成伪标签
任务和数据集
任务
這份作業的任務是Transfer Learning中的Domain Adversarial Training。也就是左下角的那一塊。
现在拥有标注的source data和未标注的target data,其中source data可能和target data有一定的联系。我们想仅使用 source data 训练一个模型,然后用在target data的推断。
数据集
数据来源 here
使用photos和the labels进行训练,预测hand-drawn graffiti的类别
● Label: 10 classes (numbered from 0 to 9).
● Training (source data): 5000 (32, 32) RGB 真实照片(with label).
● Testing (target data): 100000 (28, 28) gray scale 手写图像
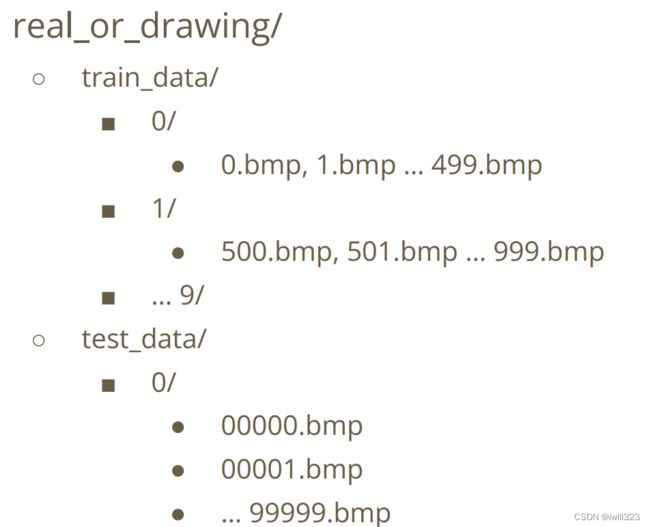
文件结构如下图:
方法论:DaNN
DaNN的核心:讓Soucre Data和Target Data經過Feature Extractor映射在同個Distribution上,这样在source domain上训练的classifier可以用于target domain
如何讓前半段的模型輸入兩種不同分布的資料,輸出卻是同個分布呢?
最簡單的方法就是像 GAN 一樣導入一個discriminator,这里叫Domain Classifier,讓它判斷經過Feature Extractor後的Feature是源自於哪個domain,讓Feature Extractor學習如何產生Feature以騙過Domain Classifier。 持久下來,通常Feature Extractor都會打贏Domain Classifier,因為Domain Classifier的Input來自於Feature Extractor,而且對Feature Extractor來說domain classification和label classification的任務並沒有衝突。
如此一來,我們就可以確信不管是哪一個Domain,Feature Extractor都會把它產生在同一個Feature Distribution上。
导包
import numpy as np
import torch
import torch.nn as nn
import torch.nn.functional as F
from torch.autograd import Function

import torch.optim as optim
import torchvision.transforms as transforms
from torchvision.datasets import ImageFolder
from torch.utils.data import DataLoader
import matplotlib.pyplot as plt
import pandas as pd
import cv2
import os
from d2l import torch as d2l

device = torch.device('cuda' if torch.cuda.is_available() else 'cpu')
数据处理
显示图片
def no_axis_show(img, title='', cmap=None):
  # imshow, and set the interpolation mode to be "nearest"。
  fig = plt.imshow(img, interpolation='nearest', cmap=cmap)
  # do not show the axes in the images.
  fig.axes.get_xaxis().set_visible(False)
  fig.axes.get_yaxis().set_visible(False)
  plt.title(title)

titles = ['horse', 'bed', 'clock', 'apple', 'cat', 'plane', 'television', 'dog', 'dolphin', 'spider']
plt.figure(figsize=(18, 18))
for i in range(10):
  plt.subplot(1, 10, i+1)
  fig = no_axis_show(plt.imread(f'/kaggle/input/ml2022-spring-hw11/real_or_drawing/train_data/{i}/{500*i}.bmp'), title=titles[i])
plt.figure(figsize=(18, 18))
for i in range(10):
plt.subplot(1, 10, i+1)
fig = no_axis_show(plt.imread(f'/kaggle/input/ml2022-spring-hw11/real_or_drawing/test_data/0/' + str(i).rjust(5, '0') + '.bmp'))Canny Edge Detection
对于这个任务,我们有一个special domain knowledge:塗鴉的時候通常只會畫輪廓,我們可以根據這點將source data做點邊緣偵測處理,讓source data更像target data一點。
用cv2.Canny做Canny Edge Detection非常方便,只需要兩個參數: low_threshold, high_threshold。
cv2.Canny(image, low_threshold, high_threshold)
簡單來說就是當邊緣值超過high_threshold,就確定它是edge。如果只有超過low_threshold,那就先判斷一下再決定是不是edge。下面对source data做Canny Edge Detection
titles = ['horse', 'bed', 'clock', 'apple', 'cat', 'plane', 'television', 'dog', 'dolphin', 'spider']
plt.figure(figsize=(12, 12))

original_img = plt.imread(f'/kaggle/input/ml2022-spring-hw11/real_or_drawing/train_data/0/0.bmp')
plt.subplot(1, 5, 1)
no_axis_show(original_img, title='original')

gray_img = cv2.cvtColor(original_img, cv2.COLOR_RGB2GRAY)
plt.subplot(1, 5, 2)
no_axis_show(gray_img, title='gray scale', cmap='gray')

canny_50100 = cv2.Canny(gray_img, 50, 100)
plt.subplot(1, 5, 3)
no_axis_show(canny_50100, title='Canny(50, 100)', cmap='gray')

canny_150200 = cv2.Canny(gray_img, 150, 200)
plt.subplot(1, 5, 4)
no_axis_show(canny_150200, title='Canny(150, 200)', cmap='gray')

canny_250300 = cv2.Canny(gray_img, 250, 300)
plt.subplot(1, 5, 5)
no_axis_show(canny_250300, title='Canny(250, 300)', cmap='gray')
low_threshold, high_threshold大小可调,他们越大,轮廓曲线就越少
transforms
这里使用了lambda表达式
source_transform = transforms.Compose([
    # Turn RGB to grayscale. (Bacause Canny do not support RGB images.)
    transforms.Grayscale(),
    # cv2 do not support skimage.Image, so we transform it to np.array,
    # and then adopt cv2.Canny algorithm.
    transforms.Lambda(lambda x: cv2.Canny(np.array(x), 170, 300)),
    # Transform np.array back to the skimage.Image.
    transforms.ToPILImage(),
    # 50% Horizontal Flip. (For Augmentation)
    transforms.RandomHorizontalFlip(),
    # Rotate +- 15 degrees. (For Augmentation), and filled with zero
    # if there's empty pixel after rotation.
    transforms.RandomRotation(15, fill=(0,)),
    # Transform to tensor for model inputs.
    transforms.ToTensor(),
])

target_transform = transforms.Compose([
    # Turn RGB to grayscale.
    transforms.Grayscale(),
    # Resize: size of source data is 32x32, thus we need to enlarge the size of target data from 28x28 to 32x32。
    transforms.Resize((32, 32)),
    # 50% Horizontal Flip. (For Augmentation)
    transforms.RandomHorizontalFlip(),
    # Rotate +- 15 degrees. (For Augmentation), and filled with zero
    # if there's empty pixel after rotation.
    transforms.RandomRotation(15, fill=(0,)),
    # Transform to tensor for model inputs.
    transforms.ToTensor(),
])
dataset和数据加载
可以使用torchvision.ImageFolder的形式加载数据
batch_train = 256
batch_test = 1024
num_workers = 2
source_dataloader = DataLoader(source_dataset, batch_size=batch_train, shuffle=True, num_workers=num_workers, pin_memory=True, drop_last=True)
target_dataloader = DataLoader(target_dataset, batch_size=batch_train, shuffle=True, num_workers=num_workers, pin_memory=True, drop_last=True)
test_dataloader = DataLoader(target_dataset, batch_size=batch_test, shuffle=False, num_workers=num_workers, pin_memory=True)
print('source集总长度是 {:d}, batch数量是 {:.2f}'.format(len(source_dataset), len(source_dataset)/ batch_train))
print('target集总长度是 {:d}, batch数量是 {:.2f}'.format(len(target_dataset), len(target_dataset)/ batch_test))
source集总长度是 5000, batch数量是 19.53 target集总长度是 100000, batch数量是 97.66
模型
Feature Extractor: 典型的VGG-like叠法。
Label Predictor / Domain Classifier: 线性模型从头到尾。
class FeatureExtractor(nn.Module):

    def __init__(self):
        super(FeatureExtractor, self).__init__()

        self.conv = nn.Sequential(
            nn.Conv2d(1, 64, 3, 1, 1),
            nn.BatchNorm2d(64),
            nn.ReLU(),
            nn.MaxPool2d(2),

            nn.Conv2d(64, 128, 3, 1, 1),
            nn.BatchNorm2d(128),
            nn.ReLU(),
            nn.MaxPool2d(2),

            nn.Conv2d(128, 256, 3, 1, 1),
            nn.BatchNorm2d(256),
            nn.ReLU(),
            nn.MaxPool2d(2),

            nn.Conv2d(256, 256, 3, 1, 1),
            nn.BatchNorm2d(256),
            nn.ReLU(),
            nn.MaxPool2d(2),

            nn.Conv2d(256, 512, 3, 1, 1),
            nn.BatchNorm2d(512),
            nn.ReLU(),
            nn.MaxPool2d(2)
        )

    def forward(self, x):
        x = self.conv(x).squeeze()
        return x

class LabelPredictor(nn.Module):

    def __init__(self):
        super(LabelPredictor, self).__init__()

        self.layer = nn.Sequential(
            nn.Linear(512, 512),
            nn.ReLU(),

            nn.Linear(512, 512),
            nn.ReLU(),

            nn.Linear(512, 10),
        )

    def forward(self, h):
        c = self.layer(h)
        return c

class DomainClassifier(nn.Module):

    def __init__(self):
        super(DomainClassifier, self).__init__()

        self.layer = nn.Sequential(
            nn.Linear(512, 512),
            nn.BatchNorm1d(512),
            nn.ReLU(),

            nn.Linear(512, 512),
            nn.BatchNorm1d(512),
            nn.ReLU(),

            nn.Linear(512, 512),
            nn.BatchNorm1d(512),
            nn.ReLU(),

            nn.Linear(512, 512),
            nn.BatchNorm1d(512),
            nn.ReLU(),

            nn.Linear(512, 1),
        )

    def forward(self, h):
        y = self.layer(h)
        return y
训练
训练函数
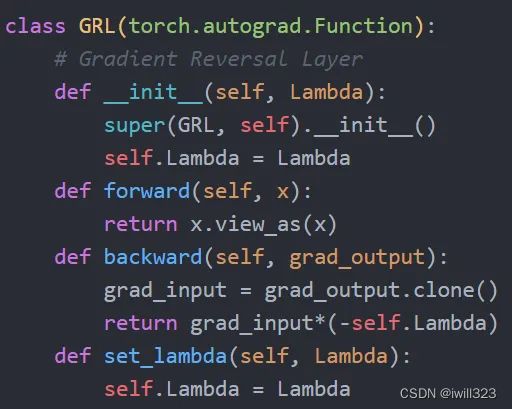
原始paper中使用了Gradient Reversal Layer,並將Feature Extractor / Label Predictor / Domain Classifier 同时训练。
这里先训练Domain Classfier,然后训练 Feature Extractor(就像在train GAN的Generator和Discriminator一樣)。
因為我們完全沒有target的label,所以結果如何,只好丟进kaggle看看
Gradient Reversal Layer
feature extractor有两个目标需要满足,第一是feature extractor生成的特征能够让 label predictor预测出正确标签,该目标保证自己提取的feature是有用的;第二是它提取的特征需要尽可能让domain classifier无法判断出来自哪个任务域,该目标保证在两个任务域生成的feature分布相近。第一个目标和 Label Predictor的优化目标相同,第二个目标和domain classifier的优化目标相反,所以为了优化feature extractor,反向传播过程 label predictor算出来的梯度是不用变,而domain classifier算出来的梯度反向传播时要乘以负号。 label predictor分类损失CrossEntropy为L,Domain Classifier分类损失记为Ld,则Feature Extractor 的Loss定义为L-Ld。
就具体实现而言,GAN的训练方式有很多种,最经典的是minmax GAN,先固定生成器,训练判别器让其更新几次,再固定判别器,训练生成器一步,这样往复循环。每一步迭代,GAN需要分两次forward,一次训练判别器减小loss,一次训练生成器增大loss。另一种是同时训练判别器和生成器,在一次forwad之后判别器和生成器都会更新,实现end-to-end训练。
同时训练判别器和生成器的情况下,如果使用L-Ld进行反向传播,那么Domain Classifier优化方向就成了梯度上升,但是Domain Classifier反向的时候梯度不用变,到feature优化的时候才取负,而这正是GRL想要起到的效果。使用了GRL之后,就可以使用L+Ld进行反向传播更新参数。GRL在正向传播中,实现一个恒等变换,在反向传播过程中,让梯度乘以负的系数,再往上一层传播.
根据助教所说,使用L-Ld进行反向传播比采用GRL的方式更好算一些。
- Gradient Reversal Layer的实现
pytorch自定义layer有两种方式:
- 通过继承torch.nn.Module类来实现拓展。只需重新实现__init__和forward函数。
- 通过继承torch.autograd.Function,除了要实现__init__和forward函数,还要实现backward函数(就是自定义求导规则)。
方式一看着简单,但是当要定义自己的求导方式时,就要自己实现backward,也就是所谓的Extending torch.autograd
一个问题
有人提出,训练的时候不能训练到完全收敛,否则结果会大幅度下降。
理想情况下,生成的feature尽可能使得discriminator对其source和target的判别概率都为0.5,对抗这一路不会收敛。但是L-Ld这个式子存在问题:训练生成器时让判别器向分类错误的方向优化。本来是想用 -Ld来表示让classifier分不清向量来源,但是把source误判为target,把target误判为source,这也能实现min-Ld。一个好的feature应该是让discriminator分辨不出它来自哪个domain,而不是让discriminator把它分到错误的那个domain。如果是后者的情况,说明其实domain discrepancy还是可以被捕捉到,所以达不到domain adaptation的效果。
参考:Gradient Reversal Layer指什么? - 知乎
lambda
lambda是用于控制Domain Adversarial Loss的系数,一开始应该小一点,随着训练的进行再逐渐增大。这是因为刚开始的时候还没从source data的label学到有用的东西,feature extractor提取出来的feature还没有实际意义,这时候feature extractor参数的更新应该多考虑 label predictor的损失而不是domain classifier的损失,因此lambda要小一点。因此可以采用Adaptive的版本,可以參考原文
def trainer(source_dataloader, target_dataloader, config):
    '''
      Args:
        source_dataloader: source data的dataloader
        target_dataloader: target data的dataloader
        lamb: control the balance of domain adaptatoin and classification.
    '''

    feature_extractor = FeatureExtractor().to(device)
    label_predictor = LabelPredictor().to(device)
    domain_classifier = DomainClassifier().to(device)
    feature_extractor.train()
    label_predictor.train()
    domain_classifier.train()

    class_criterion = nn.CrossEntropyLoss()
    domain_criterion = nn.BCEWithLogitsLoss()

    optimizer_F = optim.Adam(feature_extractor.parameters())
    optimizer_C = optim.Adam(label_predictor.parameters())
    optimizer_D = optim.Adam(domain_classifier.parameters())

    # D loss: Domain Classifier的loss
    # F loss: Feature Extrator & Label Predictor的loss
    n_epochs, lamb, marked_epoch = config['num_epoch'], config['lamb'], config['marked_epoch']
    legend = ['train_D_loss', 'train_F_loss', 'train_acc']
    animator = d2l.Animator(xlabel='epoch', xlim=[0, n_epochs], legend=legend)

    for epoch in range(n_epochs):
        running_D_loss, running_F_loss = 0.0, 0.0
        total_hit, total_num = 0.0, 0.0

        for i, ((source_data, source_label), (target_data, _)) in enumerate(zip(source_dataloader, target_dataloader)):
            source_data = source_data.to(device)
            source_label = source_label.to(device)
            target_data = target_data.to(device)

            # 混合source data和target data, 这样batch norm使用的runnning mean/var对这二者都一样
            mixed_data = torch.cat([source_data, target_data], dim=0)
            domain_label = torch.zeros([source_data.shape[0] + target_data.shape[0], 1]).to(device)
            # set domain label of source data to be 1.
            domain_label[:source_data.shape[0]] = 1

            # Step 1 : train domain classifier
            feature = feature_extractor(mixed_data)
            # feature.detach():避免step 1中对feature extractor的反向传播
            domain_logits = domain_classifier(feature.detach())
            loss = domain_criterion(domain_logits, domain_label)
            loss.backward()
            optimizer_D.step()
            running_D_loss += loss.item()

            # Step 2: train feature extractor and label classifier
            class_logits = label_predictor(feature[:source_data.shape[0]])
            domain_logits = domain_classifier(feature) # domain classifier已经更新,再生成一遍domain_logits
            # loss = cross entropy of classification - lamb * domain binary cross entropy.
            loss = class_criterion(class_logits, source_label) - lamb * domain_criterion(domain_logits, domain_label)
            loss.backward()
            optimizer_F.step()
            optimizer_C.step()

            optimizer_D.zero_grad()
            optimizer_F.zero_grad()
            optimizer_C.zero_grad()

            running_F_loss += loss.item()
            total_hit += torch.sum(torch.argmax(class_logits, dim=1) == source_label).item()
            total_num += source_data.shape[0]

        if marked_epoch is not None and epoch in marked_epoch:
            result = []
            with torch.no_grad():
                for test_data, _ in test_dataloader:
                    test_data = test_data.to(device)
                    class_logits = label_predictor(feature_extractor(test_data))
                    x = torch.argmax(class_logits, dim=1).cpu().detach().numpy()
                    result.append(x)

            result = np.concatenate(result)
            # Generate your submission
            df = pd.DataFrame({'id': np.arange(0,len(result)), 'label': result})
            df.to_csv(f'sumission_{epoch+1000}.csv',index=False)

            torch.save(feature_extractor.state_dict(), f'extractor_model_{epoch+1000}.bin')
            torch.save(label_predictor.state_dict(), f'predictor_model_{epoch+1000}.bin')

        train_D_loss = running_D_loss / (i+1)
        train_F_loss = running_F_loss / (i+1)
        train_acc = total_hit / total_num
        print('epoch {:>3d}: train D loss: {:6.4f}, train F loss: {:6.4f}, acc {:6.4f}'.format(epoch, train_D_loss, train_F_loss, train_acc))
        animator.add(epoch, (train_D_loss, train_F_loss, train_acc))

    torch.save(feature_extractor.state_dict(), f'extractor_model.bin')
    torch.save(label_predictor.state_dict(), f'predictor_model.bin')
    torch.save(domain_classifier.state_dict(), f'domain_classifier.bin')
推断
label_predictor = LabelPredictor().to(device)
feature_extractor = FeatureExtractor().to(device)
label_predictor.load_state_dict(torch.load(f'/kaggle/working/predictor_model_799.bin'))
feature_extractor.load_state_dict(torch.load(f'/kaggle/working/extractor_model_799.bin'))
label_predictor.eval()
feature_extractor.eval()

result = []
with torch.no_grad():
    for test_data, _ in test_dataloader:
        test_data = test_data.to(device)
        class_logits = label_predictor(feature_extractor(test_data))
        x = torch.argmax(class_logits, dim=1).cpu().detach().numpy()
        result.append(x)

result = np.concatenate(result)

# Generate your submission
df = pd.DataFrame({'id': np.arange(0,len(result)), 'label': result})
df.to_csv('DaNN_submission.csv',index=False)
可视化
We use t-SNE plot to observe the distribution of extracted features.
import numpy as np
import matplotlib.pyplot as plt
from sklearn import manifold

class Feature():
    def __init__(self):
        self.X = []
        self.TX = []
        self.labels = []

def get_features(model_list):
    features = []
    for model in model_list:
        model.cuda()
        model.eval()
        features.append(Feature())

    for (x, y), (tx, _) in zip(source_dataloader, target_dataloader):
        x , tx= x.cuda(), tx.cuda()
        for i, model in enumerate(model_list):
            features[i].X.append(model(x).detach().cpu())
            features[i].TX.append(model(tx).detach().cpu())
            features[i].labels.append(y)

    for feature in features:
        feature.X = torch.cat(feature.X).numpy()
        feature.TX = torch.cat(feature.TX).numpy()
        feature.labels = torch.cat(feature.labels).numpy()

    return features

def visualization(features):
    for i, feature in enumerate(features):
        data = np.concatenate([feature.X, feature.TX])
        num_source = len(feature.labels)
        X_tsne = manifold.TSNE(n_components=2, init='random', random_state=5, verbose=1).fit_transform(data)
        # Normalization the processed features
        x_min, x_max = X_tsne.min(0), X_tsne.max(0)
        X_norm = (X_tsne - x_min) / (x_max - x_min)

        plt.figure(figsize=(16, 8))
        plt.subplot(121)
        plt.title(f'epoch {marked_epoch[i]}:distribution of features accross different class')
        plt.scatter(X_norm[:num_source, 0], X_norm[:num_source, 1], c=feature.labels, label='source domain')
        plt.subplot(122)
        plt.title(f'epoch {marked_epoch[i]}:distribution of features accross different domain')
        plt.scatter(X_norm[:num_source, 0], X_norm[:num_source, 1], c='b', label='source domain')
        plt.scatter(X_norm[num_source:, 0], X_norm[num_source:, 1], c='r', label='target domain', alpha=0.5)
        plt.legend()
    plt.show()
执行
marked_epoch = config['marked_epoch']
model_list = []
for epoch in marked_epoch:
    model = FeatureExtractor()
    model.load_state_dict(torch.load(f'extractor_model_{epoch}.bin'))
    model_list.append(model)

visualization(get_features(model_list))
解答
lambda = 0.1
config = {
    # training prarameters
    'num_epoch': 1000,             # the number of training epoch
    'lamb': 0.1
}
gap = 100
config['marked_epoch'] = [0] + [gap*i - 1 for i in range(1, config['num_epoch']//gap + 1)]

trainer(source_dataloader, target_dataloader, config)
lambda = 0.7
据李宏毅2022机器学习HW11解析 - 知乎,lamb从0.1变为0.7,提升lamb意味着更注重domain classifier的表现,让source domain和target domain的表现更一致,不过也不能一味的提升,太大会影响label predictor的能力。我训练了800epoch,做出来的得分是0.47
config = {
    # training prarameters
    'num_epoch': 1000,             # the number of training epoch
    'lamb': 0.7
}
gap = 100
config['marked_epoch'] = [0] + [gap*i - 1 for i in range(1, config['num_epoch']//gap + 1)]

trainer(source_dataloader, target_dataloader, config)
adaptive lambda
根据DANN论文,可使用动态调整的lamb值,从0.02动态的调整为1,这样前期可让labelpredictor更准确,后期更注重domainclassifier的表现
....
for epoch in range(n_epochs):
    lamb = np.log(1.02 + 1.7*epoch/n_epochs)
    ....
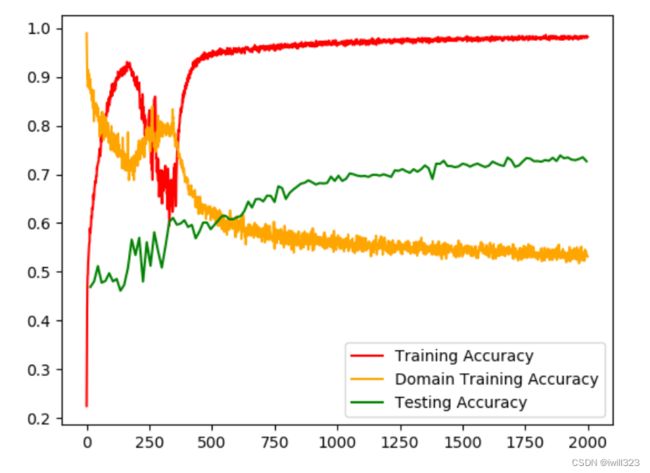
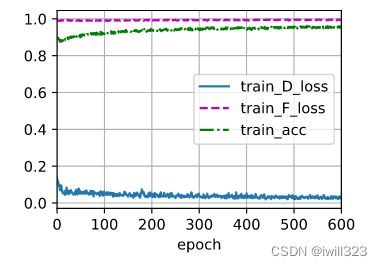
下面是助教PPT给出的训练图,model很快就在training data上过拟合,但是testing accuracy 仍然在改进,所以要多算一些epoch
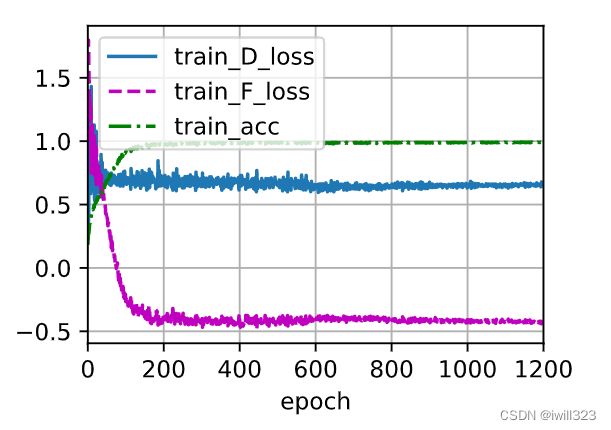
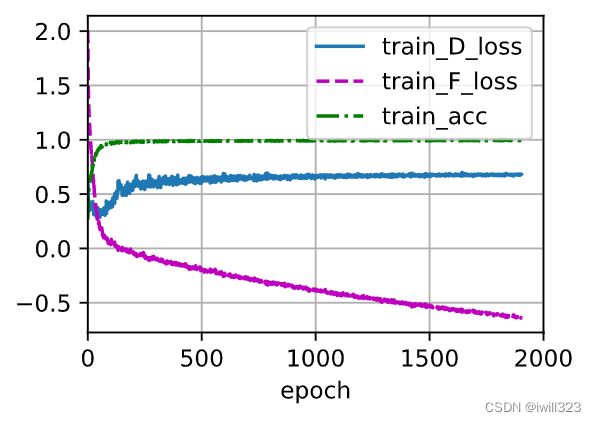
下面是我的训练图
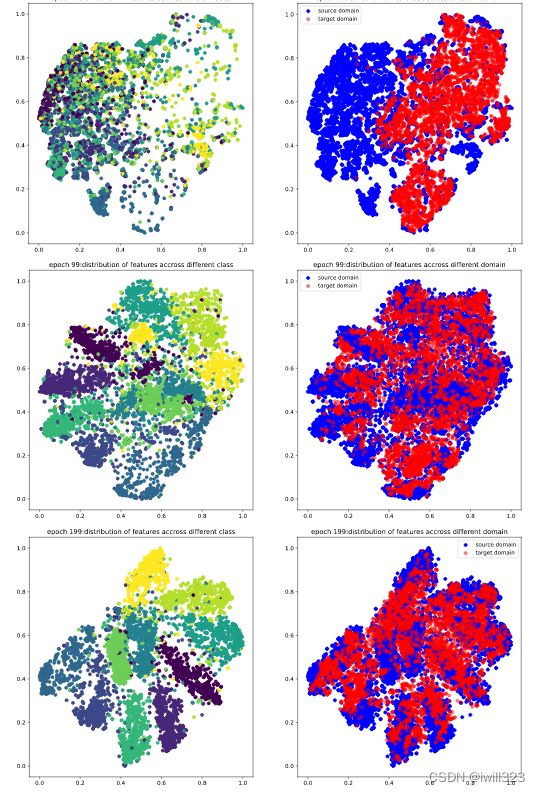
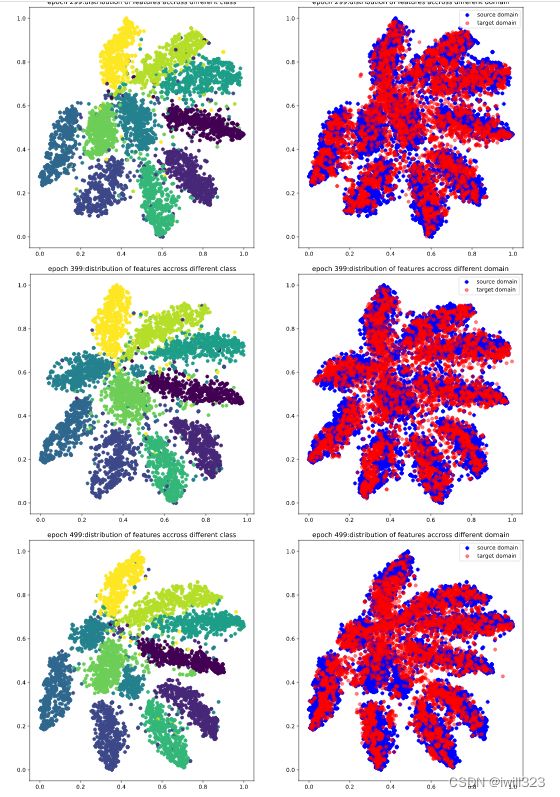
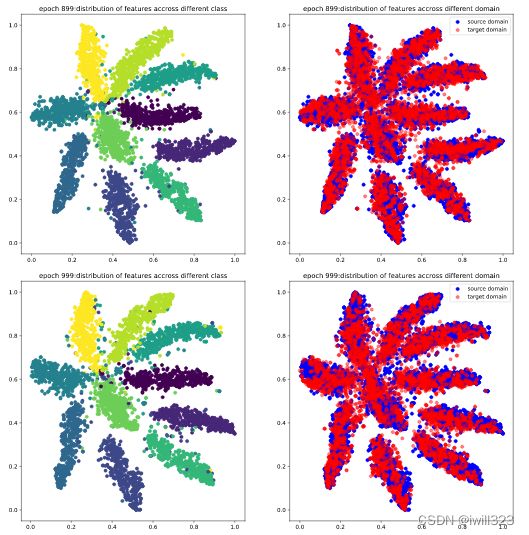
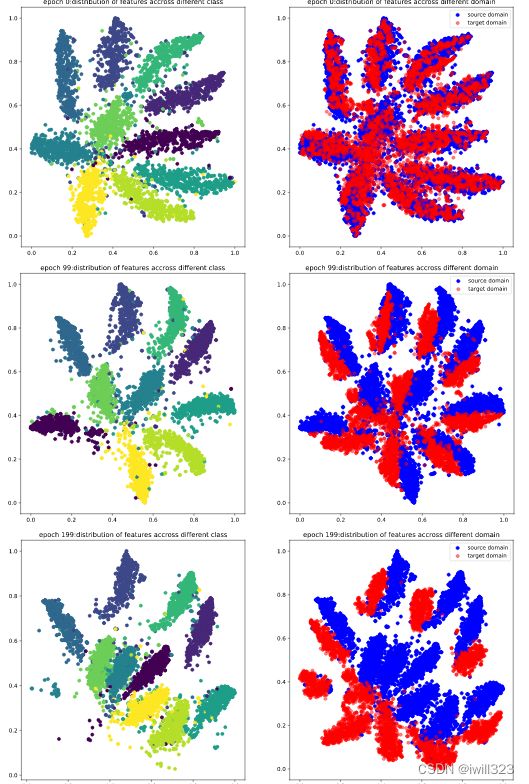
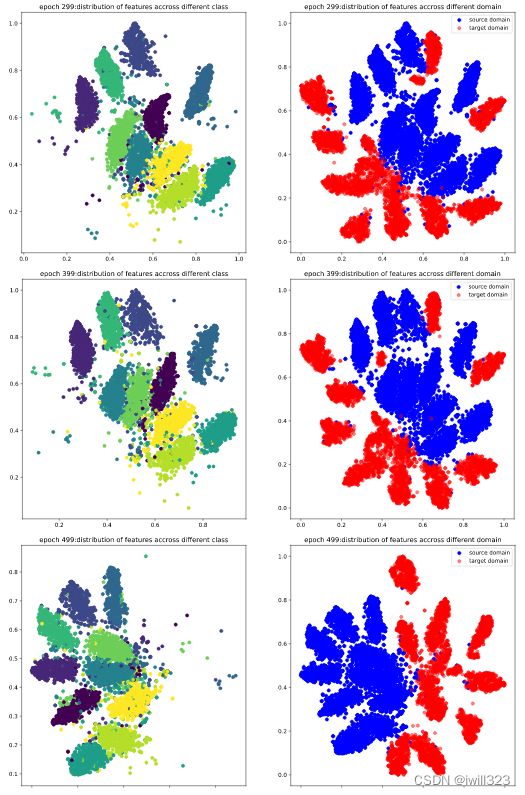
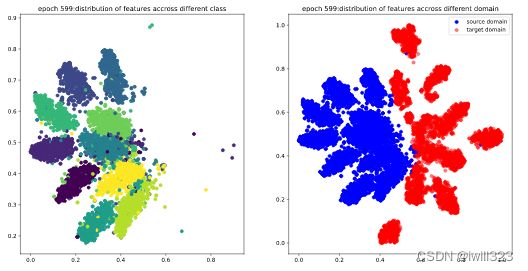
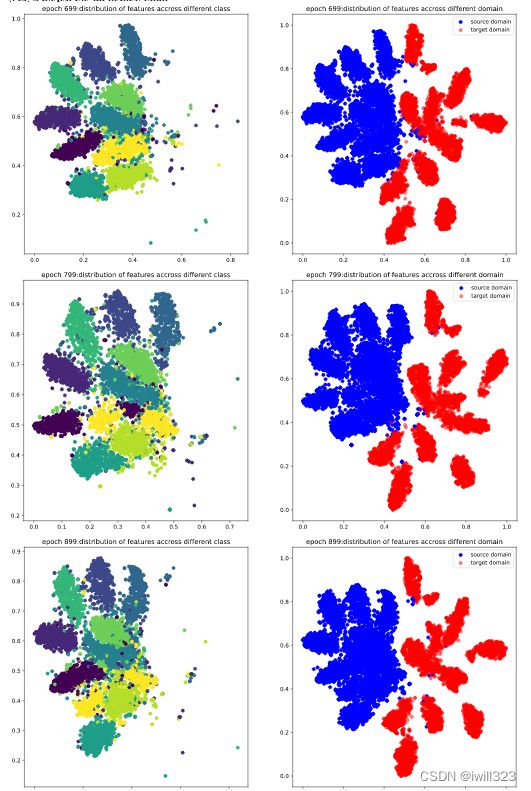
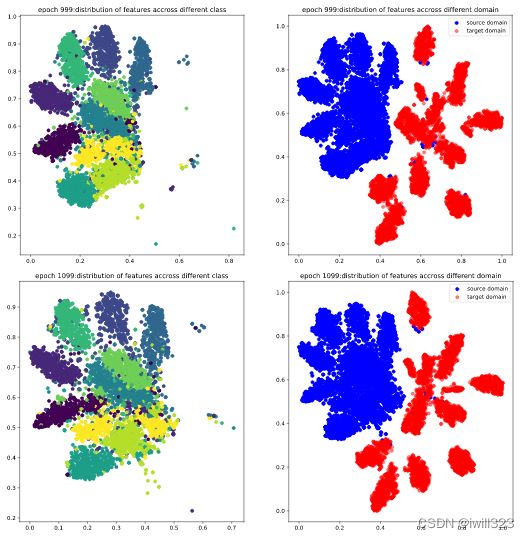
下面是0-999epoch,每隔99个epoch的t-sne图。在这些epoch,将5000张source和target图片,输入到feature_extractor模型,每张图片的输出是一个512维度的图片,然后利用t-sne方法降维到2维,最后画出source图片的不同类别分布图和source target分布对比度。可以看出,在第0个epoch,图较乱,到训练中期,分类已经比较明显,target的分布和source的分布也基本上保持一致,不过边缘仍然比较模糊,最后,分类已经很明显,target和source的分布基本一致了,达到了DANN模型的目的。
得分情况:
| epoch | 得分 | epoch | 得分 |
| 0 | 0.3354 | 599 | 0.7121 |
| 99 | 0.5178 | 699 | 0.7239 |
| 199 | 0.6160 | 799 | 0.7189 |
| 299 | 0.6618 | 899 | 0.7353 |
| 399 | 0.6905 | 999 | 0.7423 |
| 499 | 0.7066 |
在这里多说一句,虽然不知道为什么,也觉得不科学,但是我发现,同样的代码,在不同的平台(kaggle,colab,英伟达3080)上训练效果不一样,比如在kaggle上训练499步,kaggle得分就接近0.7分,但是在colab上训练999步才达到0.7分,在英伟达3080上训练999步还是不超过0.6分,即使多算几次也是如此,不知道为什么,
利用DANN模型生成伪标签
借鉴DIRT的两步训练法
第一步用adversarial的方法训练一个模型,这里直接使用strong baseline得到的模型
第二步是利用上述模型作为teacher网络,对target图片生成伪标签,对target做有监督学习,该方法能充分利用模型的潜在价值。在训练过程中,较慢地更新teacher网络,做法是设计了一个超参数赋值0.9,teacher网络的更新中0.9的权重来自于自己,0.1的权重来自于主干网络。在具体的实现环节,为了保证伪标签的可靠性,设计了一个超参数赋值0.95,所产生的伪标签概率高于该值才被使用。
下面分别是更新 teacher网络和计算target图片预测损失的函数
def new_state(model1, model2, beta=0.9):
    sd1 = model1.state_dict()
    sd2 = model2.state_dict()
    for key in sd2:
        sd2[key] = sd1[key] * (1 - beta) + sd2[key]*beta

    model2.load_state_dict(sd2)
    model2.eval()

ce = nn.CrossEntropyLoss(reduction='none')
def c_loss(logits, t_logits):
    prob, pseudo_label = t_logits.softmax(dim=1).max(dim=1)
    flag = prob > 0.95
    return (flag * ce(logits, pseudo_label)).sum() / (flag.sum() + 1e-8), flag.sum()
下面是训练函数
def trainer(source_dataloader, target_dataloader, config):
    '''
      Args:
        source_dataloader: source data的dataloader
        target_dataloader: target data的dataloader
        lamb: control the balance of domain adaptatoin and classification.
    '''
    feature_extractor = FeatureExtractor().to(device)
    label_predictor = LabelPredictor().to(device)
    feature_extractor.load_state_dict(torch.load(f'/kaggle/working/extractor_model.bin'))
    label_predictor.load_state_dict(torch.load(f'/kaggle/working/predictor_model.bin'))
    feature_extractor.train()
    label_predictor.train()
    class_criterion = nn.CrossEntropyLoss()
    optimizer = optim.Adam(list(feature_extractor.parameters()) + list(label_predictor.parameters()), lr=2e-3)

    # Setting Teacher network
    t_feature_extractor = FeatureExtractor().to(device)
    t_label_predictor = LabelPredictor().to(device)
    t_feature_extractor.load_state_dict(torch.load(f'/kaggle/working/extractor_model.bin'))
    t_label_predictor.load_state_dict(torch.load(f'/kaggle/working/predictor_model.bin'))
    t_feature_extractor.eval()
    t_label_predictor.eval()

    # D loss: Domain Classifier的loss
    # F loss: Feature Extrator & Label Predictor的loss
    n_epochs, lamb, marked_epoch = config['num_epoch'], config['lamb'], config['marked_epoch']
    legend = ['train_loss', 'train_acc', 'used_rate']
    animator = d2l.Animator(xlabel='epoch', xlim=[0, n_epochs], legend=legend)

    for epoch in range(n_epochs):
        running_loss = 0.0
        total_hit, total_num = 0.0, 0.0
        total_t_used, total_t = 0.0, 0.0
        lamb = np.log(1.02 + 1.7*epoch/n_epochs)
        for i, ((source_data, source_label), (target_data, _)) in enumerate(zip(source_dataloader, target_dataloader)):
            source_data = source_data.to(device)
            source_label = source_label.to(device)
            target_data = target_data.to(device)
            mixed_data = torch.cat([source_data, target_data], dim=0)

            class_logits = label_predictor(feature_extractor(mixed_data))
            with torch.no_grad():
                t_class_logits = t_label_predictor(t_feature_extractor(target_data))
            # loss = cross entropy of classification - lamb * domain binary cross entropy.
            #  The reason why using subtraction is similar to generator loss in disciminator of GAN
            loss_s = class_criterion(class_logits[:source_data.shape[0]], source_label) # source_dataloader的数据要预测的准
            loss_t, num = c_loss(class_logits[source_data.shape[0]:], t_class_logits)   # target_dataloader的数据预测要和teacher一样
            loss = loss_s + loss_t
            loss.backward()
            optimizer.step()  # 更新feature_extractor
            optimizer.zero_grad()

            running_loss += loss.item()
            total_t_used += num.item()
            total_t += target_data.shape[0]
            total_hit += torch.sum(torch.argmax(class_logits[:source_data.shape[0]], dim=1) == source_label).item()
            total_num += source_data.shape[0]

        if marked_epoch is not None and epoch in marked_epoch:
            result = []
            with torch.no_grad():
                for test_data, _ in test_dataloader:
                    test_data = test_data.to(device)
                    class_logits = label_predictor(feature_extractor(test_data))
                    x = torch.argmax(class_logits, dim=1).cpu().detach().numpy()
                    result.append(x)

            result = np.concatenate(result)
            # Generate your submission
            df = pd.DataFrame({'id': np.arange(0,len(result)), 'label': result})
            df.to_csv(f'sumission_{epoch+600}.csv',index=False)

            torch.save(feature_extractor.state_dict(), f'extractor_model_{epoch+600}.bin')
            torch.save(label_predictor.state_dict(), f'predictor_model_{epoch+600}.bin')

        new_state(feature_extractor, t_feature_extractor)  # 更新teacher网络
        new_state(label_predictor, t_label_predictor)      # 更新teacher网络
        train_loss = running_loss / (i+1)
        train_acc = total_hit / total_num
        used_rate = total_t_used / total_t
        print('epoch {:>3d}: train D loss: {:6.4f}, train F loss: {:6.4f}, acc {:6.4f}'.format(epoch, train_loss, train_acc, used_rate))
        animator.add(epoch, (train_loss, train_acc, used_rate))

    torch.save(feature_extractor.state_dict(), f'extractor_model.bin')
torch.save(label_predictor.state_dict(), f'predictor_model.bin')下面是0-1099epoch,每隔99个epoch的t-sne图。第0个epoch和strong baseline最后的效果差不多,这跟我们网络的初始参数来自于strong baseline相呼应。第99个epoch,图形变动较大,source和target有了明显的区分,得分跃升。source和target的分布不同是因为二者来自不同的domain,即使同属一个类,他们的feature也会有所区分
得分情况:
| epoch | 得分 | epoch | 得分 |
| 0 | 0.7369 | 599 | 0.7886 |
| 99 | 0.7653 | 699 | 0.7881 |
| 199 | 0.7778 | 799 | 0.7870 |
| 299 | 0.7787 | 899 | 0.7866 |
| 399 | 0.7759 | 999 | 0.7858 |
| 499 | 0.7871 | 1099 | 0.7879 |

