循环神经网络RNN和长短期记忆网络LSTM学习笔记
文章目录
- 一、RNN
- 二、LSTM
-
- 2.1 LSTM结构介绍
- 2.2 LSTM的pytorch代码解析
- 2.3 LSTM实现MINST手写数字数据集图像分类
一、RNN
首先思考一个问题,为什么需要RNN?
神经网络只能处理孤立的的输入,每一个输入之间是没有关系的。但是,某些任务需要能够更好的处理序列的信息,即前面的输入和后面的输入是有关系的,例如音频、视频、句子等。
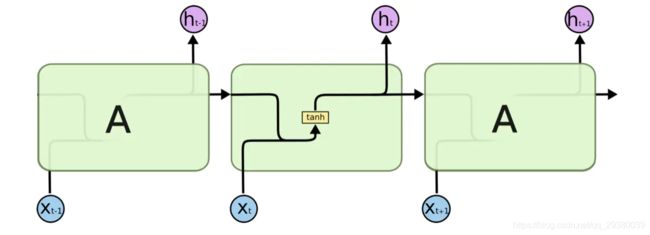
RNN较神经网络的不同是它将上一时刻的输出作为输入一起传入网络中,从而将输入联系起来。


序列依次进入网络中,之前进入序列的数据会保存信息而对后面的数据产生影响。图中X0X1…Xn不是同一时刻输入网络的,图中代表的是时间维度,实际上整个网络只有一个A单元,例如t=0时输入X0,t=1时输入X1。
- 网络的输入:X0,X1,…,Xt
- 网络的输出:h0,h1,…,ht,RNN的输出比较多样,可只将最后的ht作为输出,也可将h0到ht都作为输出。(Xt,ht都是代表向量Tensor,不是数值)
网络输出可选ht作为输出后接全连接层和softmax层将维度转化为需要的分类数从而实现序列的分类。
但是这种简易的RNN结构有两个致命缺点。
- 越前面的数据进入序列的时间越早,所以对后面的数据的影响也就越弱,倘若重点在序列的前边,当最后输出结果时前边重点对结果的影响已经接近于0,无法得到理想的结果。(可通过注意力机制改善)
- 由于网络只有一个A单元,网络的更新过程不过是不停地更新同一套权重,从结果往前进行反向传播时,梯度会出现两个结果,当梯度小于1时,多个小于1的梯度相乘,传到前边时梯度已经接近于0,发生梯度消失现象,当梯度大于1时,多个大于1的梯度相乘,传到前方时发生梯度爆炸现象。(通过LSTM结构改善)
二、LSTM
2.1 LSTM结构介绍

LSTM(Long Short-Term Memory)长短期网络模型,它解决了RNN会遗忘序列前段信息的问题。
网络外部结构与RNN相同,同样是只有一个A单元,但A的内部有所不同。
- LSTM输入为x和上一个时刻的h和c,输出为该时刻的h和c。
- A单元内包括三条支路,分别为遗忘门,输入门和输出门。可以将输出c和h比作剧情的主线和支线,从图中可以看出c是从头到尾贯穿的,在上一时刻的h和该时刻的x输入之后,先经过遗忘门,比较重要程度来看是否要遗忘c的部分内容,之后经过输入门,根据重要程度看是否要将支线剧情添加至主线,最后经过输出门获得现在的状态。
2.2 LSTM的pytorch代码解析
CLASS torch.nn.LSTM(*args, **kwargs)
参数列表
input_size– 输入数据X的向量维度。hidden_size– 隐含数据h的向量维度。num_layers– LSTM 堆叠的层数,默认值是1层,每一层都只有一个A单元。如果设置为2,第二个LSTM接收第一个LSTM的计算结果。也就是第一层输入 [ X0 X1 X2 … Xt],计算出 [ h0 h1 h2 … ht ],第二层将 [ h0 h1 h2 … ht ] 作为 [ X0 X1 X2 … Xt] 输入再次计算,输出最后的 [ h0 h1 h2 … ht ]。bias– 若设置为False,网络就不带偏置,只有权重。默认为True。batch_first– 设为True, 则输入和输出格式为(batch, seq, feature),因为输入输出格式默认为(seq, batch, feature)。dropout– 若不为0,在除了最后一层外的单元添加dropout层,drop概率为传入的不为0的数。bidirectional– 如果为真,则为双向LSTM。
输入格式
Inputs: input, (h_0, c_0)input输入数据 形状(序列长度,batchsize,输入向量维度) (seq_len, batch, input_size)h_0形状 (num_layers * num_directions, batch, hidden_size)c_0形状(num_layers * num_directions, batch, hidden_size)
若h0和c0为提供,则默认为元素为0的向量。若batch_first则batch为首个参数。num_directions默认为1,双向时为2。
输出格式
output, (h_n, c_n)outputof shape (seq_len, batch, num_directions * hidden_size) 最后一层的hn(多层情况,一层时即为所有hn)h_nof shape (num_layers * num_directions, batch, hidden_size) 包含所有层的hnc_nof shape (num_layers * num_directions, batch, hidden_size) 包含所有层的cn
2.3 LSTM实现MINST手写数字数据集图像分类
引用库文件
import torch
from torch import nn, optim
from torch.utils.data import DataLoader
from torchvision import datasets
from torchvision import transforms as T
import matplotlib.pyplot as plt
超参设置
batch_size = 100   # 批量大小
lr = 1e-3          # 学习率
num_epoches = 30   # 训练迭代周期
use_gpu = torch.cuda.is_available()  # 是否使用cpu
MINST数据集导入
train_dataset = datasets.MNIST(root='G:/dl_dataset/',train=True,transform=T.ToTensor())
test_dataset = datasets.MNIST(root='G:/dl_dataset/',train=False,transform=T.ToTensor())
train_loader = DataLoader(train_dataset,batch_size=batch_size,shuffle=True)
test_loader = DataLoader(test_dataset,batch_size=batch_size,shuffle=False)
定义LSTM结构
要使用的LSTM参数分析。
将图像的每一行作为一个X输入LSTM,所以每张图片都包含一个X0-X27,每个X是28维向量。
定义 input_size=28,hidden_size=128,num_layers = 2,batch_first=True。
class RNN(nn.Module):
    def __init__(self, in_dim, hidden_dim, n_layer, n_class):
        super(RNN, self).__init__()
        self.lstm = nn.LSTM(in_dim, hidden_dim, n_layer, batch_first=True)
        self.classifer = nn.Linear(hidden_dim, n_class)

    def forward(self,x):
        out ,_ = self.lstm(x)   # 输出为output(batch,seq_len,  hidden_size * num_directions)
        out = out[:,-1,:]        # seq=-1,即取每张图片数据的最后一个h,即hn
        out = self.classifer(out) # hn后接全连接层,使用softmax损失函数
        return out                # 返回最后的输出
model = RNN(28,128,2,10)
# in_dim=28(每个X为图片的一行,维度为28), hidden_dim=128(hn的维度), n_layer=2(LSTM层数为两层), n_class(最后的分类数)
if use_gpu:
    model = model.cuda()  # 把模型放到gpu上
定义损失函数和优化器
criterion = nn.CrossEntropyLoss()
optimizer = optim.Adam(model.parameters(),lr=lr)
训练和测试过程
for epoch in range(num_epoches):
    print('*'*20)
    print("epoch{}".format(epoch+1))
    train_loss = 0.0          # 训练损失函数计算
    train_acc = 0.0           # 训练准确度计算

    model.train()  # 置模型于训练模式
    for i, data in enumerate(train_loader):  # 一次循环读入一个batch
        img, label = data           # 读入图像张量和标签张量
        b, c, h, w = img.size()     # MINST为黑白单通道图片
        assert c == 1
        img = img.squeeze(1)  # size b h w  去除通道维度
        if use_gpu:
            img, label = img.cuda(), label.cuda()   # 放入gpu
        out = model(img)  # input(batch,seq_len,in_dim) # 输入图像进行前向传播,输出各分类的得分
        loss = criterion(out,label)   # 计算损失函数
        train_loss += loss.item()     # 记录总的损失函数
        _,pred = torch.max(out,1)     # 返回得分最大值的索引,dim=0为batch,dim=1为每个图片的分类得分
        num_correct = (pred == label).sum()  # 计算得分最大值索引与label相同的个数
        train_acc += num_correct.item()    # 计算正确总个数

        optimizer.zero_grad()     # 梯度清零
        loss.backward()           # 梯度反向传播
        optimizer.step()          # 优化器前进step
    # 完成一个epoch的训练,打印训练的loss和acc
    print('Finish {} epoch, Loss: {:.6f}, Acc: {:.6f}'.format(
        epoch + 1, train_loss / (len(train_dataset)), train_acc / (len(
            train_dataset))))

    model.eval()  # 置模型于测试模式,使dropout和bn失去作用
    eval_loss = 0.0  # 测试模式损失记录
    eval_acc = 0.0   # 测试模式准确率记录
    for data in test_loader:  一次循环读入一个batch
        img, label = data
        b, c, h, w = img.size()
        assert c == 1, 'channel must be 1'
        img = img.squeeze(1)
        if use_gpu:
            img, label = img.cuda(), label.cuda()
        with torch.no_grad():        # 测试模式无需梯度
            out = model(img)
            loss = criterion(out, label)
        eval_loss += loss.item()
        _, pred = torch.max(out, 1)
        num_correct = (pred == label).sum()
        eval_acc += num_correct.item()
    print('Test Loss: {:.6f}, Acc: {:.6f}'.format(eval_loss / (len(
        test_dataset)), eval_acc / (len(test_dataset))))
训练30个周期在测试集达到99.08%准确率。
********************
epoch30
Finish 30 epoch, Loss: 0.000106, Acc: 0.996667
Test Loss: 0.000364, Acc: 0.990800
保存模型
torch.save(model.state_dict(),'./RNN.pth')
最终性能测试
model.load_state_dict(torch.load('./RNN.pth'))
print('Final Test')
model.eval()
eval_loss = 0.0
eval_acc = 0.0
for data in test_loader:
    img, label = data
    b, c, h, w = img.size()
    assert c == 1, 'channel must be 1'
    img = img.squeeze(1)
    if use_gpu:
        img, label = img.cuda(), label.cuda()
    with torch.no_grad():
        out = model(img)
        loss = criterion(out, label)
    eval_loss += loss.item()
    _,pred = torch.max(out,1)
    eval_acc += ( pred==label ).float().mean()
print(f'Test Loss: {eval_loss/len(test_loader):.6f}, Acc: {eval_acc/len(test_loader):.6f}')
提取一个实例进行直观认识
imgs,labels = next(iter(test_loader)) # 提取一个batch
img = imgs[0]  # 取一张图片
show = img
show = show.view(28,28)
# img = img.view(img.size(0),-1)
plt.imshow(show.numpy(), cmap='Greys_r')  # 显示该图片
img = img.cuda()
label = labels[0].cuda()  # 图片和标签放入gpu
output = model(img)       # 前向传播
print(label,output,sep='\n')  # 打印各分类得分和标签
pred = torch.squeeze(torch.max(output,dim=1)[1],dim=0)  #squeeze降维,max找到得分最大的索引
print(label,pred,sep='\n') # 对比预测值和真实标签
tensor(7, device='cuda:0')   # label
tensor([[-2.8946, -2.8025,  0.2505, -0.9841,  1.3492, -3.3886, -6.0807, 13.3174,
         -3.3386,  1.1477]], device='cuda:0', grad_fn=<AddmmBackward>)  # output
tensor(7, device='cuda:0')   # label
tensor(7, device='cuda:0')   # 预测标签
