使用YOLOX进行物体检测
文章目录
- 前言
- 一、源码
- 二、安装依赖包
-
- 1.运行安装脚本
- 2.安装成功显示如下信息
- 三、安装apex
-
- 1.安装报错
-
- 解决方法
- 2.安装报错
-
- 解决 方法1
- 解决方法2
- 四、安装pycocotools
- 五、验证环境
-
- 检测结果:看到下图说明环境没有问题了
- 六、数据集
- 七、修改配置
-
- 1、 修改类别个数
- 2、修改类别
- 3、修改数据集目录
- 参考链接
前言
YOLOX 是旷视开源的高性能检测器。旷视的研究者将解耦头、数据增强、无锚点以及标签分类等目标检测领域的优秀进展与 YOLO 进行了巧妙的集成组合,提出了 YOLOX,不仅实现了超越 YOLOv3、YOLOv4 和 YOLOv5 的 AP,而且取得了极具竞争力的推理速度。
其中YOLOX-L版本以 68.9 FPS 的速度在 COCO 上实现了 50.0% AP,比 YOLOv5-L 高出 1.8% AP!还提供了支持 ONNX、TensorRT、NCNN 和 Openvino 的部署版本,本文将详细介绍如何使用 YOLOX进行物体检测。
一、源码
GitHub地址:https://github.com/Megvii-BaseDetection/YOLOX
(base) omg@omg:~/work/code/deep_learn$ git clone https://github.com/Megvii-BaseDetection/YOLOX.git
可以用PyCharm打开。
二、安装依赖包
1.运行安装脚本
(base) omg@omg:~/work/code/deep_learn/YOLOX$ python setup.py install
2.安装成功显示如下信息
......
......
Using /home/omg/anaconda3/lib/python3.9/site-packages
Searching for wheel==0.37.0
Best match: wheel 0.37.0
Adding wheel 0.37.0 to easy-install.pth file
Installing wheel script to /home/omg/anaconda3/bin

Using /home/omg/anaconda3/lib/python3.9/site-packages
Finished processing dependencies for yolox==0.3.0
三、安装apex
APEX是英伟达开源的,完美支持PyTorch框架,用于改变数据格式来减小模型显存占用的工具。其中最有价值的是amp(Automatic Mixed Precision),将模型的大部分操作都用Float16数据类型测试,一些特别操作仍然使用Float32。并且用户仅仅通过三行代码即可完美将自己的训练代码迁移到该模型。实验证明,使用Float16作为大部分操作的数据类型,并没有降低参数,在一些实验中,反而由于可以增大Batch size,带来精度上的提升,以及训练速度上的提升。
(base) omg@omg:~/work/code/deep_learn$ git clone https://github.com/NVIDIA/apex.git
1.安装报错
Processing /home/zhaoyq6/work/code/deep_learn/apex
Running command python setup.py egg_info
Traceback (most recent call last):
File "" , line 2, in <module>
File "" , line 34, in <module>
File "/home/zhaoyq6/work/code/deep_learn/apex/setup.py", line 137, in <module>
_, bare_metal_version = get_cuda_bare_metal_version(CUDA_HOME)
File "/home/zhaoyq6/work/code/deep_learn/apex/setup.py", line 17, in get_cuda_bare_metal_version
raw_output = subprocess.check_output([cuda_dir + "/bin/nvcc", "-V"], universal_newlines=True)
File "/home/zhaoyq6/anaconda3/lib/python3.9/subprocess.py", line 424, in check_output
return run(*popenargs, stdout=PIPE, timeout=timeout, check=True,
File "/home/zhaoyq6/anaconda3/lib/python3.9/subprocess.py", line 505, in run
with Popen(*popenargs, **kwargs) as process:
File "/home/zhaoyq6/anaconda3/lib/python3.9/subprocess.py", line 951, in __init__
self._execute_child(args, executable, preexec_fn, close_fds,
File "/home/zhaoyq6/anaconda3/lib/python3.9/subprocess.py", line 1821, in _execute_child
raise child_exception_type(errno_num, err_msg, err_filename)
FileNotFoundError: [Errno 2] No such file or directory: ':/usr/local/cuda/bin/nvcc'
torch.__version__ = 1.13.0+cu117
error: subprocess-exited-with-error
× python setup.py egg_info did not run successfully.
│ exit code: 1
╰─> See above for output.
解决方法
(base) omg@omg:~/work/code/deep_learn/apex$ export CUDA_HOME=/usr/local/cuda
(base) omg@omg:~/work/code/deep_learn/apex$ pip install -v --disable-pip-version-check --no-cache-dir --global-option="--cpp_ext" --global-option="--cuda_ext" ./
2.安装报错
Installing collected packages: apex
DEPRECATION: apex is being installed using the legacy 'setup.py install' method, because the '--no-binary' option was enabled for it and this currently disables local wheel building for projects that don't have a 'pyproject.toml' file. pip 23.1 will enforce this behaviour change. A possible replacement is to enable the '--use-pep517' option. Discussion can be found at https://github.com/pypa/pip/issues/11451
Running command Running setup.py install for apex
torch.__version__ = 1.13.0+cu117
Compiling cuda extensions with
nvcc: NVIDIA (R) Cuda compiler driver
Copyright (c) 2005-2021 NVIDIA Corporation
Built on Fri_Dec_17_18:16:03_PST_2021
Cuda compilation tools, release 11.6, V11.6.55
Build cuda_11.6.r11.6/compiler.30794723_0
from /usr/local/cuda/bin
Traceback (most recent call last):
File "" , line 2, in <module>
File "" , line 34, in <module>
File "/home/zhaoyq6/work/code/deep_learn/apex/setup.py", line 178, in <module>
check_cuda_torch_binary_vs_bare_metal(CUDA_HOME)
File "/home/zhaoyq6/work/code/deep_learn/apex/setup.py", line 33, in check_cuda_torch_binary_vs_bare_metal
raise RuntimeError(
RuntimeError: Cuda extensions are being compiled with a version of Cuda that does not match the version used to compile Pytorch binaries. Pytorch binaries were compiled with Cuda 11.7.
In some cases, a minor-version mismatch will not cause later errors: https://github.com/NVIDIA/apex/pull/323#discussion_r287021798. You can try commenting out this check (at your own risk).
error: subprocess-exited-with-error
× Running setup.py install for apex did not run successfully.
│ exit code: 1
╰─> See above for output.
解决 方法1
安装匹配CUDA的版本
(base) omg@omg:~/work/code/deep_learn/apex$ conda install pytorch==1.12.1 torchvision==0.13.1 torchaudio==0.12.1 -c pytorch
解决方法2
通过测试发现,如果cuda跟pytorch的版本不对应,apex直接不带–global-option安装好像也能用。
四、安装pycocotools
略…
五、验证环境
下载预训练模型,本文选用的是YOLOX-s,
下载地址:https://github.com/Megvii-BaseDetection/YOLOX/releases/download/0.1.1rc0/yolox_s.pth
下载完成后,将预训练模型放到工程的根目录:
(base) omg@omg:~/work/code/deep_learn/YOLOX$ python tools/demo.py image -n yolox-s -c yolox_s.pth --path assets/dog.jpg --conf 0.25 --nms 0.45 --tsize 640 --save_result --device gpu
2022-12-05 14:04:38.871 | INFO     | __main__:main:259 - Args: Namespace(demo='image', experiment_name='yolox_s', name='yolox-s', path='assets/dog.jpg', camid=0, save_result=True, exp_file=None, ckpt='yolox_s.pth', device='gpu', conf=0.25, nms=0.45, tsize=640, fp16=False, legacy=False, fuse=False, trt=False)
2022-12-05 14:04:46.267 | INFO     | __main__:main:269 - Model Summary: Params: 8.97M, Gflops: 26.93
2022-12-05 14:05:00.505 | INFO     | __main__:main:282 - loading checkpoint
2022-12-05 14:05:00.681 | INFO     | __main__:main:286 - loaded checkpoint done.
2022-12-05 14:05:33.607 | INFO     | __main__:inference:165 - Infer time: 32.2062s
2022-12-05 14:05:33.718 | INFO     | __main__:image_demo:202 - Saving detection result in ./YOLOX_outputs/yolox_s/vis_res/2022_12_05_14_05_00/dog.jpg
检测结果:看到下图说明环境没有问题了
六、数据集
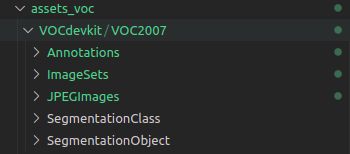
数据集我们采用VOC数据集,原始数据集是Labelme标注的数据集。
下载地址:
wget http://host.robots.ox.ac.uk/pascal/VOC/voc2007/VOCtrainval_06-Nov-2007.tar
wget http://host.robots.ox.ac.uk/pascal/VOC/voc2007/VOCtest_06-Nov-2007.tar
wget http://host.robots.ox.ac.uk/pascal/VOC/voc2007/VOCdevkit_08-Jun-2007.tar
wget https://pjreddie.com/media/files/VOCtrainval_11-May-2012.tar
wget http://pjreddie.com/media/files/VOC2012test.tar

关于VOC数据集的介绍,参考:
https://blog.csdn.net/qiqisunshine/article/details/126399423
https://blog.csdn.net/xiaotudui/article/details/122163725
七、修改配置
修改数据配置文件
1、 修改类别个数
文件路径:exps/example/yolox_voc/yolox_voc_s.py,本次使用的类别有20类,所以将num_classes修改为20。
class Exp(MyExp):
    def __init__(self):
        super(Exp, self).__init__()
        self.num_classes = 20
        self.depth = 0.33
        self.width = 0.50
        self.warmup_epochs = 1

        # ---------- transform config ------------ #
        self.mosaic_prob = 1.0
        self.mixup_prob = 1.0
        self.hsv_prob = 1.0
        self.flip_prob = 0.5

        self.exp_name = os.path.split(os.path.realpath(__file__))[1].split(".")[0]
2、修改类别
打开yolox/data/datasets/voc_classes.py文件,修改为自己的类别名:
# VOC_CLASSES = ( '__background__', # always index 0
VOC_CLASSES = (
    "aeroplane",
    "bicycle",
    "bird",
    "boat",
    "bottle",
    "bus",
    "car",
    "cat",
    "chair",
    "cow",
    "diningtable",
    "dog",
    "horse",
    "motorbike",
    "person",
    "pottedplant",
    "sheep",
    "sofa",
    "train",
    "tvmonitor",
)
3、修改数据集目录
文件路径:exps/example/yolox_voc/yolox_voc_s.py,data_dir修改为“./data/VOCdevkit”,image_sets删除2012的,最终结果如下:
    def get_eval_loader(self, batch_size, is_distributed, testdev=False, legacy=False):
        from yolox.data import VOCDetection, ValTransform

        valdataset = VOCDetection(
            data_dir=os.path.join(get_yolox_datadir(), "VOCdevkit"),
            image_sets=[('2007', 'test')],
            img_size=self.test_size,
            preproc=ValTransform(legacy=legacy),
        )
参考链接
https://view.inews.qq.com/a/20210919A03ZZK00
https://blog.csdn.net/qq_48480265/article/details/126028230

