如何使用树莓派制作避障机器人
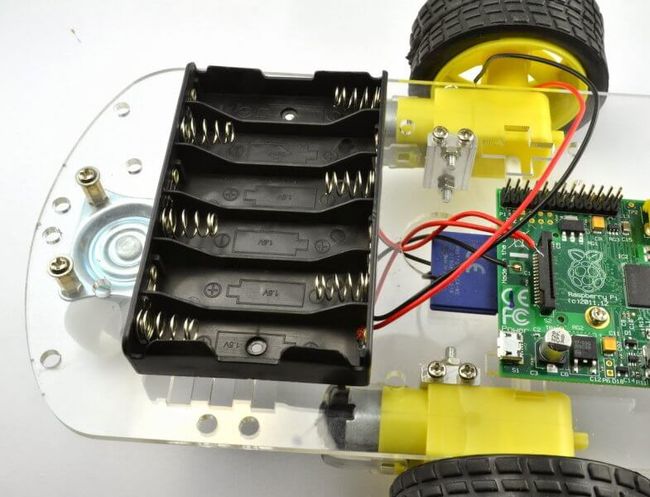
学习Arduino或者树莓派的过程中,如果仅仅看代码或者做简单实验,那么常常会虎头蛇尾,所以我们建议还是尝试一些简单的机器人项目,这样既有趣也能不断学习提高。本文将向大家展示如何使用树莓派制作简单的避障机器人。
树莓派避障机器人各功能组件
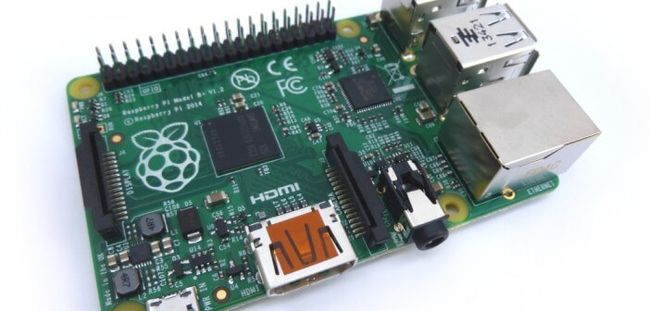
众所周知,树莓派可以通过GPIO 接口、USB接口、以太网接口、HDMI接口、LCD和摄像头接口与诸多的外设进行通信。这个项目中我们使用的是Raspberry Pi 3B,3B有一个64位的ARMv7四核处理器,内存为1GB,还内置了Wi-Fi和蓝牙。详情可阅读: 树莓派3的外围I/O数据接口
项目中采用HC-SR04超声波测距模块作为避障探头,HC-SR04超声波测距模块具有2cm-400cm非接触式测量范围,测距精度可达3mm。模块包含了超声波发射器、接收器和控制电路。HC-SR04的介绍以前做过一些,可查阅: HC-SR04超声波测距模块的测试和 树莓派3 超声波测距代码这两篇文章。
同时,项目中还用到了GP2Y0A21红外传感器,它通过发射和检测红外辐射来感知周围环境的某些特征。红外传感器能够测量物体发出的热量并探测运动。它的距离测量范围是10cm~80cm。关于红外线传感器模块,可查阅: 夏普GP2Y0A21红外测距传感器接口定义
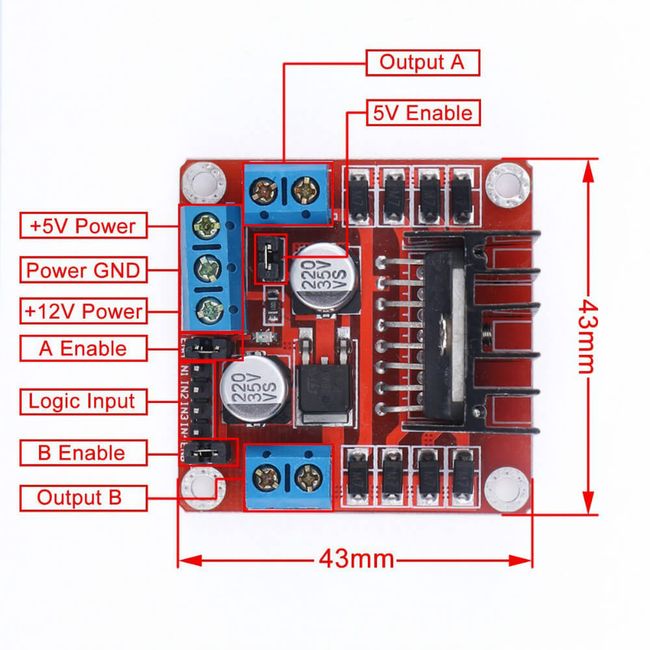
避障机器人的动力驱动,我们采用了L298N电机驱动模块,L298N驱动模块可以控制直流电机正转和反转,一块L298N驱动模块可以同时控制两个直流电机。L298N电机驱动模块接收来自树莓派的控制信号,并将信号传送给电动机,以此来控制电机的运动。关于L298N的接口定义,可阅读: 电机驱动板L298N的接口定义
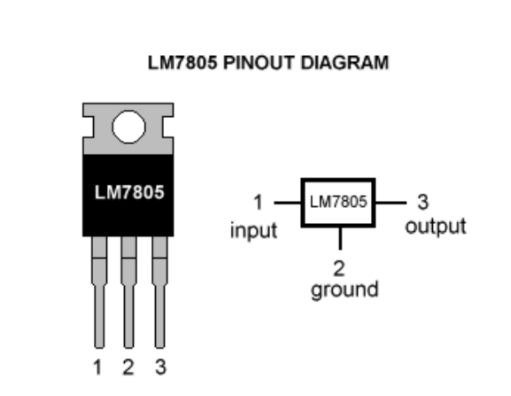
其次,项目中还会用到电压调节器IC LM7805 ,它的作用是保持输出电压在一个恒定值。78xx系列IC中的xx表示它可以提供的稳定输出电压。如7805 IC可提供+5伏的稳定电压。下图是LM7805稳压IC的针脚定义图
项目中,避障机器人采用两个200 rpm的12v直流减速电机作为动力源。
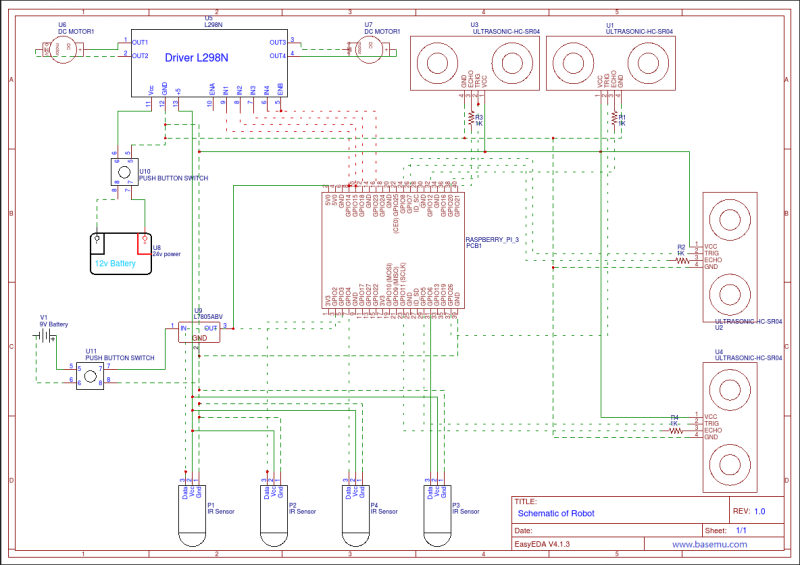
避障机器人的电路图
在电路图中,实线表示电源线Vcc,长虚线表示接地线GND,短虚线表示控制信号线。
避障机器人的Python代码
手动控制代码
import curses

import RPi.GPIO as GPIO

class MotorControler(object):

def __init__(self, parent=None):

self._data = {'name': 'MOTOR', 'delay': 0.01, 'LD': 3, 'LU': 5, 'RD': 7, 'RU': 8}

self.init_pin()

def init_pin(self):

self.GPIO_LD_PIN = self._data.get('LD', -1)

self.GPIO_LU_PIN = self._data.get('LU', -1)

self.GPIO_RD_PIN = self._data.get('RD', -1)

self.GPIO_RU_PIN = self._data.get('RU', -1)

if self.GPIO_LD_PIN == -1 or self.GPIO_LU_PIN == -1 or self.GPIO_RD_PIN == -1 or self.GPIO_RU_PIN == -1:

print('message', 'FATAL ERROR : INVALID PIN ENCOUNTER # ' + str(self.GPIO_LD_PIN) + ', ' + + str(

self.GPIO_LU_PIN) + ', ' + + str(self.GPIO_RD_PIN) + ', ' + + str(self.GPIO_RU_PIN))

# pin setup

# set GPIO numbering mode and define output pins

GPIO.setup(self.GPIO_LD_PIN, GPIO.OUT)

GPIO.setup(self.GPIO_LU_PIN, GPIO.OUT)

GPIO.setup(self.GPIO_RD_PIN, GPIO.OUT)

GPIO.setup(self.GPIO_RU_PIN, GPIO.OUT)

time.sleep(0.5) # warmup time

self.stop()

def stop(self):

GPIO.output(self.GPIO_LD_PIN, False)

GPIO.output(self.GPIO_LU_PIN, False)

GPIO.output(self.GPIO_RD_PIN, False)

GPIO.output(self.GPIO_RU_PIN, False)

def step_forward(self):

GPIO.output(self.GPIO_LD_PIN, False)

GPIO.output(self.GPIO_LU_PIN, True)

GPIO.output(self.GPIO_RD_PIN, False)

GPIO.output(self.GPIO_RU_PIN, True)

print('Move Forward')

def step_backward(self):

GPIO.output(self.GPIO_LD_PIN, True)

GPIO.output(self.GPIO_LU_PIN, False)

GPIO.output(self.GPIO_RD_PIN, True)

GPIO.output(self.GPIO_RU_PIN, False)

print('Move Backward')

def step_right(self):

GPIO.output(self.GPIO_LD_PIN, True)

GPIO.output(self.GPIO_LU_PIN, False)

GPIO.output(self.GPIO_RD_PIN, False)

GPIO.output(self.GPIO_RU_PIN, True)

print('Move Right')

def step_left(self):

GPIO.output(self.GPIO_LD_PIN, False)

GPIO.output(self.GPIO_LU_PIN, True)

GPIO.output(self.GPIO_RD_PIN, True)

GPIO.output(self.GPIO_RU_PIN, False)

print('Move Left')

def move_forward(self, count=15):

for i in range(count):

self.step_forward()

self.stop()

def move_backward(self, count=15):

for i in range(count):

self.step_backward()

self.stop()

def move_right(self, count=15):

for i in range(count):

self.step_right()

self.stop()

def move_left(self, count=15):

for i in range(count):

self.step_left()

self.stop()

#set GPIO numbering mode and define output pins

GPIO.setmode(GPIO.BOARD)

# Get the curses window, turn off echoing of keyboard to screen, turn on

# instant (no waiting) key response, and use special values for cursor keys

screen = curses.initscr()

curses.noecho()

curses.cbreak()

screen.keypad(True)

motor = MotorControler()

try:

while True:

char = screen.getch()

if char == ord('q'):

break

elif char == curses.KEY_UP:

motor.move_forward(count=15)

elif char == curses.KEY_DOWN:

motor.move_backward(count=15)

elif char == curses.KEY_RIGHT:

motor.move_right(count=15)

elif char == curses.KEY_LEFT:

motor.move_left(count=15)

elif char == 10:

motor.stop()

finally:

#Close down curses properly, inc turn echo back on!

curses.nocbreak(); screen.keypad(0); curses.echo()

curses.endwin()

GPIO.cleanup()

自动控制代码
import RPi.GPIO as GPIO import time import numpy as np

GPIO.setmode(GPIO.BOARD) GPIO.setwarnings(False)

class MotorControler(object):

def __init__(self, parent=None):

self._data = {'name': 'MOTOR', 'delay': 0.01, 'LD': 14 'LU': 15, 'RD': 18, 'RU': 23}

self.init_pin()

def init_pin(self):

self.GPIO_LD_PIN = self._data.get('LD', -1) self.GPIO_LU_PIN = self._data.get('LU', -1)

self.GPIO_RD_PIN = self._data.get('RD', -1) self.GPIO_RU_PIN = self._data.get('RU', -1)

if self.GPIO_LD_PIN == -1 or self.GPIO_LU_PIN == -1 or self.GPIO_RD_PIN == -1 or self.GPIO_RU_PIN == -1:

print('message', 'FATAL ERROR : INVALID PIN ENCOUNTER # ' + str(self.GPIO_LD_PIN) + ', ' + + str(

self.GPIO_LU_PIN) + ', ' + + str(self.GPIO_RD_PIN) + ', ' + + str(self.GPIO_RU_PIN))

# pin setup

# set GPIO numbering mode and define output pins

GPIO.setup(self.GPIO_LD_PIN, GPIO.OUT) GPIO.setup(self.GPIO_LU_PIN, GPIO.OUT) GPIO.setup(self.GPIO_RD_PIN, GPIO.OUT) GPIO.setup(self.GPIO_RU_PIN, GPIO.OUT) time.sleep(0.5) # warmup time self.stop()

def stop(self):

GPIO.output(self.GPIO_LD_PIN, False) GPIO.output(self.GPIO_LU_PIN, False)

GPIO.output(self.GPIO_RD_PIN, False) GPIO.output(self.GPIO_RU_PIN, False)

def step_forward(self):

GPIO.output(self.GPIO_LD_PIN, False) GPIO.output(self.GPIO_LU_PIN, True)

GPIO.output(self.GPIO_RD_PIN, False) GPIO.output(self.GPIO_RU_PIN, True) print('Move Forward')

def step_backward(self):

GPIO.output(self.GPIO_LD_PIN, True) GPIO.output(self.GPIO_LU_PIN, False)

GPIO.output(self.GPIO_RD_PIN, True) GPIO.output(self.GPIO_RU_PIN, False) print('Move Backward')

def step_right(self):

GPIO.output(self.GPIO_LD_PIN, True) GPIO.output(self.GPIO_LU_PIN, False)

GPIO.output(self.GPIO_RD_PIN, False) GPIO.output(self.GPIO_RU_PIN, True) print('Move Right')

def step_left(self):

GPIO.output(self.GPIO_LD_PIN, False) GPIO.output(self.GPIO_LU_PIN, True)

GPIO.output(self.GPIO_RD_PIN, True) GPIO.output(self.GPIO_RU_PIN, False) print('Move Left')

def move_forward(self, count=15):

for i in range(count):

self.step_forward() self.stop()

def move_backward(self, count=15):

for i in range(count):

self.step_backward() self.stop()

def move_right(self, count=15):

for i in range(count):

self.step_right() self.stop()

def move_left(self, count=15): for i in range(count):

self.step_left() self.stop()

def readings():

IR_SENSOR_A = 2 IR_SENSOR_B = 3 IR_SENSOR_C = 6 IR_SENSOR_D = 4

GPIO.setup(IR_SENSOR_A, GPIO.IN) GPIO.setup(IR_SENSOR_B, GPIO.IN) GPIO.setup(IR_SENSOR_C, GPIO.IN) GPIO.setup(IR_SENSOR_D, GPIO.IN)

time.sleep(0.5) # warmup time

ir_measure_a = GPIO.input(IR_SENSOR_A) ir_measure_b = GPIO.input(IR_SENSOR_B) ir_measure_c = GPIO.input(IR_SENSOR_C) ir_measure_d = GPIO.input(IR_SENSOR_D)

print(ir_measure_a, ir_measure_b, ir_measure_c, ir_measure_d)

return [ir_measure_a, ir_measure_b, ir_measure_c, ir_measure_d]

# FOR DEMO def run():

motor = MotorControler()

while True:

sensor = readings()

if sensor[1] == 0 and sensor[2] == 0:

motor.move_forward(count=15) elif sensor[1] == 1 and sensor[2] == 1:

if np.random.ranf() > 0.5 :

motor.move_left(count=15) else:

motor.move_left(count=15) # provide more condotion for better maneuvering

run()
现在大家可以尽情去尝试避障机器人的控制和修改了。由于网页编码问题,如果代码运行出行报错,尝试按Python规范修改代码缩进。
