TensorRT:2.实现Mnist手写数字识别推理
mnist手写数字识别是一个非常经典的模型了,体积小,结构简单,特别适合作为入门案例。参考了官方例子,我根据自己的使用习惯进行了梳理。
运行环境:
- Windows10
- Visual Studio 2015 Update3
- Cuda 10.0
- cuDNN 7.6.5
- TensorRT 7.0.0.11
- OpenCV 4.3.0
1.TensorRT推理的12个基本步骤
step1:创建runtime
step2:反序列化创建engine
step3:创建context
step4:获取输入输出索引
step5:创建buffers
step6:为输入输出开辟GPU显存
step7:创建cuda流
step8:从CPU到GPU----拷贝input数据
step9:异步推理
step10:从GPU到CPU----拷贝output数据
step11:同步cuda流
step12:释放资源
下面我就通过mnist的案例来逐步实现。
2.TensorRT运行库导入
TensorRT头文件
#include “NvInfer.h”
#include “NvCaffeParser.h”
#include “NvOnnxParser.h”
#include “NvUffParser.h”
#include “common.h”
using namespace nvinfer1;
using namespace nvcaffeparser1;
using namespace nvuffparser;
TensorRT库
cudart.lib
nvinfer.lib
nvinfer_plugin.lib
myelin64_1.lib
nvonnxparser.lib
nvparsers.lib
OpenCV头文件
#include
OpenCV库
opencv_world430.lib
3.下面推理执行过程
第一步:设置参数
为了方便使用,我定义了两个存储结构
struct TensorRT {
	IExecutionContext* context;
	ICudaEngine* engine;
	IRuntime* runtime;
};

struct TRT_CONFIG
{
	std::string networkName; //网络名称

	std::string trtModelName; //trt模型名称
	std::string onnxModeName; //onnx模型名称
	std::string input_blob_name; //输入网络名
	std::string output_blob_name; //输出网络名
	std::string output_config_name; //输出配置名
	int batchSize;  //batch size
	int dlaCore;     //DLA是否打开
	int runInFp16; //是否采用FP16
	int runInInt8;   //是否采用FP8

	int input_h;    //输入图像高度
	int input_w;   //输入 图像宽度
	int input_c;   //输入图像通道数
	int output_size; //输出size
	int class_num;  //输出类别数
	int output_len; //输出长度
};
//定义配置
TRT_CONFIG trtConfig;
trtConfig.networkName = "TRT.Mnist";
trtConfig.onnxModeName = "mnist.onnx";
trtConfig.trtModelName = "mnist.trt";
trtConfig.input_blob_name = "Input3";
trtConfig.output_blob_name = "Plus214_Output_0";

trtConfig.batchSize = 1;
trtConfig.dlaCore =1;
trtConfig.runInFp16 = 1;
trtConfig.runInInt8 = 0;

trtConfig.input_h = 28;
trtConfig.input_w = 28;
trtConfig.input_c = 1;
trtConfig.output_size = 10;

m_rtInterface.InitParams(trtConfig);
第二步:加载模型
IHostMemory* trtModelStream{ nullptr };

TensorRT* ptensor_rt;
IExecutionContext* context = nullptr;
IRuntime* runtime = nullptr;
ICudaEngine* engine = nullptr;


//这里我们直接加载TRT模型,省略了模型转换步骤,后面再讲
ptensor_rt = m_rtInterface.LoadTRTModel(trtConfig.trtModelName.c_str());
if (!ptensor_rt)
{
	return -1;
}
context = ptensor_rt->context;
runtime = ptensor_rt->runtime;
engine = ptensor_rt->engine;
说明:
mnist.onnx 模型可以在TensorRT文件目录下找到
mnist.onnx => mnist.trt的转换,可以直接用TensorRT目录里的trtexec 工具做。
trtexec --explicitBatch --onnx=mnist.onnx --saveEngine=mnist.trt --fp16 --workspace=512 --verbose
其中 LoadTRTModel 函数的实现
TensorRT* TRTInterface::LoadTRTModel(const char* trtFileName)
{
	//1.读取模型数据
	std::ifstream t(trtFileName, std::ios::in | std::ios::binary);
	std::stringstream tempStream;
	tempStream << t.rdbuf();
	t.close();
	DebugP("TRT File Loaded");

	tempStream.seekg(0, std::ios::end);
	const int modelSize = tempStream.tellg();
	tempStream.seekg(0, std::ios::beg);
	void* modelMem = malloc(modelSize);
	tempStream.read((char*)modelMem, modelSize);

	//2.创建runtime
	IRuntime* runtime = createInferRuntime(gLogger);
	if (runtime == nullptr)
	{
		DebugP("Build Runtime Failure");
		return 0;
	}
	runtime->setDLACore(0);

	//3.反序列化创建engine
	ICudaEngine* engine = runtime->deserializeCudaEngine(modelMem, modelSize, nullptr);
	if (engine == nullptr)
	{
		DebugP("Build Engine Failure");
		return 0;
	}
	// 打印绑定输入输出
	printf("Bindings after deserializing:\n");
	for (int bi = 0; bi < engine->getNbBindings(); bi++)
	{
		if (engine->bindingIsInput(bi) == true)
		{
			printf("Binding %d (%s): Input.\n", bi, engine->getBindingName(bi));
		}
		else
		{
			printf("Binding %d (%s): Output.\n", bi, engine->getBindingName(bi));
		}
	}

	//4.创建context,创建一些空间来存储中间激活值
	IExecutionContext* context = engine->createExecutionContext();
	if (context == nullptr)
	{
		DebugP("Build Context Failure");
		return 0;
	}

	TensorRT* trt = new TensorRT();
	trt->context = context;
	trt->engine = engine;
	trt->runtime = runtime;
	DebugP("Build trt Model Success!");
	return trt;
}
第三步:图片预处理
//1.读取图片
cv::Mat image = cv::imread("6.png", cv::IMREAD_GRAYSCALE);
if (image.empty()) {
	std::cout << "The input image is empty!!! Please check....." << std::endl;
}
//2.预处理
float* net_input = ProcessInput(image, trtConfig.input_w, trtConfig.input_h);
其中,ProcessInput函数的实现
```cpp
//缩放和归一化
float* ProcessInput(cv::Mat img,int input_w,int input_h)
{
	//Resize
	cv::Mat image;
	cv::resize(img, image, cv::Size(input_w,input_h));

	//normal
	float* net_input = (float*)calloc(image.rows*image.cols, sizeof(float));
	for (int i = 0; i < image.rows * image.cols; i++)
	{
		net_input[i] = (float(image.data[i] / 255.0) - kMnistMean) / kMnistStdDev;

	}
	return net_input;
}
第四步:推理预测
//计算时间
typedef std::chrono::high_resolution_clock Time;
typedef std::chrono::duration<double, std::ratio<1, 1000>> ms;
typedef std::chrono::duration<float> fsec;
double total = 0.0;

// run inference and cout time
auto t0 = Time::now();

//执行推理
float pre_out[OUTPUT_SIZE];
m_rtInterface.doInference(*context, net_input, pre_out, 1);

auto t1 = Time::now();
fsec fs = t1 - t0;
ms d = std::chrono::duration_cast<ms>(fs);
total += d.count();

//推理完成释放资源
context->destroy();
engine->destroy();
runtime->destroy();
其中 doInference函数的实现
void TRTInterface::doInference(IExecutionContext& context, float* input, float* output, int batchSize)
{
	const ICudaEngine& engine = context.getEngine();
	assert(engine.getNbBindings() == 2);

	//1.根据输入输出blob名字获取输入输出索引
	const int inputIndex  = engine.getBindingIndex(m_trtConfig.input_blob_name.c_str());
	const int outputIndex = engine.getBindingIndex(m_trtConfig.output_blob_name.c_str());
	DebugP(inputIndex);
	DebugP(outputIndex);

	// 2.为输入输出开辟GPU显存
	void* buffers[2];
	CHECK(cudaMalloc(&buffers[inputIndex], batchSize * m_trtConfig.input_c * m_trtConfig.input_h * m_trtConfig.input_w * sizeof(float)));
	CHECK(cudaMalloc(&buffers[outputIndex], batchSize * m_trtConfig.output_size * sizeof(float)));

	//3.创建cuda流
	cudaStream_t stream;
	CHECK(cudaStreamCreate(&stream));

	//4.从CPU到GPU----拷贝input数据
	//buffers[inputIndex] 显存中的缓冲区   input 读入内存中的数据
	CHECK(cudaMemcpyAsync(buffers[inputIndex], input, batchSize * m_trtConfig.input_c* m_trtConfig.input_h * m_trtConfig.input_w * sizeof(float), cudaMemcpyHostToDevice, stream));

	//5.异步推理
	context.enqueue(batchSize, buffers, stream, nullptr);
	//context.enqueueV2(buffers, stream, nullptr);
	//context.executeV2(buffers.getDeviceBindings().data());

	//6.从GPU到CPU----拷贝output数据
	//output 内存中的数据   buffers[outputIndex] 显存中的存储区,存放模型输出
	CHECK(cudaMemcpyAsync(output, buffers[outputIndex], batchSize * m_trtConfig.output_size * sizeof(float), cudaMemcpyDeviceToHost, stream));

	//7.同步cuda流
	cudaStreamSynchronize(stream);

	//8.释放stream 和 buffer
	cudaStreamDestroy(stream);
	CHECK(cudaFree(buffers[inputIndex]));
	CHECK(cudaFree(buffers[outputIndex]));
}
第五步:结果处理
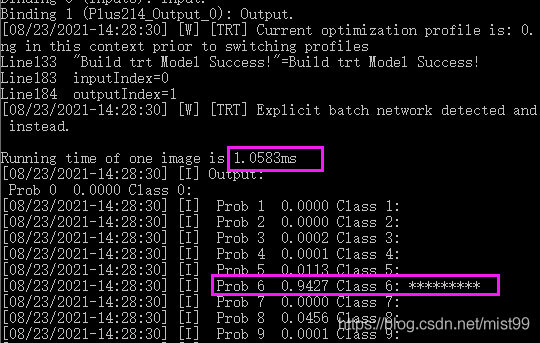
推理输出结果后,我们需要转换成容易识别的方式,比如图形化,概率等。这里mnist模型,输出是一个10分类的结果,我们就需要通过softmax将其转换成可以概率值。
//softmax
VerifyOutput(pre_out, OUTPUT_SIZE);

//打印结果
gLogInfo << "Output:\n";
for (int i = 0; i < OUTPUT_SIZE; i++)
{
	gLogInfo << " Prob " << i << "  " << std::fixed << std::setw(5) << std::setprecision(4) << pre_out[i] << " "<< "Class " << i << ": " << std::string(int(std::floor(pre_out[i] * 10 + 0.5f)), '*') << std::endl;
}

gLogInfo << std::endl;
其中 VerifyOutput 函数实现
bool VerifyOutput(float* output,int outputSize)
{
	float val{ 0.0f };
	int idx{ 0 };

	// Calculate Softmax
	float sum{ 0.0f };
	for (int i = 0; i < outputSize; i++)
	{
		output[i] = exp(output[i]);
		sum += output[i];
	}

	//gLogInfo << "Output:" << std::endl;
	for (int i = 0; i < outputSize; i++)
	{
		output[i] /= sum;
		val = std::max(val, output[i]);
		if (val == output[i])
		{
			idx = i;
		}
	}
	return val > 0.9f;
}

