FasterRCNN
FasterRCNN
论文:“Faster R-CNN: Towards Real-Time Object Detection with Region Proposal Networks”
FasterRCNN主要包括 backbone、RPN、ROI Pooling、Classifier几个部分。总体上相当于RPN+FastRCNN。
图源:https://github.com/WZMIAOMIAO/deep-learning-for-image-processing
Backbone
Backbone是整个目标检测网络的主干,用于特征提取,通常使用VGG、ResNet等网络。将原图输入进backbone之后会得到一系列特征图。
RPN
RPN(Region Proposal Network)用于生成备选区域。输入的是backbone输出的特征图。
主要步骤:
- 通过RPNHead部分预测得到每个Anchors到GT bbox的偏移量box_pred以及它们包含物体的概率cls_logits。
- 通过AnchorGenerator在backbone的特征图上产生不同尺度大小的Anchors,并投影回到原始图像上。
- Proposals将RPNHead输出的分类参数和回归参数与AnchorGenerator产生的Anchors相结合,得到最终预测的bbox坐标。
- FilterProposals过滤掉小面积的Proposal,之后根据预测概率筛选出每层特征图上的前pre_nms_top_n个bbox(2000),最后进行NMS,得到总共的post_nms_top_n个bbox(2000)。
- 如果是在训练阶段,则还要在第3步得到的Anchors的基础上分正负样本,计算损失。
RPNHead
该部分使用一个滑动窗口在输入的特征图上进行滑动,滑动的输出成为后面两个并行层(cls 层和 reg 层) 的输入。
在具体实现上,首先是一个 3 × 3 3 \times 3 3×3 卷积作为滑动窗口融合每个点周围的信息。之后通过 1 × 1 1\times1 1×1 卷积分成了并行的两层。上面的reg层回归每个Anchor到GT bbox的偏移参数。下面的cls层做一个二分类:前景(包含目标)、背景(不包含目标)。
举例:
假设通过backbone只输出一层特征图,形状为 [ C , H , W ] [C,H,W] [C,H,W], 3 × 3 3\times3 3×3 卷积不改变特征图的数量,则reg层的 1 × 1 1\times1 1×1 卷积的输出形状为 [ 4 k , H , W ] [4k,H,W] [4k,H,W]。 k k k 表示在特征图的每个像素点上生成 k k k 个Anchor。每个Anchor的偏移参数为 ( d x , d y , d h , d w ) (d_x,d_y,d_h,d_w) (dx,dy,dh,dw),因此是 4 k 4k 4k。
下面cls层的 1 × 1 1\times1 1×1 卷积输出形状为 [ 2 k , H , W ] [2k,H,W] [2k,H,W]。表示每个Anchor是前景和背景的概率(pytorch官方实现中输出为 [ k , H , W ] [k,H,W] [k,H,W],表示positive的概率),之后进行softmax(pytorch官方实现中并没有进行softmax)。
class RPNHead(nn.Module):
    """
    add a RPN head with classification and regression
    通过滑动窗口计算预测目标概率与bbox regression参数

    Arguments:
        in_channels: number of channels of the input feature
        num_anchors: number of anchors to be predicted
    """

    def __init__(self, in_channels, num_anchors):
        super(RPNHead, self).__init__()
        # 3x3 滑动窗口
        self.conv = nn.Conv2d(in_channels, in_channels, kernel_size=3, stride=1, padding=1)
        # 计算预测的目标分数(这里的目标只是指前景或者背景)
        self.cls_logits = nn.Conv2d(in_channels, num_anchors, kernel_size=1, stride=1)
        # 计算预测的目标bbox regression参数
        self.bbox_pred = nn.Conv2d(in_channels, num_anchors * 4, kernel_size=1, stride=1)

        for layer in self.children():
            if isinstance(layer, nn.Conv2d):
                torch.nn.init.normal_(layer.weight, std=0.01)
                torch.nn.init.constant_(layer.bias, 0)

    def forward(self, x):
        # type: (List[Tensor]) -> Tuple[List[Tensor], List[Tensor]]
        logits = []
        bbox_reg = []
        for i, feature in enumerate(x):
            t = F.relu(self.conv(feature))
            logits.append(self.cls_logits(t))
            bbox_reg.append(self.bbox_pred(t))
        return logits, bbox_reg
AnchorGenerator
该模块用于在原始图像上产生不同尺度大小的Anchor。
Proposals
Proposals将RPNHead回归到的Anchor偏移参数应用到AnchorGenerator生成的一系列Anchor之上。具体方法为:
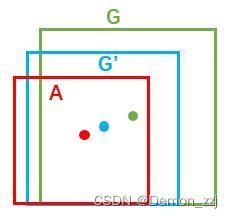
如图,红色框是positive anchor,绿色的框是GT bbox,而我们需要找到就是一个变换,将红色的框映射到蓝色的框,使得蓝色的框尽量接近绿色的GT bbox。变换方法可以使用平移+缩放的组合。
假设红色框的坐标参数为 ( A x , A y , A w , A h ) (A_x,A_y,A_w,A_h) (Ax,Ay,Aw,Ah),分别为红色框的中心点坐标、和宽、高。蓝色框的坐标参数为 ( G x ′ , G y ′ , G w ′ , G h ′ ) (G'_x,G'_y,G'_w,G'_h) (Gx′,Gy′,Gw′,Gh′)。则变换过程为
G x ′ = A w ∗ d x + A x G y ′ = A h ∗ d y + A y G w ′ = A w ∗ e d w G h ′ = A h ∗ e d h s G'_x=A_w*d_x+A_x\\ G'_y=A_h*d_y+A_y\\ G'_w=A_w*e^{d_w}\\ G'_h=A_h*e^{d_h}s Gx′=Aw∗dx+AxGy′=Ah∗dy+AyGw′=Aw∗edwGh′=Ah∗edhs
则我们需要回归的偏移参数即为 ( d x , d y , d w , d h ) (d_x,d_y,d_w,d_h) (dx,dy,dw,dh)。在训练阶段,GT bbox坐标信息已知,则 ( d x , d y , d w , d h ) (d_x,d_y,d_w,d_h) (dx,dy,dw,dh) 学习的目标值为 ( t x , t y , t w , t h ) (t_x,t_y,t_w,t_h) (tx,ty,tw,th):
t x = G x − A x A w t y = G y − A y A h t w = l o g ( G w A w ) t h = l o g ( G h A h ) t_x=\frac{G_x-A_x}{A_w}\\ t_y=\frac{G_y-A_y}{A_h}\\ t_w=log(\frac{G_w}{A_w})\\ t_h=log(\frac{G_h}{A_h}) tx=AwGx−Axty=AhGy−Aytw=log(AwGw)th=log(AhGh)
FilterProposal
def filter_proposals(self, proposals, objectness, image_shapes, num_anchors_per_level):
        # type: (Tensor, Tensor, List[Tuple[int, int]], List[int]) -> Tuple[List[Tensor], List[Tensor]]
        """
        筛除小boxes框,nms处理,根据预测概率获取前post_nms_top_n个目标
        Args:
            proposals: 预测的bbox坐标
            objectness: 预测的目标概率
            image_shapes: batch中每张图片的size信息
            num_anchors_per_level: 每个预测特征层上预测anchors的数目


        Returns:

        """
        num_images = proposals.shape[0]
        device = proposals.device

        # do not backprop throught objectness
        objectness = objectness.detach()
        objectness = objectness.reshape(num_images, -1)

        # Returns a tensor of size size filled with fill_value
        # levels负责记录分隔不同预测特征层上的anchors索引信息
        levels = [torch.full((n, ), idx, dtype=torch.int64, device=device)
                  for idx, n in enumerate(num_anchors_per_level)]
        levels = torch.cat(levels, 0)

        # Expand this tensor to the same size as objectness
        levels = levels.reshape(1, -1).expand_as(objectness)

        # select top_n boxes independently per level before applying nms
        # 获取每张预测特征图上预测概率排前pre_nms_top_n的anchors索引值
        top_n_idx = self._get_top_n_idx(objectness, num_anchors_per_level)

        image_range = torch.arange(num_images, device=device)
        batch_idx = image_range[:, None]  # [batch_size, 1]

        # 根据每个预测特征层预测概率排前pre_nms_top_n的anchors索引值获取相应概率信息
        objectness = objectness[batch_idx, top_n_idx]
        levels = levels[batch_idx, top_n_idx]
        # 预测概率排前pre_nms_top_n的anchors索引值获取相应bbox坐标信息
        proposals = proposals[batch_idx, top_n_idx]

        objectness_prob = torch.sigmoid(objectness)

        final_boxes = []
        final_scores = []
        # 遍历每张图像的相关预测信息
        for boxes, scores, lvl, img_shape in zip(proposals, objectness_prob, levels, image_shapes):
            # 调整预测的boxes信息,将越界的坐标调整到图片边界上
            boxes = box_ops.clip_boxes_to_image(boxes, img_shape)

            # 返回boxes满足宽,高都大于min_size的索引
            keep = box_ops.remove_small_boxes(boxes, self.min_size)
            boxes, scores, lvl = boxes[keep], scores[keep], lvl[keep]

            # 移除小概率boxes,参考下面这个链接
            # https://github.com/pytorch/vision/pull/3205
            keep = torch.where(torch.ge(scores, self.score_thresh))[0]  # ge: >=
            boxes, scores, lvl = boxes[keep], scores[keep], lvl[keep]

            # non-maximum suppression, independently done per level
            keep = box_ops.batched_nms(boxes, scores, lvl, self.nms_thresh)

            # keep only topk scoring predictions
            keep = keep[: self.post_nms_top_n()]
            boxes, scores = boxes[keep], scores[keep]

            final_boxes.append(boxes)
            final_scores.append(scores)
        return final_boxes, final_scores
Loss Function
在训练阶段,需要区分正负样本。在所有得到的anchors中,下面两种anchor被认为是正样本:
- 与GT bbox 拥有最大的IOU的anchor
- 与GT bbox的IOU在0.7以上的anchor
一个GT bbox可能对应多个 positive anchor
如果一个anchor与所有的GT bbox的IOU都小于0.3,那么标记其为负样本。剩下的anchor被丢弃掉。
区分完正负样本之后,还需要再次从中选取真正用于训练的样本mini-batch=256,其中正负样本的比例为1:1,如果正样本不足128个,那么剩下的用负样本来填充。
损失函数为分类损失和回归损失的加权和。分类损失使用二值交叉熵损失函数,bbox的回归损失使用smooth L1损失函数。
ROI Head
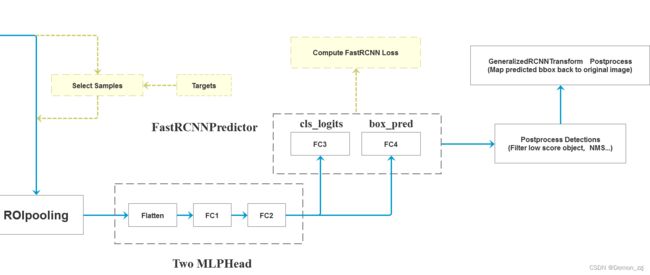
RPN网络会输出为形状为 [ 2000 , 4 ] [2000,4] [2000,4] 的tensor表示每张图像上的2000个proposals作为ROI Head模块的输入。但是在训练时并没有使用2000个proposal,而是采样了其中的512个。ROI Head部分包括了两个全连接层、FastRCNN Preditor、postprocess。
图源:https://github.com/WZMIAOMIAO/deep-learning-for-image-processing
划分正负样本
在训练阶段,需要划分出正负样本。首先对每个proposal与每个GT bbox计算IOU,将每个proposal和与其IOU最大的GT bbox对应。接着划分正负样本,划分方法:
- proposal与GT box的IOU大于0.5为正样本
- proposal与GT box的IOU小于0.5为负样本
负样本类别的target设为0代表是背景。
之后是数据采样,在输入的2000个proposal的基础上采样512个proposal,正样本占25%(可调),负样本占75%,如果正样本不够就用负样本填充。
如果是在测试阶段,那么只会生成1000个proposal。
ROI Pooling
ROI Pooling根据每张图像上的proposals得到固定大小(如 7 × 7 7\times7 7×7 )的特征图。ROI Pooling将每个proposal分成 7 × 7 7\times7 7×7 个部分,取每个部分的最大值作为输出。为了解决在此过程中多次取整的问题,可以用ROI Align代替。ROI Align通过双线性插值解决不断取整的问题。通过该部分得到每个图像的特征图的形状为 [N,out_channels,7,7]。其中N是整个batch的proposal的个数,如果batch_size=2,则N=1024。out_channels是backbone输出特征图的通道数。
Two MLP Head
该模块包含了两个全连接层,首先将ROI Pooling的输出特征图展平成 [N, out_channels × \times × 7 × \times × 7],经过两个全连接层 FC1: [N × \times × out_channels × \times × 7 × \times × 7, 1024], FC2: [1024,1024]。最后输出为[N, 1024] 的tensor。
FastRCNN Predictor
该模块的输入是Two MLP Head部分的输出。通过两个全连接层并行地预测类别和bbox参数。FC3: [1024, num_classes] 预测类别,输出为 [N, num_classes] 的tensor。FC4: [1024, num_classes × \times × 4] 预测bbox的参数,对每个proposal的每个类别都预测一个bbox。在训练阶段还会计算该部分的损失,同样由分类损失和bbox回归损失两部分组成。
PostProcess
该模块是后处理。


