Deep Homography Estimation - Pytorch实现
Deep Homography Estimation - Pytorch实现
- Deep Homography Estimation- PyTorch Implementation
-
- 使用说明
- 代码实现
Deep Homography Estimation- PyTorch Implementation
Deep Image Homography Estimation
Daniel DeTone, Tomasz Malisiewicz, and Andrew Rabinovich
这篇论文的Pytorch实现,代码地址 Deep-homography-estimation-pytorch. 喜欢的朋友给个⭐哦
使用说明
一、生成合成数据集
下载COCO2014数据集,分别设置训练集、验证集和测试集对应的路径。
cd data/
python gen_data.py
生成500.000个训练样本数据、5000个验证样本数据和5000个测试样本数据。
运行完成后生成的合成数据集文件列表如下:

二、训练
python train.py
三、测试
下载预训练权重并存放在checkpoints/文件夹下
链接:https://pan.baidu.com/s/10HXNthOBhlZbrtvIkolxKw 提取码:l9l8
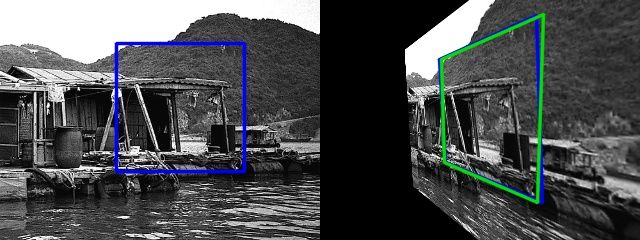
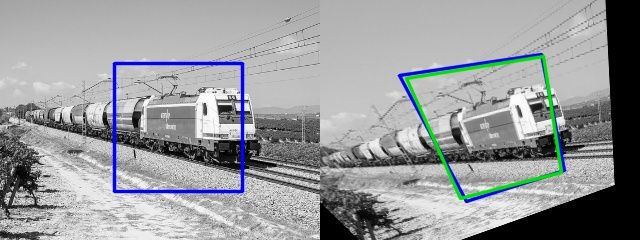
python test.py
| results |
|---|
 |
 |
 |
 |
 |
代码实现
下面对单应性模型的代码实现进行简单分析:
import torch.nn as nn
import torch.nn.functional as F

class HomographyNet(nn.Module):
    def __init__(self):
        super(HomographyNet, self).__init__()
        self.layer1 = nn.Sequential(
            nn.Conv2d(2, 64, kernel_size=3, padding=1, bias=False),
            nn.BatchNorm2d(64),
            nn.ReLU(inplace=True),
            nn.Conv2d(64, 64, kernel_size=3, padding=1, bias=False),
            nn.BatchNorm2d(64),
            nn.ReLU(inplace=True),
            nn.MaxPool2d(kernel_size=2, stride=2)
        )
        self.layer2 = nn.Sequential(
            nn.Conv2d(64, 64, kernel_size=3, padding=1, bias=False),
            nn.BatchNorm2d(64),
            nn.ReLU(inplace=True),
            nn.Conv2d(64, 64, kernel_size=3, padding=1, bias=False),
            nn.BatchNorm2d(64),
            nn.ReLU(inplace=True),
            nn.MaxPool2d(kernel_size=2, stride=2)
        )
        self.layer3 = nn.Sequential(
            nn.Conv2d(64, 128, kernel_size=3, padding=1, bias=False),
            nn.BatchNorm2d(128),
            nn.ReLU(inplace=True),
            nn.Conv2d(128, 128, kernel_size=3, padding=1, bias=False),
            nn.BatchNorm2d(128),
            nn.ReLU(inplace=True),
            nn.MaxPool2d(kernel_size=2, stride=2)
        )
        self.layer4 = nn.Sequential(
            nn.Conv2d(128, 128, kernel_size=3, padding=1, bias=False),
            nn.BatchNorm2d(128),
            nn.ReLU(inplace=True),
            nn.Conv2d(128, 128, kernel_size=3, padding=1, bias=False),
            nn.BatchNorm2d(128),
            nn.ReLU(inplace=True)
        )
        self.fc = nn.Sequential(
            nn.Dropout(0.5),
            nn.Linear(128 * 16 * 16, 1024),
            nn.ReLU(True),
            nn.Dropout(0.5),
            nn.Linear(1024, 8)
        )

    def forward(self, x):
        out = self.layer1(x)
        out = self.layer2(out)
        out = self.layer3(out)
        out = self.layer4(out)
        out = out.contiguous().view(x.size(0), -1)
        out = self.fc(out)
        return out


if __name__ == "__main__":
    from torchsummary import summary
    model = HomographyNet().cuda()
    print(HomographyNet())
    summary(model, (2, 128, 128))
这是一个VGG风格的网络,网络的输入是2×128×128的Patch对,网络使用了8个卷积层,每个卷积层的窗口形状为3×3,填充为1,并紧接BatchNorm和ReLU;8个卷积层对应的滤波器数量为64,64,64,64,128,128,128,128。每两个卷积层后使用一个窗口形状为2、步幅为2的最大池化层。全连接层有1024个隐藏单元,输出层单元数为8,在最后一个卷积层之后和全连接层之后使用DropOut。
用torchsummary打印一下模型结构:
----------------------------------------------------------------
        Layer (type)               Output Shape         Param #
================================================================
            Conv2d-1         [-1, 64, 128, 128]           1,152
       BatchNorm2d-2         [-1, 64, 128, 128]             128
              ReLU-3         [-1, 64, 128, 128]               0
            Conv2d-4         [-1, 64, 128, 128]          36,864
       BatchNorm2d-5         [-1, 64, 128, 128]             128
              ReLU-6         [-1, 64, 128, 128]               0
         MaxPool2d-7           [-1, 64, 64, 64]               0
            Conv2d-8           [-1, 64, 64, 64]          36,864
       BatchNorm2d-9           [-1, 64, 64, 64]             128
             ReLU-10           [-1, 64, 64, 64]               0
           Conv2d-11           [-1, 64, 64, 64]          36,864
      BatchNorm2d-12           [-1, 64, 64, 64]             128
             ReLU-13           [-1, 64, 64, 64]               0
        MaxPool2d-14           [-1, 64, 32, 32]               0
           Conv2d-15          [-1, 128, 32, 32]          73,728
      BatchNorm2d-16          [-1, 128, 32, 32]             256
             ReLU-17          [-1, 128, 32, 32]               0
           Conv2d-18          [-1, 128, 32, 32]         147,456
      BatchNorm2d-19          [-1, 128, 32, 32]             256
             ReLU-20          [-1, 128, 32, 32]               0
        MaxPool2d-21          [-1, 128, 16, 16]               0
           Conv2d-22          [-1, 128, 16, 16]         147,456
      BatchNorm2d-23          [-1, 128, 16, 16]             256
             ReLU-24          [-1, 128, 16, 16]               0
           Conv2d-25          [-1, 128, 16, 16]         147,456
      BatchNorm2d-26          [-1, 128, 16, 16]             256
             ReLU-27          [-1, 128, 16, 16]               0
          Dropout-28                [-1, 32768]               0
           Linear-29                 [-1, 1024]      33,555,456
             ReLU-30                 [-1, 1024]               0
          Dropout-31                 [-1, 1024]               0
           Linear-32                    [-1, 8]           8,200
================================================================
Total params: 34,193,032
Trainable params: 34,193,032
Non-trainable params: 0
----------------------------------------------------------------
Input size (MB): 0.12
Forward/backward pass size (MB): 70.52
Params size (MB): 130.44
Estimated Total Size (MB): 201.08
----------------------------------------------------------------
非常地VGG了。
完整代码见 Deep-homography-estimation-pytorch. 喜欢的朋友给个⭐哦