yolov5优化实例(反光衣识别)
转自:反光衣识别算法冠军方案总结(附源码)|极市打榜 - 知乎
3.数据分析
本次比赛一共包括四类类别:reflective_vest(反光衣),no_reflective_vest(未穿或不规范穿反光衣)、person_reflective_vest(穿反光衣的行人)、person_no_reflective_vest(未穿或不规范穿反光衣的行人)。打榜者对图像中反光衣穿着情况的进行目标检测,给出目标框和对应的类别信息,且预警情况只有no_reflective_vest(未穿或不规范穿反光衣)这一情况。
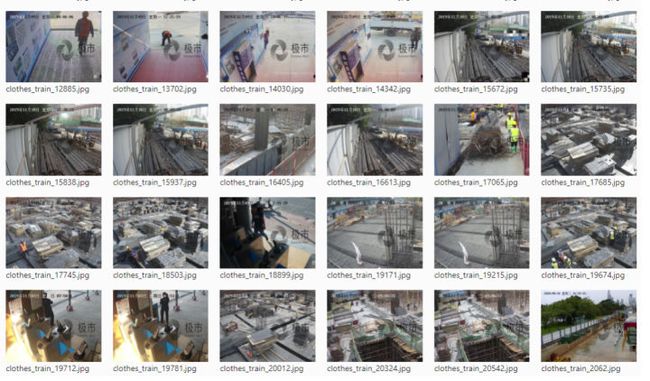
数据集是由监控摄像头采集的现场场景数据,训练数据集的数量为36346张,测试数据集的数量为14024张。可见数据集的图像数量非常很多,因此如果采用十分庞大的网络模型训练,比如两阶段检测模型,势必会十分缓慢。
通过查看样例集的数据,可以发现人员所处的环境比较复杂。另外,数据集是从监控摄像头中采集,人员在近距离和远距离都有,目标的尺度比较丰富。因此需要选用具有多尺度检测能力的检测器。虽然图像中有时会存在比较小的目标,但是由于场景为施工现场,所以目标相对比较稀疏,遮挡情况不太严重,且与周围环境相比目标特征也比较明显。
4.技术展示
这次训练技术展示分为两个部分:训练方法和推理方法。
通过以上分析以及往届极市平台介绍的方案,我们选择YOLO算法。最近yolov5更新到v6.0版本,其性能优秀并且训练、部署、调优等方面使用非常灵活方便。因此选择YOLOv5作为baseline,在此基础上根据实际情况进行具体模型的选择和模型的修改。
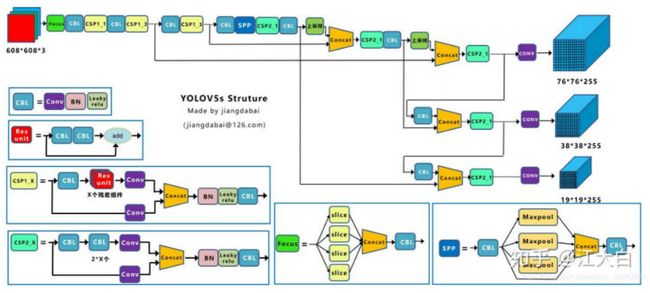
其中,yolov5算法的框架如下图所示。Yolov5s,m,x等结构仅仅为网络深度和宽度差别,由yolov5*.yaml结构定义文件夹的超参数depth_multiple和width_multiple控制。
这是很早之前的一幅图,现在YOLOv5的v6.0版本,已经有了修改,backbone主要修改如下:
1.第一层取消了Focus,采用卷积核大小为6,步长为2的卷积层代替。yolov5官方解答,Focus() 是用来降低FLOPS的,跟mAP无关。Focus模块在v5中是图片进入backbone前,对图片进行切片操作,具体操作是在一张图片中每隔一个像素拿到一个值,类似于邻近下采样,这样就拿到了四张图片,四张图片互补,输入通道扩充了4倍,即拼接起来的图片相对于原先的RGB三通道模式变成了12个通道,最后将得到的新图片再经过卷积操作,最终得到了没有信息丢失情况下的二倍下采样特征图。
2.更改backbone的基本单元BottleneckCSP为c3模块。在新版yolov5中,作者将BottleneckCSP(瓶颈层)模块转变为了C3模块,其结构作用基本相同均为CSP架构,只是在修正单元的选择上有所不同,其包含了3个标准卷积层以及多个Bottleneck模块(数量由配置文件.yaml的ndepth_multiple参数乘积决定)从C3模块的结构图可以看出,C3相对于BottleneckCSP模块不同的是,经历过残差输出后的Conv模块被去掉了,concat后的标准卷积模块中的激活函数也由LeakyRelu变味了SiLU。
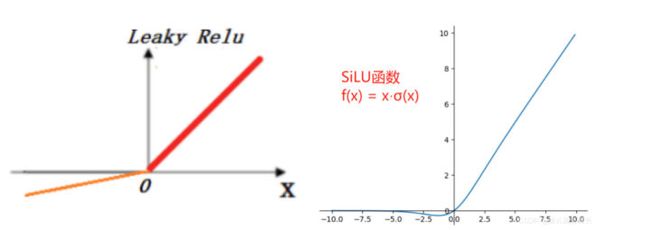
3.更改Leaky_Relu激活函数为SiLU激活函数。作者在CONV模块(CBL模块)中封装了三个功能:包括卷积(Conv2d)、BN以及Activate函数(在新版yolov5中,作者采用了SiLU函数作为激活函数),同时autopad(k, p)实现了padding的效果。
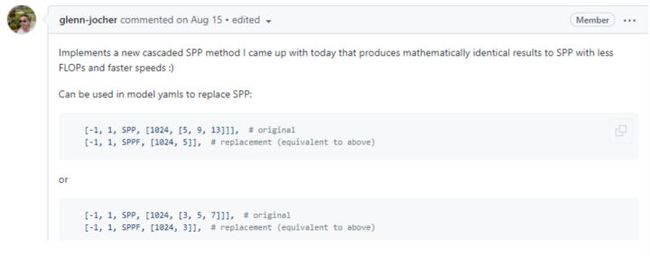
4.SPP更改为SPPF(Spatial Pyramid Pooling - Fast), 结果是一样的,但是可以降低FLOPS,运行的更快。
官方介绍:
训练方法
首先,在训练之前,我们将训练集进行划分训练集:测试集为8:2。其中训练集图像数量为29077,测试集图像数量为7269.数据集目录在'/home/data/309/',如果是在实例中,100张样例在'/home/data/309/sample_m'。
1.由于数据集的jpg和xml在一个文件夹,首先我们将图片和标签进行分离,源码如下:
import os
import shutil
from os import listdir, getcwd
from os.path import join
datasets_path = '/home/data/309/'
def jpg_xml():
    if not os.path.exists(datasets_path + 'Annotations/'):
        os.makedirs(datasets_path + 'Annotations/')
    if not os.path.exists(datasets_path + 'images/'):
        os.makedirs(datasets_path + 'images/')
    filelist = os.listdir(datasets_path)
    for files in filelist:
        filename1 = os.path.splitext(files)[1]  # 读取文件后缀名
        if filename1 == '.jpg':
            full_path = os.path.join(datasets_path, files)
            shutil.move(full_path, datasets_path+'images')
        elif filename1 == '.xml':
            full_path = os.path.join(datasets_path, files)
            shutil.move(full_path, datasets_path+'Annotations')
        else :
            continue
2.然后根据自定义的训练集和验证集比例,生成txt。如果要更改比例,仅仅更改 trainval_percent和train_percent即可,源码如下。
classes= ['reflective_vest','no_reflective_vest','person_reflective_vest','person_no_reflective_vest']  #自己训练的类别
import random
def train_val_split():
    trainval_percent = 0.2
    train_percent = 0.8

    images_filepath = datasets_path + 'images/'
    txtsavepath = datasets_path
    total_imgfiles = os.listdir(images_filepath)

    num = len(total_imgfiles)
    lists = range(num)

    tr = int(num * train_percent)
    train = random.sample(lists, tr)

    ftrain = open(txtsavepath + 'train.txt', 'w+')
    ftest = open(txtsavepath +  'test.txt', 'w+')
    fval = open(txtsavepath + 'val.txt', 'w+')

    for i in lists:
        name = images_filepath + total_imgfiles[i] + '\n'
        if i in train:
            ftrain.write(name)
        else:
            fval.write(name)
            ftest.write(name)

    ftrain.close()
    fval.close()
ftest.close()
3.最后将voc格式转换为yolo格式,源码如下。
def convert(size, box):
    dw = 1. / size[0]
    dh = 1. / size[1]
    x = (box[0] + box[1]) / 2.0
    y = (box[2] + box[3]) / 2.0
    w = box[1] - box[0]
    h = box[3] - box[2]
    x = x * dw
    w = w * dw
    y = y * dh
    h = h * dh
    return (x, y, w, h)

def convert_annotation(image_id):
    in_file = open(datasets_path + 'Annotations/%s.xml' % (image_id),encoding='utf-8')
    out_file = open(datasets_path + 'labels/%s.txt' % (image_id), 'w',encoding='utf-8')

    tree = ET.parse(in_file)
    root = tree.getroot()
    size = root.find('size')
    w = int(size.find('width').text)
    h = int(size.find('height').text)

    for obj in root.iter('object'):
        difficult = 0
        cls = obj.find('name').text
        if cls not in classes or int(difficult) == 1:
            continue
        cls_id = classes.index(cls)
        xmlbox = obj.find('bndbox')
        b=(float(xmlbox.find('xmin').text),float(xmlbox.find('xmax').text), float(xmlbox.find('ymin').text),
        float(xmlbox.find('ymax').text))
        bb = convert((w, h), b)
        out_file.write(str(cls_id) + " " + " ".join([str(a) for a in bb]) + '\n')

def generate_labels():
    if not os.path.exists(datasets_path + 'labels/'):
        os.makedirs(datasets_path + 'labels/')
    sets = ['train', 'val']
    for image_set in sets:
        image_ids = open(datasets_path + '%s.txt' % (image_set)).read().strip().split()
        for image_id in image_ids:
            convert_annotation(image_id.split('/')[-1][:-4])
在第一次训练时,我们选择了yolov5m模型。在训练了12小时后,仅仅训练了几个epoch,并且进行第一次测试,结果f1-score仅仅为0.2732,并且性能分很低。在时间紧张且计算资源有限的情况下,这显然不能满足我们的需求。
然后,我们选择了yolov5s模型,进行第二次训练。选择hyp.scratch.yaml配置文件作为参数,并且修改了其中数据增强方式,主要将参数mosaic: 1.0 # image mosaic (probability) 数值修改为0.5。如下图所示:
因为在数据集中小目标较少,不需要每次都进行mosaic。并且不采用裁剪、复制粘贴、旋转、mixup。因为我觉得数据量其实已经足够训练yolov5s网络了。并且为了加快训练速度,输入图像改为512大小,能多训练几个epoch。优化器选择SGD优化器即可。并且这里需要采用官方的yolov5s.pt作为预训练模型,能加速模型的收殓。
在12小时训练完成后,f1-score就可以到0.7543。
在第三次训练时,采用同样的方法进行训练。一方面使测试集中的图像参加到训练过程中;另一方面,12个小时才训练了几个epoch,肯定没有训练充分。再等12小时后训练完,f1-score就可以到0.7746。此时与0.8分就十分接近了。
最后,我们采用冻结训练策略,并且训练图像大小修改为640。Yolov5冻结参数也十分方便,只需要传递参数即可。我们将backbone以及neck+head轮流冻结。并且直接采用hyp.scratch-med.yaml进行最后的训练。这一部分具体看石工讲的冻结训练策略。通过最后一步,f1-sorce达到了0.8031。
这里需要对源码进行修改,主要是因为在neck+head冻结时,yolov5只能顺序冻结。这里需要修改,修改方式如下。修改后便可以冻结任意层。 ①train.py修改前:
train.py修改后:
![]()
②train.py修改前:
train.py修改后:
此时我们计算一下,0.8-0.8031*0.9=0.07721。然后再0.07721/0.1=0.7721。即,性能分达到77.21就满足了,是不是很容易了。
推理方法
在推理部分,我们这里直接pt文件直接进行推理,并没有采用模型加速方案。但是不采用FP32精度进行推理,而是采用FP16进行推理。具体可以参考,detect.py文件中的方法。运行时直接采用添加—half即可采用FP16进行推理。在本次打榜中,我仅仅采用FP16半精度推理即可达到比赛要求。根据https://www.cvmart.net/topList/10044?dbType=1&tab=RankDescription 的赛道说明,我们写测试文件,源码如下。
import json
import torch
import sys
import numpy as np
from pathlib import Path

from ensemble_boxes import weighted_boxes_fusion

from models.experimental import attempt_load
from utils.torch_utils import select_device
from utils.general import check_img_size, non_max_suppression, scale_coords
from utils.augmentations import letterbox


@torch.no_grad()
model_path = '/best.pt'
def init():
    weights = model_path
    device = 'cuda:0'  # cuda device, i.e. 0 or 0,1,2,3 or

    half = True  # use FP16 half-precision inference
    device = select_device(device)
    w = str(weights[0] if isinstance(weights, list) else weights)
    model = torch.jit.load(w) if 'torchscript' in w else attempt_load(weights, map_location=device)
    if half:
        model.half()  # to FP16
    model.eval()
    return model

def process_image(handle=None, input_image=None, args=None, **kwargs):
        half = True  # use FP16 half-precision inference
        conf_thres = 0.5  # confidence threshold
        iou_thres = 0.5  # NMS IOU threshold

        max_det = 1000  # maximum detections per image
        imgsz = [640, 640]
        names = {
            0: 'reflective_vest',
            1: 'no_reflective_vest',
            2: 'person_reflective_vest',
            3: 'person_no_reflective_vest'
        }

        stride = 32
    fake_result = {
    }
    fake_result["algorithm_data"] = {
        "is_alert": False,
        "target_count": 0,
        "target_info": []
    }

    fake_result["model_data"] = {
        "objects": []
    }
        img = letterbox(input_image, imgsz, stride, True)[0]
        img = img.transpose((2, 0, 1))[::-1]  # HWC to CHW, BGR to RGB
        img /= 255.0  # 0 - 255 to 0.0 - 1.0
        pred = handle(img, augment=False, visualize=False)[0]

        pred = non_max_suppression(pred, conf_thres, iou_thres, None, False, max_det=max_det)

        for i, det in enumerate(pred):  # per image
            det[:, :4] = scale_coords(img.shape[2:], det[:, :4], input_image.shape).round()
            for *xyxy, conf, cls in reversed(det):
                xyxy_list = torch.tensor(xyxy).view(1, 4).view(-1).tolist()
                conf_list = conf.tolist()
                label = names[int(cls)]
                fake_result['model_data']['objects'].append({
                    "xmin": int(xyxy_list[0]),
                    "ymin": int(xyxy_list[1]),
                    "xmax": int(xyxy_list[2]),
                    "ymax": int(xyxy_list[3]),
                    "confidence": conf_list,
                    "name": label
                })
                if label == 'no_reflective_vest':
                    fake_result['algorithm_data']['target_info'].append({
                        "xmin": int(xyxy_list[0]),
                        "ymin": int(xyxy_list[1]),
                        "xmax": int(xyxy_list[2]),
                        "ymax": int(xyxy_list[3]),
                        "confidence": conf_list,
                        "name": "no_reflective_vest"
                    })
        fake_result['algorithm_data']['is_alert'] = True if len(
            fake_result['algorithm_data']['target_info']) > 0 else False
        fake_result['algorithm_data']["target_count"] = len(fake_result['algorithm_data']['target_info'])

    return json.dumps(fake_result, indent=4)
5.讨论与总结
本次极市平台举行的基于反光衣识别的新手训练营项目,确实对新手十分的友好,容易上手,不需要添加额外的tricks,也不需要更换backbone,neck即可达到要求,能够很好的熟悉平台。本人作为新人,本次打榜相关的结论可归纳为以下几点:
- 选择好baseline是基础。最开始本人由于经验少,以为选择大的模型肯定能取得好的分数。因此,我们要针对数据情况、计算资源、算法精度和性能选择合适的baseline.
- 做好数据分析是关键。目标尺度分布,目标遮挡情况,目标密集程度,数据集数量等等方面,影响着我们选择对应策略。比如,小目标过多的情况下,需要采用mosic数据增强策略;数据充足且丰富的情况下适当减少数据增强策略;图像尺寸根据实际情况进行调整。
- 多看别人经验十分重要。本次能上榜的原因也是石工之前的冻结训练策略能运用上,才达到打榜要求。除此之外,还有许多提分经验,希望大家多多尝试。深度学习可能就是这样,在别人上面可能有效,在自己工程上就无效了,要多尝试。
- 针对赛题对性能的要求,采用FP16精度做推理,若需要更高的推理速度,可采用Openvino和TensorRT等方式部署模型。
参考
- https://github.com/ultralytics/yolov5
- https://mp.weixin.qq.com/s/e07eRbNAkoDVRs7Q-rV0TA
- https://mp.weixin.qq.com/s/VgDcS-edk9Mqkv-qSfcRJA
- http://www.cvmart.net
- https://blog.csdn.net/weixin_38842821/article/details/108544609


