LeNet-5用在cifar-10数据集
目录
一、模型建立
二、训练模型
1、导入需要的库
2、 数据预处理
3、加载数据集
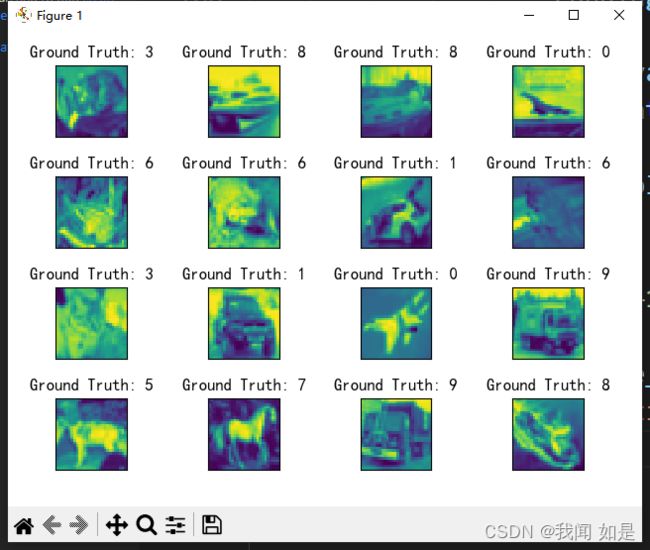
4、显示前16个图片
5、加载模型,查看模型参数
6、开始训练
7、可视化预测结果
8、将epoch增大到30
[1] 文章下载地址:LeNet
[2] 学习视频:LeNet demo
[3] github地址:GitHub
[4] transform的使用:transforms
这篇文章借鉴的是学习视频[2]的内容,视频内容从原理到代码实现都讲的比较详细。本文是以视频为主线,以实现为主,理论为辅,旨在能够理解模型的基本实现方法。
软件:VSCode(下载地址)
硬件:GPU
数据集:cifar-10(官网下载地址)
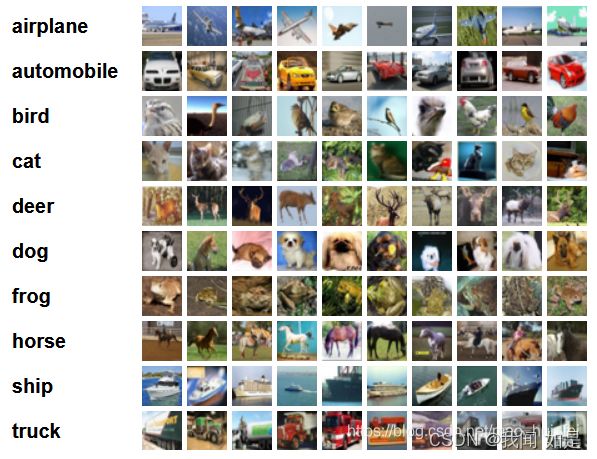
共包含10个类别RGB图片:飞机、汽车、鸟类、猫、鹿、狗、蛙类、马、船和卡车。
图片尺寸:32×32
训练集:50000张
测试集:10000张
图1 数据集部分数据展示
一、模型建立
根据论文中的下图进行建立各层
图2 模型结构图
为了方便查看各层的数据,列成表格形式。
数据的格式为[batch,channel,heigh,width],
计算的时候默认batch=32来计算各层的参数个数。
参数=batch*channel*heigh*width。
经过卷积和池化后的图片尺寸大小计算公式:
经过计算后各层的数据见表1.
表1 各层数据表
| In_channel | out_channel | kernal_size | stride | padding | In_size | out_size | 输入特征数 | 输出特征数 | parameters | 备注 | |
| Input | 3 | 32*32 | 98304 | ||||||||
| conv1/RELU | 3 | 16 | 5 | 1 | 0 | 32*32 | 28*28 | 401408 | |||
| maxpooling | 16 | 16 | 2 | 2 | 0 | 28*28 | 14*14 | 100352 | 池化后参数减少4倍 | ||
| conv2/RELU | 16 | 32 | 5 | 1 | 0 | 14*14 | 10*10 | 102400 | |||
| maxpooling | 32 | 32 | 2 | 2 | 0 | 10*10 | 5*5 | 25600 | |||
| full connection | 32*5*5 | 120 | 展开成一维 | ||||||||
| full connection | 120 | 84 | 展开成一维 | ||||||||
| full connection | 84 | 10 | 10就是需要分的种类 |
根据图2和表1建立模型。
为了方便使用sequential来建立模型。
model.py程序:
import torch
import torch.nn as nn
import torch.nn.functional as F

LeNet=nn.Sequential(
                    nn.Conv2d(in_channels=3,out_channels=16,kernel_size=5),
                    nn.ReLU(),
                    nn.MaxPool2d(kernel_size=2,stride=2),
                    nn.Conv2d(in_channels=16,out_channels=32,kernel_size=5),
                    nn.ReLU(),
                    nn.MaxPool2d(kernel_size=2,stride=2),
                    nn.Flatten(),
                    nn.Linear(in_features=32*5*5,out_features=120),
                    nn.Linear(in_features=120,out_features=84),
                    nn.Linear(84,10)
)
打印各层的情况。
print(LeNet)
X=torch.randn(size=(32,3,32,32))
for layer in LeNet:
    X=layer(X)
    print(layer.__class__.__name__,'output layer shape:\t',X.shape)
输出为:
Sequential(
(0): Conv2d(3, 16, kernel_size=(5, 5), stride=(1, 1))
(1): ReLU()
(2): MaxPool2d(kernel_size=2, stride=2, padding=0, dilation=1, ceil_mode=False)
(3): Conv2d(16, 32, kernel_size=(5, 5), stride=(1, 1))
(4): ReLU()
(5): MaxPool2d(kernel_size=2, stride=2, padding=0, dilation=1, ceil_mode=False)
(6): Flatten(start_dim=1, end_dim=-1)
(7): Linear(in_features=800, out_features=120, bias=True)
(8): Linear(in_features=120, out_features=84, bias=True)
(9): Linear(in_features=84, out_features=10, bias=True)
)
Conv2d output layer shape: torch.Size([32, 16, 28, 28])
ReLU output layer shape: torch.Size([32, 16, 28, 28])
MaxPool2d output layer shape: torch.Size([32, 16, 14, 14])
Conv2d output layer shape: torch.Size([32, 32, 10, 10])
ReLU output layer shape: torch.Size([32, 32, 10, 10])
MaxPool2d output layer shape: torch.Size([32, 32, 5, 5])
Flatten output layer shape: torch.Size([32, 800])
Linear output layer shape: torch.Size([32, 120])
Linear output layer shape: torch.Size([32, 84])
Linear output layer shape: torch.Size([32, 10])
输出的效果与我们期望的一样。
二、训练模型
直接看程序
1、导入需要的库
import os
import torch
import torchvision
import torch.nn as nn
from model import LeNet
import torch.optim as optim #优化算法
import torchvision.transforms as transforms
from torchsummary import summary#打印模型参数
import matplotlib.pyplot as plt
plt.rcParams['font.sans-serif']=['SimHei'] #用来正常显示中文标签
plt.rcParams['axes.unicode_minus']=False #用来正常显示负号
os.environ['KMP_DUPLICATE_LIB_OK']='True'#绘图时需要,要不然会有OMP错误
其中torchvision是一个很有用的模块[4]。
tochvision主要处理图像数据,包含一些常用的数据集、模型、转换函数等。torchvision独立于PyTorch,需要专门安装。安装命令:pip install torchvison
torchvision主要包含以下四部分:
- torchvision.models: 提供深度学习中各种经典的网络结构、预训练好的模型,如:Alex-Net、VGG、ResNet、Inception等。
- torchvision.datasets:提供常用的数据集,设计上继承 torch.utils.data.Dataset,主要包括:MNIST、CIFAR10/100、ImageNet、COCO等。
- torchvision.transforms:提供常用的数据预处理操作,主要包括对Tensor及PIL Image对象的操作。
- torchvision.utils:工具类,如保存张量作为图像到磁盘,给一个小批量创建一个图像网格。
2、 数据预处理
transform = transforms.Compose(
        [transforms.ToTensor(),#张量
         transforms.Resize((28,28)),#一定要对图片重新裁剪到28*28,要不然会报错
transforms.Normalize(mean=(0.5,0.5,0.5), std=(0.5,0.5,0.5))])- Compose():用来管理所有的transforms操作。
- ToTensor():把图片数据转换成张量并转化范围在[0,1]区间内。
- Normalize(mean, std):归一化。
- Resize(size):输入的PIL图像调整为指定的大小,参数可以为int或int元组。
- CenterCrop(size):将给定的PIL Image进行中心切割,得到指定size的tuple。
- RandomCrop(size, padding=0):随机中心点切割。
- RandomHorizontalFlip(size, interpolation=2):将给定的PIL Image随机切割,再resize。
- RandomHorizontalFlip():随机水平翻转给定的PIL Image。
- RandomVerticalFlip():随机垂直翻转给定的PIL Image。
- ToPILImage():将Tensor或numpy.ndarray转换为PIL Image。
- FiveCrop(size):将给定的PIL图像裁剪成4个角落区域和中心区域。
- Pad(padding, fill=0, padding_mode=‘constant’):对PIL边缘进行填充。
- RandomAffine(degrees, translate=None, scale=None):保持中心不变的图片进行随机仿射变化。
- RandomApply(transforms, p=0.5):随机选取变换。
3、加载数据集
    train_set = torchvision.datasets.CIFAR10(root='./data', #存目录
                                             train=True,#训练用
                                             download=False, #下载
                                             transform=transform)#数据增强
    train_loader = torch.utils.data.DataLoader(train_set,
                                               batch_size=32,
                                               shuffle=True, #乱序
                                               num_workers=0)#单线程
     val_set = torchvision.datasets.CIFAR10(root='./data',
                                           train=False,
                                           download=False,
                                           transform=transform)
    val_loader = torch.utils.data.DataLoader(val_set,
                                             batch_size=10000,#将所有验证数据导入
                                             shuffle=False,
                                             num_workers=0)
    val_data_iter = iter(val_loader)
    val_image, val_label = next(val_data_iter)
4、显示前16个图片
 fig = plt.figure()
    for i in range(4):
        plt.subplot(2,2,i+1)
        plt.tight_layout()
        plt.imshow(val_image[i][0],cmap='gray', interpolation='none')
        plt.title("Ground Truth: {}".format(val_label[i]))
        plt.xticks([])
        plt.yticks([])
    plt.show()
5、加载模型,查看模型参数
    net = LeNet()
    net.to(device)
    summary(net,input_size=(3,28,28),device="cuda")
Layer (type) Output Shape Param #
================================================================
Conv2d-1 [-1, 6, 28, 28] 456
MaxPool2d-2 [-1, 6, 14, 14] 0
Conv2d-3 [-1, 16, 10, 10] 2,416
MaxPool2d-4 [-1, 16, 5, 5] 0
Linear-5 [-1, 120] 48,120
Linear-6 [-1, 84] 10,164
Linear-7 [-1, 10] 850
================================================================
Total params: 62,006
Trainable params: 62,006
Non-trainable params: 0
----------------------------------------------------------------
Input size (MB): 0.01
Forward/backward pass size (MB): 0.06
Params size (MB): 0.24
Estimated Total Size (MB): 0.31
6、开始训练
 #损失函数
    loss_function = nn.CrossEntropyLoss()
    #优化器
    optimizer = optim.Adam(net.parameters(), lr=0.001)
    tr_loss=[]
    val_acc=[]
    #开始训练
    for epoch in range(10):  # loop over the dataset multiple times

        running_loss = 0.0
        for step, data in enumerate(train_loader, start=0):
            # get the inputs; data is a list of [inputs, labels]
            inputs, labels = data

            # zero the parameter gradients
            optimizer.zero_grad() #梯度清零
            # forward + backward + optimize
            outputs = net(inputs.to(device))
            loss = loss_function(outputs, labels.to(device))
            loss.backward()
            optimizer.step()

            # print statistics
            running_loss += loss.item()
            if step % 500 == 499:    # print every 500 mini-batches
                with torch.no_grad():
                    outputs = net(val_image.to(device))  # [batch, 10]
                    predict_y = torch.max(outputs, dim=1)[1]
                    accuracy = torch.eq(predict_y, val_label.to(device)).sum().item() / val_label.size(0)
                    tr_loss.append(running_loss / 500)
                    val_acc.append(accuracy)
                    print('[%d, %5d] train_loss: %.3f  acc:%d/%d %.0f%%' %
                          (epoch + 1, step + 1, running_loss / 500,torch.eq(predict_y, val_label.to(device)).sum().item(),val_label.size(0),100.*accuracy))
                    running_loss = 0.0
1, 500] train_loss: 1.816 acc:4174/10000 42%
[1, 1000] train_loss: 1.548 acc:4640/10000 46%
[1, 1500] train_loss: 1.452 acc:4927/10000 49%
[2, 500] train_loss: 1.352 acc:5097/10000 51%
[2, 1000] train_loss: 1.305 acc:5313/10000 53%
[2, 1500] train_loss: 1.265 acc:5403/10000 54%
[3, 500] train_loss: 1.183 acc:5567/10000 56%
[3, 1000] train_loss: 1.173 acc:5508/10000 55%
[3, 1500] train_loss: 1.174 acc:5774/10000 58%
[4, 500] train_loss: 1.099 acc:5931/10000 59%
[4, 1000] train_loss: 1.095 acc:5949/10000 59%
[4, 1500] train_loss: 1.085 acc:5867/10000 59%
[5, 500] train_loss: 1.030 acc:6012/10000 60%
[5, 1000] train_loss: 1.027 acc:6102/10000 61%
[5, 1500] train_loss: 1.020 acc:6094/10000 61%
[6, 500] train_loss: 0.961 acc:6074/10000 61%
[6, 1000] train_loss: 0.971 acc:6142/10000 61%
[6, 1500] train_loss: 0.968 acc:6100/10000 61%
[7, 500] train_loss: 0.904 acc:6115/10000 61%
[7, 1000] train_loss: 0.910 acc:6247/10000 62%
[7, 1500] train_loss: 0.943 acc:6280/10000 63%
[8, 500] train_loss: 0.856 acc:6277/10000 63%
[8, 1000] train_loss: 0.888 acc:6250/10000 62%
[8, 1500] train_loss: 0.881 acc:6336/10000 63%
[9, 500] train_loss: 0.825 acc:6302/10000 63%
[9, 1000] train_loss: 0.843 acc:6306/10000 63%
[9, 1500] train_loss: 0.843 acc:6289/10000 63%
[10, 500] train_loss: 0.769 acc:6371/10000 64%
[10, 1000] train_loss: 0.807 acc:6359/10000 64%
[10, 1500] train_loss: 0.824 acc:6313/10000 63%
当epoch=10时,输出精度只有64%。
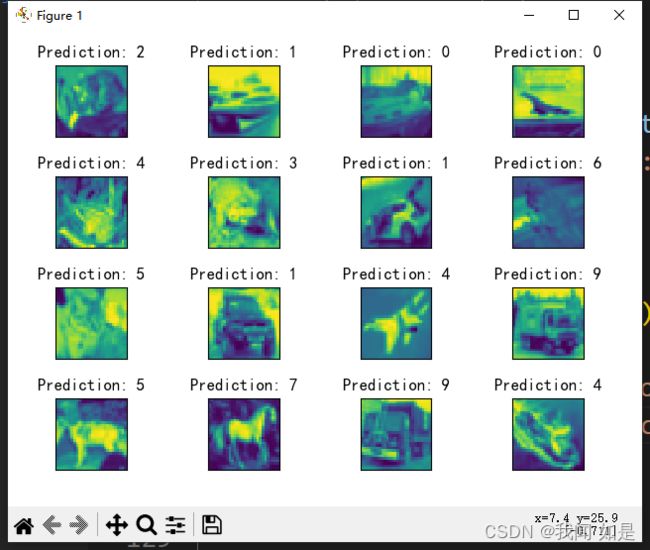
7、可视化预测结果
和真实值作比较,可以看出来预测结果很差。
8、将epoch增大到30
预测结果稳定到64%作用,看来随着epoch增大,不会提高精度。


