用CUDA设计一个将RGB图像转换生成灰度图像的程序,要求通过实例测试串行程序和GPU并行程序的执行效率(要求处理至少100张图片)。
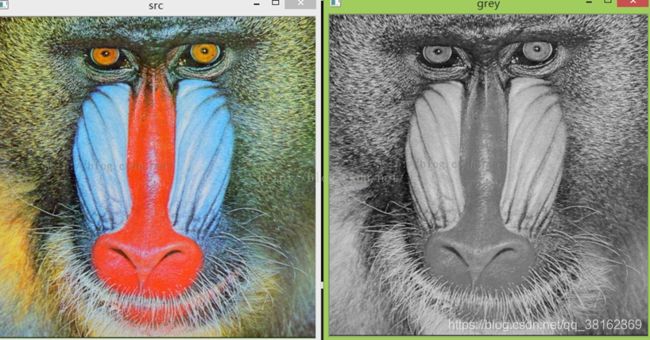
效果如图:
RGB彩色图像中,一种彩色由R(红色),G(绿色),B(蓝色)三原色按比例混合而成。图像的基本单元是一个像素,就像一个巨幅电子广告屏上远处看是衣服图像,走近你会看到一个一个的方格,这个方格的颜色是一种,从远处看,觉察不到这个方格的存在。
一个像素需要3块表示,分别代表R,G,B,如果8为表示一个颜色,就由0-255区分不同亮度的某种原色。一张9像素的8位RGB图像,在计算机内存中的分布大概示意如下:
实际中数都是二进制形式的,并且未必按照R,G,B顺序,比如OpenCV是按照B,G,R顺序将三个色值保存在3个连续的字节里
灰度图像是用不同饱和度的黑色来表示每个图像点,比如用8位 0-255数字表示“灰色”程度,每个像素点只需要一个灰度值,8位即可,这样一个3X3的灰度图,只需要9个byte就能保存RGB值和灰度的转换,实际上是人眼对于彩色的感觉到亮度感觉的转换,这是一个心理学问题,有一个公式:
Grey = 0.299*R + 0.587*G + 0.114*B
根据这个公式,依次读取每个像素点的R,G,B值,进行计算灰度值(转换为整型数),将灰度值赋值给新图像的相应位置,所有像素点遍历一遍后完成转换。
实验环境
操作系统:Windows10
开发环境:Visual Studio 2019 + CUDA Toolkit 11.0 + OpenCV
文件位置说明:
彩色图片素材应存放在项目文件夹下的Picture文件夹下
转为灰度的图片存放在项目文件夹下的GrayPicture文件夹下
存放gputime和cputime的文件为time.txt,位于项目文件夹下
100张彩色图片资源链接:
https://wwe.lanzoui.com/iDYY4swrahe
https://wwe.lanzoui.com/i7QQUswrchg
https://wwe.lanzoui.com/itU8Cswre5g
灰度图像处理的CPU程序
#include "cuda_runtime.h"
#include "device_launch_parameters.h"
#include
#include
#include
#include
#include
#include
#include
#include
#include
#include
#include
#include
#include "opencv2/highgui.hpp"
#include "opencv2/imgcodecs/legacy/constants_c.h"
#include
#include
#include
using namespace cv;
using namespace std;
#define THREAD_NUM 256
//串行转换灰度图像
void rgb2grayincpu(unsigned char* const d_in, unsigned char* const d_out, uint imgheight, uint imgwidth) {
//使用两重循环嵌套实现x方向 y方向的变换
for (int i = 0; i < imgheight; i++) {
for (int j = 0; j < imgwidth; j++) {
d_out[i * imgwidth + j] = 0.299f * d_in[(i * imgwidth + j) * 3]
+ 0.587f * d_in[(i * imgwidth + j) * 3 + 1]
+ 0.114f * d_in[(i * imgwidth + j) * 3 + 2];
}
}
}
int Initfunc(string inputfilename, double& cpusumtime) {
/*图片数据预处理*/
//传入图片
Mat srcImg = imread(inputfilename);
FILE* fp;//创建运行时间文件
//读取图片像素值
int imgHeight = srcImg.rows;
int imgWidth = srcImg.cols;
Mat grayImg(imgHeight, imgWidth, CV_8UC1, Scalar(0)); //输出灰度图
int hist[256]; //灰度直方图统计数组
memset(hist, 0, 256 * sizeof(int)); //对灰度直方图数组初始化为0
/*CPU串行开始*/
//串行灰度化
//计时开始
auto cpustart = chrono::system_clock::now();
//调用主函数
rgb2grayincpu(srcImg.data, grayImg.data, imgHeight, imgWidth);
vector<int> compression_params;
compression_params.push_back(CV_IMWRITE_PNG_COMPRESSION);
compression_params.push_back(9);
//计时结束
auto cpuend = chrono::system_clock::now();
//计算时间差
auto cpuduration = chrono::duration_cast<chrono::microseconds>(cpuend - cpustart);
double cput = cpuduration.count();
//微秒转化为秒
double cputime = cput / 1000000;
cpusumtime += cputime;
//打印串行执行时间
cout << setiosflags(ios::fixed) << setprecision(10) << "cpu exec time: " << cputime << " s" << endl;
//printf("cpu exec time is %.10lg s\n", cputime / 1000000);
/*输出灰度图片*/
try {
int len = inputfilename.length();
cout << "inputfilename.length:" << len << endl;
string str = "./GrayPicture/";
imwrite(str + inputfilename.substr(10, len - 14) + "_to_gray.png", grayImg, compression_params);
cout << str + inputfilename.substr(10, len - 14) + "_to_gray.png" << endl;
//在GrayPicture文件夹中,生成灰度变换后的结果图片
}
catch (runtime_error& ex) {
fprintf(stderr, "图像转换成PNG格式发生错误:%s\n", ex.what());
return 1;
}
return 0;
}
//批量读取图片
void getFiles(string path, vector<string>& files) {
//文件句柄
intptr_t hFile = 0;
//文件信息
struct _finddata_t fileinfo;
string p;
if ((hFile = _findfirst(p.assign(path).append("\\*").c_str(), &fileinfo)) != -1) {
do {
//如果是目录,迭代之
//如果不是,加入列表
if ((fileinfo.attrib & _A_SUBDIR)) {
if (strcmp(fileinfo.name, ".") != 0 && strcmp(fileinfo.name, "..") != 0)
getFiles(p.assign(path).append("\\").append(fileinfo.name), files);
}
else {
files.push_back(p.assign(path).append("\\").append(fileinfo.name));
}
} while (_findnext(hFile, &fileinfo) == 0);
_findclose(hFile);
}
}
int main() {
//图片文件路径,在项目文件下的Picture文件夹里面
string filePath = "./Picture";
vector<string> files;
//读取图片文件
getFiles(filePath, files);
//读取图片数量
int size = files.size();
//输出图片数量
cout << "图片数量:" << size << endl;
double cpusumtime = 0;
for (int i = 0; i < size; i++) {
cout << "第 " << i + 1 << "/" << size << " 张图片" << endl;
cout << files[i].c_str() << endl;
Initfunc(files[i].c_str(), cpusumtime);
cout << endl;
}
cout << "cpusumtime:" << cpusumtime << " s" << endl;
return 0;
}
灰度图像处理的GPU程序并记录下GPU程序和CPU程序消耗的时间
#include "cuda_runtime.h"
#include "device_launch_parameters.h"
#include
#include
#include
#include
#include
#include
#include
#include
#include
#include
#include
#include
#include "opencv2/highgui.hpp"
#include "opencv2/imgcodecs/legacy/constants_c.h"
#include
#include
#include
using namespace cv;
using namespace std;
#define THREAD_NUM 256
//输入图像为BGR图,将其转化为gray图
__global__ void rgb2grayInCuda(uchar3* dataIn, unsigned char* dataOut, int imgHeight, int imgWidth)
{
//图片二维扫描,分别有x方向,y方向的像素点
int xIndex = threadIdx.x + blockIdx.x * blockDim.x; //表示x方向上的ID
int yIndex = threadIdx.y + blockIdx.y * blockDim.y; //表示y方向上的ID
//灰度变换操作
if (xIndex < imgWidth && yIndex < imgHeight)
{
uchar3 rgb = dataIn[yIndex * imgWidth + xIndex];
dataOut[yIndex * imgWidth + xIndex] = 0.299f * rgb.x + 0.587f * rgb.y + 0.114f * rgb.z;
}
}
//串行转换灰度图像
void rgb2grayincpu(unsigned char* const d_in, unsigned char* const d_out, uint imgheight, uint imgwidth)
{
//使用两重循环嵌套实现x方向 y方向的变换
for (int i = 0; i < imgheight; i++)
{
for (int j = 0; j < imgwidth; j++)
{
d_out[i * imgwidth + j] = 0.299f * d_in[(i * imgwidth + j) * 3]
+ 0.587f * d_in[(i * imgwidth + j) * 3 + 1]
+ 0.114f * d_in[(i * imgwidth + j) * 3 + 2];
}
}
}
//灰度直方图统计
__global__ void imHistInCuda(unsigned char* dataIn, int* hist)
{
int threadIndex = threadIdx.x + threadIdx.y * blockDim.x;
int blockIndex = blockIdx.x + blockIdx.y * gridDim.x;
int index = threadIndex + blockIndex * blockDim.x * blockDim.y;
atomicAdd(&hist[dataIn[index]], 1);
//多个thread有序地对*dataIn地址加1
//如果使用自加(++),会出现多个threads同步写竞争,造成数据出错
}
int CUDAfunc(string inputfilename, double& gpusumtime, double& cpusumtime) {
/*图片数据预处理*/
//传入图片
Mat srcImg = imread(inputfilename);
FILE* fp;//创建运行时间文件
//读取图片像素值
int imgHeight = srcImg.rows;
int imgWidth = srcImg.cols;
Mat grayImg(imgHeight, imgWidth, CV_8UC1, Scalar(0)); //输出灰度图
int hist[256]; //灰度直方图统计数组
memset(hist, 0, 256 * sizeof(int)); //对灰度直方图数组初始化为0
/*CUDA并行开始*/
//在GPU中开辟输入输出空间
uchar3* d_in;
unsigned char* d_out;
int* d_hist;
//分配内存空间
cudaMalloc((void**)&d_in, imgHeight * imgWidth * sizeof(uchar3));
cudaMalloc((void**)&d_out, imgHeight * imgWidth * sizeof(unsigned char));
cudaMalloc((void**)&d_hist, 256 * sizeof(int));
//将图像数据传入GPU中
cudaMemcpy(d_in, srcImg.data, imgHeight * imgWidth * sizeof(uchar3), cudaMemcpyHostToDevice);
cudaMemcpy(d_hist, hist, 256 * sizeof(int), cudaMemcpyHostToDevice);
dim3 threadsPerBlock(THREAD_NUM, THREAD_NUM);
dim3 blocksPerGrid((imgWidth + threadsPerBlock.x - 1) / threadsPerBlock.x, (imgHeight + threadsPerBlock.y - 1) / threadsPerBlock.y);
//cuda灰度化
//计时开始
auto gpustart = chrono::system_clock::now();
//调用核函数
rgb2grayInCuda << <blocksPerGrid, threadsPerBlock >> > (d_in, d_out, imgHeight, imgWidth);
//同步CPU和gpu,否则测速结果为cpu启动内核函数的速度
cudaDeviceSynchronize();
//计时结束
auto gpuend = chrono::system_clock::now();
//计算时间差
auto gpuduration = chrono::duration_cast<chrono::microseconds>(gpuend - gpustart);
double gput = gpuduration.count();
//微秒转化为秒
double gputime = gput / 1000000;
gpusumtime += gputime;
//打印cuda并行执行时间
cout << setiosflags(ios::fixed) << setprecision(10) << "cuda exec time: " << gputime << " s" << endl;
//printf("cuda exec time is %.10lg s\n", gputime / 1000000);
//灰度直方图统计
imHistInCuda << <blocksPerGrid, threadsPerBlock >> > (d_out, d_hist);
//将数据从GPU传回CPU
cudaMemcpy(hist, d_hist, 256 * sizeof(int), cudaMemcpyDeviceToHost);
cudaMemcpy(grayImg.data, d_out, imgHeight * imgWidth * sizeof(unsigned char), cudaMemcpyDeviceToHost);
vector<int> compression_params;
compression_params.push_back(CV_IMWRITE_PNG_COMPRESSION);
compression_params.push_back(9);
//释放内存
cudaFree(d_in);
cudaFree(d_out);
cudaFree(d_hist);
/*CPU串行开始*/
//串行灰度化
//计时开始
auto cpustart = chrono::system_clock::now();
//调用主函数
rgb2grayincpu(srcImg.data, grayImg.data, imgHeight, imgWidth);
//计时结束
auto cpuend = chrono::system_clock::now();
//计算时间差
auto cpuduration = chrono::duration_cast<chrono::microseconds>(cpuend - cpustart);
double cput = cpuduration.count();
//微秒转化为秒
double cputime = cput / 1000000;
cpusumtime += cputime;
//打印串行执行时间
cout << setiosflags(ios::fixed) << setprecision(10) << "cpu exec time: " << cputime << " s" << endl;
//printf("cpu exec time is %.10lg s\n", cputime / 1000000);
/*记录时间信息*/
//将串行、并行执行时间记录到文件中,方便查看比对
fp = fopen("time.txt", "w");
fprintf(fp, "cpu exec time is %.10lf s ,cuda exec time is %.10lf s \n", cputime, gputime);
fclose(fp);
/*输出灰度图片*/
try
{
int len = inputfilename.length();
cout << "inputfilename.length:" << len << endl;
string str = "./GrayPicture/";
imwrite(str + inputfilename.substr(10, len - 14) + "_to_gray.png", grayImg, compression_params);
cout << str + inputfilename.substr(10, len - 14) + "_to_gray.png" << endl;
//在GrayPicture文件夹中,生成灰度变换后的结果图片
}
catch (runtime_error& ex)
{
fprintf(stderr, "图像转换成PNG格式发生错误:%s\n", ex.what());
return 1;
}
return 0;
}
//批量读取图片
void getFiles(string path, vector<string>& files)
{
//文件句柄
intptr_t hFile = 0;
//文件信息
struct _finddata_t fileinfo;
string p;
if ((hFile = _findfirst(p.assign(path).append("\\*").c_str(), &fileinfo)) != -1)
{
do
{
//如果是目录,迭代之
//如果不是,加入列表
if ((fileinfo.attrib & _A_SUBDIR))
{
if (strcmp(fileinfo.name, ".") != 0 && strcmp(fileinfo.name, "..") != 0)
getFiles(p.assign(path).append("\\").append(fileinfo.name), files);
}
else
{
files.push_back(p.assign(path).append("\\").append(fileinfo.name));
}
} while (_findnext(hFile, &fileinfo) == 0);
_findclose(hFile);
}
}
int main()
{
//图片文件路径,在项目文件下的Picture文件夹里面
string filePath = "./Picture";
vector<string> files;
//读取图片文件
getFiles(filePath, files);
//读取图片数量
int size = files.size();
//输出图片数量
cout << "图片数量:" << size << endl;
double gpusumtime = 0, cpusumtime = 0;
for (int i = 0; i < size; i++)
{
cout << "第 " << i + 1 << "/" << size << " 张图片" << endl;
cout << files[i].c_str() << endl;
CUDAfunc(files[i].c_str(), gpusumtime, cpusumtime);
cout << endl;
}
cout << "gpusumtime:" << gpusumtime << " s" << "\n" << "cpusumtime:" << cpusumtime << " s" << endl;
FILE* fp;
fp = fopen("time.txt", "a");
fprintf(fp, "cpusumtime: %.10lf s ,gpusumtime: %.10lf s \n", cpusumtime, gpusumtime);
fclose(fp);
return 0;
}
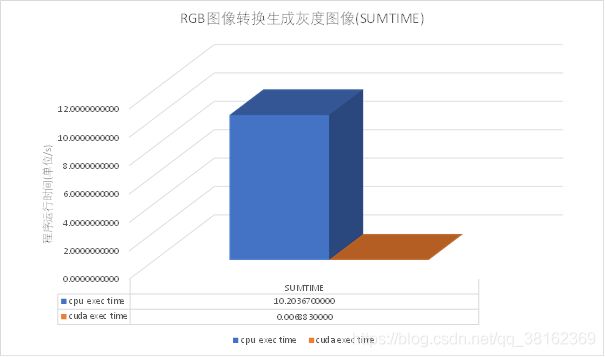
我们从图1和图2中可以看出通过CUDA编程的GPU程序处理RGB图像转换生成灰度图像问题时消耗的时间远小于通过CPU处理的时间,处理120张图片CPU程序的耗时大约是GPU程序耗时的1482倍。
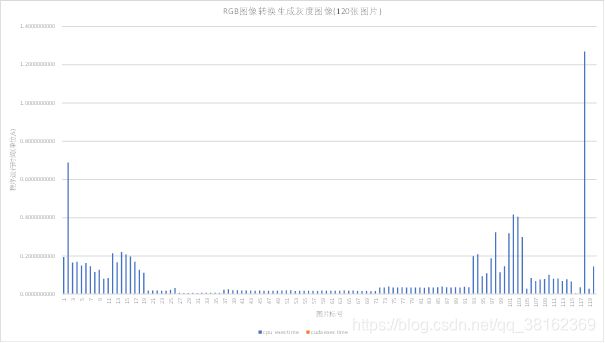
图2 RGB图像转换生成灰度图像(SUMTIME)
RGB彩色图像中,一种彩色由R(红色),G(绿色),B(蓝色)三原色按比例混合而成。图像的基本单元是一个像素,就像一个巨幅电子广告屏上远处看是衣服图像,走近你会看到一个一个的方格,这个方格的颜色是一种,从远处看,觉察不到这个方格的存在。
一个像素需要3块表示,分别代表R,G,B,如果8为表示一个颜色,就由0-255区分不同亮度的某种原色。
实际中数都是二进制形式的,并且未必按照R,G,B顺序,比如OpenCV是按照B,G,R顺序将三个色值保存在3个连续的字节里。
灰度图像是用不同饱和度的黑色来表示每个图像点,比如用8位 0-255数字表示“灰色”程度,每个像素点只需要一个灰度值,8位即可,这样一个3X3的灰度图,只需要9个byte就能保存RGB值和灰度的转换,实际上是人眼对于彩色的感觉到亮度感觉的转换,这是一个心理学问题,有一个公式:
Grey = 0.299*R + 0.587*G + 0.114*B
根据这个公式,依次读取每个像素点的R,G,B值,进行计算灰度值(转换为整型数),将灰度值赋值给新图像的相应位置,所有像素点遍历一遍后完成转换。
一张500X500的图像转换为同样大小的灰度图需要进行25万次上述公式的计算。进行优化是很有必要的,这个简单的算法是O(n)复杂度的,应该是不能优化了(或者用并行进行优化,本文不涉及),但是Grey = 0.299*R + 0.587*G + 0.114*B
有更加高效的等价形式。
在ALU中,位操作快于整数加法,整数加法快于整数乘法(快多少取决于有没有乘法电路,乘法电路的结构),整数运算又比浮点数运算快得多。所以可以通过将浮点数运算转化为整数运算,整数运算转换为位操作进行优化
Grey = 0.299*R + 0.587*G + 0.114*B
可以转化为
Grey = (299*R + 587*G + 114*B + 500) /1000;
整数运算会截断小数部分,加上500是为了四舍五入(找两个例子便可理解),减少精度损失。这里的除法( 即使是整数除法计算也是很耗时),转换为移位操作可以优化,那么怎么转换为位操作?左右移位对应于乘除2的幂,为了把除法转为右移操作,做如下处理:
Grey = 0.299*R+0.587*G+0.114*B
Grey = (299*R+587*G+114*B)÷ 1000
Grey = (1024*299*R+1024*587*G+1024*114*B)÷(1024*1000)
Grey = (306176*R+601088*G+116736*B)÷(1024*1000)
Grey = (306.176*R+601.088*G+116.736*B)÷(1024)
Grey = (306*R+601*G+116*B)÷(1024)//截断误差
Grey = (306*R+601*G+116*B) >> 10;
误差最大是多少?(0.176*255+0.088*255+0.736*255)÷1024 = 255÷1024 = 0.249
,可能会导致1个灰度值的波动。有一种计算方法可以降低误差
R的系数 = 1024*0.229 = 306.176 ≈ 306
G的系数 = 1024*0.587+0.176 = 601.264 ≈ 601
B的系数 = 1024*0.114+0.264 = 117
保留了小数部分的作用,可以得到一个误差较小的公式:
Grey = (306*R+601*G+117*B) >> 10;
这样得来的是10位精度的。
同样的方法可以获得其他精度的,比如
Grey = (R*1 + G*2 + B*1) >> 2 (Grey = (R + G<<1 + B) >> 2
Grey = (R*38 + G*75 + B*15) >> 7
Grey = (R*76 + G*150 + B*30) >> 8
Grey = (R*19595 + G*38469 + B*7472) >> 16