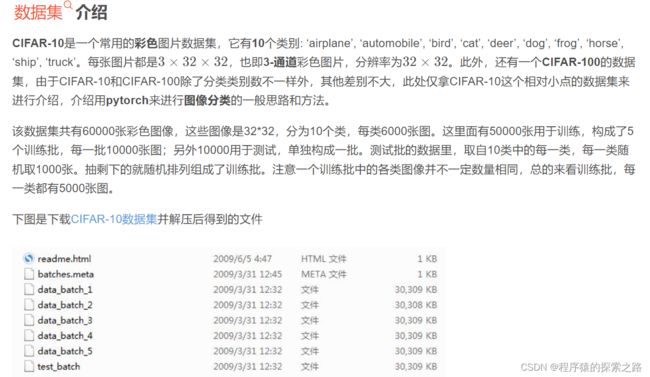
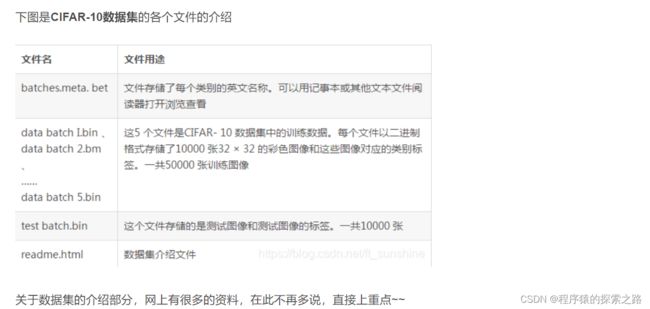
【笔记】Cifar-10 的介绍和使用 : 将 像素 3 x 32 x 32 的图片的像素数据 和 标签信息 压缩为二进制文件
附1:cifar10介绍及转换图片
具体参考:CIFAR-10 dataset 的下载与使用、转图片_gmHappy的博客-CSDN博客_cifar10数据集图片
解压源文件的函数:
import cv2
import numpy as np
import pickle
import os

# 解压缩,返回解压后的字典
def unpickle(file):
    fo = open(file, 'rb')
    dict = pickle.load(fo, encoding='latin1')
    fo.close()
    return dict
cifar10转图片 :
def cifar10_to_images():
  tar_dir='../data/cifar-10-batches-py/' #原始数据库目录
  train_root_dir='../data/cifar10/train/' #图片保存目录
  test_root_dir='../data/cifar10/test/'
  if not os.path.exists(train_root_dir):
    os.makedirs(train_root_dir)
  if not os.path.exists(test_root_dir):
    os.makedirs(test_root_dir)
  # 生成训练集图片,如果需要png格式,只需要改图片后缀名即可。
  label_names = ["airplane", "automobile", "bird", "cat", "dear", "dog", "frog", "horse", "ship", "truck"]
  for j in range(1, 6):
      dataName = tar_dir+"data_batch_" + str(j)
      Xtr = unpickle(dataName)
      print(dataName + " is loading...")

      for i in range(0, 10000):
          img = np.reshape(Xtr['data'][i], (3, 32, 32))  # Xtr['data']为图片二进制数据
          img = img.transpose(1, 2, 0)  # 读取image
          picName = train_root_dir + str(Xtr['labels'][i])+ '_' + label_names[Xtr['labels'][i]]+'_'+ str(i + (j - 1)*10000)+'.jpg'  # label+class+index
          cv2.imwrite(picName, img)
      print(dataName + " loaded.")

  print("test_batch is loading...")

  # 生成测试集图片
  testXtr = unpickle(tar_dir+"test_batch")
  for i in range(0, 10000):
      img = np.reshape(testXtr['data'][i], (3, 32, 32))
      img = img.transpose(1, 2, 0)
      picName = test_root_dir + str(testXtr['labels'][i])+ '_' + label_names[testXtr['labels'][i]]+'_' + str(i) + '.jpg'
      cv2.imwrite(picName, img)
  print("test_batch loaded.")
结果:文件名为 # label_class_index.jpg
附2:
data_batch_1 ~ data_batch_5 是划分好的训练数据,每个文件里包含10000张图片,test_batch 是测试集数据,也包含10000张图片。他们的结构是一样的,下面就用 data_batch_1 作为例子进行说明。读取数据
import pickle

def load_file(filename):
    with open(filename, 'rb') as fo:
        data = pickle.load(fo, encoding='latin1')
    return data
首先定义读取数据的函数,这几个文件都是通过 pickle 产生的,所以在读取的时候也要用到这个包。
这里面返回的data是一个字典,先看看这个字典里面有哪些键吧。
data = load_file('test_batch')
print(data.keys())
输出结果
dict_keys(['batch_label', 'labels', 'data', 'filenames'])
batch_label
对应的值是一个字符串,用来表明当前文件的一些基本信息。
如果是 data_batch_1 这个文件,里面的值就是
pythontraining batch 1 of 5
如果是 test_batch 这个文件,里面的值就是
pythontesting batch 1 of 1
labels
对应的值是一个长度为10000的列表,每个数字取值范围 0~9,代表当前图片所属类别
data
10000 * 3072 的二维数组,每一行代表一张图片的像素值。(32323=3072)
filenames
长度为10000的列表,里面每一项是代表图片文件名的字符串。
batches.meta 文件可以用相同的方法读取,里面存的是一些基本信息。
num_cases_per_batch
10000
label_names
['airplane', 'automobile', 'bird', 'cat', 'deer', 'dog', 'frog', 'horse', 'ship', 'truck']
num_vis
3072转为图片
 # -*- coding: utf-8 -*-
from scipy.misc import imsave
import numpy as np
import pickle

# 解压缩,返回解压后的字典
def unpickle(file):
    fo = open(file, 'rb')
    dict = pickle.load(fo, encoding='latin1')
    fo.close()
    return dict

# 生成训练集图片,如果需要png格式,只需要改图片后缀名即可。
for j in range(1, 6):
    dataName = "data_batch_" + str(j)  # 读取当前目录下的data_batch12345文件,dataName其实也是data_batch文件的路径,本文和脚本文件在同一目录下。
    Xtr = unpickle(dataName)
    print(dataName + " is loading...")

    for i in range(0, 10000):
        img = np.reshape(Xtr['data'][i], (3, 32, 32))  # Xtr['data']为图片二进制数据
        img = img.transpose(1, 2, 0)  # 读取image
        picName = 'train/' + str(Xtr['labels'][i]) + '_' + str(i + (j - 1)*10000) + '.jpg'  # Xtr['labels']为图片的标签,值范围0-9,本文中,train文件夹需要存在,并与脚本文件在同一目录下。
        imsave(picName, img)
    print(dataName + " loaded.")

print("test_batch is loading...")

# 生成测试集图片
testXtr = unpickle("test_batch")
for i in range(0, 10000):
    img = np.reshape(testXtr['data'][i], (3, 32, 32))
    img = img.transpose(1, 2, 0)
    picName = 'test/' + str(testXtr['labels'][i]) + '_' + str(i) + '.jpg'
    imsave(picName, img)
print("test_batch loaded.")
正文:
数据集介绍:
Code:
import torchvision as tv
import torchvision.transforms as transforms
from torchvision.transforms import ToPILImage
import torch as t

show = ToPILImage() # 可以把Tensor转成Image,方便可视化

# 第一次运行程序torchvision会自动下载CIFAR-10数据集,
# 大约160M,需花费一定的时间,
# 如果已经下载有CIFAR-10,可通过root参数指定

# 定义对数据的预处理
transform = transforms.Compose([
        transforms.ToTensor(), # 转为Tensor
        transforms.Normalize((0.5, 0.5, 0.5), (0.5, 0.5, 0.5)), # 归一化 先将输入归一化到(0,1),再使用公式”(x-mean)/std”,将每个元素分布到(-1,1)
                             ])

# 训练集(因为torchvision中已经封装好了一些常用的数据集,包括CIFAR10、MNIST等,所以此处可以这么写 tv.datasets.CIFAR10())
trainset = tv.datasets.CIFAR10(
                    root='DataSet/',   # 将下载的数据集压缩包解压到当前目录的DataSet目录下
                    train=True,
                    download=False,    # 如果之前没手动下载数据集,这里要改为True
                    transform=transform)

trainloader = t.utils.data.DataLoader(
                    trainset,
                    batch_size=40,
                    shuffle=True,
                    num_workers=2)

# 测试集
testset = tv.datasets.CIFAR10(
                    'DataSet/',
                    train=False,
                    download=False,   # 如果之前没手动下载数据集,这里要改为True
                    transform=transform)

testloader = t.utils.data.DataLoader(
                    testset,
                    batch_size=40,
                    shuffle=False,
                    num_workers=2)

classes = ('plane', 'car', 'bird', 'cat',
           'deer', 'dog', 'frog', 'horse', 'ship', 'truck')


import torch.nn as nn
import torch.nn.functional as F

class Net(nn.Module):
    def __init__(self):
        super(Net, self).__init__()
        self.conv1 = nn.Conv2d(3, 6, 5)
        self.conv2 = nn.Conv2d(6, 16, 5)
        self.fc1   = nn.Linear(16*5*5, 120)
        self.fc2   = nn.Linear(120, 84)
        self.fc3   = nn.Linear(84, 10)  # 最后是一个十分类,所以最后的一个全连接层的神经元个数为10

    def forward(self, x):
        x = F.max_pool2d(F.relu(self.conv1(x)), (2, 2))
        x = F.max_pool2d(F.relu(self.conv2(x)), 2)
        x = x.view(x.size()[0], -1)  # 展平  x.size()[0]是batch size
        x = F.relu(self.fc1(x))
        x = F.relu(self.fc2(x))
        x = self.fc3(x)
        return x


# net = Net()
# print(net)


if __name__=="__main__":
    # dataiter = iter(trainloader)  # trainloader is a DataLoader Object
    # images,labels=dataiter.next()
    # import matplotlib.pyplot as plt
    # print(show(tv.utils.make_grid((images),nrow=10)))
    # plt.imshow(show(tv.utils.make_grid(images,nrow=10)))
    # plt.show()
    # print(images.shape)

    # for i in range(100):
    #     images, labels = dataiter.next()  # 返回4张图片及标签   images,labels都是Tensor    images.size()= torch.Size([4, 3, 32, 32])     lables = tensor([5, 6, 3, 8])
    #     print(labels)
    #     input()
    # print(' '.join('%11s' % classes[labels[j]] for j in range(4)))
    # show(tv.utils.make_grid((images + 1) / 2)).resize((400, 100))
    # import matplotlib.pyplot as plt
    # for i in images:
    #     j=t.tensor(i,dtype=t.float32).permute(1,2,0)
    #     plt.imshow(j)
    #     plt.show()


    # from torch import optim
    # criterion = nn.CrossEntropyLoss() # 交叉熵损失函数
    # optimizer = optim.SGD(net.parameters(), lr=0.001, momentum=0.9)


    dataiter = iter(testloader)
    images, labels = dataiter.next() # 一个batch返回4张图片

    net_gpu = Net()
    net_gpu.cuda()

    from torch import optim

    criterion = nn.CrossEntropyLoss()  # 交叉熵损失函数
    optimizer = optim.SGD(net_gpu.parameters(), lr=0.001, momentum=0.9)

    device = t.device("cuda:0" if t.cuda.is_available() else "cpu")
    images = images.to(device)
    labels = labels.to(device)
    output = net_gpu(images)
    output = output.to(device)
    loss= criterion(output,labels)

    for epoch in range(200):

        running_loss = 0.0
        for i, data in enumerate(trainloader, 0):  # i 第几个batch     data:一个batch中的数据

            # 输入数据
            inputs, labels = data  # images:大小为4   labels:大小为4

            inputs = inputs.to(device)
            labels = labels.to(device)

            # 梯度清零
            optimizer.zero_grad()

            # forward + backward
            outputs = net_gpu(inputs)

            outputs = outputs.to(device)

            loss = criterion(outputs, labels)
            loss.backward()

            # 更新参数
            optimizer.step()

            # 打印log信息
            # loss 是一个scalar,需要使用loss.item()来获取数值,不能使用loss[0]
            running_loss += loss.item()
            if i % 2==1:
            # if i % 2000 == 1999:  # 每2000个batch打印一下训练状态
                print('[%d, %5d] loss: %.3f' \
                      % (epoch + 1, i + 1, running_loss / 2000))
                running_loss = 0.0
    print('Finished Training')


