voc数据集格式转coco数据集格式
小白AI:VOC数据集史上最实用的介绍和使用(1)
刚入门目标检测时,用的都是VOC格式的数据集,简单且评价标准单一。目前cv领域用的都是COCO格式的评价标准,前期使用Labelimg自制的数据集格式都是voc格式的xml文件,所以需要转换成COCO数据集的json格式。在转格式之前,弄清voc和coco标注文件的组成是非常必要的。
VOC数据集
什么是VOC数据集
PASCAL VOC挑战赛 (The PASCAL Visual Object Classes )是一个世界级的计算机视觉挑战赛, PASCAL全称:Pattern Analysis, Statical Modeling and Computational Learning,是一个由欧盟资助的网络组织。http://host.robots.ox.ac.uk/pascal/VOC/
简言之,VOC是 (Visual Object Classes)的简称,它是一套检测和识别标准化的数据集,可以说是该类数据集的开山之作,后续的很多数据集,都是在此基础上的扩展。目前应用最广的是VOC 2007和VOC 2012,即在2007推出的VOC和2012年推出的。但是,VOC系列止步于2012版本,后续就不再更新,学术界的主流用的是COCO数据集和其评价标准,VOC数据集数据量不大,可用于入门。
VOC数据集的组成
● Annotations:这里所谓的标注信息,实际上是图片中物体(instances)的位置坐标和。文件的形式是xml,并且是1个xml和1张图片相对应
● ImageSets:
○ Layout下存放的是具有人体部位的数据(人的head、hand等)
○ Segmentation下存放的是可用于分割的数据。
○ Main文件夹中存放的主要又有四个文本文件test.txt, train.txt, trainval.txt, val.txt,其中分别存放的是测试集图片的文件名、训练集图片的文件名、训练验证集图片的文件名、验证集图片的文件名。
● SegmentationClass与SegmentationObject:存放的都是图片,且都是图像分割结果图,对目标检测任务来说没有用。class segmentation 标注出每一个像素的类别 。object segmentation 标注出每一个像素属于哪一个物体。
接下来分析最重要的label文件。VOC数据集的标注文件是xml格式
<annotation>
  <folder>17folder> # 图片所处文件夹
  <filename>77258.bmpfilename> # 图片名
  <path>~/frcnn-image/61/ADAS/image/frcnn-image/17/77258.bmppath>
  <source>  #图片来源相关信息
    <database>Unknowndatabase>
  source>
  <size> #图片尺寸
    <width>640width>
    <height>480height>
    <depth>3depth>
  size>
  <segmented>0segmented>  #是否有分割label
  <object> 包含的物体
    <name>carname>  #物体类别
    <pose>Unspecifiedpose>  #物体的姿态
    <truncated>0truncated>  #物体是否被部分遮挡(>15%)
    <difficult>0difficult>  #是否为难以辨识的物体, 主要指要结体背景才能判断出类别的物体。虽有标注, 但一般忽略这类物体
    <bndbox>  #物体的bound box
      <xmin>2xmin>
      <ymin>156ymin>
      <xmax>111xmax>
      <ymax>259ymax>
    bndbox>
  object>
annotation>
● annotation:文件以annotation开头,也以它结尾,信息存储在其中
● size:代表图片的分辨率,以该xml为例,对应的图片宽度是353pixel,高度是500pixel,通道数是3
● object:代表目标,里面有name,pose和bndbox(bounding box)。其中比较重要的是name和bndbox。name是指目标所属类别,bndbox是标注框的信息,信息为左上角的xy坐标和右下角的xy坐标
MS COCO
What is the COCO Dataset? What you need to know in 2022
COCO数据集
MS COCO的全称是Microsoft Common Objects in Context,起源于微软于2014年出资标注的Microsoft COCO数据集,与ImageNet竞赛一样,被视为是计算机视觉领域最受关注和最权威的比赛之一。 MS COCO数据集中的图像分为训练、验证和测试集
COCO数据集是一个大型的、丰富的物体检测,分割和字幕数据集。这个数据集以scene understanding为目标,主要从复杂的日常场景中截取,图像中的目标通过精确的segmentation进行位置的标定。可用于目标检测与实例分割、人体关键点检测、材料识别、全景分割、图像描述。
解析数据集
COCO数据集解析
COCO数据集标注格式及意义
COCO数据集现在有3种标注类型:object instances(目标实例), object keypoints(目标上的关键点), 和image captions(看图说话),使用json文件存储。

上面所述的一共有三种类型,每种类型又包含了训练和验证,所以共6个JSON文件。

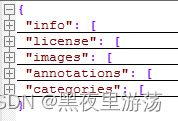
包含5个字段信息:info, licenses, images, annotations, categories。上面3种标注类型共享的字段信息有:info、image、license。不共享的是annotation和category这两种字段,他们在不同类型的JSON文件中是不一样的
以目标检测为例,解析COCO格式
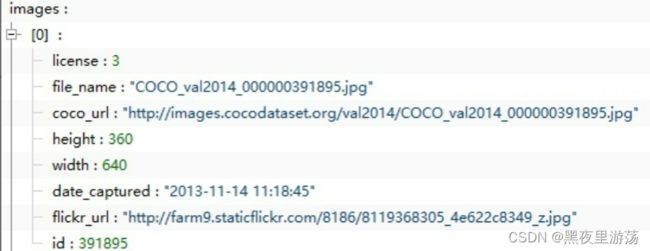
images字段
images字段中包含图像的基本信息,名称、url地址、尺寸。
categories字段
supercategory是父类,name是子类,id是类别id(按照子类统计)
annotations字段
包括下图中的内容,每个序号对应一个注释,一张图片上可能有多个注释
● category_id:该注释的类别id,与image的id一一对应,且唯一
● id:当前注释的id号
● image_id:该注释所在的图片id号
● area:标注区域面积
● bbox:目标的矩形标注框
● iscrowd:0或1。0表示标注的单个对象,此时segmentation使用polygon表示;1表示标注的是一组对象,此时segmentation使用RLE格式。
● segmentation:
○ 若使用polygon标注时,则记录的是多边形的坐标点,连续两个数值表示一个点的坐标位置,因此此时点的数量为偶数
○ 若使用RLE格式(Run Length Encoding(行程长度压缩算法))
RLE算法概述
将图像中目标区域的像素值设定为1,背景设定为0,则形成一个张二值图,该二值图可以使用z字形按照位置进行 编码,例如:0011110011100000…… 但是这样的形式太复杂了,可以采用统计有多少个0和1的形式进行局部压缩,因此上面的RLE编码形式为: 2-0-4-1-2-0-3-1-5-0……(表示有2个0,4个1,2个0,3个1,5个0)
CheckVOC
从网上下载的数据集,因为有些是经过多次转换格式,比如voc2coco,csv2xml等等,其中有些文件发生损坏,或者标注的时候标错了。但是大部分人(包括我自己)没有发现,直接送进网络就开train,侥幸跑通罢了。所以在转格式或者开train之前检查下数据集是非常必要的。
import xml.etree.ElementTree as ET
import pickle
import os
from os import listdir, getcwd
from os.path import join
import cv2
import matplotlib.pyplot as plt
from math import sqrt as sqrt
print(os.getcwd())
# 需要检查的数据
sets = [('2007', 'train'), ('2007', 'val')]

# 需要检查的类别
classes = ['face', 'face_mask']

if __name__ == '__main__':
    # GT框宽高统计
    width = []
    height = []

    for year, image_set in sets:
        # 图片ID不带后缀
        image_ids = open('VOC%s/ImageSets/Main/%s.txt'%(year, image_set)).read().strip().split()
        for image_id in image_ids:
            # 图片的路径
            img_path = 'VOC%s/JPEGImages/%s.jpg'%(year, image_id)
            # 这张图片的XML标注路径
            label_file = open('VOC%s/Annotations/%s.xml' % (year, image_id))
            tree = ET.parse(label_file)
            root = tree.getroot()
            try:
                size = root.find('size')    # 图像的size
                img_w = int(size.find('width').text)  # 宽
                img_h = int(size.find('height').text)  # 高
                img = cv2.imread(img_path)
            except:
                print(image_id)
                continue
            for obj in root.iter('object'):     # 解析object字段
                difficult = obj.find('difficult').text
                cls = obj.find('name').text #
                if cls not in classes or int(difficult) == 2:
                    continue
                cls_id = classes.index(cls)

                xmlbox = obj.find('bndbox')
                xmin = int(xmlbox.find('xmin').text)
                ymin = int(xmlbox.find('ymin').text)
                xmax = int(xmlbox.find('xmax').text)
                ymax = int(xmlbox.find('ymax').text)
                obj_w = xmax - xmin
                obj_h = ymax - ymin
                # width.append(w)
                # height.append(h)
                img = cv2.rectangle(img, (int(xmin), int(ymin)), (int(xmax), int(ymax)), (0, 255, 0), 3)    # 对应目标上画框
                # resize图和目标框到固定值
                try:
                    w_change = (obj_w / img_w) * 416
                except:
                    print(image_id)
                h_change = (obj_h / img_h) * 416
                # width.append(w_change)
                # height.append(h_change)
                s = w_change * h_change
                width.append(sqrt(s))
                height.append(w_change / h_change)
            # print(img_path)
            img = cv2.resize(img, (608, 608))
            cv2.imshow('result', img)
            cv2.waitKey()
    plt.plot(width, height, 'ro')
    plt.show()
VOC2COCO代码
# coding:utf-8
import sys
import os
import json
import xml.etree.ElementTree as ET

START_BOUNDING_BOX_ID = 1
# 注意下面的dict存储的是实际检测的类别,需要根据自己的实际数据进行修改
# 这里以自己的数据集person和hat两个类别为例,如果是VOC数据集那就是20个类别
# 注意类别名称和xml文件中的标注名称一致
PRE_DEFINE_CATEGORIES = {"face": 0, "face_mask": 1}

# 注意按照自己的数据集名称修改编号和名称
def get(root, name):
    vars = root.findall(name)
    return vars

def get_and_check(root, name, length):
    vars = root.findall(name)
    if len(vars) == 0:
        raise NotImplementedError('Can not find %s in %s.' % (name, root.tag))
    if length > 0 and len(vars) != length:
        raise NotImplementedError('The size of %s is supposed to be %d, but is %d.' % (name, length, len(vars)))
    if length == 1:
        vars = vars[0]
    return vars

def get_filename_as_int(filename):
    try:
        filename = os.path.splitext(filename)[0]
        return (filename)
    except:
        raise NotImplementedError('Filename %s is supposed to be an integer.' % (filename))


def convert(xml_dir, json_file):
    xmlFiles = os.listdir(xml_dir)

    json_dict = {"images": [], "type": "instances", "annotations": [],
                 "categories": []}
    categories = PRE_DEFINE_CATEGORIES
    bnd_id = START_BOUNDING_BOX_ID
    num = 0
    for line in xmlFiles:
        #         print("Processing %s"%(line))
        num += 1
        if num % 50 == 0:
            print("processing ", num, "; file ", line)

        xml_f = os.path.join(xml_dir, line)
        tree = ET.parse(xml_f)
        root = tree.getroot()
        # The filename must be a number
        filename = line[:-4]
        image_id = get_filename_as_int(filename)
        size = get_and_check(root, 'size', 1)
        width = int(get_and_check(size, 'width', 1).text)
        height = int(get_and_check(size, 'height', 1).text)
        # image = {'file_name': filename, 'height': height, 'width': width,
        #          'id':image_id}
        image = {'file_name': (filename + '.jpg'), 'height': height, 'width': width,
                 'id': image_id}
        json_dict['images'].append(image)
        # Cruuently we do not support segmentation
        #  segmented = get_and_check(root, 'segmented', 1).text
        #  assert segmented == '0'
        for obj in get(root, 'object'):
            category = get_and_check(obj, 'name', 1).text
            if category not in categories:
                new_id = len(categories)
                categories[category] = new_id
            category_id = categories[category]
            bndbox = get_and_check(obj, 'bndbox', 1)
            xmin = int(get_and_check(bndbox, 'xmin', 1).text) - 1
            ymin = int(get_and_check(bndbox, 'ymin', 1).text) - 1
            xmax = int(get_and_check(bndbox, 'xmax', 1).text)
            ymax = int(get_and_check(bndbox, 'ymax', 1).text)
            assert (xmax > xmin)
            assert (ymax > ymin)
            o_width = abs(xmax - xmin)
            o_height = abs(ymax - ymin)
            ann = {'area': o_width * o_height, 'iscrowd': 0, 'image_id':
                image_id, 'bbox': [xmin, ymin, o_width, o_height],
                   'category_id': category_id, 'id': bnd_id, 'ignore': 0,
                   'segmentation': []}
            json_dict['annotations'].append(ann)
            bnd_id = bnd_id + 1

    for cate, cid in categories.items():
        cat = {'supercategory': 'none', 'id': cid, 'name': cate}
        json_dict['categories'].append(cat)
    json_fp = open(json_file, 'w')
    json_str = json.dumps(json_dict)
    json_fp.write(json_str)
    json_fp.close()

if __name__ == '__main__':
    folder_list = ["test"]
    # 注意更改base_dir为本地实际图像和标注文件路径
    base_dir = "./VOC2007/"
    # 修改为自己的路径
    for i in range(1):
        folderName = folder_list[i]
        xml_dir = base_dir + folderName
        json_dir = base_dir + folderName + "/instances_" + folderName + ".json"
        print("deal: ", folderName)
        print("xml dir: ", xml_dir)
        print("json file: ", json_dir)
        convert(xml_dir, json_dir)


