基于Python,OpenCV,Numpy和Albumentations实现目标检测的合成数据集
1.总述
训练一个对象检测模型,如YOLOv5,需要一个包含感兴趣对象的图像和注释(带有对象边界框坐标的文本文件)的数据集。
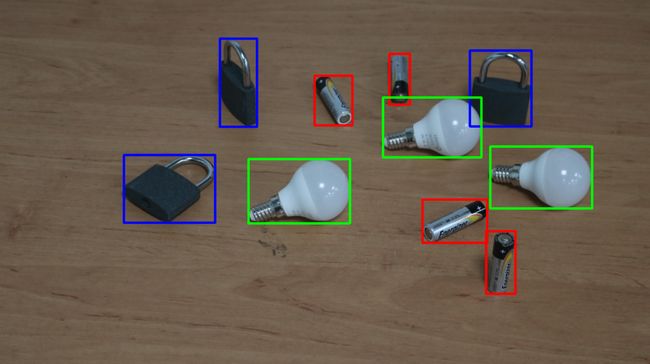
例如,在下面的图片中,你可以看到可视化的边界框。每个边界框表示与特定类别相关的感兴趣的对象:battery 电池(红色)、lightbulb 灯泡(绿色)、padlock 挂锁(蓝色)。

数据集包含的图像越多,模型的训练效果就越好,因为在训练过程中会看到更多的例子。包含200+图像的数据集是可以的。拥有1000张以上图像的数据集要好得多。优秀的数据集包含5000张以上的图片。
请注意,数据集不应仅包含大量图像,而是所有图像应尽可能多样化。这些图像上感兴趣的对象应该与其他对象混合,呈现在不同的环境、不同的背景、不同的位置等。
创建数据集的一种方法是手动创建它。这意味着我们拍了很多照片,就像上面的照片,然后手动注释它们。这种方法是最好的,因为所有照片都是真实的,但是创建这样的数据集需要很多时间。
另一种方法是自动创建合成数据集。使用这种方法,对象的感兴趣区域会随机缩放、旋转并使用 python 脚本添加到背景中。标注是使用相同的脚本创建的。在这种方法下,我们创建的图像并不完全是真实照片,但这些图像上的对象和背景是 100% 真实的。
来自合成数据集的图像示例如下:


来自合成数据集的图像示例:初始背景照片(左上)、自动添加对象的背景照片(左下)、自动添加对象的边界框(右下)、自动添加对象的mask(右上)。
与手动过程相比,自动化过程使我们能够花费更少的时间来创建数据集。例如,生成 1000 个合成图像和标注可能需要不到一个小时。这比拍摄 1000 张不同的照片并手动标注要快得多。
下面,我将描述创建用于对象检测的合成数据集的所有步骤。
我将展示如何使用电池、灯泡和挂锁创建合成数据集以训练 YOLOv5。为此,我们需要以下数据:
- 不同位置的感兴趣对象(电池、灯泡、挂锁)的裁剪照片和蒙版;
- 背景图片(只是不同于互联网上的照片);
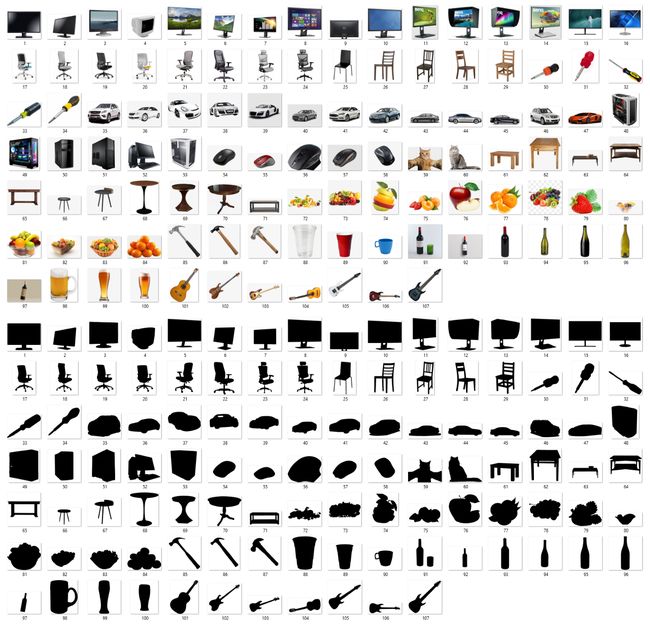
- 不同物体(汽车、椅子、吉他等)的裁剪照片和mask,它们将用作背景噪声,使背景更加复杂。
我拍了26张电池的照片,23张灯泡的照片,21张挂锁的照片,并为这些物体创建了mask:

我收集了30张图片作为背景。看看这些图片:
我还收集了107张不同物体的图片,它们将被用作背景噪声。它们可以是除电池、灯泡或挂锁以外的任何物体:

从这里下载上述数据以及如何在Photoshop的帮助下创建对象的Mask视频。
链接:https://pan.baidu.com/s/11vCg-d2_sTfMskUSriiMHQ?pwd=123a
提取码:123a
下面是如何使用下载的数据来创建一个合成场景:
- 首先,我们将随机从
bg/文件夹中选择一个背景图像,并调整它的大小,例如,1920x1080。 - 其次,我们将从
bg_noise/文件夹中随机选取一个背景噪声对象。然后我们随机调整大小,旋转,并将其添加到背景图像。 - 我们将重复第二步几次。
- 第三,我们将从文件夹
battery/,lightbulb/,padlock/中随机选择一个感兴趣的对象。然后,我们将随机调整大小、旋转并将其添加到上一步得到的图像中。 - 我们将重复第三步几次。
随机合成的物体就是合成的场景。
合成数据集由多个合成场景组成。
2.代码实现
让我们创建一个脚本来创建合成数据集。
2.1 导入相关库
在Jupyter笔记本中创建一个新的笔记本。
首先,我们需要导入必要的模块:
import cv2
import matplotlib.pyplot as plt
import os
import numpy as np
import albumentations as A
import time
from tqdm import tqdm
2.2 文件路径
将下载的数据解压到文件夹data/,并创建包含图像和Mask路径的列表:
obj_dict = {
    1: {'folder': "battery", 'longest_min': 150, 'longest_max': 800},
    2: {'folder': "lightbulb", 'longest_min': 150, 'longest_max': 800},
    3: {'folder': "padlock", 'longest_min': 150, 'longest_max': 800}
}

PATH_MAIN = "data"

for k, _ in obj_dict.items():
    folder_name = obj_dict[k]['folder']

    files_imgs = sorted(os.listdir(os.path.join(PATH_MAIN, folder_name, 'images')))
    files_imgs = [os.path.join(PATH_MAIN, folder_name, 'images', f) for f in files_imgs]

    files_masks = sorted(os.listdir(os.path.join(PATH_MAIN, folder_name, 'masks')))
    files_masks = [os.path.join(PATH_MAIN, folder_name, 'masks', f) for f in files_masks]

    obj_dict[k]['images'] = files_imgs
    obj_dict[k]['masks'] = files_masks

print("The first five files from the sorted list of battery images:", obj_dict[1]['images'][:5])
print("\nThe first five files from the sorted list of battery masks:", obj_dict[1]['masks'][:5])

files_bg_imgs = os.listdir(os.path.join(PATH_MAIN, 'bg'))
files_bg_imgs = [os.path.join(PATH_MAIN, 'bg', f) for f in files_bg_imgs]

files_bg_noise_imgs = os.listdir(os.path.join(PATH_MAIN, "bg_noise", "images"))
files_bg_noise_imgs = [os.path.join(PATH_MAIN, "bg_noise", "images", f) for f in files_bg_noise_imgs]
files_bg_noise_masks = os.listdir(os.path.join(PATH_MAIN, "bg_noise", "masks"))
files_bg_noise_masks = [os.path.join(PATH_MAIN, "bg_noise", "masks", f) for f in files_bg_noise_masks]

print("\nThe first five files from the sorted list of background images:", files_bg_imgs[:5])
print("\nThe first five files from the sorted list of background noise images:", files_bg_noise_imgs[:5])
print("\nThe first five files from the sorted list of background noise masks:", files_bg_noise_masks[:5])
为了更好地理解创建列表的结构,我们来看看它的输出:
The first five files from the sorted list of battery images: ['data\battery\images\1.png', 'data\battery\images\10.png', 'data\battery\images\11.png', 'data\battery\images\12.png', 'data\battery\images\13.png']

The first five files from the sorted list of battery masks: ['data\battery\masks\1.png', 'data\battery\masks\10.png', 'data\battery\masks\11.png', 'data\battery\masks\12.png', 'data\battery\masks\13.png']

The first five files from the sorted list of background images: ['data\bg\bg_1.jpg', 'data\bg\bg_10.jpg', 'data\bg\bg_11.jpg', 'data\bg\bg_12.jpg', 'data\bg\bg_13.jpg']

The first five files from the sorted list of background noise images: ['data\bg_noise\images\1.png', 'data\bg_noise\images\10.jpg', 'data\bg_noise\images\100.png', 'data\bg_noise\images\101.jpg', 'data\bg_noise\images\102.png']

The first five files from the sorted list of background noise masks: ['data\bg_noise\masks\1.png', 'data\bg_noise\masks\10.png', 'data\bg_noise\masks\100.png', 'data\bg_noise\masks\101.png', 'data\bg_noise\masks\102.png']
稍后,我们的脚本将有一个代码块,它将随机地从这些列表中挑选一个对象图像,调整它的大小,向它添加扩展,并将其添加到背景中。
同样,为了设置对象图像大小的下界和上界,我们为字典obj_dict中的每个感兴趣的对象设置' longest_min ': 150, ' longest_max ': 800。这意味着图像的最长边将不小于150px,但不大于800px。你可以设置其他数字,但我建议下限至少为30,上限应该小于背景的高度和宽度。
2.3 图片和Mask
Mask有几种类型:
Original mask是物体区域用黑色(0,0,0)填充,背景区域用白色(255,255,255)填充的Mask。Boolean mask是对象区域填充为True,背景区域填充为False的Mask。Binary mask是对象区域用1填充,背景区域用0填充的Mask。
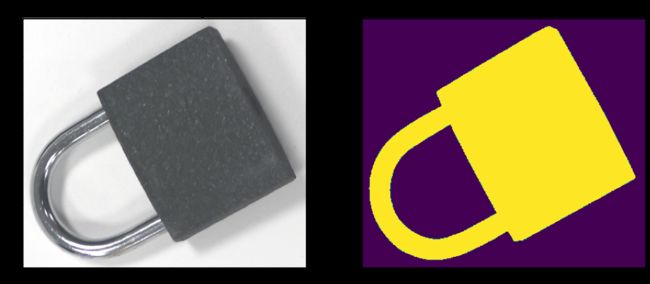
于本脚本的目的,我们将把original masks转换为Binary mask。
这里我们定义了一个函数,它以OpenCV格式返回对象的图像,以二进制格式返回对象的Mask:
def get_img_and_mask(img_path, mask_path):

    img = cv2.imread(img_path)
    img = cv2.cvtColor(img, cv2.COLOR_BGR2RGB)

    mask = cv2.imread(mask_path)
    mask = cv2.cvtColor(mask, cv2.COLOR_BGR2RGB)

    mask_b = mask[:,:,0] == 0 # This is boolean mask
    mask = mask_b.astype(np.uint8) # This is binary mask

    return img, mask
让我们看看这个函数是如何工作的:
# Let's look at a random object and its binary mask

img_path = obj_dict[3]['images'][0]
mask_path = obj_dict[3]['masks'][0]

img, mask = get_img_and_mask(img_path, mask_path)

print("Image file:", img_path)
print("Mask file:", mask_path)
print("\nShape of the image of the object:", img.shape)
print("Shape of the binary mask:", mask.shape)

fig, ax = plt.subplots(1, 2, figsize=(16, 7))
ax[0].imshow(img)
ax[0].set_title('Object', fontsize=18)
ax[1].imshow(mask)
ax[1].set_title('Binary mask', fontsize=18);
输出:
Image file: Data\Padlock\images\1.png
Mask file: Data\Padlock\masks\1.png
Shape of the image of the object: (962, 847, 3)
Shape of the binary mask: (962, 847)

注意,图像的宽度是847,高度是962。此外,图像有3个通道。这就是为什么图像的形状是(962,847,3)。Binary mask具有相同的宽度和高度,但只有一个通道。这就是为什么Binary mask的形状是(962,847)。
2.4 调整背景图像
将用作背景的图像有不同的大小。例如:2114x1398、3456x5184、1920x1440、3264x4080等。其中一些是水平的(宽度>高度),其他是垂直的(高度>宽度)。
但我们可能希望合成数据集中的所有图像都具有固定尺寸:水平图像为 1920x1080,垂直图像为 1080x1920。为此,我们将借助 resize_img() 函数调整背景图像的大小:
def resize_img(img, desired_max, desired_min=None):

    h, w = img.shape[0], img.shape[1]

    longest, shortest = max(h, w), min(h, w)
    longest_new = desired_max
    if desired_min:
        shortest_new = desired_min
    else:
        shortest_new = int(shortest * (longest_new / longest))

    if h > w:
        h_new, w_new = longest_new, shortest_new
    else:
        h_new, w_new = shortest_new, longest_new

    transform_resize = A.Compose([
        A.Sequential([
        A.Resize(h_new, w_new, interpolation=1, always_apply=False, p=1)
        ], p=1)
    ])

    transformed = transform_resize(image=img)
    img_r = transformed["image"]

    return img_r
让我们看看这个函数是如何工作的:
# Let's look how a random background image can be resized with resize_img() function

img_bg_path = files_bg_imgs[5]
img_bg = cv2.imread(img_bg_path)
img_bg = cv2.cvtColor(img_bg, cv2.COLOR_BGR2RGB)

img_bg_resized_1 = resize_img(img_bg, desired_max=1920, desired_min=None)
img_bg_resized_2 = resize_img(img_bg, desired_max=1920, desired_min=1080)

print("Shape of the original background image:", img_bg.shape)

print("Shape of the resized background image (desired_max=1920, desired_min=None):", img_bg_resized_1.shape)
print("Shape of the resized background image (desired_max=1920, desired_min=1080):", img_bg_resized_2.shape)

fig, ax = plt.subplots(1, 2, figsize=(16, 7))
ax[0].imshow(img_bg_resized_1)
ax[0].set_title('Resized (desired_max=1920, desired_min=None)', fontsize=18)
ax[1].imshow(img_bg_resized_2)
ax[1].set_title('Resized (desired_max=1920, desired_min=1080)', fontsize=18);
输出:
Shape of the original background image: (3068, 2454, 3)
Shape of the resized background image (desired_max=1920, desired_min=None): (1920, 1535, 3)
Shape of the resized background image (desired_max=1920, desired_min=1080): (1920, 1080, 3)

您可以看到该函数找出图像的哪一侧(宽度或高度)最长,并沿最长的一侧将图像调整为 desired_max 大小。如果未设置desired_min,则图像的最短边按比例调整大小,否则图像沿最短边调整为desired_min 大小。
2.5 调整大小和转换对象
用于调整和转换对象大小的函数resize_transform_obj()与用于调整背景图像大小的函数类似,但有一些附加功能。
函数resize_transform_obj()调整对象的图像大小和对象的binary mask。此外,可以将来自albumentations库的transforms作为参数传递给函数。
def resize_transform_obj(img, mask, longest_min, longest_max, transforms=False):

    h, w = mask.shape[0], mask.shape[1]

    longest, shortest = max(h, w), min(h, w)
    longest_new = np.random.randint(longest_min, longest_max)
    shortest_new = int(shortest * (longest_new / longest))

    if h > w:
        h_new, w_new = longest_new, shortest_new
    else:
        h_new, w_new = shortest_new, longest_new

    transform_resize = A.Resize(h_new, w_new, interpolation=1, always_apply=False, p=1)

    transformed_resized = transform_resize(image=img, mask=mask)
    img_t = transformed_resized["image"]
    mask_t = transformed_resized["mask"]

    if transforms:
        transformed = transforms(image=img_t, mask=mask_t)
        img_t = transformed["image"]
        mask_t = transformed["mask"]

    return img_t, mask_t

transforms_bg_obj = A.Compose([
    A.RandomRotate90(p=1),
    A.ColorJitter(brightness=0.3,
                  contrast=0.3,
                  saturation=0.3,
                  hue=0.07,
                  always_apply=False,
                  p=1),
    A.Blur(blur_limit=(3,15),
           always_apply=False,
           p=0.5)
])

transforms_obj = A.Compose([
    A.RandomRotate90(p=1),
    A.RandomBrightnessContrast(brightness_limit=(-0.1, 0.2),
                               contrast_limit=0.1,
                               brightness_by_max=True,
                               always_apply=False,
                               p=1)
])
在上面的代码中定义了两个复杂的转换:
transforms_bg_obj在大范围内旋转图像、添加模糊、更改颜色、对比度和亮度。这种激进的变换将用于变换背景噪声对象。transforms_obj旋转图像并在狭窄范围内改变对比度和亮度。这种可忽略不计的影响将被用来改变感兴趣的对象。
可以为转换添加更多选项。阅读 albumentations文档以了解如何做到这一点。
让我们看看resize_transform_obj()函数是如何工作的:
# Let's look how image and binary mask of a random object can be transformed
# with help of resize_transform_obj() function

img_path = obj_dict[3]['images'][0]
mask_path = obj_dict[3]['masks'][0]

img, mask = get_img_and_mask(img_path, mask_path)

img_t, mask_t = resize_transform_obj(img,
                                     mask,
                                     longest_min=300,
                                     longest_max=400,
                                     transforms=transforms_obj)

print("Shape of the image of the transformed object:", img_t.shape)
print("Shape of the transformed binary mask:", mask_t.shape)
print("\n")

fig, ax = plt.subplots(1, 2, figsize=(16, 7))
ax[0].imshow(img_t)
ax[0].set_title('Transformed object', fontsize=18)
ax[1].imshow(mask_t)
ax[1].set_title('Transformed binary mask', fontsize=18);
输出
Shape of the image of the transformed object: (335, 381, 3)
Shape of the transformed binary mask: (335, 381)
2.6 添加对象到背景中
在这里,我们将定义函数add_obj(),它将对象添加到背景。要详细了解这个函数是如何工作的,我建议您阅读Python添加对象到图像这篇文章。
def add_obj(img_comp, mask_comp, img, mask, x, y, idx):
    '''
    img_comp - composition of objects
    mask_comp - composition of objects` masks
    img - image of object
    mask - binary mask of object
    x, y - coordinates where center of img is placed
    Function returns img_comp in CV2 RGB format + mask_comp
    '''
    h_comp, w_comp = img_comp.shape[0], img_comp.shape[1]

    h, w = img.shape[0], img.shape[1]

    x = x - int(w/2)
    y = y - int(h/2)

    mask_b = mask == 1
    mask_rgb_b = np.stack([mask_b, mask_b, mask_b], axis=2)

    if x >= 0 and y >= 0:

        h_part = h - max(0, y+h-h_comp) # h_part - part of the image which gets into the frame of img_comp along y-axis
        w_part = w - max(0, x+w-w_comp) # w_part - part of the image which gets into the frame of img_comp along x-axis

        img_comp[y:y+h_part, x:x+w_part, :] = img_comp[y:y+h_part, x:x+w_part, :] * ~mask_rgb_b[0:h_part, 0:w_part, :] + (img * mask_rgb_b)[0:h_part, 0:w_part, :]
        mask_comp[y:y+h_part, x:x+w_part] = mask_comp[y:y+h_part, x:x+w_part] * ~mask_b[0:h_part, 0:w_part] + (idx * mask_b)[0:h_part, 0:w_part]
        mask_added = mask[0:h_part, 0:w_part]

    elif x < 0 and y < 0:

        h_part = h + y
        w_part = w + x

        img_comp[0:0+h_part, 0:0+w_part, :] = img_comp[0:0+h_part, 0:0+w_part, :] * ~mask_rgb_b[h-h_part:h, w-w_part:w, :] + (img * mask_rgb_b)[h-h_part:h, w-w_part:w, :]
        mask_comp[0:0+h_part, 0:0+w_part] = mask_comp[0:0+h_part, 0:0+w_part] * ~mask_b[h-h_part:h, w-w_part:w] + (idx * mask_b)[h-h_part:h, w-w_part:w]
        mask_added = mask[h-h_part:h, w-w_part:w]

    elif x < 0 and y >= 0:

        h_part = h - max(0, y+h-h_comp)
        w_part = w + x

        img_comp[y:y+h_part, 0:0+w_part, :] = img_comp[y:y+h_part, 0:0+w_part, :] * ~mask_rgb_b[0:h_part, w-w_part:w, :] + (img * mask_rgb_b)[0:h_part, w-w_part:w, :]
        mask_comp[y:y+h_part, 0:0+w_part] = mask_comp[y:y+h_part, 0:0+w_part] * ~mask_b[0:h_part, w-w_part:w] + (idx * mask_b)[0:h_part, w-w_part:w]
        mask_added = mask[0:h_part, w-w_part:w]

    elif x >= 0 and y < 0:

        h_part = h + y
        w_part = w - max(0, x+w-w_comp)

        img_comp[0:0+h_part, x:x+w_part, :] = img_comp[0:0+h_part, x:x+w_part, :] * ~mask_rgb_b[h-h_part:h, 0:w_part, :] + (img * mask_rgb_b)[h-h_part:h, 0:w_part, :]
        mask_comp[0:0+h_part, x:x+w_part] = mask_comp[0:0+h_part, x:x+w_part] * ~mask_b[h-h_part:h, 0:w_part] + (idx * mask_b)[h-h_part:h, 0:w_part]
        mask_added = mask[h-h_part:h, 0:w_part]

    return img_comp, mask_comp, mask_added
函数 add_obj() 返回图像合成(背景 + 添加的对象)、Mask合成(添加对象的Mask合成)和最后添加的对象的Mask。
让我们看看在背景中添加挂锁是如何工作的:
img_bg_path = files_bg_imgs[26]
img_bg = cv2.imread(img_bg_path)
img_bg = cv2.cvtColor(img_bg, cv2.COLOR_BGR2RGB)

h, w = img_bg.shape[0], img_bg.shape[1]
mask_comp = np.zeros((h,w), dtype=np.uint8)

img_path = obj_dict[3]['images'][0]
mask_path = obj_dict[3]['masks'][0]
img, mask = get_img_and_mask(img_path, mask_path)

img_comp, mask_comp, _ = add_obj(img_bg, mask_comp, img, mask, x=800, y=600, idx=1)

fig, ax = plt.subplots(1, 2, figsize=(16, 7))
ax[0].imshow(img_comp)
ax[0].set_title('Composition', fontsize=18)
ax[1].imshow(mask_comp)
ax[1].set_title('Composition mask', fontsize=18);

这里的初始合成是背景图像img_bg。数组mask_comp = np.zeros((h,w), dtype=np.uint8)是一个初始合成的Mask。因为初始的合成只是一个没有任何对象的背景图像,它的Mask只包含0。
通过将挂锁添加到img_bg,它的Mask被添加到mask_comp中,方法是将这些像素中的初始值与1重叠,这些像素对应于在图像合成中添加的挂锁。通过将参数idx=1传递给函数add_obj(),我们已经为添加的挂锁的Mask定义了数字1。
上面的右图是关于合成Mask的:数字0用深紫色标记,数字1用黄色标记。
让我们再添加一次挂锁:
img_comp, mask_comp, _ = add_obj(img_comp, mask_comp, img, mask, x=1350, y=1050, idx=2)

fig, ax = plt.subplots(1, 2, figsize=(16, 7))
ax[0].imshow(img_comp)
ax[0].set_title('Composition', fontsize=18)
ax[1].imshow(mask_comp)
ax[1].set_title('Composition mask', fontsize=18);

这一次,初始合成img_comp已经包含一个挂锁,所以初始合成mask_comp的Mask包含数字0和1。
通过在合成中再添加一个挂锁,该挂锁的Mask通过将这些像素中的初始值与 2 重叠来添加到 mask_comp,这对应于图像合成上添加的挂锁。这次我们通过将参数 idx=2 传递给函数 add_obj() 来为添加挂锁的Mask定义为数字 2。
上面的右图是关于合成Mask的:数字0用暗紫色标记,数字1用蓝色和绿色混合标记,数字2用黄色标记。
2.7 在背景中添加噪声对象
我们希望数据集的背景尽可能多样。各种背景有利于目标检测神经网络的训练过程。但是我们只有 30 个背景图像,如果我们要创建 1000 个或更多图像的数据集,这并不多。
为了使背景更加多样化,我们将随机添加噪声对象。
噪声对象将通过函数create_bg_with_noise()添加:
def create_bg_with_noise(files_bg_imgs,
                         files_bg_noise_imgs,
                         files_bg_noise_masks,
                         bg_max=1920,
                         bg_min=1080,
                         max_objs_to_add=60,
                         longest_bg_noise_max=1000,
                         longest_bg_noise_min=200,
                         blank_bg=False):

    if blank_bg:
        img_comp_bg = np.ones((bg_min, bg_max,3), dtype=np.uint8) * 255
        mask_comp_bg = np.zeros((bg_min, bg_max), dtype=np.uint8)
    else:
        idx = np.random.randint(len(files_bg_imgs))
        img_bg = cv2.imread(files_bg_imgs[idx])
        img_bg = cv2.cvtColor(img_bg, cv2.COLOR_BGR2RGB)
        img_comp_bg = resize_img(img_bg, bg_max, bg_min)
        mask_comp_bg = np.zeros((img_comp_bg.shape[0], img_comp_bg.shape[1]), dtype=np.uint8)

    for i in range(1, np.random.randint(max_objs_to_add) + 2):

        idx = np.random.randint(len(files_bg_noise_imgs))
        img, mask = get_img_and_mask(files_bg_noise_imgs[idx], files_bg_noise_masks[idx])
        x, y = np.random.randint(img_comp_bg.shape[1]), np.random.randint(img_comp_bg.shape[0])
        img_t, mask_t = resize_transform_obj(img, mask, longest_bg_noise_min, longest_bg_noise_max, transforms=transforms_bg_obj)
        img_comp_bg, _, _ = add_obj(img_comp_bg, mask_comp_bg, img_t, mask_t, x, y, i)

    return img_comp_bg
参数说明如下:
files_bg_imgs是一个包含背景图像路径的列表;files_bg_noise_imgs是一个包含噪声对象图像路径的列表;bg_max和bg_min是背景图像最长和最短边的目标尺寸;max_objs_to_add是要添加到背景中的最大噪声对象数;long_bg_noise_min和longest_bg_noise_max是噪声对象最长边的最小和最大尺寸。long_bg_noise_max应小于bg_min,longest_bg_noise_min应至少为 30。- 如果我们希望背景为白色而不是随机图像,则
blank_bg应该为True。
如果我们设置白色背景,让我们看看这个函数是如何工作的:
img_comp_bg = create_bg_with_noise(files_bg_imgs,
                                   files_bg_noise_imgs,
                                   files_bg_noise_masks,
                                   max_objs_to_add=20,
                                   blank_bg=True)
plt.figure(figsize=(15,15))
plt.imshow(img_comp_bg)
img_comp_bg = create_bg_with_noise(files_bg_imgs,
                                   files_bg_noise_imgs,
                                   files_bg_noise_masks,
                                   max_objs_to_add=20)
plt.figure(figsize=(15,15))
plt.imshow(img_comp_bg)

请注意,每次调用create_bg_with_noise()函数后,我们都会得到一个新的噪声对象组合,因为它们是随机选择并放置在背景之上的。
2.8 控制重叠程度
新添加的感兴趣对象可以与先前添加的感兴趣对象部分重叠。有时它可以与另一个对象的重要部分重叠,例如其面积的 60% 或 70%,甚至完全重叠。但我们不希望这种情况发生。
我们可能想要控制重叠的程度,使其小于20%或30%。或者我们可能希望我们感兴趣的物体完全不重叠。
让我们定义函数 check_areas() 来检查任何先前添加的对象是否重叠超过重叠度阈值:
def check_areas(mask_comp, obj_areas, overlap_degree=0.3):
    obj_ids = np.unique(mask_comp).astype(np.uint8)[1:-1]
    masks = mask_comp == obj_ids[:, None, None]

    ok = True

    if len(np.unique(mask_comp)) != np.max(mask_comp) + 1:
        ok = False
        return ok

    for idx, mask in enumerate(masks):
        if np.count_nonzero(mask) / obj_areas[idx] < 1 - overlap_degree:
            ok = False
            break

    return ok
将新对象添加到合成后,此功能会将先前添加的对象的未重叠部分的区域与先前添加的对象的原始区域进行比较。如果之前添加的任何对象的重叠度超过了overlap_degree,则该函数返回 False。如果所有先前添加的对象重叠不超过overlap_degree 或根本不重叠,则该函数返回True。
参数 mask_comp 是添加新对象后的Mask合成。
参数 obj_areas 是对象的原始区域列表,按添加顺序排列,就好像它们没有重叠一样。此列表在将其传递给 check_areas() 函数时不应包含新添加的对象。
2.9 创建合成数据
这里我们将定义函数create_composition(),它创建对象的合成数据:
def create_composition(img_comp_bg,
                       max_objs=15,
                       overlap_degree=0.2,
                       max_attempts_per_obj=10):

    img_comp = img_comp_bg.copy()
    h, w = img_comp.shape[0], img_comp.shape[1]
    mask_comp = np.zeros((h,w), dtype=np.uint8)

    obj_areas = []
    labels_comp = []
    num_objs = np.random.randint(max_objs) + 2

    i = 1

    for _ in range(1, num_objs):

        obj_idx = np.random.randint(len(obj_dict)) + 1

        for _ in range(max_attempts_per_obj):

            imgs_number = len(obj_dict[obj_idx]['images'])
            idx = np.random.randint(imgs_number)
            img_path = obj_dict[obj_idx]['images'][idx]
            mask_path = obj_dict[obj_idx]['masks'][idx]
            img, mask = get_img_and_mask(img_path, mask_path)

            x, y = np.random.randint(w), np.random.randint(h)
            longest_min = obj_dict[obj_idx]['longest_min']
            longest_max = obj_dict[obj_idx]['longest_max']
            img, mask = resize_transform_obj(img,
                                             mask,
                                             longest_min,
                                             longest_max,
                                             transforms=transforms_obj)

            if i == 1:
                img_comp, mask_comp, mask_added = add_obj(img_comp,
                                                          mask_comp,
                                                          img,
                                                          mask,
                                                          x,
                                                          y,
                                                          i)
                obj_areas.append(np.count_nonzero(mask_added))
                labels_comp.append(obj_idx)
                i += 1
                break
            else:
                img_comp_prev, mask_comp_prev = img_comp.copy(), mask_comp.copy()
                img_comp, mask_comp, mask_added = add_obj(img_comp,
                                                          mask_comp,
                                                          img,
                                                          mask,
                                                          x,
                                                          y,
                                                          i)
                ok = check_areas(mask_comp, obj_areas, overlap_degree)
                if ok:
                    obj_areas.append(np.count_nonzero(mask_added))
                    labels_comp.append(obj_idx)
                    i += 1
                    break
                else:
                    img_comp, mask_comp = img_comp_prev.copy(), mask_comp_prev.copy()

    return img_comp, mask_comp, labels_comp, obj_areas
参数说明如下:
img_comp_bg是将添加感兴趣对象的背景。max_obobjects为最大添加对象数。overlap_degree是阈值,它定义了一个随机添加的感兴趣对象是否与任何先前添加的感兴趣对象重叠超过由overlap_degree定义的阈值。如果至少一个感兴趣的对象重叠过多,则该函数返回到先前的合成并再次添加该对象。max_attempts_per_obj是函数将尝试添加对象的尝试次数,而不会与其他对象重叠超过由overlap_degree定义的阈值。
这个函数返回:
- mg_comp:添加了感兴趣的对象的图像。在我们的例子中,感兴趣的对象是电池、灯泡和挂锁。
- mask_comp:添加对象的掩码组合。背景像素的值为 0,第一个添加对象的像素值为 1,第二个添加对象的像素值为 2,以此类推。
- labels_comp:添加对象类别的数字表示。例如,如果按以下顺序添加对象
[lightbulb, battery, padlock, padlock, lightbulb, padlock, battery],则标签数组将为[2, 1, 3, 3, 2, 3, 1]。类和数字的这种关系在脚本开头的obj_dict中定义。 obj_areas:对象区域的列表,按添加顺序排列,就好像它们没有重叠一样。
让我们生成一个合成数据:
img_comp, mask_comp, labels_comp, obj_areas = create_composition(img_comp_bg,
                                                                 max_objs=15,
                                                                 overlap_degree=0.2,
                                                                 max_attempts_per_obj=10)
plt.figure(figsize=(40,40))
plt.imshow(img_comp)

在这里您可以看到电池、灯泡和挂锁,但要快速找到它们并不总是那么容易。 让我们看看这个合成数据的Mask:
plt.figure(figsize=(40,40))
plt.imshow(mask_comp)

如果您查看Mask组成,您可以轻松找到所有对象。在这里,您可以看到 2 个电池、3 个灯泡和 4 个挂锁。 让我们看一下标签数组:
print("Labels (classes of the objects) on the composition in order of object's addition:", labels_comp)

# Labels (classes of the objects) on the composition in order of object's addition: [3, 1, 2, 2, 3, 2, 3, 1, 3]
在这里你可以看到第一个添加的对象是一个挂锁(类别3),然后添加一个电池(类别1),等等……
让我们也比较物体的原始区域(没有重叠)和合成的区域:
obj_ids = np.unique(mask_comp).astype(np.uint8)[1:]
masks = mask_comp == obj_ids[:, None, None]

print("Degree of how much area of each object is overlapped:")

for idx, mask in enumerate(masks):
    print(np.count_nonzero(mask) / obj_areas[idx])
# Degree of how much area of each object is overlapped:
# 0.8688065237500786
# 0.8778115434707346
# 1.0
# 1.0
# 1.0
# 1.0
# 1.0
# 1.0
# 1.0
这里我们看到第一个添加的对象重叠了 1 - 0.869 = 13.1%,第二个添加的对象重叠了 1 - 0.878 = 12.2%。 13.1% 和 12.2% 都小于 0.2 的重叠阈值,该阈值作为参数overlap_degree传递给函数 reate_composition()。
此外,我们可以看到第一个添加的对象是padlock(labels_comp 数组中的第一个元素的标签为 3),第二个添加的对象是 battery(labels_comp 数组中的第二个元素的标签为 1)。如果我们再看Mask的组成,我们可以看到一个padlock和一个battery被lampbulbs重叠。这意味着我们可以直观地确认我们的脚本可以正常工作。 我们还为每个添加的对象绘制边界框:
colors = {1: (255,0,0), 2: (0,255,0), 3: (0,0,255)}

img_comp_bboxes = img_comp.copy()

obj_ids = np.unique(mask_comp).astype(np.uint8)[1:]
masks = mask_comp == obj_ids[:, None, None]

for i in range(len(obj_ids)):
    pos = np.where(masks[i])
    xmin = np.min(pos[1])
    xmax = np.max(pos[1])
    ymin = np.min(pos[0])
    ymax = np.max(pos[0])
    img_comp_bboxes = cv2.rectangle(img_comp_bboxes,
                                    (xmin, ymin),
                                    (xmax,ymax),
                                    colors[labels_comp[i]],
                                    6)

plt.figure(figsize=(40,40))
plt.imshow(img_comp_bboxes)

您可以看到从Mask中获取每个对象的边界框。在上图中,每个类别都有自己的颜色(红色代表电池,绿色代表灯泡,蓝色代表挂锁)。
2.10 转换为YOLO格式
我们编写了一个 python 脚本来创建合成图像和Mask。现在我们将编写为图像创建标注的脚本。
YOLO 格式要求将标注存储为 txt 文件。每个图像应该有一个 txt 文件,它们应该具有相同的名称。每个 txt 文件由几行组成;一行对应于一个边界框,由五个数字组成 object_class、 x_center、 y_center、 width 和 height。
第一个数字 object_class 是对象类的编号。 YOLO 格式要求对象类应以 0 开头。 其他四个数字是 x_center、 y_center、 width 和 height格式的边界框的坐标。坐标必须以标准化格式[0,1]呈现。要获得标准化坐标,请将 x_center 和 width 除以背景图像宽度,将 y_center 和 height 除以背景图像高度。
这是为合成场景创建注释的函数:
def create_yolo_annotations(mask_comp, labels_comp):
    comp_w, comp_h = mask_comp.shape[1], mask_comp.shape[0]

    obj_ids = np.unique(mask_comp).astype(np.uint8)[1:]
    masks = mask_comp == obj_ids[:, None, None]

    annotations_yolo = []
    for i in range(len(labels_comp)):
        pos = np.where(masks[i])
        xmin = np.min(pos[1])
        xmax = np.max(pos[1])
        ymin = np.min(pos[0])
        ymax = np.max(pos[0])

        xc = (xmin + xmax) / 2
        yc = (ymin + ymax) / 2
        w = xmax - xmin
        h = ymax - ymin

        annotations_yolo.append([labels_comp[i] - 1,
                                 round(xc/comp_w, 5),
                                 round(yc/comp_h, 5),
                                 round(w/comp_w, 5),
                                 round(h/comp_h, 5)])

    return annotations_yolo
函数返回mask_comp上显示的每个对象的注释列表。让我们看看它是如何工作的:
annotations_yolo = create_yolo_annotations(mask_comp, labels_comp)
for i in range(len(annotations_yolo)):
    print(' '.join(str(el) for el in annotations_yolo[i]))

# 2 0.66042 0.78472 0.18021 0.4287
# 0 0.28802 0.30139 0.18333 0.58056
# 1 0.84297 0.82593 0.2224 0.3463
# 1 0.74557 0.18194 0.1151 0.225
# 2 0.73385 0.55556 0.04792 0.17778
# 1 0.24844 0.08472 0.15937 0.16944
# 2 0.60547 0.40463 0.07656 0.25556
# 0 0.38333 0.79028 0.21875 0.28241
# 2 0.21589 0.70602 0.08802 0.31389
再次需要注意的是,这里的对象的数字类从 0 开始,而不是 1。在数组 labels_comp 中,1 与电池相关,2 与灯泡相关,3 与挂锁相关。但是,标注中,对象的类应该以0开头,这是YOLO格式的要求,所以我们将每个数字减一,这意味着注解中0与电池有关,1与灯泡有关,2与挂锁有关。
2.11 创建和保存合成数据集
YOLOv5 要求将训练图像和注释存储在文件夹 train/images/ 和 train/labels/ 中。数据集的验证部分应存储在文件夹 valid/images/ 和 valid/labels/ 中。
下面是创建数据集的函数:
def generate_dataset(imgs_number, folder, split='train'):
    time_start = time.time()
    for j in tqdm(range(imgs_number)):
        img_comp_bg = create_bg_with_noise(files_bg_imgs,
                                           files_bg_noise_imgs,
                                           files_bg_noise_masks,
                                           max_objs_to_add=60)

        img_comp, mask_comp, labels_comp, _ = create_composition(img_comp_bg,
                                                                 max_objs=15,
                                                                 overlap_degree=0.2,
                                                                 max_attempts_per_obj=10)

        img_comp = cv2.cvtColor(img_comp, cv2.COLOR_RGB2BGR)
        cv2.imwrite(os.path.join(folder, split, 'images/{}.jpg').format(j), img_comp)

        annotations_yolo = create_yolo_annotations(mask_comp, labels_comp)
        for i in range(len(annotations_yolo)):
            with open(os.path.join(folder, split, 'labels/{}.txt').format(j), "a") as f:
                f.write(' '.join(str(el) for el in annotations_yolo[i]) + '\n')

    time_end = time.time()
    time_total = round(time_end - time_start)
    time_per_img = round((time_end - time_start) / imgs_number, 1)

    print("Generation of {} synthetic images is completed. It took {} seconds, or {} seconds per image".format(imgs_number, time_total, time_per_img))
    print("Images are stored in '{}'".format(os.path.join(folder, split, 'images')))
    print("Annotations are stored in '{}'".format(os.path.join(folder, split, 'labels')))
现在,创建文件夹 dataset/train/images/、dataset/train/labels/、dataset/valid/images/、dataset/valid/labels/,其中函数 generate_dataset() 将保存图像和注释。
让我们创建一个包含1000张训练图像和200张验证图像的数据集:
generate_dataset(1000, folder='dataset', split='train')
generate_dataset(200, folder='dataset', split='valid')
输出
100%|████████████████████████████████████████████████████████████████████████████| 1000/1000 [1:04:37<00:00,  3.88s/it]
Generation of 1000 synthetic images is completed. It took 3878 seconds, or 3.9 seconds per image
Images are stored in 'dataset\train\images'
Annotations are stored in 'dataset\train\labels'
100%|████████████████████████████████████████████████████████████████████████████████| 200/200 [12:15<00:00,  3.68s/it]
Generation of 200 synthetic images is completed. It took 735 seconds, or 3.7 seconds per image
Images are stored in 'dataset\valid\images'
Annotations are stored in 'dataset\valid\labels'
太棒了!现在我们有了一个合成数据集,可以训练对象检测模型了!
在我的例子中,在一台处理器为Intel Core i7-6700HQ、内存为8GB的笔记本电脑上,在运行其他一些任务的情况下,生成1200张图片的数据集大约需要1小时20分钟。一幅合成图像在不到4秒的时间内生成。
我还用不同环境下的电池、灯泡和挂锁拍摄了 43 张照片,并手工对它们进行了标注。我们可以使用这些真实照片来测试训练后的目标检测模型的质量。
在这里你可以下载1000张合成训练图像、200张合成验证图像和43张真实测试图像的完整数据集。
2.12 YOLOv5模型的训练和测试
我使用生成的数据集在 Google Colab 中训练 YOLOv5x6 模型。我为训练设置了以下超参数:图像大小为 1280,每批 4 张图像,10 个 epoch。 训练模型后,我在真实照片上进行了测试。结果非常好(P 是精度,R 是召回率,mAP 是平均精度):
    Class  Images  Labels       P       R     mAP@.5    mAP@.5:.95
      all      43     354   0.976   0.944      0.956         0.883
  Battery      43     133   0.944    0.88      0.895         0.774
Lightbulb      43     110   0.985   0.991      0.995         0.949
  Padlock      43     111       1    0.96      0.978         0.926
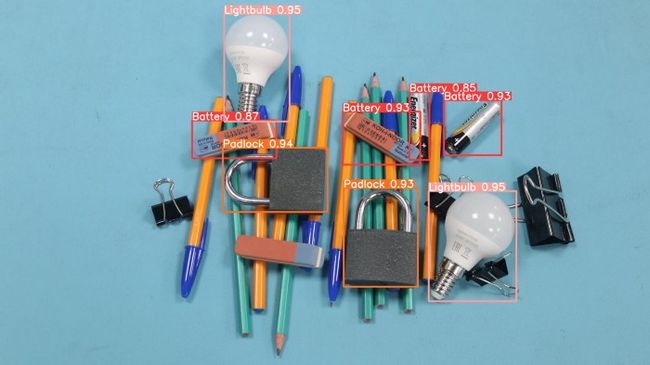
让我们看看几张检测到物体的测试照片:
我特意制作了一些物体部分重叠的照片和一些物体在复杂环境中的照片,以使模型更难识别感兴趣的物体。但是经过训练的合成数据集模型可以很好地识别这些照片上的对象。
2.13 噪声对象在合成场景中的重要性
我希望你们注意这张测试照片:

您可以在此处看到两个橡皮擦被标识为电池。很可能,模型发现了橡皮擦和电池之间的一些共同特征(形状+文本的存在),并将橡皮擦认为电池。
在生成合成数据集时,可以通过添加橡皮擦作为噪声对象来避免这种情况。因此,在训练过程中,模型可以调整其权重,以免将橡皮擦误认为电池。
此外,我们添加的不同种类的噪声对象越多,训练出来的模型越不会关注它们,这意味着误报检测会更少。 这就是为什么在生成合成场景时向背景添加噪声对象很重要的原因。
好的,现在您知道如何生成用于对象检测的合成数据集了。 您可以用您感兴趣的对象替换电池、灯泡和挂锁,并根据您的需要生成数据集。 如果您需要创建的数据集不是为 YOLOv5 而是为其他一些对象检测模型,您也可以更改注释的格式。
参考目录
https://medium.com/@alexppppp/how-to-create-synthetic-dataset-for-computer-vision-object-detection-fd8ab2fa5249
https://github.com/alexppppp/synthetic-dataset-object-detection

