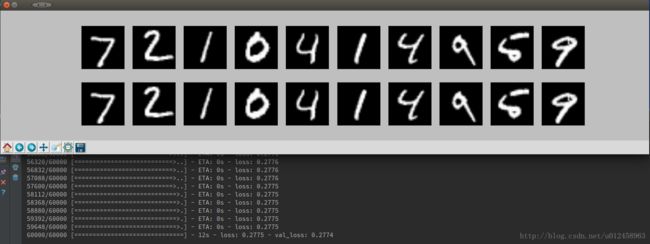
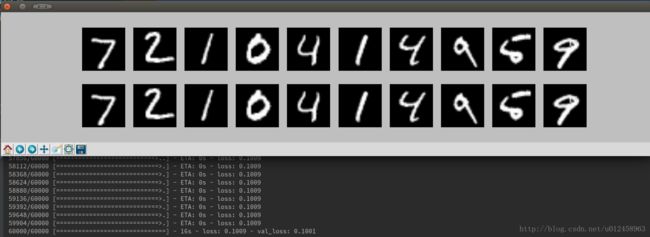
利用keras搭建自编码器网络——脑机接口
因为我的本科毕设就是做自编码器的,所以,自编码器部分还是很好理解的,在这里不多赘述。
我现在主要是看一下mnist的自编码器部分,然后利用这个来搭建自己数据的自编器网络。
贴几个参考代码的链接
https://kiseliu.github.io/2016/08/16/building-autoencoders-in-keras/
http://ff120.github.io/2017/04/20/%E6%B7%B1%E5%BA%A6%E5%AD%A6%E4%B9%A0%E4%B8%93%E9%A2%98/%E4%BD%BF%E7%94%A8keras%E5%AE%9E%E7%8E%B0autoencoder/
https://keras-cn.readthedocs.io/en/latest/blog/autoencoder/
https://morvanzhou.github.io/tutorials/machine-learning/keras/3-1-save/
#!/usr/bin/python
# -*- coding:utf8 -*-

import keras
import numpy as np
from keras.datasets import mnist
from keras.models import Model
from keras.layers import Dense, Input
from keras import regularizers
import matplotlib.pyplot as plt

batch_size = 256

epochs = 100

#数据预处理
(x_train, _), (x_test, _) = mnist.load_data() #去掉标签加载数据
x_train = x_train.astype('float32') #数据归一化
x_test = x_test.astype('float32')
x_train /= 255
x_test /= 255
x_train = x_train.reshape((len(x_train), np.prod(x_train.shape[1:]))) #把28×28的数据平展成784大小的向量
x_test = x_test.reshape((len(x_test), np.prod(x_test.shape[1:])))
print x_train.shape
print x_test.shape

#建立自编码器模型
encoding_dim = 32  #将784维的数据压缩到32维,压缩率为24.5
input_img = Input(shape=(784,))
# 增加稀疏性
encoded = Dense(encoding_dim, activation='relu', activity_regularizer=regularizers.l1(10e-5))(input_img) #对输入的编码表示(压缩)
decoded = Dense(784, activation='sigmoid')(encoded) #输入的有损失重构
autoencoder = Model(inputs=input_img, outputs=decoded) #把输入映射到它的重构上

#建立单独的编码器模型
encoder = Model(inputs=input_img, outputs=encoded)

#建立单独的解码器模型
encoded_input = Input(shape=(encoding_dim,)) #编码维度是解码器的输入
decoded_layer = autoencoder.layers[-1]
decoder = Model(inputs=encoded_input, outputs=decoded_layer(encoded_input)) #把编码后的数据映射到最后的输出

#激活模型(compile)
autoencoder.compile(optimizer='adadelta', loss='binary_crossentropy') #配置模型参数,基于元素的二元交叉熵损失,和Adadelta优化算子

#训练模型
autoencoder.fit(x_train, x_train,
          batch_size=batch_size,
          epochs=epochs,
          shuffle=True,
          validation_data=(x_test, x_test))

# 可视化
encoded_imgs = encoder.predict(x_test)
decoded_imgs = decoder.predict(encoded_imgs)

n = 10
plt.figure(figsize=(20, 4))
for i in range(n):
    ax = plt.subplot(2, n, i+1) #display original
    plt.imshow(x_test[i].reshape(28, 28))
    plt.gray()
    ax.get_xaxis().set_visible(False)
    ax.get_yaxis().set_visible(False)

    ax = plt.subplot(2, n, i+1+n) #display reconstruction
    plt.imshow(x_test[i].reshape(28, 28))
    plt.gray()
    ax.get_xaxis().set_visible(False)
    ax.get_yaxis().set_visible(False)
plt.show()
注意:我看参考链接的正则化都是:
activity_regularizer=regularizers.activity_l1(10e-5))(input_img)
因为运行后报错,我查阅了keras中文文档里正则化的API,发现应该改为
activity_regularizer=regularizers.l1(10e-5))(input_img)因为模型加入正则化更不容易过拟合,所以训练的epochs从原来的50,加到了100
loss有点大,再找下原因
多层自编码器
为了使loss减小,可以尝试多层训练,设计栈式自编码器
代码如下:
#!/usr/bin/python
# -*- coding:utf8 -*-

import keras
import numpy as np
from keras.datasets import mnist
from keras.models import Model
from keras.layers import Dense, Input
from keras import regularizers
import matplotlib.pyplot as plt

batch_size = 256

epochs = 100

#数据预处理
(x_train, _), (x_test, _) = mnist.load_data() #去掉标签加载数据
x_train = x_train.astype('float32') #数据归一化
x_test = x_test.astype('float32')
x_train /= 255
x_test /= 255
x_train = x_train.reshape((len(x_train), np.prod(x_train.shape[1:]))) #把28×28的数据平展成784大小的向量
x_test = x_test.reshape((len(x_test), np.prod(x_test.shape[1:])))
print x_train.shape
print x_test.shape

#建立自编码器模型
encoding_dim = 32  #将784维的数据压缩到32维,压缩率为24.5
input_img = Input(shape=(784,))
# 增加稀疏性
encoded = Dense(128, activation='relu')(input_img) #对输入的编码表示(压缩)
encoded = Dense(64, activation='relu')(encoded)
encoded = Dense(encoding_dim, activation='relu')(encoded)

decoded = Dense(64, activation='relu')(encoded)
decoded = Dense(128, activation='relu')(decoded)
decoded = Dense(784, activation='sigmoid')(decoded) #输入的有损失重构
autoencoder = Model(inputs=input_img, outputs=decoded) #把输入映射到它的重构上

#建立单独的编码器模型
encoder = Model(inputs=input_img, outputs=encoded)

#建立单独的解码器模型
encoded_input = Input(shape=(encoding_dim,)) #编码维度是解码器的输入
num_decoder_layers = 3
decoder_layer = encoded_input
for i in range(-num_decoder_layers, 0):
    decoder_layer = autoencoder.layers[i](decoder_layer)
decoder = Model(encoded_input, decoder_layer) #这里我参考了stack Overflow上的一个回答https://stackoverflow.com/questions/37758496/python-keras-theano-wrong-dimensions-for-deep-autoencoder


#激活模型(compile)
autoencoder.compile(optimizer='adadelta', loss='binary_crossentropy') #配置模型参数,基于元素的二元交叉熵损失,和Adadelta优化算子

#训练模型
autoencoder.fit(x_train, x_train,
          batch_size=batch_size,
          epochs=epochs,
          shuffle=True,
          validation_data=(x_test, x_test))

# 可视化
encoded_imgs = encoder.predict(x_test)
decoded_imgs = decoder.predict(encoded_imgs)

n = 10
plt.figure(figsize=(20, 4))
for i in range(n):
    ax = plt.subplot(2, n, i+1) #display original
    plt.imshow(x_test[i].reshape(28, 28))
    plt.gray()
    ax.get_xaxis().set_visible(False)
    ax.get_yaxis().set_visible(False)

    ax = plt.subplot(2, n, i+1+n) #display reconstruction
    plt.imshow(x_test[i].reshape(28, 28))
    plt.gray()
    ax.get_xaxis().set_visible(False)
    ax.get_yaxis().set_visible(False)
plt.show()
注意,由于构建了深度解码器,在单独构建解码器的时候,不能再取最后一层作为解码器了,因为此时最后一层的输入是128维,而此时encoding dim是32维,所以程序会报错https://stackoverflow.com/questions/37758496/python-keras-theano-wrong-dimensions-for-deep-autoencoder

