velodyne+cartographer 2D构建栅格地图
velodyne+cartographer 2D构建栅格地图
已经许久未更新博客,最近在做项目指标测试的时候,需要与单车cartographer建图进行对比实验。由于实验室的多线激光雷达是velodyne VLP16 而cartographer建图主要是利用速腾的rslidar16激光雷达来运行的,为了消除激光雷达型号对实验指标的影响,不得不进行改动。关于cartographer的安装相关问题就不在这里做过多说明,有需要的可以去参考这个链接cartographer安装
这篇博客主要说如何利用velodyne VLP16 进行cartographer 2D建图和地图保存。
程序修改
程序的需修改主要就两部分运行文件和激光雷达环境配置文件
launch文件创建与编写
在cartographer_ros/launch 文件夹下创建一个建图程序,可以自己随便命名,不和现有的重复就行。(我这里是demo_VLP16_2d.launch)。上程序:
<launch>
  <param name="/use_sim_time" value="true" />

  <node name="cartographer_node" pkg="cartographer_ros"
      type="cartographer_node" args="
          -configuration_directory $(find cartographer_ros)/configuration_files
          -configuration_basename velodyne.lua"
      output="screen">
    <remap from="scan" to="scan" />
  </node>

  <node name="cartographer_occupancy_grid_node" pkg="cartographer_ros"
      type="cartographer_occupancy_grid_node" args="-resolution 0.05" />
//resolution 0.05 这个参数可以修改,主要是建图时rviz中的分辨率
  <node name="rviz" pkg="rviz" type="rviz" required="true"
      args="-d $(find cartographer_ros)/configuration_files/demo_2d.rviz" />

</launch>
lua 文件编写
在cartographer_ros/configuration_files文件夹下,创建velodyne的lua文件,我这里是velodyne.lua
将下面的代码复制进去。
include "map_builder.lua"
include "trajectory_builder.lua"

options = {
  map_builder = MAP_BUILDER,
  trajectory_builder = TRAJECTORY_BUILDER,
  map_frame = "map",
  tracking_frame = "velodyne",
  published_frame = "velodyne",
  odom_frame = "odom",
  provide_odom_frame = true,
  publish_frame_projected_to_2d = false,
  use_odometry = false,
  use_nav_sat = false,
  use_landmarks = false,
  num_laser_scans = 1,
  num_multi_echo_laser_scans = 0,
  num_subdivisions_per_laser_scan = 1,
  num_point_clouds = 0,
  lookup_transform_timeout_sec = 0.2,
  submap_publish_period_sec = 0.3,
  pose_publish_period_sec = 5e-3,
  trajectory_publish_period_sec = 30e-3,
  rangefinder_sampling_ratio = 1.,
  odometry_sampling_ratio = 1.,
  fixed_frame_pose_sampling_ratio = 1.,
  imu_sampling_ratio = 1.,
  landmarks_sampling_ratio = 1.,
}

MAP_BUILDER.use_trajectory_builder_2d = true

TRAJECTORY_BUILDER_2D.submaps.num_range_data = 35
TRAJECTORY_BUILDER_2D.min_range = 0.3
TRAJECTORY_BUILDER_2D.max_range = 8.
TRAJECTORY_BUILDER_2D.missing_data_ray_length = 1.
TRAJECTORY_BUILDER_2D.use_imu_data = false
TRAJECTORY_BUILDER_2D.use_online_correlative_scan_matching = true
TRAJECTORY_BUILDER_2D.real_time_correlative_scan_matcher.linear_search_window = 0.1
TRAJECTORY_BUILDER_2D.real_time_correlative_scan_matcher.translation_delta_cost_weight = 10.
TRAJECTORY_BUILDER_2D.real_time_correlative_scan_matcher.rotation_delta_cost_weight = 1e-1

POSE_GRAPH.optimization_problem.huber_scale = 1e2
POSE_GRAPH.optimize_every_n_nodes = 35
POSE_GRAPH.constraint_builder.min_score = 0.65

return options
完成上述两个文件,保存并重新编译cartographer功能包!!!!!一定要重新编译!!!注意如果是安按照我上面提供的连接安装的cartographer,编译时不能用catkin_make,用下面这句:
catkin_make_isolated --install --use-ninja
编译没问题后,就可以进行测试了。
测试
首先启动激光雷达,然后运行cartographer建图程序
roslaunch velodyne_pointcloud VLP16.launch
//
cd cartographer
source ioslated_devel/setup.bash
roslaunch cartographer_ros demo_VLP16_2d.launch
地图保存
我一开始是想按照正常的cartographer2D栅格地图保存的方式来保存所建地图来着,但是觉得太费事了,还需要将.pbstream地图转换成.pgm和yaml格式。这里推荐大家一个好用的功能包,使用它就可以像保存gmapping栅格地图一样保存cartographer 2d地图了。这个功能包是基于map_server改进的,具体原理是由于carto保存地图格式和map_saver不一致,对相关源码进行修改即可,修改后的包在这个链接里戳这里
即使你已经安装了map_server这里不影响,你只需要新建一个工作空间将这个功能包复制进去,编译一下就可了。使用时,也是就是正常的地图保存指令rosrun map_server map_saver -f <绝对路径>/<地图名字>。
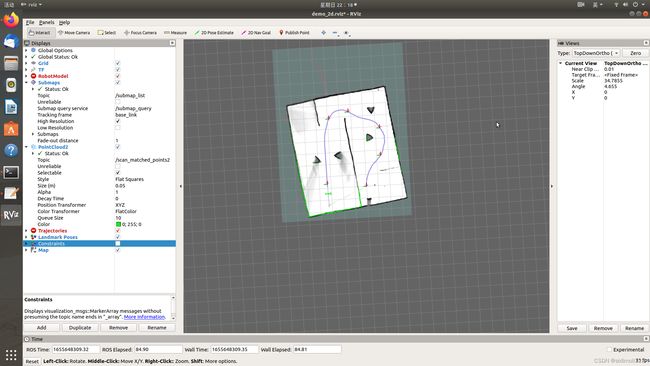
下面是我的建图

最近太懒了,一直没更新。重新振作起来,再次出发!!!
后面那个连接,如果GitHub登不上的可以私聊我,我给你发。或者过一阵子我看看能否上传资源。
(致谢:感谢同为工大你却那么优秀的@合工大机器人实验室!撒花✿✿ヽ(°▽°)ノ✿)

