YoloV1原理和代码解读
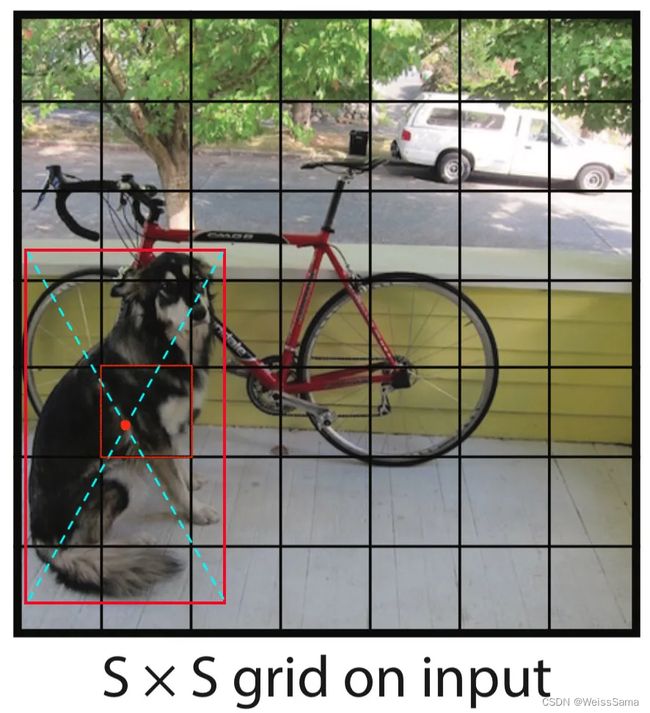
图一
YoloV1,由于不需提取region proposal,检测流程很简单:
- Resize image:将输入图片resize到448x448。
- Run ConvNet:使用CNN提取特征,FC层输出分类和回归结果。
- Non-max Suppression:非极大值抑制筛选出最终的结果。
没有region proposal,总不能用滑窗一个个像素划过去。
那yolo如果找到可能的目标检测框呢?
如上图中,yolo将一张图划分成SxS个grid,上图中S=7,若目标ground truth的中心点落在了某个grid中,那么该grid负责该目标框的预测,如下图。
图二

这里,每个格子负责预测B个box和C个类,而每个box含有五个维度[x,y,w,h,c],其中c是置信度,C个类是一个长度为C的one-hot vector,所以最终网络的输出是SxSx(5xB+C),在论文中,B取值为2,所以一共预测出了7x7x2=98个box,如下图,每个格子预测2个框,框的颜色越深,代表预测的置信度越大。

20221012 继续编辑
https://zhuanlan.zhihu.com/p/94986199
loss函数大概就是
loss = 0
for img in img_all:
   for i in range(4):
      for j in range(4):
         loss_ij = lamda_1*(c_pred-c_label)**2 + c_label*(x_pred-x_label)**2 +\
                     c_label*(y_pred-y_label)**2 + c_label*(w_pred-w_label)**2 + \
                     c_label*(h_pred-h_label)**2
         loss += loss_ij
loss.backward()
其中lamda_1是协调位置loss和类别loss的参数
回到刚刚的问题,我们把一张图划分了4x4区域,在每个区域中检测目标,有目标是1,没有是0。但是如果一个区域中,有两个目标,怎么把他们都检测出来?
我们的思路是:
将4x4区域划分的更细致,比如40x40,这样一个小区域中有2个目标的概率会大大降低,这是一方面,另一方面,我们使用NMS来筛一下,毕竟两个有很大重合的框,大概率是同一个物体。
来手写复习一下NMS的代码:
def nms(boxes, nms_threshold):
    """
    # Args
detections: Nx5 numpy arrays of              [[x0,y0,x1,y1,conf]]
    """
    x0 = boxes[:, 0]
    y0 = boxes[:, 1]
    x1 = boxes[:, 2]
    y1 = boxes[:, 3]
    conf = boxes[:, 4]
    ordered = box_confidences.argsort()[::-1]
    keep = []
    while ordered.size > 0:
        # Index of the current element:
        i = ordered[0]
        keep.append(i)
        xx0 = np.maximum(x0[i], boxes[ordered[1:],0])
        yy0 = np.maximum(y0[i], boxes[ordered[1:],1])
        xx1 = np.minimum(x1[i] ,boxes[ordered[1:],2])
        yy1 = np.minimum(y1[i],boxes[ordered[1:],3])

        w = np.maximum(0.0, xx1 - xx0 + 1)
        h = np.maximum(0.0, yy1 - yy0 + 1)
        inter = w * h
        union = (x1[i]-x0[i])*(y1[i]-y0[i]) + (boxes[ordered[1:],2]-boxes[ordered[1:],0])*(boxes[ordered[1:],3]-boxes[ordered[1:],1]) - inter
        iou = inter / union
        indexes = np.where(iou <= nms_threshold)
        ordered = ordered[indexes[0] + 1]
    return keep
之前我们讨论的都是单类的情况,如果我们既要检测脸,又要检测手、葫芦等多个类,那么输出向量的结果就不再是 c x y w h。
假设我们要检测3个类[脸,手,葫芦]。
img–cbrp–cbrp–cbrp–cbrp–fc256–fc[(5+3)*N],也就是
[c,x,y,w,h,one-hot]*N,其中one-hot是分类任务常用的表达方式
形式是[0,1] [1,0], 分别对应每一个类是否存在。
为了更精确的检测大和小的物体(注意这里是大和小,不是前景和背景),我们添加两组五元数组。
那么现在的网络输出应该是
[c1,x1,y1,w1,h1,c2,x2,y2,w2,h2,one-hot]
这里虽然有两个cxywh,但是最后经过nms之后,只会留下置信度高的那个
到这里 yolo-v1的雏形就出来了

每个格子中有大小两个box来进行回归,还有20维的one-hot向量表示类的置信度。
一共是7x7x(2x5+20)=1470
我们这里有box回归的坐标loss,还有置信度的loss,还有类别判断的loss
loss = 0
for img in img_all:
   for i in range(7):
      for j in range(7):
         conf_loss = lamda_1*(c_pred-c_label)**2
         geo_loss = c_label_big*(x_big_pred-x_big_label)**2 +\
                     c_label_big*(y_big_pred-y_big_label)**2 + c_label_big*(w_big_pred-w_big_label)**2 + \
                     c_label_big*(h_big_pred-h_big_label)**2 +\
                     c_label_small*(x_small_pred-x_small_label)**2 +\
                     c_label_small*(y_small_pred-y_small_label)**2 + c_label_small*(w_small_pred-w_small_label)**2 + \
                     c_label_small*(h_small_pred-h_small_label)**2
         class_loss = 1/m * mse_loss(p_pred, p_label)
         loss_ij =c_loss  + geo_loss + class_loss
         loss += loss_ij
loss.backward()
yolo-v1借鉴的是googleNet的结构。
在另一篇文章记录了GoogleNet介绍
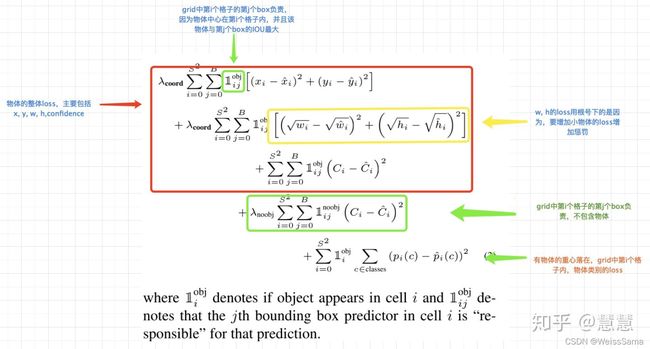
回到YOLOv1的训练和loss函数
![]()
训练的时候时候用的时候224x224,然后推理的时候用448x448,这样效果更好。
Loss 函数的第一行和第二行是直接回归坐标。第三行是前景的confidence loss,第四行是背景的confidence loss,第五行是class loss。
接下来看一下模型的代码。使用简单VGG作为一个特征提取器(这里只是demo,没用inception)
我们之前介绍了inception的原理。这一部分需要说明一下,由于原论文是采用自己设计的20层卷积层先在ImageNet上训练了一周,完成特征提取部分的训练。也就是随便替换为一个分类网络(除去最后的全连接层)其实都行。因此,我打算使用ResNet34的网络作为特征提取部分。这样做的好处是,pytorch的torchvision中提供了ResNet34的预训练模型,训练集也是ImageNet,等于说有先成训练好的模型可以直接使用,从而免去了特征提取部分的训练时间。然后,除去ResNet34的最后两层,再连接上YOLOv1的最后4个卷积层和两个全连接层,作为我们训练的网络结构。
import torch
from torch import nn
import torchvision
class VGG(nn.Module):
    def __init__(self):
       super(VGG,self).__init__()
       # the vgg's layers
       #self.features = features
       cfg = [64,64,'M',128,128,'M',256,256,256,'M',512,512,512,'M',512,512,512,'M']
       layers= []
       batch_norm = False
       in_channels = 3
       for v in cfg:
           if v == 'M': # M的意思是Maxpooling
               layers += [nn.MaxPool2d(kernel_size=2,stride = 2)]
           else:
               conv2d = nn.Conv2d(in_channels,v,kernel_size=3,padding = 1)
               if batch_norm:
                   layers += [conv2d,nn.Batchnorm2d(v),nn.ReLU(inplace=True)]
               else:
                   layers += [conv2d,nn.ReLU(inplace=True)]
               in_channels = v
       # use the vgg layers to get the feature
       self.features = nn.Sequential(*layers)
       # 全局池化
       self.avgpool = nn.AdaptiveAvgPool2d((7,7))
       # 决策层:分类层
       self.classifier = nn.Sequential(
           nn.Linear(512*7*7,4096),
           nn.ReLU(True),
           nn.Dropout(),
           nn.Linear(4096,4096),
           nn.ReLU(True),
           nn.Dropout(),
           nn.Linear(4096,1000),
       )
       # 经过五次MaxPooling,输入大小从224降到7,map大小是7x7x512
    def forward(self,x):

         x_fea = self.features(x)
         x_avg = self.avgpool(x_fea)
         x_reshape = x_avg.view(x_avg.size(0),-1)
         x_classify = self.classifier(x_reshape)
         return x_classify,x_fea,x_avg
    self.avgpool = nn.AdaptiveAvgPool2d((7,7))
    def extractor(self,x):
         x = self.features(x)
         return x
下面是VGG和yolo的主体架构
class YOLOV1(nn.Module):
    def __init__(self):
       super(YOLOV1,self).__init__()
       vgg = VGG()
       self.extractor = vgg.extractor
       self.avgpool = nn.AdaptiveAvgPool2d((7,7))
       # 决策层:检测层
       self.detector = nn.Sequential(
          nn.Linear(512*7*7,4096),
          nn.ReLU(True),
          nn.Dropout(),
          #nn.Linear(4096,1470), # 7x7x30
          nn.Linear(4096,245), # 7x7x5
       )
       for m in self.modules():
           if isinstance(m,nn.Conv2d):
               nn.init.kaiming_normal_(m.weight,mode='fan_out',nonlinearity='relu')
               if m.bias is not None:
                   nn.init.constant_(m.bias,0)
           elif isinstance(m,nn.BatchNorm2d):
               nn.init.constant_(m.weight,1)
               nn.init.constant_(m.bias,1)
           elif isinstance(m,nn.Linear):
               nn.init.normal_(m.weight,0,0.01)
               nn.init.constant_(m.bias,0)
    def forward(self,x):
        x = self.extractor(x)
        #import pdb
        #pdb.set_trace()
        x = self.avgpool(x)
        x = x.view(x.size(0),-1) #
        x = self.detector(x)
        b,_ = x.shape
        #x = x.view(b,7,7,30)
        x = x.view(b,7,7,5)
        return x
if __name__ == '__main__':
# 把架构打印出来看看
    vgg = VGG()
    x  = torch.randn(1,3,512,512)
    x_classify,x_fea,x_avg = vgg(x)
    print(x_classify.shape)
    print(x_fea.shape)
    print(x_avg.shape)
    yolov1 = YOLOV1()
    feature = yolov1(x)
    # feature_size b*7*7*30
    print(feature.shape)
当x是torch.randn(1,3,512,512)
输出结果是
torch.Size([1, 1000])#vgg的分类层输出
torch.Size([1, 512, 16, 16]) # vgg中输入512经过五次maxpooling是16
torch.Size([1, 512, 7, 7]) #经过7x7的全局池化
torch.Size([1, 7, 7, 5])
当x是torch.randn(1,3,224,224)
输出结果是
torch.Size([1, 1000])
torch.Size([1, 512, 7, 7]) #vgg中输入224经过五次maxpooling是7
torch.Size([1, 512, 7, 7])#
torch.Size([1, 7, 7, 5])
输出的1x7x7x5代表49个网格中每个xywhc特征。
下面是模型的训练函数
def train():
    for epoch in range(epochs):
        ts = time.time()
        for iter, batch in enumerate(train_loader):
            optimizer.zero_grad()
            # 取图片
            inputs = input_process(batch)
            # 取标注
            labels = target_process(batch)
            # 获取得到输出
            outputs = yolov1_model(inputs)
            #import pdb
            #pdb.set_trace()
            #loss = criterion(outputs, labels)
            loss,lm,glm,clm = lossfunc_details(outputs,labels)
            loss.backward()
            optimizer.step()
            #print(torch.cat([outputs.detach().view(1,5),labels.view(1,5)],0).view(2,5))
            if iter % 10 == 0:
            #    print(torch.cat([outputs.detach().view(1,5),labels.view(1,5)],0).view(2,5))
                print("epoch{}, iter{}, loss: {}, lr: {}".format(epoch, iter, loss.data.item(),optimizer.state_dict()['param_groups'][0]['lr']))

        #print("Finish epoch {}, time elapsed {}".format(epoch, time.time() - ts))
        #print("*"*30)
        #val(epoch)
        scheduler.step()
图片经过预处理函数input_process和网络yolov1_model得到需要的特征和标注的labels。outputs和labels进行计算得到loss。
下面是具体的几个函数
首先是图像预处理函数
def input_process(batch):
    #import pdb
    #pdb.set_trace()
    batch_size=len(batch[0])
    input_batch= torch.zeros(batch_size,3,448,448)
    for i in range(batch_size):
        inputs_tmp = Variable(batch[0][i])
        inputs_tmp1=cv2.resize(inputs_tmp.permute([1,2,0]).numpy(),(448,448))
        inputs_tmp2=torch.tensor(inputs_tmp1).permute([2,0,1])
        input_batch[i:i+1,:,:,:]= torch.unsqueeze(inputs_tmp2,0)
    return input_batch # [Batch,3,448,448]
然后是标注文件的处理函数
def target_process(batch,grid_number=7):
    # batch[1]表示label
    # batch[0]表示image
    batch_size=len(batch[0])
    target_batch= torch.zeros(batch_size,grid_number,grid_number,30)
    #import pdb
    #pdb.set_trace()
    for i in range(batch_size):
        labels = batch[1]
        batch_labels = labels[i]
        #import pdb
        #pdb.set_trace()
        number_box = len(batch_labels['boxes'])
        for wi in range(grid_number):
            for hi in range(grid_number):
                # 遍历每个标注的框
                for bi in range(number_box):
                    bbox=batch_labels['boxes'][bi]
                    _,himg,wimg = batch[0][i].numpy().shape
                    bbox = bbox/ torch.tensor([wimg,himg,wimg,himg])
                    #import pdb
                    #pdb.set_trace()
                    center_x= (bbox[0]+bbox[2])*0.5
                    center_y= (bbox[1]+bbox[3])*0.5
                    #print("[%s,%s,%s],[%s,%s,%s]"%(wi/grid_number,center_x,(wi+1)/grid_number,hi/grid_number,center_y,(hi+1)/grid_number))
                    if center_x<=(wi+1)/grid_number and center_x>=wi/grid_number and center_y<=(hi+1)/grid_number and center_y>= hi/grid_number:
                        #pdb.set_trace()
                        cbbox =  torch.cat([torch.ones(1),bbox])
                        # 中心点落在grid内,
                        target_batch[i:i+1,wi:wi+1,hi:hi+1,:] = torch.unsqueeze(cbbox,0)
                    #else:
                        #cbbox =  torch.cat([torch.zeros(1),bbox])
                #import pdb
                #pdb.set_trace()
                #print(target_batch[i:i+1,wi:wi+1,hi:hi+1,:])
                #target_batch[i:i+1,wi:wi+1,hi:hi+1,:] = torch.unsqueeze(cbbox,0)
    return target_batch
输出的labels的shape和网络模型输出的feature大小是对应的,我们如果做20个类的检测,那么像上面提到的,一共是cxywhcxywh+20classes=30个特征通道,但是这里我们网络demo输出的特征是1x7x7x5,我们只需要做一个cxywh就可以。
batch_labels表示每张图片的label,number_box表示这张图片有几个真值框。
循环遍历每个grid的每个框,bbox表示正在遍历的这个标注框。
根据bbox中心点是否落入grid来给bbox赋予1或者0 。
最后 是loss function
之前说过,Loss 函数的第一行和第二行是直接回归坐标。第三行是前景的confidence loss,第四行是背景的confidence loss,第五行是class loss。

由于不同大小的边界框对预测偏差的敏感度不同,小的边界框对预测偏差的敏感度更大。为了均衡不同尺寸边界框对预测偏差的敏感度的差异。作者巧妙的对边界框的 w,h 取根号值再求 L2 loss. YOLO 中更重视坐标预测,赋予坐标损失更大的权重,记为 coord,在 pascal voc 训练中 coodd=5 ,classification error 部分的权重取 1。
某边界框的置信度定义为:某边界框的 confidence = 该边界框存在某类对象的概率 pr (object) 该边界框与该对象的 ground truth 的 IOU 值* ,若该边界框存在某个对象 pr (object)=1 ,否则 pr (object)=0 。由于一幅图中大部分网格中是没有物体的,这些网格中的边界框的 confidence 置为 0,相比于有物体的网格,这些不包含物体的网格更多,对梯度更新的贡献更大,会导致网络不稳定。为了平衡上述问题,**YOLO 损失函数中对没有物体的边界框的 confidence error 赋予较小的权重,记为 noobj,对有物体的边界框的 confidence error 赋予较大的权重。在 pascal VOC 训练中 noobj=0.5 ,**有物体的边界框的 confidence error 的权重设为 1.
def lossfunc_details(outputs,labels):
    # 判断模型输出维度和标注labels的
    assert ( outputs.shape == labels.shape),"outputs shape[%s] not equal labels shape[%s]"%(outputs.shape,labels.shape)
    #import pdb
    #pdb.set_trace()
    b,w,h,c = outputs.shape
    loss = 0
    #import pdb
    #pdb.set_trace()
    conf_loss_matrix = torch.zeros(b,w,h)
    geo_loss_matrix = torch.zeros(b,w,h)
    loss_matrix = torch.zeros(b,w,h)
    for bi in range(b):
        for wi in range(w):
            for hi in range(h):
                #import pdb
                #pdb.set_trace()
                # detect_vector=[confidence,x,y,w,h]
                detect_vector = outputs[bi,wi,hi]
                #outputs是1x7x7x5,所以detect_vector是[c,x,y,w,h]
                gt_dv = labels[bi,wi,hi]
                conf_pred = detect_vector[0]
                conf_gt = gt_dv[0]
                x_pred = detect_vector[1]
                x_gt = gt_dv[1]
                y_pred = detect_vector[2]
                y_gt = gt_dv[2]
                w_pred = detect_vector[3]
                w_gt = gt_dv[3]
                h_pred = detect_vector[4]
                h_gt = gt_dv[4]
                loss_confidence = (conf_pred-conf_gt)**2
                loss_geo = (x_pred-x_gt)**2 + (y_pred-y_gt)**2 + (w_pred**0.5-w_gt**0.5)**2 + (h_pred**0.5-h_gt**0.5)**2

                #loss_geo = (x_pred-x_gt)**2 + (y_pred-y_gt)**2 + (w_pred-w_gt)**2 + (h_pred-h_gt)**2
                loss_geo = conf_gt*loss_geo
                loss_tmp = loss_confidence + 0.3*loss_geo
                #print("loss[%s,%s] = %s,%s"%(wi,hi,loss_confidence.item(),loss_geo.item()))
                loss += loss_tmp
                conf_loss_matrix[bi,wi,hi]=loss_confidence
                geo_loss_matrix[bi,wi,hi]=loss_geo
                loss_matrix[bi,wi,hi]=loss_tmp
    #打印出batch中每张片的位置loss,和置信度输出
    print(geo_loss_matrix)
    print(outputs[0,:,:,0]>0.5)
    return loss,loss_matrix,geo_loss_matrix,conf_loss_matrix
因为我们实现的这个模型只检测1个类,所以没有class_loss。
loss_geo = conf_gt*loss_geo这里只计算了前景的geo_loss
到此为止,yolo的基本思想介绍完毕。
参考
https://zhuanlan.zhihu.com/p/94986199
另外,yolov1 到 yolov4整体总结见我的另一篇文章
https://blog.csdn.net/Bismarckczy/article/details/121958203

