Swim_transformer
Swim_transformer
model
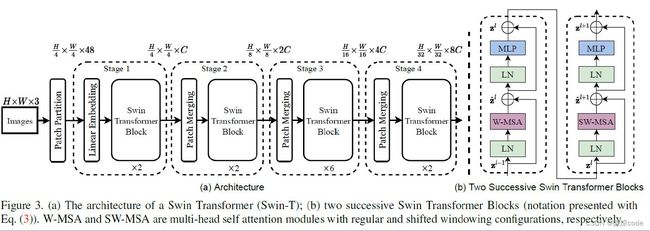
整体架构
- 首先图片经过Patch_Embeding操作,将图片分成patch,和vit前置操作一样,只不过这个大小是4*4
- 将得到的patch图片送入Stage,每个stage都由不同数量的block组成,上图为[2,2,6,2]
- 将得到的向量送入head分类头,就完成了
下面将详细讲解每一部分
Patch_Embeding
'''
    将图片裁剪成patch_size大小的一个个patch,经过了Patch_Embeding操作,我们得到了
    [batch,num_patches,embed_dim]大小的向量
'''
class Patch_Embeding(nn.Module):
    def __init__(self, dim=96, patch_size=4):
        super().__init__()
        # 96=4*4*3*2
        # 将3维图片转为96维度,然后对每个(4*4)的patch进行扫描,和VIT一样
        self.patch = nn.Conv2d(3, dim, kernel_size=patch_size, stride=patch_size)
        self.norm = nn.LayerNorm(dim)

    def forward(self, x):
        x = self.patch(x)  # [B, C, H, W] , C = dim
        x = x.flatten(2).transpose(1, 2)  # [B, num_patches, C]
        x = self.norm(x)
        # x=[batch_size,num_patches,C]
        return x
Swin_stage
下面将向量送入第一个stage,每个stage将生成depth个block层
所以每个stage做一次block层,做一次patch_merge操作
'''
    每个stage相当于特征金字塔的一个层
'''
class Swin_stage(nn.Module):
    def __init__(self,
                 depth,#每个block深度
                 dim,#输入的维度
                 num_heads,#多头注意力
                 input_res,#输入特征图的h,w
                 window_size,#窗口数量
                 qkv_bias=None,#自注意力的偏置
                 patch_merging=None#是否将patch进行合并
                 ):
        super().__init__()
        # 根据每个stage的深度进行堆叠block
        self.blocks = nn.ModuleList([
            Swin_Block(
                dim=dim,
                num_heads=num_heads,
                input_res=input_res,
                window_size=window_size,
                qkv_bias=qkv_bias,
                shift_size=0 if (i % 2 == 0) else window_size // 2 #根据depth决定是否进行移位操作
            )
            for i in range(depth)
        ])

        if patch_merging is None:
            self.patch_merge = nn.Identity()
        else:
            self.patch_merge = Patch_Merging(input_res, dim)

    def forward(self, x):

        # 由于patch_size为4,所以总共是56*56个patch
        # 第一次进入的特征图为[b,56*56,96]
        for block in self.blocks:
            # 见3.1
            x = block(x)

        # 见4.1
        x = self.patch_merge(x)
        return x
每个block要经过layernorm层,注意力操作,layernorm层,MLP层,最后输出
Swin_Block
# swin_encode & Patch_Merging
class Swin_Block(nn.Module):
    def __init__(self, dim, num_heads, input_res, window_size, qkv_bias=False, shift_size=0):
        super().__init__()

        self.dim = dim#输入维度C
        self.resolution = input_res#当前特征图的H,W
        self.num_heads = num_heads
        self.window_size = window_size
        self.shift_size = shift_size
        self.atten_norm = nn.LayerNorm(dim)
        self.atten = window_attention(dim, num_heads, qkv_bias)
        self.mlp_norm = nn.LayerNorm(dim)
        self.mlp = MLP(dim, mlp_ratio=4)


    def forward(self, x):

        # x:[B, num_patches, embed_dim]
        # resolution是每个特征图的大小
        # [56,56]-->[28,28]-->[14,14]-->[7,7]
        H, W = self.resolution
        B, N, C = x.shape

        assert N == H * W

        h = x
        x = self.atten_norm(x)

        # 展平,方便移动窗口
        x = x.reshape(B, H, W, C)
        # 第一次进入block没有平移操作,等下面再讲,可以跳过shift_size>0这步
        if self.shift_size > 0:
            shift_x = torch.roll(x, shifts=(-self.shift_size, -self.shift_size), dims=(1, 2))
            atten_mask = generate_mask(input_res=self.resolution, window_size=self.window_size,
                                       shift_size=self.shift_size)
        else:
            shift_x = x
            atten_mask = None
        # 将特征图划分为窗口大小,对每个窗口做自注意力操作
        # [B*num_patches, window_size, window_size, C]
        x_window = window_partition(shift_x, self.window_size)
        # reshape
        x_window = x_window.reshape(-1, self.window_size * self.window_size, C)
        # 自注意力操作
        atten_window = self.atten(x_window, mask=atten_mask)  # [B*num_patches, window_size*window_size, C]
        # 重新reshape回来
        atten_window = atten_window.reshape(-1, self.window_size, self.window_size, C)
        # 再将每个窗口还原回去每个patch大小的维度
        x = window_reverse(atten_window, self.window_size, H, W)  # [B, H, W, C]
        x = x.reshape(B, -1, C)
        # resnet
        x = h + x

        h = x
        x = self.mlp_norm(x)
        # MLP操作
        x = self.mlp(x)
        x = h + x

        return x
注意力操作 window_attention
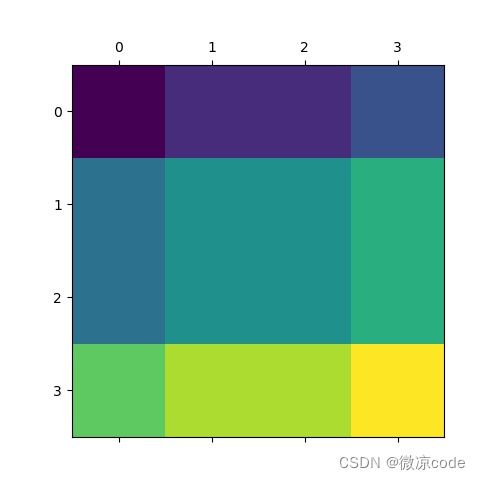
为了使得窗口间有交互,做自注意力。将A,B,C向左向上移动,填充到右下角.

import numpy as np
import matplotlib.pylab as plt
import torch
data=np.array([
    [1,2,2,3],
    [4,5,5,6],
    [4,5,5,6],
    [7,8,8,9]
])
shift_x = torch.roll(torch.from_numpy(data), shifts=(-1, -1), dims=(0, 1))
plt.matshow(data)
plt.matshow(shift_x.numpy())
plt.show()
关于掩码可以看这个window_mask
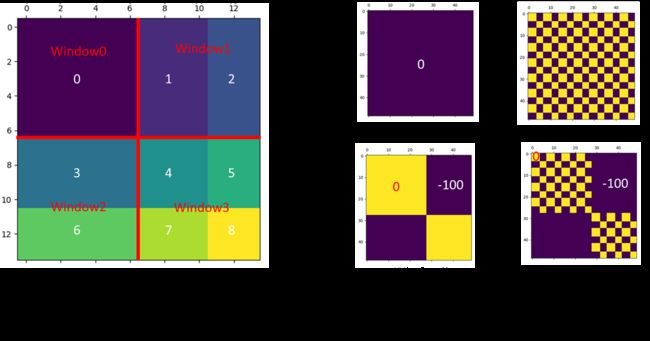
我们需要对每个窗口做自注意力,但是3和6不应该做,1和2也不应该做,(4,5,7,8)也不应该相互做,所以我们需要掩码操作
# 对于不需要计算的部分产生一个大的负数-100,这样softmax之后就是0
def generate_mask(input_res, window_size, shift_size):
    H, W, = input_res
    # 保证H、W可以被window size整除 ceil 向上取整
    Hp = int(np.ceil(H / window_size)) * window_size
    Wp = int(np.ceil(W / window_size)) * window_size

    image_mask = torch.zeros((1, Hp, Wp, 1))

    h_slice = (slice(0, -window_size),
               slice(-window_size, -shift_size),
               slice(-shift_size, None)
               )

    w_slice = (slice(0, -window_size),
               slice(-window_size, -shift_size),
               slice(-shift_size, None)
               )
    cnt = 0
    for h in h_slice:
        for w in w_slice:
            image_mask[:, h, w, :] = cnt
            cnt += 1

    # 将mask划分成一个个窗口
    # [B * window_num , Hp, Wp, C]
    mask_window = window_partition(image_mask, window_size)

    # 将每一个窗口内的元素展平
    # [B * window_num * C, Hp*Wp]
    mask_window = mask_window.reshape(-1, window_size * window_size)

    # [B * window_num * C, 1, Hp*Wp] - [B * window_num * C, Hp*Wp, 1] 广播机制 -> [B * window_num * C, Hp*Wp, Hp*Wp]
    #见下
    attn_mask = mask_window.unsqueeze(1) - mask_window.unsqueeze(2)

    # 将不等于0的值变为-100,将等于0的值变为0
    attn_mask = attn_mask.masked_fill(attn_mask != 0, float(-100.0)).masked_fill(attn_mask == 0, float(0.0))

    return attn_mask
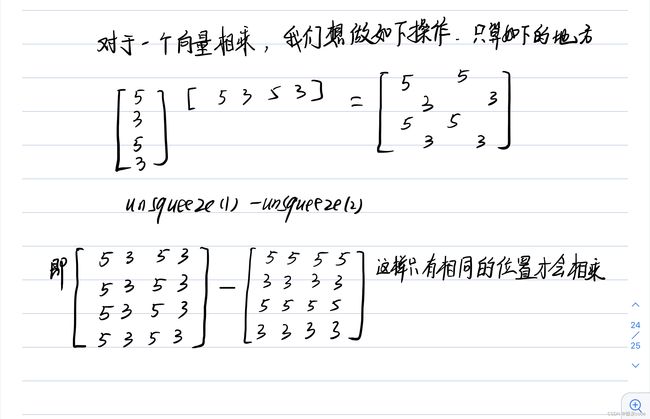
对于一个窗口,只有数字相同我们才做自注意力,如下图所示.对于数字不同的,我们应该加上掩码,不用其做自注意力。

mask_window.unsqueeze(1) - mask_window.unsqueeze(2)
例子:
import torch
import numpy as np
import matplotlib.pylab as plt
a=np.array([1,1,3,4,4])
b=a

aa=torch.from_numpy(a).unsqueeze(0)
bb=torch.from_numpy(b).unsqueeze(1)
print(f'-------------')
print(aa)
print(f'-------------')
print(bb)
print(aa.shape,bb.shape)
dd=aa-bb
print(dd)
print(dd.shape)
plt.matshow(dd[:,:])
plt.show()
我们可以看到,可以相乘的地方会变成0,然后可以masked_fill操作
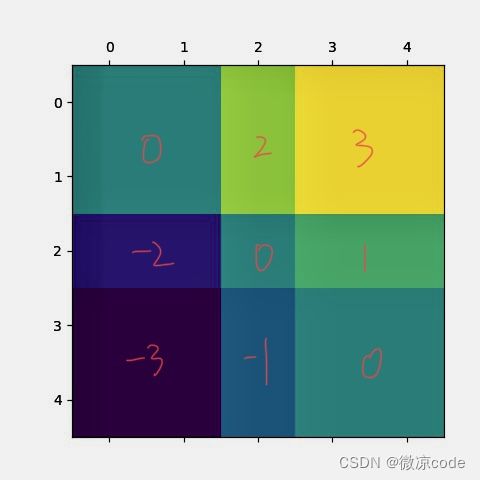
这是上面github链接的代码例子,可以帮助理解掩码
import torch

import matplotlib.pyplot as plt


def window_partition(x, window_size):
    """
    Args:
        x: (B, H, W, C)
        window_size (int): window size

    Returns:
        windows: (num_windows*B, window_size, window_size, C)
    """
    B, H, W, C = x.shape
    x = x.view(B, H // window_size, window_size, W // window_size, window_size, C)
    windows = x.permute(0, 1, 3, 2, 4, 5).contiguous().view(-1, window_size, window_size, C)
    return windows


window_size = 7
shift_size = 3
H, W = 14, 14
img_mask = torch.zeros((1, H, W, 1))  # 1 H W 1
h_slices = (slice(0, -window_size),
            slice(-window_size, -shift_size),
            slice(-shift_size, None))
w_slices = (slice(0, -window_size),
            slice(-window_size, -shift_size),
            slice(-shift_size, None))
cnt = 0
for h in h_slices:
    for w in w_slices:
        img_mask[:, h, w, :] = cnt
        cnt += 1

mask_windows = window_partition(img_mask, window_size)  # nW, window_size, window_size, 1
mask_windows = mask_windows.view(-1, window_size * window_size)

attn_mask = mask_windows.unsqueeze(2) - mask_windows.unsqueeze(1)
print(attn_mask.shape)
squemask=attn_mask
attn_mask = attn_mask.masked_fill(attn_mask != 0, float(-100.0)).masked_fill(attn_mask == 0, float(0.0))

# 给不同的区域上不同的色
plt.matshow(img_mask[0, :, :, 0].numpy())

plt.matshow(attn_mask[0].numpy())
plt.matshow(attn_mask[1].numpy())
plt.matshow(attn_mask[2].numpy())
plt.matshow(attn_mask[3].numpy())

plt.show()
这个例子中窗口大小是7X7的,但是我们得到的掩码却是49X49的,那是为什么呢?
因为我们的掩码是添加在Q@K之后的
Q,K是49维的向量,做自注意力时相乘变为49X49,此时想要添加掩码,掩码也是49X49大小的
然后再乘V变回来
patch_merge
直接见图
class Patch_Merging(nn.Module):
    def __init__(self, input_res, dim):
        super().__init__()
        self.resolution = input_res
        self.dim = dim

        self.reduction = nn.Linear(4 * dim, 2 * dim)
        self.norm = nn.LayerNorm(2 * dim)

    def forward(self, x):
        # x: [B, num_patches, C]
        H, W = self.resolution
        B, _, C = x.shape

        x = x.reshape(B, H, W, C)

        # Focus操作
        x0 = x[:, 0::2, 0::2, :]
        x1 = x[:, 0::2, 1::2, :]
        x2 = x[:, 1::2, 0::2, :]
        x3 = x[:, 1::2, 1::2, :]

        x = torch.cat((x0, x1, x2, x3), -1)

        x = x.reshape(B, -1, 4 * C)
        x = self.reduction(x)
        x = self.norm(x)

        return x
相对位置编码可以看这个博客
