pytorch实现Yolov3网络结构
#基于torch的yolov3网络结构Darknet53实现
最近一段时间在研究目标检测,先从yolov3看起。本文讲下如何使用pytorch实现yolov3网络结构中的DarkNet53网络结构。
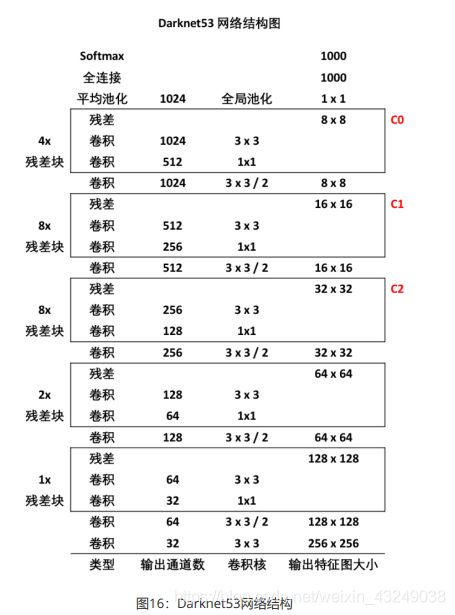
首先上图,这张图片是论文原图,非常经典。

下面开始讲如何使用torch逐步搭建Darknet53网络结构。
首先,搭建一个ConvBNLayer层,也是yolov3中的最小网络组件。即Conv层+BatchNorm层+LeakyRelu层的组合。
下面开始上代码。
import torch
import torch.nn as nn
import numpy as np

class ConvBNLayer(nn.Module):
    def __init__(self, ch_in, ch_out, filter_size=3, padding=1, stride=1, bnorm=True, leaky=True):
        super(ConvBNLayer, self).__init__()
        self.conv = nn.Conv2d(ch_in, ch_out, filter_size, stride, padding, bias=False if bnorm else True)
        self.bnorm = nn.BatchNorm2d(ch_out, eps=1e-3) if bnorm else None
        self.leaky = nn.LeakyReLU(0.1) if leaky else None

    def forward(self, x):
        x = self.conv(x)
        x = self.bnorm(x)
        x = self.leaky(x)
        return x
假若filter_size=3,padding=1,stride=1,则ConvBNLayer层对输入图片的宽和高不会产生影响。
定义完ConvBNLayer层后,再定义一个下采样层,在yolov3中,下采样是通过stride=2的卷积操作来实现的。
下面展示一些 内联代码片。
class DownSample(nn.Module):
    def __init__(self, ch_in, ch_out, filter_size=3, stride=2, padding=1):
        super(DownSample, self).__init__()
        self.conv_bn_layer = ConvBNLayer(ch_in, ch_out, filter_size=filter_size, stride=stride, padding=padding)
        self.ch_out = ch_out

    def forward(self, x):
        x = self.conv_bn_layer(x)
        return x
在ch_out=2*ch_in,filter_size=3,stride=2,padding=1的情况下,刚好可以将特征图的宽和高同时减小为原来的一半,同时特征图的通道数增加一倍。
下面定义残差块,yolov3中借鉴了ResNet的设计思想。输入x经过两层卷积,然后将第二层卷积的输出和输入x相加。
class BasicBlock(nn.Module):
    def __init__(self, ch_in, ch_out):
        super(BasicBlock, self).__init__()
        self.conv1 = ConvBNLayer(ch_in, ch_out, filter_size=1, stride=1, padding=0)
        self.conv2 = ConvBNLayer(ch_in=ch_out, ch_out=ch_out * 2, filter_size=3, stride=1, padding=1)
        self.shortcut = nn.Sequential()

    def forward(self, x):
        out = self.conv1(x)
        out = self.conv2(out)
        out += self.shortcut(x)
        return out
由代码可看出,BasicBlock模块不会改变输入特征图的宽和高。
定义完残差块后我们再定义Darknet53的基本层LayerWarp。(Darknet53是一个较为复杂的网络结构,拆解的越细,后续实现会越简单)。
class LayerWarp(nn.Module):
    def __init__(self, ch_in, ch_out, count):
        super(LayerWarp, self).__init__()
        self.basicblock0 = BasicBlock(ch_in, ch_out)
        self.res_outs = nn.ModuleList(BasicBlock(ch_out * 2, ch_out) for i in range(count - 1))

    def forward(self, inputs):
        out = self.basicblock0(inputs)
        for i, res_out in enumerate(self.res_outs):
            out = res_out(out)
        return out
由代码我们可以看出,LayerWarp共有3个输入参数,ch_in,ch_out,count。当count为1时,LayerWarp只有basicblock0在起作用。当count大于1时,整个LayerWarp层由一个BasicBlock(ch_in,ch_out)和(count-1)个BasicBlock(ch_out2,ch_out)组成。**倘若输入的参数中ch_in=2ch_out。则经过LayerWarp层后,输出通道数仍为ch_in**。
搭建完这些基本模块之后,下面开始搭建Darknet53的主题网络结构。
下面展示一些 内联代码片。
DarkNet_cfg = {53: ([1, 2, 8, 8, 4])}
class DarkNet53_conv_body(nn.Module):
    def __init__(self):
        super(DarkNet53_conv_body, self).__init__()
        self.stages = DarkNet_cfg[53]
        self.stages = self.stages[0:5]

        self.conv0 = ConvBNLayer(ch_in=3, ch_out=32, filter_size=3, stride=1, padding=1)
        self.downsample0 = DownSample(ch_in=32, ch_out=32 * 2)
        self.darknet53_conv_block_lists = nn.ModuleList(
            LayerWarp(32 * (2 ** (i + 1)), 32 * (2 ** i), stage) for i, stage in enumerate(self.stages))
        self.downsample_lists = nn.ModuleList(
            DownSample(ch_in=32 * (2 ** (i + 1)), ch_out=32 * (2 ** (i + 2))) for i in range(len(self.stages) - 1))
    def forward(self, inputs):
        out = self.conv0(inputs)
        out = self.downsample0(out)
        blocks = []
        for i, darknet53_conv_list in enumerate(self.darknet53_conv_block_lists):
            out = darknet53_conv_list(out)
            blocks.append(out)
            if i < len(self.stages) - 1:
                out = self.downsample_lists[i](out)
        return blocks[-1:-4:-1]#将C0,C1,C2作为返回值
最后将C0,C1,C2作为返回值输出。这样做的原因可以参考这篇博客链接: link.
由代码可看出,整个Darknet53结构先经历一层ConvBNLayer层和DownSample层,假设输入[1,3,w,h]。此时输出为[1,64,w/2,h/2]。
接下来,特征图分别经过stage为1,2,8,8,4的LayerWarp层(stage为LayerWarp中的count参数,且每个相邻的stage之间均安排了DownSample环节进行降采样。
stage=1,i=0。经过LayerWarp(64,32,1)。输入特征图仅经过一个basicblock0层。输出特征图:[1,64,w/2,h/2]。
DownSample层:输出特征图[1,128,w/4,h/4]
stage=2,i=1。经过LayerWarp(128,64,2)。输入特征图经过basicblock0层,也经过1个BasicBlock(ch_out2,ch_out)层。输出特征图[1,128,w/4,h/4]。
DownSample层:输出特征图[1,256,w/8,h/8]
stage=8,i=2。经过LayerWarp(256,128,8)。输入特征图经过basicblock0层,也经过7个BasicBlock(ch_out2,ch_out)层。输出特征图[1,256,w/8,h/8]。此一步输出上图中的C2。
DownSample层:输出特征图[1,512,w/16,w/16]
stage=8,i=3。经过LayerWarp(512,256,8)。输入特征图经过basicblock0层,也经过7个BasicBlock(ch_out2,ch_out)层。输出特征图[1,512,w/16,w/16]。此一步输出上图中C1。
DownSample层:输出特征图[1,1024,w/32,h/32]。
stage=4,i=4。经过LayerWarp(1024,512,4)。输入特征图经过basicblock0层,也经过3层BasicBlock(ch_out2,ch_out)层。输出特征图[1,1024,w/32,w/32]。此一步输出上图中的C0。
打印出网络结构并进行测试。
with torch.no_grad():
	net=DarkNet53_conv_body()
	x=torch.randn(1,3,640,640)
	y1,y2,y3=net(x)
	print(net)
	print(y1.shape,y2.shape,y3.shape)

# output
# torch.Size([1,1024,20,20])
# torch.Size([1,512,40,40])
# torch.Size([1,256,80,80])
此致,结束。
更多详细代码请参考我的github地址链接: link
参考资料:《百度架构师手把手教深度学习》,代码设计思路亦来源于此书。