torchvision Faster-RCNN ResNet-50 FPN代码解析(总体结构)
在看本文之前,请下载对应的代码作为参考:pytorch/vision/detection/faster_rcnn。
总体结构
花了点时间把整个代码架构理了理,画了如下这张图:
(*) 假设原始图片大小是599x900

主体部分分为这几大部分:
- Transform,主要是对输入图像进行转换
- Resnet-50,主干网,主要是特征提取
- FPN,主要用于构建特征金字塔给RPN提供输入特征图
- RPN,主要是产生region proposals
- ROI,主要是检测object区域,各个区域的labels以及各个区域的scores
Transform
请看torchvision Faster-RCNN ResNet-50 FPN代码解析(图片转换和坐标)
Resnet-50
这里就不多做介绍,这里用的标准的Resnet-50。
FPN
前面的libtorch学习笔记(17)- ResNet50 FPN以及如何应用于Faster-RCNN已经有详细介绍,请参考之。
RPN
首先请看RPN头部紫色部分,对应的代码中是:
class RegionProposalNetwork(torch.nn.Module):
	......
    def forward(self,
                images,       # type: ImageList
                features,     # type: Dict[str, Tensor]
                targets=None  # type: Optional[List[Dict[str, Tensor]]]
                ):
		......
        # RPN uses all feature maps that are available
        features = list(features.values())
        objectness, pred_bbox_deltas = self.head(features)
		......

class RPNHead(nn.Module):
	......
    def __init__(self, in_channels, num_anchors):
        super(RPNHead, self).__init__()
        self.conv = nn.Conv2d(
            in_channels, in_channels, kernel_size=3, stride=1, padding=1
        )
        self.cls_logits = nn.Conv2d(in_channels, num_anchors, kernel_size=1, stride=1)
        self.bbox_pred = nn.Conv2d(
            in_channels, num_anchors * 4, kernel_size=1, stride=1
        )

    def forward(self, x):
        # type: (List[Tensor]) -> Tuple[List[Tensor], List[Tensor]]
        logits = []
        bbox_reg = []
        for feature in x:
            t = F.relu(self.conv(feature))
            logits.append(self.cls_logits(t))
            bbox_reg.append(self.bbox_pred(t))
        return logits, bbox_reg
这里先对5个特征图进行3x3的卷积处理,输入和输出的channel都是256,这里主要是对特征进行进一步提取以便于产生proposals。然后再对这些输出,同时进行两个1x1的卷积处理:
- Objectness,用于表明每点在某层特征图上对应的anchor是否在一个object的可能性张量
- pred_bbox_deltas,用于表明每点在某层特征图上对应的anchor距离中心点各个方向的偏移的张量
这一点是和标准的Faster-RCNN提到的是不一样的,标准论文中每个点取9个不同的anchors,这里是5个特征层,每层每点取3个anchor,总共取15个anchor,具体参考前面文章libtorch学习笔记(17)- ResNet50 FPN以及如何应用于Faster-RCNN。这也是为什么cls_logits这个1x1卷积层输出为3(3 anchor/point in one level * 1 (foreground possibility)),而bbox_pred则是12(3 anchor/point in one level * 4 (4 offset/box))。
然后再看anchor_generator,这个模块主要是在每层特征图上产生3个anchors。
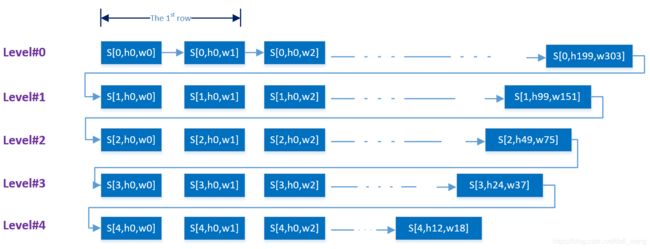
最后卷积层对每层特征图进行处理后进入concat_box_prediction_layers函数进行拼接,

最后得到的box_cls变成了这样的layout,box_regression也是按照这个顺序排列的:

box_coder.decode在这里的作用把产生的anchor和box_regression结合产生
w i d t h a n c h o r = x a n c h o r _ b o t t o m _ r i g h t − x a n c h o r _ t o p _ l e f t h e i g h t a n c h o r = y a n c h o r _ b o t t o m _ r i g h t − y a n c h o r _ t o p _ l e f t c e n t e r _ x = x a n c h o r _ t o p _ l e f t + w i d t h a n c h o r / 2.0 c e n t e r _ y = y a n c h o r _ t o p _ l e f t + h e i g h t a n c h o r / 2.0 d x , d y , d w , d h = b o x _ r e g r e s s i o n p r e d _ c e n t e r x = d x ∗ w i d t h a n c h o r + c e n t e r _ x p r e d _ c e n t e r y = d y ∗ h e i g h t a n c h o r + c e n t e r _ y p r e d _ w = e d w ∗ w i d t h a n c h o r p r e d _ h = e d h ∗ h e i g h t a n c h o r p r e d _ b o x _ x t o p _ l e f t = p r e d _ c e n t e r x − p r e d _ w / 2 p r e d _ b o x _ y t o p _ l e f t = p r e d _ c e n t e r y − p r e d _ h / 2 p r e d _ b o x _ x b o t t o m _ r i g h t = p r e d _ c e n t e r x + p r e d _ w / 2 p r e d _ b o x _ y b o t t o m _ r i g h t = p r e d _ c e n t e r y + p r e d _ h / 2 \begin{aligned} width_{anchor} &= x_{anchor\_bottom\_right} - x_{anchor\_top\_left}\\ height_{anchor} &= y_{anchor\_bottom\_right} - y_{anchor\_top\_left}\\ center\_x &= x_{anchor\_top\_left} + width_{anchor}/2.0\\ center\_y &= y_{anchor\_top\_left} + height_{anchor}/2.0\\ d_x, d_y, d_w, d_h &= box\_regression\\ pred\_center_x &= d_x*width_{anchor} + center\_x\\ pred\_center_y &= d_y*height_{anchor} + center\_y\\ pred\_w &= e^{d_w}*width_{anchor}\\ pred\_h &= e^{d_h}*height_{anchor}\\ pred\_box\_x_{top\_left} &= pred\_center_x - pred\_w/2\\ pred\_box\_y_{top\_left} &= pred\_center_y - pred\_h/2\\ pred\_box\_x_{bottom\_right} &= pred\_center_x + pred\_w/2\\ pred\_box\_y_{bottom\_right} &= pred\_center_y + pred\_h/2\\ \end{aligned} widthanchorheightanchorcenter_xcenter_ydx,dy,dw,dhpred_centerxpred_centerypred_wpred_hpred_box_xtop_leftpred_box_ytop_leftpred_box_xbottom_rightpred_box_ybottom_right=xanchor_bottom_right−xanchor_top_left=yanchor_bottom_right−yanchor_top_left=xanchor_top_left+widthanchor/2.0=yanchor_top_left+heightanchor/2.0=box_regression=dx∗widthanchor+center_x=dy∗heightanchor+center_y=edw∗widthanchor=edh∗heightanchor=pred_centerx−pred_w/2=pred_centery−pred_h/2=pred_centerx+pred_w/2=pred_centery+pred_h/2
这些在R-CNN论文中已经由详细描述,而且前面的笔记也已经做了详细描述,这里就不做赘述。
最后RPN网络通过filter_proposals选出1000个proposals。
具体实现解读参考另外一篇torchvision Faster-RCNN ResNet-50 FPN代码解析(RPN。
ROI
ROI对输入的1000个proposal进行检测,根据设定的阀值进行选择,最终输出满足阀值的检测结果,包括分数(Scores),标签(Labels)和区域(Boxes)。具体参考另外一篇torchvision Faster-RCNN ResNet-50 FPN代码解析(ROI)。
笔记写得不易,觉得有点干货的,望点个赞!