TensorFlow 2.0简介
目录
- 知识树
- 1、TensorFlow 2.x vs 1.x
-
- 1.1 TensorFlow发展历程
- 1.2 为什么要学习TensorFlow
- 1.3 TensorFlow 2.x vs 1.x
- 1.4 TensorFlow 2.0 变化
- 2、Eager Execution
-
- 2.1 Eager Execution优缺点
- 3、TensorFlow API
-
- 3.1 低层TensorFlow API
- 3.2 中层TensorFlow API
- 3.3 高层TensorFlow API
- 3.4 TensorFlow API 总结
- 4、资料来源
知识树
1、TensorFlow 2.x vs 1.x
1.1 TensorFlow发展历程
1.2 为什么要学习TensorFlow
- 开源生态成熟;
- 完整的部署流程;
- 产品化方案;
TensorFlow 1.X有哪些问题?
- 文档和接口混乱;
- 默认占用所有GPU的所有内存;
- 使用繁琐;
- 调试困难等;
1.3 TensorFlow 2.x vs 1.x
1.4 TensorFlow 2.0 变化
TensorFlow 2.0 推荐使用tf.keras、tf.data等高级库;
- 用Eager模式搭建原型;
- 用tf.data处理数据;
- 用tf.feature_column提取特征;
- 用tf.keras搭建模型;
- 用tf.saved_model打包模型;
2、Eager Execution
Eager模式就是类似于Python这样的命令式编程,写好程序之后,不需要编译,就可以直接运行,而且非常直观;
而之前的Session静态图模式则类似于C/C++的声明式编程,写好程序之后要先编译,然后才能运行;
Eager模式是在TF1.4版本之后引入的,在TF2.x的版本会把eager模式变为默认执行模式;
好处:
- 不需要编写完整的静态图;
- 调试不需要打开会话(Session);
- Python上调用它进行计算可以直接得出结果;
- TensorFlow 2.x的入门会简单得多;
2.1 Eager Execution优缺点
优点:
- eager模式提供了更直观的接口,可以像写Python代码一样写模型;
- 更方便调试;
- 自然的控制流程,像编写Python程序一样;
缺点:
- 通过graph构造的模型在分布式训练、性能优化以及线上部署上有优势;
推荐使用@tf.function(而非1.x中的tf.Session)实现Graph Execution,从而将模型转换为易于部署且高性能的TensorFlow图模型;
举个例子:
import tensorflow as tf
@tf.function
def simple_nn_layer(x, y):
	return tf.nn.relu(tf.matmul(x, y))

x = tf.random.uniform((3,3))
y = tf.random.uniform((3,3))

simple_nn_layer(x,y)
3、TensorFlow API
TensorFlow API一共可以分为三个层次,即低阶API、中阶API、高阶API:
- 第一层为Python实现的操作符,主要包括各种张量操作算子、计算图、自动微分;
- 第二层为Python实现的模型组件,对低级API进行了函数封装,主要包括各种模型层,损失函数,优化器,数据管道,特征列等等;
- 第三层为Python实现的模型成品,一般为按照OOP方式封装的高级API,主要为tf.keras.models提供的模型的类接口;
3.1 低层TensorFlow API
import tensorflow as tf

a = tf.constant([[1,2],[3,4]])
b = tf.constant([[5,6],[7,8]])

# 标量计算
a+b  tf.math.add(a,b)
a-b  tf.math.subtract(a,b)
a*b  tf.math.multiply(a,b)
a/b  tf.math.divide(a,b)

# 向量计算
a = tf.range(1,100)
tf.print(tf.reduce_sum(a))
tf.print(tf.reduce_mean(a))
tf.print(tf.reduce_max(a))
tf.print(tf.reduce_min(a))
tf.print(tf.reduce_prod(a))
3.2 中层TensorFlow API
a = tf.random.uniform(shape=(10,5), minval=0, maxval=10)  # 矩阵
tf.nn.softmax(a)  # softmax操作

a = tf.random.uniform(shape(10,5), minval=-0.5, maxval=-0.5)  # 矩阵
b = tf.keras.layers.Dense(10)(a)  # 全连接层
b = tf.nn.softmax(b)  # softmax操作

a = tf.random.uniform(shape=(10,100,50), minval=-0.5, maxval=-0.5)  # 矩阵
b = tf.keras.LSTM(100)(a)  # LSTM层
b = tf.keras.layers.Dense(b)  # 全连接层
b = tf.nn.softmax(b)  # softmax操作
3.3 高层TensorFlow API
tensorflow.keras.models
建模方式有三种:
- Sequential办法;
- 函数式API方法;
- Model子类化自定义模型
如何构建模型将会在后面详细介绍,下面我们举个例子:
import tensorflow as tf

# 随机初始化输入X和输出y
X = tf.random.uniform(shape=(10,100,50),minval=-0.5,maxval=0.5)
y = tf.random.categorical(tf.random.uniform(shape=(10.3),minval=-0.5,maxval=-0.5),2)

# 构造模型
model = tf.keras.models.Sequential()
model.add(tf.keras.layers.LSTM(100,input_shape=(100,50)))
model.add(tf.keras.layers.Dense(10))
model.add(tf.keras.layers.Dense(2,activation='softmax'))

model.compilc(optimizer='adam',loss='categorical crossentropy',metrics=['accuracy'])

model.summary()
model.fit(X,y)
3.4 TensorFlow API 总结

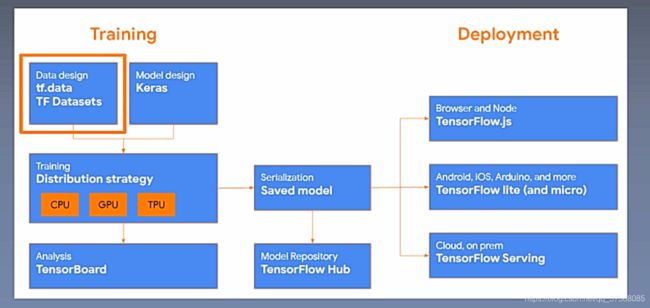
上图中的tf.data用于构造数据,Keras用于构造模型的层,接着用CPU、GPU、TPU进行加速训练,对训练结果使用TensorBoard进行可视化,可以对模型进行保存(Saved model),TensorFlow HUb的作用是模型复用,Deployment的作用是模型部署。
4、资料来源
深度之眼课程——《TensorFlow》


