Linux环境下Nginx安装及Ubuntu Server 15.0.4尝试安装Nginx
=======================以下内容转自:http://bovin.szecp.com/?p=111===================
新建一个名为www的用户组
| [root@os11728 src]# groupadd www |
在www用户组下新建一个名为www的用户
| [root@os11728 src]# useradd -g www www |
1.1. 安装 pcre
Pcre是Nginx所必需的库。
| [root@os11728 src]# wget http://sourceforge.net/projects/pcre/files/pcre/8.30/pcre-8.30.tar.gz/download [root@os11728 src]# tar -zxvf pcre-8.30.tar.gz [root@os11728 src]# cd pcre-8.30 [root@os11728 pcre-8.30]# ./configure –prefix=/usr/local/pcre –enable-utf8 –enable-unicode-properties –enable-pcregrep-libz –enable-pcregrep-libbz2 [root@os11728 pcre-8.30]# make [root@os11728 pcre-8.30]# make install |
1.2. 安装Nginx
| [root@os11728 src]# wget http://nginx.org/download/nginx-1.3.3.tar.gz [root@os11728 src]# tar -zxvf nginx-1.3.3.tar.gz [root@os11728 src]# cd nginx-1.3.3 [root@os11728 nginx-1.3.3]# ./configure –user=www –group=www –prefix=/usr/local/nginx –with-http_stub_status_module –with-http_ssl_module –with-http_gzip_static_module –with-pcre=/usr/local/src/pcre-8.30 [root@os11728 nginx-1.3.3]# make [root@os11728 nginx-1.3.3]# make install |
1.3. 修改Nginx配置文件
在conf目录下新建了两个文件夹 extra和vhosts,一个是放置Nginx的扩展配置,一个是放置虚拟主机配置。
| [root@os11728 nginx-1.3.3]# mkdir /usr/local/nginx/conf/extra [root@os11728 nginx-1.3.3]# mkdir /usr/local/nginx/conf/vhosts |
修改Nginx配置文件:
| [root@os11728 nginx-1.3.3]# vi /usr/local/nginx/conf/nginx.conf |
主要修改的内容如下:
| #user nobody;
user www www;
worker_processes 1;
#error_log logs/error.log; #error_log logs/error.log notice; #error_log logs/error.log info;
#pid logs/nginx.pid;
events { worker_connections 1024; }
http { include mime.types; default_type application/octet-stream;
#log_format main ‘$remote_addr – $remote_user [$time_local] “$request” ‘ # ‘$status $body_bytes_sent “$http_referer” ‘ # ‘”$http_user_agent” “$http_x_forwarded_for”‘;
#access_log logs/access.log main; log_format access ‘$remote_addr – $remote_user [$time_local] “$request” ‘ ‘$status $body_bytes_sent “$http_referer” ‘ ‘”$http_user_agent” $http_x_forwarded_for’; #access_log logs/access_ng_finet230_cn.log main; access_log logs/access_ng_finet230_cn.log access;
sendfile on; tcp_nopush on;
#keepalive_timeout 0; keepalive_timeout 65;
tcp_nodelay on;
fastcgi_connect_timeout 300; fastcgi_send_timeout 300; fastcgi_read_timeout 300; fastcgi_buffer_size 64k; fastcgi_buffers 4 64k; fastcgi_busy_buffers_size 128k; fastcgi_temp_file_write_size 128k;
#gzip on; gzip on; gzip_min_length 1k; gzip_buffers 4 16k; gzip_http_version 1.0; gzip_comp_level 2; gzip_types text/plain application/x-javascript text/css application/xml; gzip_vary on;
server { listen 8080; server_name 192.168.1.230;
#charset koi8-r;
#access_log logs/host.access.log main;
location / { root html; index index.html index.htm index.php; }
#error_page 404 /404.html;
# redirect server error pages to the static page /50x.html # error_page 500 502 503 504 /50x.html; location = /50x.html { root html; }
# proxy the PHP scripts to Apache listening on 127.0.0.1:80 # #location ~ \.php$ { # proxy_pass http://127.0.0.1; #}
# pass the PHP scripts to FastCGI server listening on 127.0.0.1:9000 # #location ~ \.php$ { # root html; # fastcgi_pass 127.0.0.1:9000; # fastcgi_index index.php; # fastcgi_param SCRIPT_FILENAME /scripts$fastcgi_script_name; # include fastcgi_params; #}
# deny access to .htaccess files, if Apache’s document root # concurs with nginx’s one # #location ~ /\.ht { # deny all; #} }
# another virtual host using mix of IP-, name-, and port-based configuration # #server { # listen 8000; # listen somename:8080; # server_name somename alias another.alias;
# location / { # root html; # index index.html index.htm; # } #}
# HTTPS server # #server { # listen 443; # server_name localhost;
# ssl on; # ssl_certificate cert.pem; # ssl_certificate_key cert.key;
# ssl_session_timeout 5m;
# ssl_protocols SSLv2 SSLv3 TLSv1; # ssl_ciphers HIGH:!aNULL:!MD5; # ssl_prefer_server_ciphers on;
# location / { # root html; # index index.html index.htm; # } #} #include /usr/local/nginx/conf/extra/fastcgi.conf; #include /usr/local/nginx/conf/extra/gzip.conf; include /usr/local/nginx/conf/vhosts/*.conf;
}
|
1.4. 创建虚拟主机
| [root@os11728 httpd-2.2.22]# vi /usr/local/nginx/conf/vhosts/www_finet230_cn.conf |
内容如下:
| server { listen 8080; server_name ng.fine230.cn finet85.cn;
root /var/www/root/ng_finet230_cn;
#激活/关闭自动索引 autoindex on;
#设定索引时文件大小的单位(B,KB, MB或 GB) #默认为on,显示出文件的确切大小,单位是bytes。 #改为off后,显示出文件的大概大小,单位是kB或者MB或者GB autoindex_exact_size off;
#开启以本地时间来显示文件时间的功能。默认为关(GMT时间) #默认为off,显示的文件时间为GMT时间。 #改为on后,显示的文件时间为文件的服务器时间 autoindex_localtime on;
#charset koi8-r;
location / { index index.html index.htm index.php; }
#error_page 404 /404.html;
# redirect server error pages to the static page /50x.html # error_page 500 502 503 504 /50x.html; location = /50x.html { root /var/www/root/ng_finet230_cn; }
# proxy the PHP scripts to Apache listening on 127.0.0.1:80 # #location ~ \.php$ { # proxy_pass http://127.0.0.1; #}
# pass the PHP scripts to FastCGI server listening on 127.0.0.1:9000 # #location ~ \.php$ { # root html; # fastcgi_pass 127.0.0.1:9000; # fastcgi_index index.php; # fastcgi_param SCRIPT_FILENAME /scripts$fastcgi_script_name; # include fastcgi_params; #}
# deny access to .htaccess files, if Apache’s document root # concurs with nginx’s one # #location ~ /\.ht { # deny all; #}
#将客户端的请求转交给fastcgi location ~ .*\.(php|php5|shtml)?$ { #root html; fastcgi_pass 127.0.0.1:9000;#这里指定了fastcgi进程侦听的端口,nginx就是通过这里与php交互的 fastcgi_index index.php; fastcgi_param SCRIPT_FILENAME $document_root$fastcgi_script_name; include fastcgi_params; }
#网站的图片较多,更改较少,将它们在浏览器本地缓存30天 location ~ .*\.(gif|jpg|jpeg|png|bmp|swf)$ { expires 30d; }
#网站会加载很多JS、CSS,将它们在浏览器本地缓存1小时 location ~ .*\.(js|css)?$ { expires 1h; }
}
# another virtual host using mix of IP-, name-, and port-based configuration # #server { # listen 8000; # listen somename:8080; # server_name somename alias another.alias;
# location / { # root html; # index index.html index.htm; # } #}
# HTTPS server # #server { # listen 443; # server_name localhost;
# ssl on; # ssl_certificate cert.pem; # ssl_certificate_key cert.key;
# ssl_session_timeout 5m;
# ssl_protocols SSLv2 SSLv3 TLSv1; # ssl_ciphers HIGH:!aNULL:!MD5; # ssl_prefer_server_ciphers on;
# location / { # root html; # index index.html index.htm; # } #}
server { listen 8080; server_name status.ng.finet230.cn;
location / { stub_status on; access_log off; } } |
将/var/www/root/ng_finet230_cn目录下的所有档案与子目录的拥有者皆设为www群体的使用者www :
| [root@os11728 ~]# chown -R www:www /var/www/root/ng_finet230_cn |
1.5. Nginx的启动与关闭
启动Nginx
| [root@os11728 ~]# ulimit -SHn 65535 [root@os11728 ~]# /usr/local/nginx/sbin/nginx |
停止Nginx
| [root@os11728 ~]# /usr/local/nginx/sbin/nginx -s stop 或 [root@os11728 ~]# /usr/local/nginx/sbin/nginx -s quit |
重启Nginx
| [root@os11728 ~]# /usr/local/nginx/sbin/nginx -s reload 或 [root@os11728 ~]# kill -HUP `cat /usr/local/nginx/logs/nginx.pid` |
配置开机自动启动Nginx + PHP
| [root@os11728 ~]# vi /etc/rc.local |
在末尾增加以下内容:
ulimit -SHn 65535/usr/local/php/sbin/php-fpm
/usr/local/nginx/sbin/nginx
=======================以上内容转自:http://bovin.szecp.com/?p=111===================
1.6.Ubuntu Server安装Nginx
Nginx资源:http://nginx.org/en/download.html
# 安装前提(否则Nginx make& make install会失败):
C C++ compiler:sudo apt-get install build-essential
g++:sudo apt-get install g++-3.4
gcc: sudo apt-get install gcc-3.4
From:http://blog.csdn.net/klarclm/article/details/8550931
Nginx安装示例
http://www.nginx.cn/install
http://bovin.szecp.com/?p=111
http://jingyan.baidu.com/article/d45ad148cfefe669542b8066.html,http://www.cnblogs.com/skynet/p/4146083.html
Nginx简易配置
方式一:按照前面转载的内容依次安装pcre、openssl、zlib..........#./configure & make & make install,直接看上面内容。
方式二:下载Nginx所需的支持包pcre、openssl、zlib;此外还要将之前的gcc和g++安装,因为Nginx需要C、C++编译环境。
(1)下载Nginx、pcre、openssl、zlib并解压;
nginx:/home/boonya/nginxtemp/nginx-1.8.0
pcre:/home/boonya/nginxtemp/pcre-8.37
openssl:/home/boonya/nginxtemp/openssl-1.0.2d
zlib: /home/boonya/nginxtemp/zlib-1.2.8
(2)这里用一种简易的配置方式:
./configure --prefix=/home/boonya/nginxtemp/nginx-1.8.0 --with-http_realip_module --with-http_sub_module --with-http_flv_module --with-http_dav_module --with-http_gzip_static_module --with-http_stub_status_module --with-http_addition_module --with-pcre=/home/boonya/nginxtemp/pcre-8.37 --with-openssl=/home/boonya/nginxtemp/openssl-1.0.2d --with-http_ssl_module --with-zlib=/home/boonya/nginxtemp/zlib-1.2.8
(3)执行:make & make install
注意:这里可能会报错,有些时候感觉是捕风捉影,卡住了就影响心情。所以我不理会这些错误了,如:
Ubuntu ./configure: error: the HTTP rewrite module requires the PCRE library.
使用 sbin/nginx启动Nginx,如果报没有./logs/error.log和../logs/access.log创建这两个文件就可以启动了。
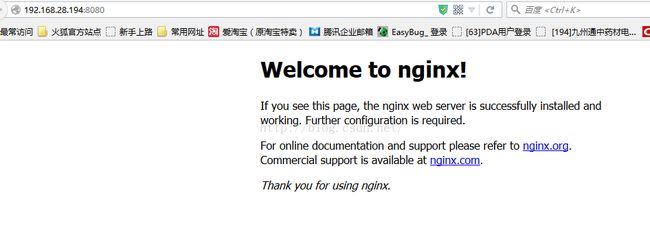
我的虚拟机IP是192.168.28.194,Nginx修改配置文件./conf/nginx.conf 绑定的端口是8080,服务器名将localhost改为IP:192.168.28.194即可。
在外面宿主浏览器访问Nginx成功:http://192.168.28.194:8080/
因为网上提供的Nginx的安装例子,大多大同小异,所以配置过程中出现问题也比较好解决问题。
注:由于Ubuntu server很多环境支持包需要手动安装,过程中操作极易遇到错误,建议如果是安装Nginx还是选择centOS;Ubuntu下很多错误甄别起来比较麻烦,有时候安装过的东西都找不到,经常需要更新。

