Spark执行环境——RPC环境
导读
RpcEnv是Spark 2.x.x版本中新出现的组件,它是用来替代Spark 2.x.x以前版本中使用的Akka。Akka具有分布式集群下的消息发送、远端同步调用、远端异步调用、路由、持久化、监管、At Least Once Delivery(至少投递一次)等能力,一旦Akka被替代,那就意味着RpcEnv必须也能支持这些机制。
SparkEnv中创建RpcEnv的代码:
private[spark] val driverSystemName = "sparkDriver"
private[spark] val executorSystemName = "sparkExecutor"

val systemName = if (isDriver) driverSystemName else executorSystemName
val rpcEnv = RpcEnv.create(systemName, hostname, port, conf, securityManager, clientMode = !isDriver)
如果当前应用为Driver(即SparkEnv位于Driver中),那么systemName为sparkDriver,否则(即SparkEnv位于Executor中),systemName为sparkExecutor,然后调用RpcEnv的create方法创建RpcEnv。create方法只有现行代码:
val config = RpcEnvConfig(conf, name, host, port, securityManager, clientMode)//RpcEnvConfig中保存了RpcEnv的配置信息
new NettyRpcEnvFactory().create(config)//创建RpcEnv
RpcEnvConfig实际是一个样例类,用于保存RpcEnv的配置信息。实际创建RpcEnv的动作在NettyRpcEnvFactory的create方法中
def create(config: RpcEnvConfig): RpcEnv = {
  val sparkConf = config.conf
  //创建javaSerializerInstance,用于RPC传输对象的序列化
  val javaSerializerInstance =
    new JavaSerializer(sparkConf).newInstance().asInstanceOf[JavaSerializerInstance]
  //创建nettyEnv
  val nettyEnv =
    new NettyRpcEnv(sparkConf, javaSerializerInstance, config.host, config.securityManager)
  //在非本地模式下,启动NettyRpcEnv
  if (!config.clientMode) {
    val startNettyRpcEnv: Int => (NettyRpcEnv, Int) = { actualPort =>
      nettyEnv.startServer(actualPort)
      (nettyEnv, nettyEnv.address.port)
    }
    try {
      Utils.startServiceOnPort(config.port, startNettyRpcEnv, sparkConf, config.name)._1
    } catch {
      case NonFatal(e) =>
        nettyEnv.shutdown()
        throw e
    }
  }
  nettyEnv
}
在启动NettyRpcEnv时,首先定义了一个偏函数startNettyRpcEnv,其函数实际为执行NettyRpcEnv的startServer方法,最终在启动NettyRpcEnv之后返回NettyRpcEnv及服务最终使用的端口。最后使用了Utils的startServiceOnPort方法,startServiceOnPort实际上是调用了作为参数的偏函数startNettyRpcEnv。
抽象类RpcEnv只有一个实现子类NettyRpcEnv,下面将直接介绍NettyRpcEnv。RpcEnvpoint和RpcEndpointRef都是NettyRpcEnv中的重要概念,再深入学习NettyRpcEnv的构造过程。
1 RPC端点RpcEndpoint
RPCEndpoint是对Spark的RPC通信实体的统一抽象,所有运行于RPC框架之上的实体都应该继承RpcEndpoint。Spark早期版本节点间的消息主要采用Akka的Actor,从Spark 2.0.0版本开始移除了对Akka的依赖,这就意味着Spark需要Actor的替代品,RPC端点RpcEndpoint由此而生。RpcEndpoint是对能够处理RPC请求,给某一特定服务提供本地调用及跨节点调用的RPC组件的抽象。
1.1 RPC端点RpcEndpoint的定义
private[spark] trait RpcEndpoint {
  //当前RpcEndpoint所属的RpcEnv
  val rpcEnv: RpcEnv
  //获取RpcEndpoint相关联的RpcEndpiontRef,调用了RpcEnv的endpointRef方法。由于RpcEnv并未实现此方法,需要RpcEnv的子类来实现
  final def self: RpcEndpointRef = {
    require(rpcEnv != null, "rpcEnv has not been initialized")
    rpcEnv.endpointRef(this)
  }
  //接收消息并处理,但不需要给客户端回复
  def receive: PartialFunction[Any, Unit] = {
    case _ => throw new SparkException(self + " does not implement 'receive'")
  }
  //接收消息并处理,并通过RpcCallContext来实现的
  def receiveAndReply(context: RpcCallContext): PartialFunction[Any, Unit] = {
    case _ => context.sendFailure(new SparkException(self + " won't reply anything"))
  }
  //当处理消息发生异常时调用,可以对异常进行一些处理
  def onError(cause: Throwable): Unit = {
    throw cause
  }
  //当客户端与当前节点连接上后调用,可以针对连接进行一些处理
  def onConnected(remoteAddress: RpcAddress): Unit = {}
  //当客户端与当前节点断开后调用,可以针对断开连接进行一些处理
  def onDisconnected(remoteAddress: RpcAddress): Unit = {}
  //当客户端与当前节点之间的连接发生网络错误时调用,可以针对连接发生的网络错误进行一些处理
  def onNetworkError(cause: Throwable, remoteAddress: RpcAddress): Unit = {}
  //在RpcEndpoint开始处理消息之前调用,可以RpcEndpoint正式工作之前做一些准备
  def onStart(): Unit = {}
  //在停止RpcEndpoint时调用,可以在RpcEndpoint停止的时候做一些收尾工作
  def onStop(): Unit = {}
  //用于停止当前RpcEndpoint,其调用了RpcEnv的stop方法;由于RpcEnv并未实现此方法,需要其子类来实现。
  final def stop(): Unit = {
    val _self = self
    if (_self != null) {
      rpcEnv.stop(_self)
    }
  }
}
1.2 特质RpcEndpoint的继承体系
由于RpcEndpoint只是一个特质,除了对接口的定义,并没有任何实现逻辑,所以我们需要看看哪些子类实现了RpcEndpoint。RpcEndpoint的继承体系如下
绿色的子类DummyMaster(Dummy意为虚拟的、假的或傀儡的)正如其名字一样,不是NettyRpcEnv中具有真正用途的RpcEndpoint,而只是用于测试。
其中ThreadSafeRpcEndpoint是继承自RpcEndpoint的特质,主要用于消息的处理,必须是线程安全的场景。ThreadSafeRpcEndpoint对消息的处理都是串行的,即前一条消息处理完才能接头处理下一条消息。ThreadSafeRpcEndpoint的继承体系如下:
TestRpcEndpoint用于测试,其余实现类都在NettyRpcEnv中发挥着各自的作用。
2 RPC 端点引用RpcEndpointRef
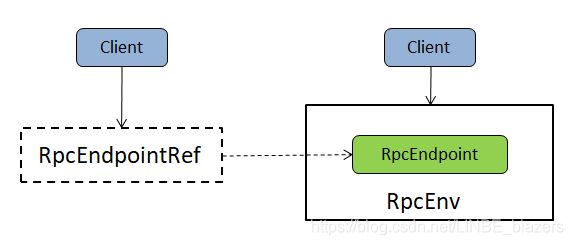
如果说RpcEndpoint是Akka中Actor的替代产物,那么RpcEndpointRef就是ActorRef的替代产物。在Akka中只要你持有了一个Actor的引用ActorRef,那么你就可以使用此ActorRef向远端的Actor发起请求。RpcEndpointRef也具同等的效用,要向一个远端的RpcEndpoint发起请求,就必须持有这个RpcEndpoint的RpcEndpointRef。RpcEndpoint与RpcEndpointRef之间的关系如下:
2.1 消息投递规则
一般而言,消息投递有下面3种情况:
- at-most-once:每条应用了这种机制的消息会被投递0次或1次,可能会产生消息丢失
- at-least-once:每条应用了这种机制的消息潜在地存在多次投递尝试并保证至少会成功一次,消息可能会重复但不会丢失
- exactly-once:每条应用了这种机制的消息只会向接收者准确地发送一次,消息既不会丢失,也不会重复
2.2 RPC端点引用RpcEndpointRef的定义
抽象类RpcEndpointRef定义了所有RpcEndpoint引用的属性与接口,如下:
private[spark] abstract class RpcEndpointRef(conf: SparkConf) extends Serializable with Logging {
  //RPC最大重新连接次数。可以使用spark.rpc.numRetries属性进行配置,默认为3次
  private[this] val maxRetries = RpcUtils.numRetries(conf)
  //PRC每次重新连接需要等待的毫秒数。可以使用spark.rpc.retry.wait属性进行配置,默认值为3秒
  private[this] val retryWaitMs = RpcUtils.retryWaitMs(conf)
  //RPC的ask操作的默认超时时间
  //可以使用spark.rpc.askTimeout或者spark.network.timeout属性进行配置,默认值为120秒。
  private[this] val defaultAskTimeout = RpcUtils.askRpcTimeout(conf)
  //返回当前PpcEndpointRef对应RpcEndpoint的RPC地址(RpcAddress)
  def address: RpcAddress
  //返回当前RpcEndpointRef对应RpcEndpoint的名称
  def name: String

  def send(message: Any): Unit
  def ask[T: ClassTag](message: Any, timeout: RpcTimeout): Future[T]
  def ask[T: ClassTag](message: Any): Future[T] = ask(message, defaultAskTimeout)
  def askWithRetry[T: ClassTag](message: Any): T = askWithRetry(message, defaultAskTimeout)
  def askWithRetry[T: ClassTag](message: Any, timeout: RpcTimeout): T = {
    var attempts = 0
    var lastException: Exception = null
    while (attempts < maxRetries) {
      attempts += 1
      try {
        val future = ask[T](message, timeout)
        val result = timeout.awaitResult(future)
        if (result == null) {
          throw new SparkException("RpcEndpoint returned null")
        }
        return result
      } catch {
        case ie: InterruptedException => throw ie
        case e: Exception =>
          lastException = e
          logWarning(s"Error sending message [message = $message] in $attempts attempts", e)
      }
      if (attempts < maxRetries) {
        Thread.sleep(retryWaitMs)
      }
    }
    throw new SparkException(
      s"Error sending message [message = $message]", lastException)
  }
}
RpcEndpointRef各个方法的功能:
- send:发送单向异步的消息。send采用了at-most-once的投递规则。RpcEndpointRef的send方法非常类似于Akka中Actor的tell方法。
- ask[T: ClassTag](message: Any):才默认的超时时间作为timeout参数
- askWithRetry[T: ClassTag](message: Any, timeout: RpcTimeout):发送同步的请求,此类请求将会被RpcEndpoint接收,并在指定的超时时间内等待返回类型为T的处理结果。当此方法抛出SparkException时,将会进行请求重试,直到超过默认的重试次数为止。由于此类方法会重试,因此要求服务端对消息的处理是幂等的,此方法也采用了at-least-once的投递规则。此方法也非常类似于Akka中采用了at-least-once机制的Actor的ask方法
3 创建传输上下文TransportCont
TransportConf是RPC框架中的配置类,由于RPC环境RpcEnv的底层也依赖于数据总线,因此需要创建传输上下文TransportConf。创建TransportConf是构造NettyRpcEnv的过程中的第一步,代码如下:
//类名:org.apache.spark.rpc.netty.NettyRpcEnv
private[netty] val transportConf = SparkTransportConf.fromSparkConf(
  conf.clone.set("spark.rpc.io.numConnectionsPerPeer", "1"),
  "rpc",
  conf.getInt("spark.rpc.io.threads", 0))
由代码可知SparkTransportConf调用fromSparkConf时,对SparkConf进行了克隆,然后设置了spark.rpc.io.numCommectionsPerPeer,并通过spark.rpc.io.threads属性来设置Netty传输线程数。
4 消息调度器Dispatcher
创建消息调度器Dispatcher是有效提高NettyRpcEnv对消息异步处理并最大提升并行处理能力的前提。Dispather负责将RPC消息路由到要该对此消息处理的RpcEndpoint(RPC端点)
//org.apache.spark.rpc.netty.NettyRpcEnv
private val dispatcher: Dispatcher = new Dispatcher(this)
4.1 消息调度器Dispathcer的概述
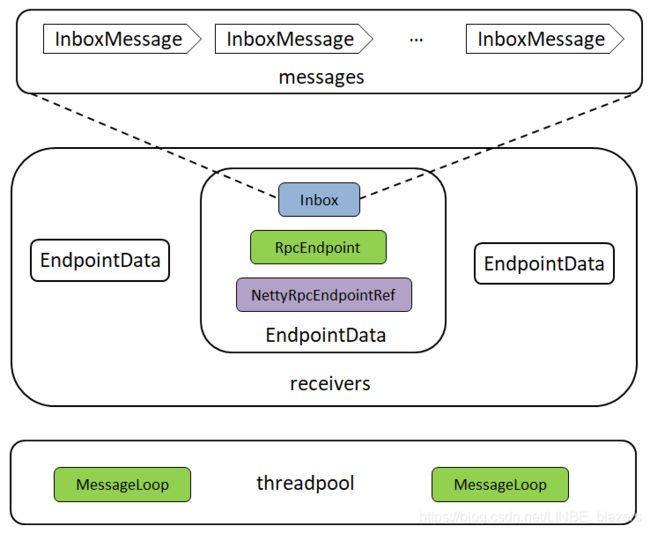
Dispatcher中的概念如下:
- RpcEndpoint:RPC端点,即RPC分布式环境中一个具体的实例,其可以对指定的消息进行处理。由于RpcEndpoint是一个特质,所以需要提供RpcEndpoint的实现类。
- RpcEndpointRef:RPC端点引用,即RPC分布式环境中一个具体实体的引用,所谓引用实际是“spark://host:port/name”这种格式的地址。其中,host是端点所在RPC服务所在的主机IP,port是端点所在RPC服务的端口,name是端点实例的名称。
- InboxMessage:Inbox盒子内的消息。InboxMessage是一个特质,所有类型的RPC消息都继承自InboxMessage,如下代码
private[netty] sealed trait InboxMessage
//RpcEndpoint处理此类型的消息后不需要向客户端回复消息
private[netty] case class OneWayMessage(senderAddress: RpcAddress, content: Any) extends InboxMessage
//RPC消息,RpcEndpoint处理完此消息后需要向客户端回复消息
private[netty] case class RpcMessage(senderAddress: RpcAddress,
    content: Any,
    context: NettyRpcCallContext) extends InboxMessage
//用于Inbox实例化后,再通知与此Inbox相关联的RpcEndpoint启动
private[netty] case object OnStart extends InboxMessage
//用于Inbox停止后,通知与此Inbox相关联的RpcEndpoint停止
private[netty] case object OnStop extends InboxMessage
//此消息用于告诉所有的RpcEndpoint,有远端的进程已经与当前RPC服务建立了连接
private[netty] case class RemoteProcessConnected(remoteAddress: RpcAddress) extends InboxMessage
//此消息用于告诉所有RpcEndpoint,与远端某个地址之间的连接发生了错误
private[netty] case class RemoteProcessDisconnected(remoteAddress: RpcAddress) extends InboxMessage
//此消息用于告诉所有的RpcEndpoint,与远端某个地址之间的连接发生了错误
private[netty] case class RemoteProcessConnectionError(cause: Throwable, remoteAddress: RpcAddress)
extends InboxMessage- Inbox:端点内的盒子。每个RpcEndpoint都有一个对应的盒子,这个盒子里有个存储InboxMessage消息的列表messages,所有的消息都缓存在messages列表里面,并由RpcEndpoint异步处理这些消息。
- EndpointData:RPC端点数据,它包括了RpcEndpoint、NettyRpcEndpointRef及Inbox等属于同一个端点的实例。Inbox与RpcEndpoint、NettyRpcEndpointRef通过此EndpoinData相关联
查看Dispathcer中的一些成员变量:
- endpoints:端点实例名称与端点数据EndpointData之间映射关系的缓存,可使用端点名称从中快速获取或删除EndpointData
- endpointRefs:端点实例RpcEndpoint与端点实例引用RpcEndpointRef之间映射关系的缓存,可使用端点实例从中快速获取或删除端点实例引用
- receivers:存储端点数据EndpointData的阻塞队列,只有Inbox中有消息的EndpointData才会被放入此阻塞队列
- stopped:Dispatcher是否停止的状态
- threadpool:用于对消息进行调度的线程池,此线程池运行的任务都MessageLoop的内存。
Dispathcer的内存模型:
4.2 Dispatcher的调度原理
在创建Dispatcher的最后会创建对消息进行调度的线程池threadpool,如下:
private val threadpool: ThreadPoolExecutor = {
  val numThreads = nettyEnv.conf.getInt("spark.rpc.netty.dispatcher.numThreads",
    math.max(2, Runtime.getRuntime.availableProcessors()))
  val pool = ThreadUtils.newDaemonFixedThreadPool(numThreads, "dispatcher-event-loop")
  for (i <- 0 until numThreads) {
    pool.execute(new MessageLoop)
  }
  pool
}
由上述代码可知创建threadpool线程池的步骤如下:
- 1)获取此线程池的大小numThreads。此线程池的大小默认为2与当前系统可用处理器数量之间的最大值,也可以使用spark.rpc.netty.dispatcher.numThreads属性配置
- 2)创建线程池。此线程池是固定大小的线程池,并且启动的线程都以后台线程方式运行,且线程名以dispatcher-event-loop为前缀
- 3)启动多个运行MessageLoop任务的线程,这些线程的数据与threadpool线程池的大小相同
- 4)返回此线程池的引用
MessageLoop实现了Java的Runnable接口,代码如下:
private class MessageLoop extends Runnable {
  override def run(): Unit = {
    try {
      while (true) {
        try {
          val data = receivers.take()
          if (data == PoisonPill) {
            receivers.offer(PoisonPill)
            return
          }
          data.inbox.process(Dispatcher.this)
        } catch {
          case NonFatal(e) => logError(e.getMessage, e)
        }
      }
    } catch {
      case ie: InterruptedException => // exit
    }
  }
MessageLoop在循环过程中不断对新的消息进行处理,每次循环中的逻辑如下:
- 1)从receivers中获取EndpointData。receivers中的EndpointData,其Inbox的messages列表中肯定有了新的消息,其原因为receivers是个阻塞队列,所以当receivers中没有EndpointData时,MessageLoop线程会被阻塞
- 2)如果取到的EndpointData是“毒药”(PoisonPill),那么此MessageLoop线程将退出(通过return语句)。这里有个动作就是将PoisonPill重新放入到receivers中,这是因为threadpool线程池有可能不止一个MessageLoop线程,为了让大家都“毒发身亡”,还需要把“毒药”放回到receivers中,这样其它“活着”的线程就会再次识“毒药”,达到所有MessageLoop线程都线束的效果
- 3)如果取到的EndpointData不是“毒药”,那么调用EndpointData中Inbox的process方法对消息进行处理
上文的MessageLoop任务实际是将消息交给EndpointData中的Inbox的process方法处理的,在正式介绍process之前 ,先来看看Inbox中的一些成员属性:
protected val messages = new java.util.LinkedList[InboxMessage]()
private var stopped = false
private var enableConcurrent = false
private var numActiveThreads = 0- messages:消息列表。用于缓存需要由对应RpcEndpoint处理的消息,即与Inbox在同一EndpointData中的RpcEndpoint
- stopped:Inbox的停止状态
- enableConcurrent:是否允许多个线程同时处理messages中的消息
- numActiveThreads:激活线程的数量,即正在处理messages中消息的线程数量
介绍完Inbox的成员属性后,再来剖析process方法,其代码如下:
def process(dispatcher: Dispatcher): Unit = {
  var message: InboxMessage = null
  inbox.synchronized {
    //进行线程并发检查
    if (!enableConcurrent && numActiveThreads != 0) {
      return
    }
    //从messages中获取消息
    message = messages.poll()
    if (message != null) {
      numActiveThreads += 1
    } else {
      return
    }
  }
  while (true) {
    safelyCall(endpoint) {
      //根据消息类型进行匹配,并执行对应的逻辑
      message match {
        case RpcMessage(_sender, content, context) =>
          try {
            endpoint.receiveAndReply(context).applyOrElse[Any, Unit](content, { msg =>
              throw new SparkException(s"Unsupported message $message from ${_sender}")
            })
          } catch {
            case NonFatal(e) =>
              context.sendFailure(e)
              throw e
          }
        case OneWayMessage(_sender, content) =>
          endpoint.receive.applyOrElse[Any, Unit](content, { msg =>
            throw new SparkException(s"Unsupported message $message from ${_sender}")
          })
        case OnStart =>
          endpoint.onStart()
          if (!endpoint.isInstanceOf[ThreadSafeRpcEndpoint]) {
            inbox.synchronized {
              if (!stopped) {
                enableConcurrent = true
              }
            }
          }
        case OnStop =>
          val activeThreads = inbox.synchronized { inbox.numActiveThreads }
          assert(activeThreads == 1,
            s"There should be only a single active thread but found $activeThreads threads.")
          dispatcher.removeRpcEndpointRef(endpoint)
          endpoint.onStop()
          assert(isEmpty, "OnStop should be the last message")
        case RemoteProcessConnected(remoteAddress) =>
          endpoint.onConnected(remoteAddress)
        case RemoteProcessDisconnected(remoteAddress) =>
          endpoint.onDisconnected(remoteAddress)
        case RemoteProcessConnectionError(cause, remoteAddress) =>
          endpoint.onNetworkError(cause, remoteAddress)
      }
    }
    //对激活线程数量进行控制
    inbox.synchronized {
      if (!enableConcurrent && numActiveThreads != 1) {
        numActiveThreads -= 1
        return
      }
      message = messages.poll()
      if (message == null) {
        numActiveThreads -= 1
        return
      }
    }
  }
}
根据上述代码,Inbox对消息处理的步骤如下:
- 1)进行线程并发检查。如果不允许多个线程同时处理messages中的消息(enableConcurrent为false),并且当前激活线程数(numActiveThread)不为0,这说明已经有线程在处理消息,所以当前线程不允许再去处理消息(使用return返回)
- 2)从messages中获取消息。如果有消息未处理,赐当前线程需要处理此消息,因而算是一个新的激活线程(需要将numActiveThread加1)。如果messages中没有消息了(一般发生在多线程情况下),则直接返回
- 3)根据消息类型进行匹配,并执行对应的逻辑。这里有个小技巧舍得借鉴,那就是匹配执行的过程中也许会发生错误,当发生错误的时候,希望当前Inbox所对应RpcEndpoint的错误处理方法onError可以接收到这些错误信息。Inbox的safelyCall方法提供了这方面的实现,代码如下:
private def safelyCall(endpoint: RpcEndpoint)(action: => Unit): Unit = {
  try action catch {
    case NonFatal(e) =>
      try endpoint.onError(e) catch {
        case NonFatal(ee) => logError(s"Ignoring error", ee)
      }
  }
}- 4)对激活线程数据进行控制。当第3步对消息处理完结后,当前线程作为之前已经激活的线程是否还有存在的必要?这里有两个判断:如果不允许多个线程同时处理messages中的消息并且当前激活的线程数多于1个,那么需要当前线程退出并将numActiveThreads减1;如果messages已经没有消息要处理了,这说明当前线程无论如何也该返回并将numActiveThreads减1。
第1)、2)、4)位于Inbox的锁保护下,是因为messages是普通的java.util.LinkedList,LinkedList本身不是线程安全的,为了增加并发安全性,需要通过同步保护。
4.3 Inbox的消息来源
MessageLoop线程的执行逻辑是不断地消费各个EndpointData中Inbox里的消息,但是EndpointData是何时放入receivers中的?Inbox里的消息来自哪里?Dispatcher中有很多完成这些功能的方法。
(1)注册RpcEndpoint
Dispatcher的registerRpcEndpoint方法用于注册RpcEndpoint,同时可将EndpointData放入receivers,其代码如下:
def registerRpcEndpoint(name: String, endpoint: RpcEndpoint): NettyRpcEndpointRef = {
  //使用当前RpcEndpoint所在NettyRpcEnv的地址和RpcEndpoint的名称创建RpcEndpointAddress对象
  val addr = RpcEndpointAddress(nettyEnv.address, name)
  //创建RpcEndpoint的引用对象——NettyRpcEndpointRef
  val endpointRef = new NettyRpcEndpointRef(nettyEnv.conf, addr, nettyEnv)
  synchronized {
    if (stopped) {
      throw new IllegalStateException("RpcEnv has been stopped")
    }
	//创建EndpointData,并放入endpoint缓存
    if (endpoints.putIfAbsent(name, new EndpointData(name, endpoint, endpointRef)) != null) {
      throw new IllegalArgumentException(s"There is already an RpcEndpoint called $name")
    }
    val data = endpoints.get(name)
	//将RpcEndpoint与NettyRpcEndpointRef的映射关系放入endpointRefs缓存
    endpointRefs.put(data.endpoint, data.ref)
	//将EndpointData放入阻塞队列receivers的队尾。MessageLoop线程异步获取到此EndpointData,并处理其Inbox中刚刚放入的OnStart消息
	//最终调用RpcEndpoint的OnStart方法RpcEndpoint开始处理消息之前做一些准备工作
    receivers.offer(data)  // for the OnStart message
  }
  //返回NettyRpcEndpointRef
  endpointRef
}
(2)对RpcEndpoint去注册
Dispatcher的stop方法用于对RpcEndpoint的去注册,代码如下:
def stop(rpcEndpointRef: RpcEndpointRef): Unit = {
  synchronized {
    if (stopped) {
      return
    }
    unregisterRpcEndpoint(rpcEndpointRef.name)
  }
}
首先判断Dispatcher是否已经停止,如果Dispatcher未停止,则调用Dispatcher的unregisterRpcEndpoint方法对RpcEndpoint去注册,unregisterRpcEndpoint方法同时将EndpointData放入receivers中,代码如下:
private def unregisterRpcEndpoint(name: String): Unit = {
  val data = endpoints.remove(name)
  if (data != null) {
    data.inbox.stop()
    receivers.offer(data)  // for the OnStop message
  }
}
上述代码步骤:
- 1)从endpoints中移除EndpointData
- 2)调用EndpointData中Inbox的stop方法停止Inbox
- 3)将EndpointData重新放入receivers中
代码比较简单,但为什么EndpointData从endpoints中移除后,最后还要放入receivers?EndpointData虽然移除了,但是对应的RpcEndpointRef并没有从endpointRefs缓存中移除,这是何原因?
当要移除一个EndpointData时,其Inbox可能正在对消息进行处理,所以不能直接停止。这里采用了更平滑的停止方式,即调用了Inbox的stop方法来平滑过度,stop方法的实现代码如下:
def stop(): Unit = inbox.synchronized {
  if (!stopped) {
    enableConcurrent = false
    stopped = true
    messages.add(OnStop)
  }
}
代码步骤如下:
- 1)根据之前的分析,MessageLoop有 “允许并发运行” 和 “不允许并发运行” 两种情况 。对于允许并发的情况,为了确保安全,应该将enableConcurrent设置为false
- 2)设置当前Inbox为停止状态
- 3)向messages中添加OnStop消息。在MessageLoop的代码分析中,为了能够处理OnStop消息,只有Inbox所属的EndpointData放入recievers中,其messages列表中的消息才会被处理;为实现平滑停止,OnStop消息最终将调用Dispatcher的removeRpcEndpointRef方法,将RpcEndpoint与RpcEndpointRef的映射从缓存endpointRefs中移除。在匹配执行OnStop消息的最后,将调用RpcEndpoint的onStop方法对RpcEndpoint停止
(3)将消息提交给指定的RpcEndpoint
Dispatcher的postMessage用于将消息提交给指定的RpcEndpoint,其代码如下:
private def postMessage(
    endpointName: String,
    message: InboxMessage,
    callbackIfStopped: (Exception) => Unit): Unit = {
  val error = synchronized {
    val data = endpoints.get(endpointName)
    if (stopped) {
      Some(new RpcEnvStoppedException())
    } else if (data == null) {
      Some(new SparkException(s"Could not find $endpointName."))
    } else {
      data.inbox.post(message)
      receivers.offer(data)
      None
    }
  }
  error.foreach(callbackIfStopped)
}
上述代码执行步骤:
- 1)根据端点名称endpointName从缓存endpoints中获取EndpointData
- 2)如果当前Dispatcher没有停止并且缓存endpoints中确实存在名为endpointName的EndpointData,那么将调用EndpointData对应Inbox的post方法将消息加入Inbox的消息列表中,因此还需要将EndpointData推入receivers,以便MessageLoop处理此Inbox中的消息。Inbox的post方法的实现如下,其逻辑为Inbox未停止时向messages列表加入消息
def post(message: InboxMessage): Unit = inbox.synchronized {
  if (stopped) {
    onDrop(message)
  } else {
    messages.add(message)
    false
  }
}
此外,Dispatcher中还有一些方法间接使用了Dispatcher的postMessage方法,如下:
def postToAll(message: InboxMessage): Unit = {
  val iter = endpoints.keySet().iterator()
  while (iter.hasNext) {
    val name = iter.next
    postMessage(name, message, (e) => logWarning(s"Message $message dropped. ${e.getMessage}"))
  }
}

def postRemoteMessage(message: RequestMessage, callback: RpcResponseCallback): Unit = {
  val rpcCallContext =
    new RemoteNettyRpcCallContext(nettyEnv, callback, message.senderAddress)
  val rpcMessage = RpcMessage(message.senderAddress, message.content, rpcCallContext)
  postMessage(message.receiver.name, rpcMessage, (e) => callback.onFailure(e))
}

def postLocalMessage(message: RequestMessage, p: Promise[Any]): Unit = {
  val rpcCallContext =
    new LocalNettyRpcCallContext(message.senderAddress, p)
  val rpcMessage = RpcMessage(message.senderAddress, message.content, rpcCallContext)
  postMessage(message.receiver.name, rpcMessage, (e) => p.tryFailure(e))
}

def postOneWayMessage(message: RequestMessage): Unit = {
  postMessage(message.receiver.name, OneWayMessage(message.senderAddress, message.content),
    (e) => throw e)
}
(4)停止Dispatcher
Dispatcher的stop方法用来停止Dispatcher,其代码如下:
 def stop(): Unit = {
   synchronized {
     if (stopped) {
       return
     }
     stopped = true
   }
   endpoints.keySet().asScala.foreach(unregisterRpcEndpoint)
   receivers.offer(PoisonPill)
   threadpool.shutdown()
 }
上述代码执行步骤:
- 1)如果Dispatcher还未停止,则将自身状态修改为已停止
- 2)对endpoints中的所有EndpointData去注册。这里通过调用unregisterRpcEndpoint方法,将向endpoints中的每个EndpointData的Inbox里放置Onstop消息
- 3)向receivers中投放“毒药”
- 4)关闭threadpool线程池
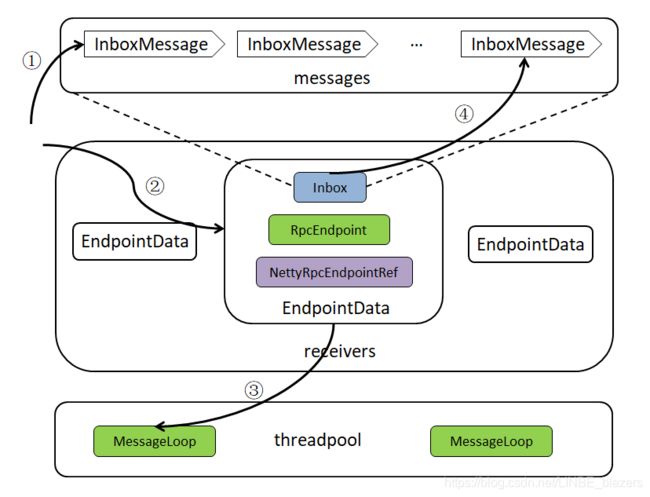
经过对Dispatcher和MessageLoop分析,可以对Dispatcher的内存模型增加一些运行时的执行流程:
-
①表示调用Inbox的post方法将消息放入messages列表中
-
②表示将有消息的Inbox相关的EndpointData放入receivers
-
③表示MessageLoop每次循环首先从receivers中获取EndpointData
-
④表示执行EndpointData中Inbox的process方法对消息进行具体处理
5 创建传输上下文TransportContext
创建传输上下文TransportContext是NettyRpcEnv提供服务端与客户端能力的前提。创建TransportContext的代码如下:
//类名:org.apache.spark.rpc.netty. NettyRpcEnv
private val streamManager = new NettyStreamManager(this)
private val transportContext = new TransportContext(transportConf,
  new NettyRpcHandler(dispatcher, this, streamManager))
关于TransportContext,《Spark内置RPC框架》一文中已做过详细介绍,这里主要看其构造器中传入的RpcHandler参数。这里用于构造TransportContext的RpcHandler实际是其实现类NettyRpcHandler,NettyRpcHandler的构造器里则以NettyStreamManager实例作为参数。
5.1 NettyStreamManager详解
NettyStreamManager实现了StreamManager,专用于为NettyRpcEnv提供文件服务的能力。
//类名:org.apache.spark.rpc.netty. NettyRpcEnv
private val streamManager = new NettyStreamManager(this)
NettyStreamManager客户定义了三个文件与目录缓存,如下:
private val files = new ConcurrentHashMap[String, File]()
private val jars = new ConcurrentHashMap[String, File]()
private val dirs = new ConcurrentHashMap[String, File]()
NettyStreamManager中提供了两类方法,一类用于添加缓存,一类用于支持文件流的读取。添加缓存的三个方法:
override def addFile(file: File): String = {
  val existingPath = files.putIfAbsent(file.getName, file)
  require(existingPath == null || existingPath == file,
    s"File ${file.getName} was already registered with a different path " +
      s"(old path = $existingPath, new path = $file")
  s"${rpcEnv.address.toSparkURL}/files/${Utils.encodeFileNameToURIRawPath(file.getName())}"
}
override def addJar(file: File): String = {
  val existingPath = jars.putIfAbsent(file.getName, file)
  require(existingPath == null || existingPath == file,
    s"File ${file.getName} was already registered with a different path " +
      s"(old path = $existingPath, new path = $file")
  s"${rpcEnv.address.toSparkURL}/jars/${Utils.encodeFileNameToURIRawPath(file.getName())}"
}
override def addDirectory(baseUri: String, path: File): String = {
  val fixedBaseUri = validateDirectoryUri(baseUri)
  require(dirs.putIfAbsent(fixedBaseUri.stripPrefix("/"), path) == null,
    s"URI '$fixedBaseUri' already registered.")
  s"${rpcEnv.address.toSparkURL}$fixedBaseUri"
}
NettyStreamManager提供的用于打开文件流的方法如下:
override def openStream(streamId: String): ManagedBuffer = {
  val Array(ftype, fname) = streamId.stripPrefix("/").split("/", 2)
  val file = ftype match {
    case "files" => files.get(fname)
    case "jars" => jars.get(fname)
    case other =>
      val dir = dirs.get(ftype)
      require(dir != null, s"Invalid stream URI: $ftype not found.")
      new File(dir, fname)
  }
  if (file != null && file.isFile()) {
    new FileSegmentManagedBuffer(rpcEnv.transportConf, file, 0, file.length())
  } else {
    null
  }
}
openStream方法从缓存中获取文件后,将TransportConf及File等信息封装为FileSegmentManagerBuffer并返回。各个Executor节点就可以使用Driver节点的RpcEnv提供的NettyStreamManager,从Driver将Jar包或文件下载到Executor节点上供任务执行。
5.2 NettyRpcHandler详解
上文提到NettyRpcEnv中用于构造TransportContext的RpcHandler实际是实现类NettyRpcHandler,通过两个重载的receive方法来看NettyRpcHandler是如何实现RpcHandler的。
对客户端进行响应的receive方法:
override def receive(
    client: TransportClient,
    message: ByteBuffer,
    callback: RpcResponseCallback): Unit = {
  val messageToDispatch = internalReceive(client, message)
  dispatcher.postRemoteMessage(messageToDispatch, callback)
}
上述代码处理步骤如下:
- 1)调用internalReceive方法将ByteBuffer类型的message转换为RequestMessage
- 2)调用Dispatcher的postRemoteMessage将消息转换为RpcMessage后放入Inbox的消息列表。MessageLoop将调用RpcEndpoint实现类的receiveAndReply方法,即RpcEndpoint处理完后消息会向客户端进行回复。
internalReceive方法可以将ByteBuffer类型的message转换为RequestMessage,其实现代码如下:
private def internalReceive(client: TransportClient, message: ByteBuffer): RequestMessage = {
  val addr = client.getChannel().remoteAddress().asInstanceOf[InetSocketAddress]
  assert(addr != null)
  val clientAddr = RpcAddress(addr.getHostString, addr.getPort)
  val requestMessage = nettyEnv.deserialize[RequestMessage](client, message)
  if (requestMessage.senderAddress == null) {
    // Create a new message with the socket address of the client as the sender.
    RequestMessage(clientAddr, requestMessage.receiver, requestMessage.content)
  } else {
    // The remote RpcEnv listens to some port, we should also fire a RemoteProcessConnected for
    // the listening address
    val remoteEnvAddress = requestMessage.senderAddress
    if (remoteAddresses.putIfAbsent(clientAddr, remoteEnvAddress) == null) {
      dispatcher.postToAll(RemoteProcessConnected(remoteEnvAddress))
    }
    requestMessage
  }
}
上述代码执行步骤如下:
- 1)从TransportClient中获取远端地址RpcAddress
- 2)调用NettyRpcEnv的deserialize方法对客户端发送的序列化的消息(即ByteBuffer类型的消息)进行反序列化
- 3)如果反序列化得到的请求消息requestMessage中没有发送者的地址信息,则使用从TransportClient中获取的远端地址RpcAddress、requestMessage的接收者(即RpcEndpoint)、requestMessage的内容,以构造新的RequestMessage。
- 4)如果反序列化得到的请求消息requestMessage中含有发送者的地址信息,则将从Tranport中获取获取远端地址RpcAddress与requestMessage中的发送者地址信息之间的映射关系放入缓存remoteAddress;还将调用Dispatcher的postToAll方法,最后返回requestMessage
6 创建传输客户端工厂TransportClientFactory
创建传输客户端工厂TransportClientFactory是NettyRpcEnv向远端服务发起请求的基础,Spark与远端RpcEnv进行通信都依赖于TransportClientFactory生产的TransportClient。NettyRpcEnv中共创建了两个TransportClientFactory,代码如下:
private val clientFactory = transportContext.createClientFactory(createClientBootstraps())
@volatile private var fileDownloadFactory: TransportClientFactory = _
这里的clientFactory用于常规的发送请求和接收响应,fileDownloadFactory则用于文件下载。由于有些RpcEnv本身并不需要从远端下载文件,所以只声明了变量fileDownloadFactory,并未进一步对其初始化。需要下载文件的RpcEnv会调用downloadClient方法创建TransportClientFactory,并用此TransportClientFactory创建下载所需的传输客户端TransportClient。downloadClient的创建如下:
private def downloadClient(host: String, port: Int): TransportClient = {
  if (fileDownloadFactory == null) synchronized {
    if (fileDownloadFactory == null) {
      val module = "files"
      val prefix = "spark.rpc.io."
      val clone = conf.clone()
      // Copy any RPC configuration that is not overridden in the spark.files namespace.
      conf.getAll.foreach { case (key, value) =>
        if (key.startsWith(prefix)) {
          val opt = key.substring(prefix.length())
          clone.setIfMissing(s"spark.$module.io.$opt", value)
        }
      }
      val ioThreads = clone.getInt("spark.files.io.threads", 1)
      val downloadConf = SparkTransportConf.fromSparkConf(clone, module, ioThreads)
      val downloadContext = new TransportContext(downloadConf, new NoOpRpcHandler(), true)
      fileDownloadFactory = downloadContext.createClientFactory(createClientBootstraps())
    }
  }
  fileDownloadFactory.createClient(host, port)
}
根据上述代码可知fileDownloadFactory与clientFactory使用的SparkTransportConf内部代理的SparkConf都是从NettyRpcEnv的SparkConf克隆来的,不同之处在于clientFactory所属的模块(module变量)为rpc,fileDownloadFactory所属的模块为files。clientFactory中的读写线程数由spark.rpc.io.numConnectionsPerPeer属性控制,而fileDownloadFactory中读写线程数由spark.files.io.threads属性控制。
7 创建TransportServer
作为一个RPC环境,NettyRpcEnv不应该只具有向远端服务发起请求并接收响应的能力,也应当对外提供接收请求、处理请求、回复客户端的服务。NettyRpcEnv中创建TransportServer的代码如下:
@volatile private var server: TransportServer = _上述代码中TransportServer并未实例化,在类NettyRpcEnv中负责启动RpcEnv的偏函数startNettyRpcEnv,startNettyRpcEnv将负责回调NettyRpcEnv的startServer方法,startServer的实现如下:
def startServer(port: Int): Unit = {
  val bootstraps: java.util.List[TransportServerBootstrap] =
    if (securityManager.isAuthenticationEnabled()) {
      java.util.Arrays.asList(new SaslServerBootstrap(transportConf, securityManager))
    } else {
      java.util.Collections.emptyList()
    }
  //创建TransportServer
  server = transportContext.createServer(host, port, bootstraps)
  //向Dispatcher注册RpcEndpointVerifier
  dispatcher.registerRpcEndpoint(
    RpcEndpointVerifier.NAME, new RpcEndpointVerifier(this, dispatcher))
}
根据上述代码,启动NettyRpcEnv的步骤如下:
- 1)创建TransportServer。这里使用了TransportContext的createServer方法
- 2)向Dispatcher注册RpcEndpointVerifier。RpcEndpointVerifier用于校验指定名称的RpcEndpoint是否存在,RpcEndpointVerifier在Dispatcher中的注册名endpoint-verifier
RpcEndpointVerifier的实现:
private[netty] class RpcEndpointVerifier(override val rpcEnv: RpcEnv, dispatcher: Dispatcher) extends RpcEndpoint {
  override def receiveAndReply(context: RpcCallContext): PartialFunction[Any, Unit] = {
    case RpcEndpointVerifier.CheckExistence(name) => context.reply(dispatcher.verify(name))
  }
}

private[netty] object RpcEndpointVerifier {
  val NAME = "endpoint-verifier"
  case class CheckExistence(name: String)
}
上述代码可看到RpcEndpointVerifier实现了RpcEndpoint的receiveAndReply方法,因此MessageLoop线程在处理RpcEndpointVerifier所关联的Inbox中的消息时,会匹配RpcMessage调用RpcEndpointVerifier的receiveAndReply方法。RpcEndpointVerifier实现的receiveAndReply方法的处理步骤如下:
- 1)接收CheckExistence类型的消息,匹配出name参数,此参数代表要查询的RpcEndpoint的具体名称
- 2)调用Dispatcher的verify方法。rerify用于校验Dispatcher的endpoints缓存中是否存在名为name的RpcEndpoint,其代码如下:
def verify(name: String): Boolean = {
  endpoints.containsKey(name)
}- 3)调用RpcCallContext的reply方法回复客户端
根据对RpcEndpointVerifier的实现分析,它对外提供了查询当前RpcENdpointVerifier所在RpcEnv的Dispatcher中是否存在请求中指定名称所对应的RpcEndpoint。TransportServer初始化并且启动后,就可利用NettyRpcHandler和NettyStreamManager对外提供服务了。
8 客户端请求发送
之前已经介绍了NettyRpcHandler和NettyStreamManager提供的服务端实现,下面看客户端如何向远端RpcEndpoint发送消息。
当TransportClient发出请求之后,会等待获取服务端的回复,这就涉及超时问题。另外由于TransportClientFactory.createClient方法是阻塞式设计 ,所以需要一个异步的处理。NettyRpcEnv中实现这些需求的代码如下:
val timeoutScheduler = ThreadUtils.newDaemonSingleThreadScheduledExecutor("netty-rpc-env-timeout")
private[netty] val clientConnectionExecutor = ThreadUtils.newDaemonCachedThreadPool(
  "netty-rpc-connection",
  conf.getInt("spark.rpc.connect.threads", 64))
private val outboxes = new ConcurrentHashMap[RpcAddress, Outbox]()
上述代码中创建了与发送请求相关的三个组件,分别如下:
- 1)timeoutScheduler:用于处理请求超时的调度器。timeoutScheduler的类型实际是ScheduledExecutorService,比起使用Timer组件,ScheduledExecutorService将比Timer更加稳定,比如线程挂掉后,ScheduledExecutorService会重启一个新的线程定时检查请求是否超时。
- 2)clientConnectionExecutor:一个用于异步处理TransportClientFactory.createClient方法调用的线程池。这个线程池的大小默认为64,可以使用spark.rpc.connect.threads属性进行配置。
- 3)outboxes:RpcAddress与OutBox的映射关系的缓存。每次向远端发送请求时,此请求消息首先放入此远端地址对应的OutBox,然后使用线程异步发送。
8.1 Outbox与OutboxMessage
outboxes缓存了远端RPC地址与Outbox的关系,下面来看下Outbox中的成员属性:
- nettyEnv:当前Outbox所在节点上的NettyRpcEnv
- address:Outbox所对应的远端NettyRpcEnv地址
- messages:向其它远端NettyRpcEnv上的所有RpcEndpoint发送的消息列表
- client:当前Outbox内的TransportClient。消息的发送都依赖于此传输客户端。
- connectFuture:指向当前Outbox内连接任务的java.util.concurrent.Future引用。如果当前没有连接任务,则connectFuture为null
- stopped:当前Outbox是否停止的状态
- draining:表示当前Outbox内正有线程在处理messages列表中消息的状态
消息列表messages中的消息类型为OutboxMessage,所有将要向远端发送的消息都会被封装成OutboxMessage类型。OutboxMessage作为一个特质,定义了所有向外发送消息的规范,其代码如下:
private[netty] sealed trait OutboxMessage {
  def sendWith(client: TransportClient): Unit
  def onFailure(e: Throwable): Unit
}
根据OutboxMessage的名称,与Dispatcher中Inbox里的InboxMessage类型的消息关联起来:OutboxMessage在客户端使用,是对外发送消息的封装;InboxMessage在服务端使用,是对所接收消息的封装。OutboxMessage的继承体系如下:
以RpcOutboxMessage为例,RpcOutboxMessage的实现代码如下:
//类名:org.apache.spark.rpc.netty.Outbox
private[netty] case class RpcOutboxMessage(
    content: ByteBuffer,
    _onFailure: (Throwable) => Unit,
    _onSuccess: (TransportClient, ByteBuffer) => Unit)
  extends OutboxMessage with RpcResponseCallback {

  private var client: TransportClient = _
  private var requestId: Long = _

  override def sendWith(client: TransportClient): Unit = {
    this.client = client
    this.requestId = client.sendRpc(content, this)
  }
  def onTimeout(): Unit = {
    require(client != null, "TransportClient has not yet been set.")
    client.removeRpcRequest(requestId)
  }
  override def onFailure(e: Throwable): Unit = {
    _onFailure(e)
  }
  override def onSuccess(response: ByteBuffer): Unit = {
    _onSuccess(client, response)
  }
}
根据上述代码,RpcOutboxMessage重写的sendWith方法正是利用了TransportClient的sendRpc方法;TransportClient的sendRpc方法的第二个参数是RpcResponseCallback类型,RpcOutboxMessage本身也实现了RpcResponseCallback,所以调用的时候传递了RpcOutboxMessage的this引用。
介绍完Outbox的各个属性,下面学习Outbox的各个方法。Outbox的发送消息方法是最常用的方法,其代码如下:
def send(message: OutboxMessage): Unit = {
  val dropped = synchronized {
    if (stopped) {
      true
    } else {
      messages.add(message)
      false
    }
  }
  if (dropped) {
    message.onFailure(new SparkException("Message is dropped because Outbox is stopped"))
  } else {
    drainOutbox()
  }
}
由上述代码可知其执行步骤:
- 1)判断当前Outbox的状态是否已经停止
- 2)如果Outbox已经停止,则向发送者发送SparkException异常。如果Outbox还未停止,则将OutboxMessage添加到messages列表中,并且调用drainOutbox方法处理messages中的消息。drainOutbox是一个私有方法,其代码如下:
private def drainOutbox(): Unit = {
  var message: OutboxMessage = null
  synchronized {
    if (stopped) {
      return
    }
    if (connectFuture != null) {
      return
    }
    if (client == null) {
      launchConnectTask()
      return
    }
    if (draining) {
      return
    }
    message = messages.poll()
    if (message == null) {
      return
    }
    draining = true
  }
  while (true) {
    try {
      val _client = synchronized { client }
      if (_client != null) {
        message.sendWith(_client)
      } else {
        assert(stopped == true)
      }
    } catch {
      case NonFatal(e) =>
        handleNetworkFailure(e)
        return
    }
    synchronized {
      if (stopped) {
        return
      }
      message = messages.poll()
      if (message == null) {
        draining = false
        return
      }
    }
  }
}
根据上述代码,drainOutbox的执行步骤如下:
- 1)如果当前Outbox已经停止或者正在连接远端服务,则返回
- 2)如果Outbox中的TransportClient为null,说明还未连接远端服务。此时需要调用launchConnectTask方法运行连接远端服务的任务,然后返回
- 3)如果正有线程在处理(即发送)messages列表中的消息,则返回
- 4)如果messages列表中没有消息要处理,则返回。否则取出其中的一条消息,并将draining状态置为true。
- 5)循环处理messages列表中的消息,即不断从messages列表中取出消息并调用OutboxMessage的sendWith方法发送消息。
在drainOutbox方法中调用launchConnectTask方法,运行连接远端服务的任务,其代码如下:
private def launchConnectTask(): Unit = {
  connectFuture = nettyEnv.clientConnectionExecutor.submit(new Callable[Unit] {
    override def call(): Unit = {
      try {
        val _client = nettyEnv.createClient(address)
        outbox.synchronized {
          client = _client
          if (stopped) {
            closeClient()
          }
        }
      } catch {
        case ie: InterruptedException =>
          return
        case NonFatal(e) =>
          outbox.synchronized { connectFuture = null }
          handleNetworkFailure(e)
          return
      }
      outbox.synchronized { connectFuture = null }
      drainOutbox()
    }
  })
}
根据上述代码,launchConnectTask方法的执行步骤如下:
- 1)构造Callable的匿名内部类,此匿名类将调用NettyRpcEnv的createClient方法创建TransportClient,然后调用drainOutbox方法处理Outbox中的消息
- 2)使用NettyRpcEnv中的clientConnectionExecutor提交Callabler的匿名内部类
8.2 NettyRpcEndpointRef详解
在NettyRpcEnv中,要向远端RpcEndpoint发送请求,首先要持有RpcEndpoint的引用对象NettyRpcEndpointRef(类似于Akka中的Actor的ActorRef)。NettyRpcEndpointRef是RpcEndpointRef的唯一子类。NettyRpcEndpointRef重写了RpcEndpointRef的部分方法,其代码如下:
private[netty] class NettyRpcEndpointRef(
    @transient private val conf: SparkConf,
    endpointAddress: RpcEndpointAddress,
    @transient @volatile private var nettyEnv: NettyRpcEnv)
  extends RpcEndpointRef(conf) with Serializable with Logging {

  @transient @volatile var client: TransportClient = _

  private val _address = if (endpointAddress.rpcAddress != null) endpointAddress else null
  private val _name = endpointAddress.name

  override def address: RpcAddress = if (_address != null) _address.rpcAddress else null

  private def readObject(in: ObjectInputStream): Unit = {
    in.defaultReadObject()
    nettyEnv = NettyRpcEnv.currentEnv.value
    client = NettyRpcEnv.currentClient.value
  }

  private def writeObject(out: ObjectOutputStream): Unit = {
    out.defaultWriteObject()
  }

  override def name: String = _name

  override def ask[T: ClassTag](message: Any, timeout: RpcTimeout): Future[T] = {
    nettyEnv.ask(RequestMessage(nettyEnv.address, this, message), timeout)
  }

  override def send(message: Any): Unit = {
    require(message != null, "Message is null")
    nettyEnv.send(RequestMessage(nettyEnv.address, this, message))
  }

  override def toString: String = s"NettyRpcEndpointRef(${_address})"

  def toURI: URI = new URI(_address.toString)

  final override def equals(that: Any): Boolean = that match {
    case other: NettyRpcEndpointRef => _address == other._address
    case _ => false
  }

  final override def hashCode(): Int = if (_address == null) 0 else _address.hashCode()
}
NettyRpcEndpointRef包含了以下属性:
- client:类型为TransportClient,NettyRpcEndpointRef将利用此TransportClient向远端的RpcEndpoint发送请求
- _address:远端RpcEndpoint的地址RpcEndpointAddress发送请求
- _name:远端RpcEndpoint的名称
下面来介绍NettyRpcEndpointRef中重写的方法:
- address:返回_address属性的值,或返回null
- name:返回_name属性的值
- ask:首先将message封装为RequestMessage,然后调用NettyRpcEnv的ask方法
- send:首先将message封装为RequestMessage,然后调用NettyRpcEnv的send方法
NettyRpcEndpointRef的ask方法和send方法分别调用了NettyRpcEnv的ask方法和send方法,下面将对它们进行详细介绍:
(1)询问
NettyRpcEnv重写了抽象类RpcEnv的ask方法,其代码如下:
private[netty] def ask[T: ClassTag](message: RequestMessage, timeout: RpcTimeout): Future[T] = {
  val promise = Promise[Any]()
  val remoteAddr = message.receiver.address
  def onFailure(e: Throwable): Unit = {
    if (!promise.tryFailure(e)) {
      logWarning(s"Ignored failure: $e")
    }
  }
  def onSuccess(reply: Any): Unit = reply match {
    case RpcFailure(e) => onFailure(e)
    case rpcReply =>
      if (!promise.trySuccess(rpcReply)) {
        logWarning(s"Ignored message: $reply")
      }
  }
  try {
    if (remoteAddr == address) {
      val p = Promise[Any]()
      p.future.onComplete {
        case Success(response) => onSuccess(response)
        case Failure(e) => onFailure(e)
      }(ThreadUtils.sameThread)
      dispatcher.postLocalMessage(message, p)
    } else {
      val rpcMessage = RpcOutboxMessage(serialize(message),
        onFailure,
        (client, response) => onSuccess(deserialize[Any](client, response)))
      postToOutbox(message.receiver, rpcMessage)
      promise.future.onFailure {
        case _: TimeoutException => rpcMessage.onTimeout()
        case _ =>
      }(ThreadUtils.sameThread)
    }
    val timeoutCancelable = timeoutScheduler.schedule(new Runnable {
      override def run(): Unit = {
        onFailure(new TimeoutException(s"Cannot receive any reply in ${timeout.duration}"))
      }
    }, timeout.duration.toNanos, TimeUnit.NANOSECONDS)
    promise.future.onComplete { v =>
      timeoutCancelable.cancel(true)
    }(ThreadUtils.sameThread)
  } catch {
    case NonFatal(e) =>
      onFailure(e)
  }
  promise.future.mapTo[T].recover(timeout.addMessageIfTimeout)(ThreadUtils.sameThread)
}
其执行步骤如下:
- 1)如果请求消息的接收者的地址与当前NettyRpcEnv的地址相同(则说明处理请求的RpcEndpoint位于本地的NettyRpcEnv),那么新建Promise对象,并且Promise的future(类型为Future)设置完成时的回调函数(成功时调用onSuccess方法,失败时调用onFailure方法)。发送消息最终通过调用本地Dispatcher的postLocalMessage方法实现。
- 2)如果请求消息的接收者的地址与当前NettyRpcEnv的地址不同(则说明处理请求的RpcEndpoint位于其它节点的NettyRpcEnv中),那么将message序列化,并与onFailure、onSuccess方法一起封装为RpcOutboxMessage类型的消息。最后调用postToOutbox方法将消息投递出去。
- 3)使用timeoutScheduler设置一个定时器,用于超时处理。此定时器在等待指定的超时时间后抛出TimeoutException异常。请求如果在超时时间内处理完毕,则会调用timeoutScheduler的cancel方法取消此超时定时器。
- 4)返回请求处理的结果
(2)发送消息
NettyRpcEnv重写了抽象类RpcEnv的send方法,其实现代码如下:
private[netty] def send(message: RequestMessage): Unit = {
    val remoteAddr = message.receiver.address
    if (remoteAddr == address) {
      try {
        dispatcher.postOneWayMessage(message)
      } catch {
        case e: RpcEnvStoppedException => logWarning(e.getMessage)
      }
    } else {
      postToOutbox(message.receiver, OneWayOutboxMessage(serialize(message)))
    }
  }
NettyRpcEnv的send方法的执行步骤如下:
- 1)如果请求消息的接收者地址与当前NettyRpcEnv的地址相同,那么将通过调用本地Dispatcher的postOneWayMessage方法实现发送。
- 2)如果请求消息的接收者的地址与当前NettyRpcEnv的地址不同,那么将message序列化并封装为RpcOutboxMessage类型的消息,最后调用postToOutbox方法将消息投递出去
NettyRpcEnv的ask和send方法都调用了私有方法postToOutbox,postToOutbox用于向远端节点上的RpcEndpoint发送消息,其实现代码如下:
private def postToOutbox(receiver: NettyRpcEndpointRef, message: OutboxMessage): Unit = {
  if (receiver.client != null) {
    message.sendWith(receiver.client)
  } else {
    require(receiver.address != null,
      "Cannot send message to client endpoint with no listen address.")
    val targetOutbox = {
      val outbox = outboxes.get(receiver.address)
      if (outbox == null) {
        val newOutbox = new Outbox(this, receiver.address)
        val oldOutbox = outboxes.putIfAbsent(receiver.address, newOutbox)
        if (oldOutbox == null) {
          newOutbox
        } else {
          oldOutbox
        }
      } else {
        outbox
      }
    }
    if (stopped.get) {
      outboxes.remove(receiver.address)
      targetOutbox.stop()
    } else {
      targetOutbox.send(message)
    }
  }
}
上述postToOutbox方法的执行步骤如下:
- 1)如果NettyRpcEndpointRef中TransportClient不为空,则直接调用Outbox-Message的sendWith方法,否则进入第2步
- 2)获取NettyRpcEndpointRef的远端RpcEndpoint地址所对应的Outbox。首先从outboxes缓存中获取Outbox。如果outboxes中没有相应的Outbox,则需要新建Outbox并放入outboxes缓存中
- 3)如果当前NettyRpcEnv已经处于停止状态,则将第2步得到的Outbox从outboxes中移除,并且调用Outbox的stop方法停止Outbox。如果当前NettyRpcEnv还未停止,则调用第2步得到的Outbox的send方法发送消息
根据本节对客户端发送请求的分析,可将此流程下图表示:
上图展示了两个不同节点上的NettyRpcEnv。右边的NettyRpcEnv采用简略的表示方法,只展示了其内部的Dispatcher组件,实际上右边的NettyRpcEnv与左边的NettyRpcEnv在结构和组成上是一样的。除了Dispatcher组件,还展示了NettyRpcEnv内部的outboxes列表、outboxes列表内的Outbox及Outbox内部用于缓存OutboxMessage的messages列表。左边NettyRpcEnv中的NettyRpcEndpointRef和右边一个提供服务的RpcEndpoint之间有箭头的虚线表示NettyRpcEndpointRef引用RpcEndpoint,也就是说NettyRpcEndpointRef知道RpcEndpoint的地址信息。有了这些简短的陈述,下面对图中的序号进行说明:
- 序号①:表示通过调用NettyRpcEndpointRef的send和ask方法向本地节点的RpcEndpoint发送消息。由于是在同一节点,所以直接调用Dispatcher的postLocalMessage或postOneWayMessage方法将消息放入EndpointData内部Inbox的messages列表中。MessageLoop线程最后处理消息,并将消息发给对应的RpcEndpoint处理。
- 序号②:表示通过调用NettyRpcEndpointRef的send和ask方法向远端节点的RpcEndpoint发送消息。这种情况下,消息将首先被封装为OutboxMessage,然后放入到远端RpcEndpoint的地址所对应的Outbox的messages列表中
- 序号③:表示每个Outbox的drainOutbox方法通过循环,不断从messages列表中取得OutboxMessage
- 序号④:表示每个Outbox的drainOutbox方法使用Outbox内部的TransportClient向远端的NettyRpcEnv发送序号③中取得的OutboxMessage
- 序号⑤:表示序号④发出的请求在与远端NettyRpcEnv的TransportServer建立了连接后,请求消息首先经过Netty管道的处理,然后经由NettyRpcHandler处理,最后NettyRpcHandler的receive方法会调用Dispatcher的postRemoteMessage或postOneWayMesage方法,将消息放入EndpointData内部Inbox的messages列表中。MessageLoop线程最后处理消息,并将消息发给对应的RpcEndpoint处理。


