目标检测
目标检测
一、目标检测概述
1.目标检测概述


2.目标检测算法介绍


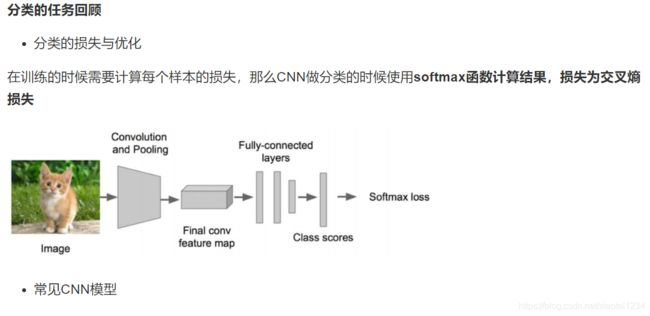
3.目标检测的任务


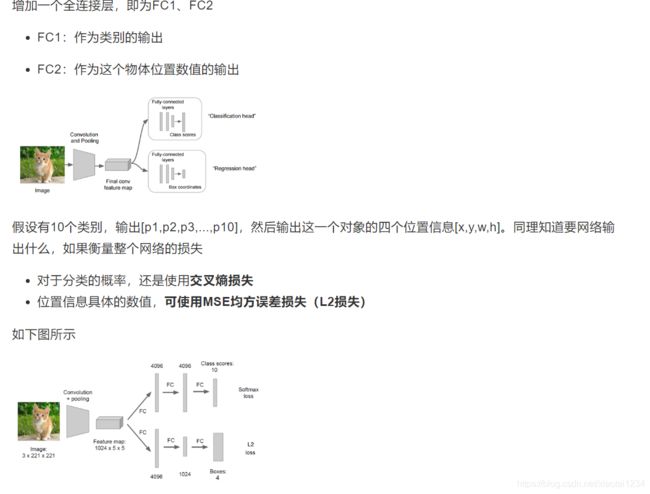
4.目标定位的简单实现思路
在分类的时候我们直接输出各个类别的概率,如果再加上定位的话,我们可以考虑在网络的最后输出加上位置信息。下面我们考虑图中只有一个物体的检测时候,我们可以有以下方法去进行训练我们的模型
回归位置
两种Bounding box名称


二、R-CNN

1.目标检测-Overfeat模型
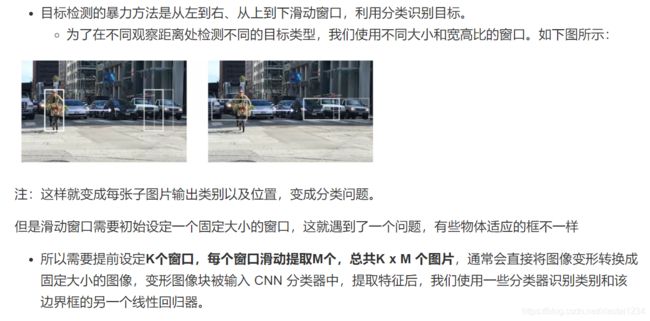
滑动窗口

Overfeat模型总结

2.目标检测-R-CNN模型
在CVPR 2014年中Ross Girshick提出R-CNN。论文名称:用于精确的对象检测和语义分割的丰富功能层次结构(Rich feature hierarchies for accurate object detection and semantic segmentation)
论文背景

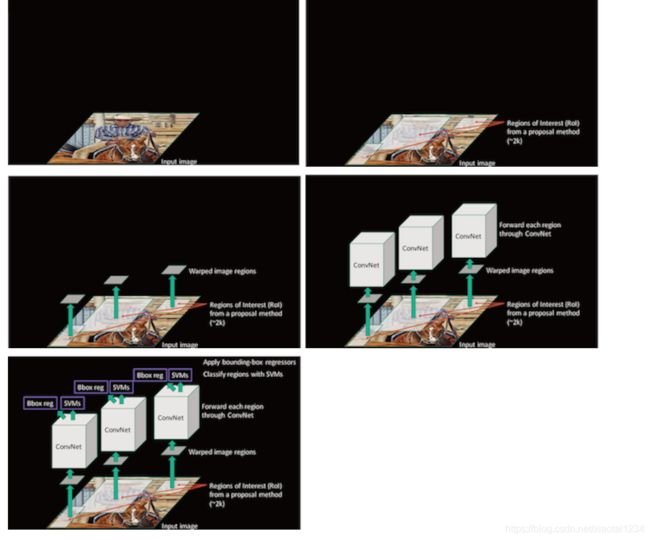
完整R-CNN结构


候选区域(Region of Interest)得出(了解)


CNN特征提取
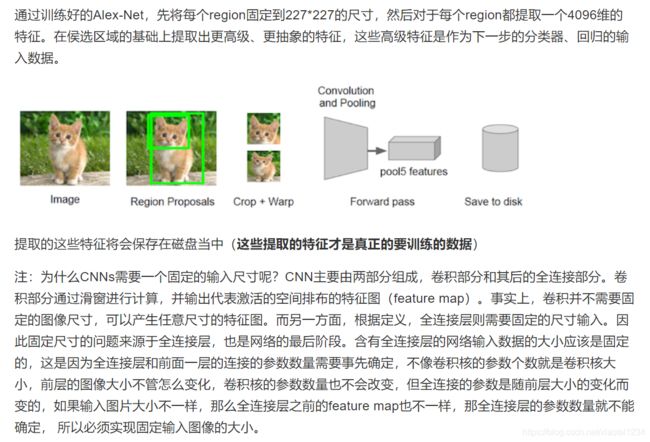
3.模型训练
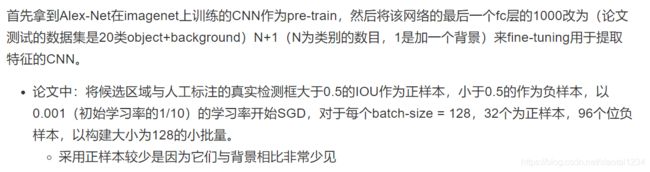
CNN训练训练
分类器SVM训练


Boundingbox Regression


正负样本分配问题?

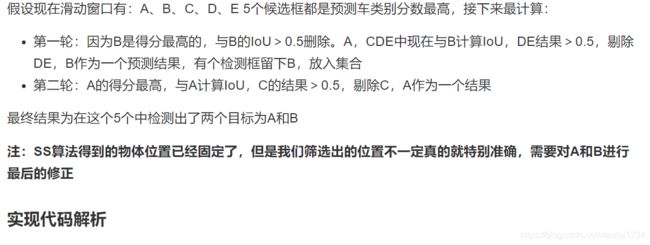
4.测试过程

非最大抑制(NMS)

import numpy as np

def nms(dets, thresh):
    # dets: 检测的 boxes 及对应的 scores
    # thresh: 设定的阈值

    # boxes 位置
    x1 = dets[:, 0]
    y1 = dets[:, 1]
    x2 = dets[:, 2]
    y2 = dets[:, 3]

    # boxes scores
    scores = dets[:, 4]

    areas = (x2 - x1 + 1) * (y2 - y1 + 1) # 各 box 的面积
    order = scores.argsort()[::-1] # boxes 的按照 score 排序

    keep = [] # 记录保留下的 boxes
    while order.size > 0:
        i = order[0] # score 最大的 box 对应的 index
        keep.append(i) # 将本轮 score 最大的 box 的 index 保留

        # 计算剩余 boxes 与当前 box 的重叠程度 IoU
        xx1 = np.maximum(x1[i], x1[order[1:]])
        yy1 = np.maximum(y1[i], y1[order[1:]])
        xx2 = np.minimum(x2[i], x2[order[1:]])
        yy2 = np.minimum(y2[i], y2[order[1:]])

        w = np.maximum(0.0, xx2 - xx1 + 1) # IoU
        h = np.maximum(0.0, yy2 - yy1 + 1)
        inter = w * h
        ovr = inter / (areas[i] + areas[order[1:]] - inter)

        # 保留 IoU 小于设定阈值的 boxes
        inds = np.where(ovr <= thresh)[0]
        order = order[inds + 1]

    return keep
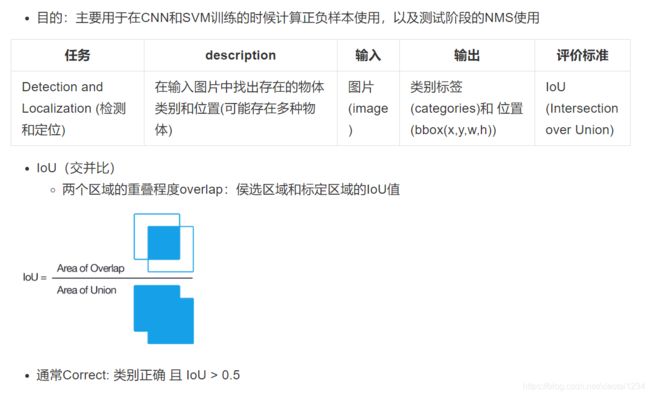
5.检测的评价指标
IoU交并比
IOU 实现(重点)
def union(au, bu, area_intersection):
    """
    计算并集
    :param au:
    :param bu:
    :param area_intersection:
    :return:
    """
    # 计算a的面积
    area_a = (au[2] - au[0]) * (au[3] - au[1])
    # 计算b的面积
    area_b = (bu[2] - bu[0]) * (bu[3] - bu[1])
    # a和b的面积-交集面积=总共面积
    area_union = area_a + area_b - area_intersection
    return area_union


def intersection(ai, bi):
    """
    计算交集
    :param ai:a框坐标
    :param bi:b框坐标
    :return:
    """
    # 1、取出交集的左上角点
    x = max(ai[0], bi[0])
    y = max(ai[1], bi[1])
    # 2、取出交集的右下角点,并减去左上角点值,计算出交集长宽
    w = min(ai[2], bi[2]) - x
    h = min(ai[3], bi[3]) - y
    # 3、如果一个为0,返回交集面积为0
    if w < 0 or h < 0:
        return 0
    return w*h


def iou(a, b):
    """
    计算交并比
    :param a: a框坐标
    :param b: b框坐标
    :return:
    """
    # 1、如果a,b 传入有问题
    if a[0] >= a[2] or a[1] >= a[3] or b[0] >= b[2] or b[1] >= b[3]:
        return 0.0

    # 2、计算IOU
    # 交集区域
    area_i = intersection(a, b)
    # 并集区域
    area_u = union(a, b, area_i)

    return float(area_i) / float(area_u + 1e-6)  # 防止分母为0,加一个稳定系数

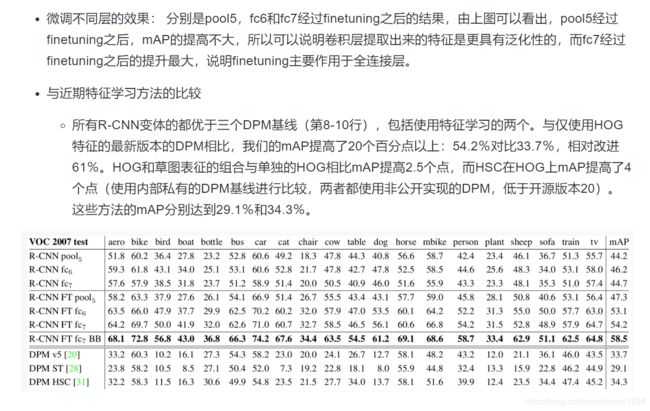
平均精确率(mean average precision)mAP


6.论文R-CNN总结
特征提取对比
网络架构

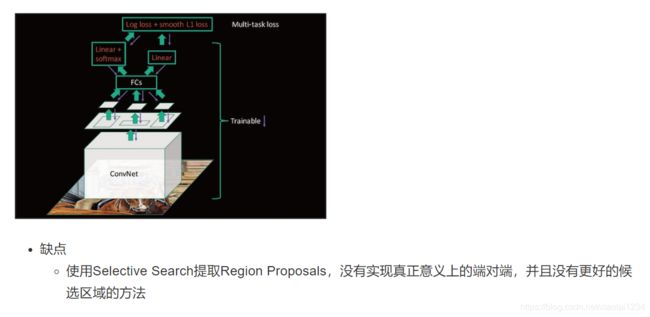
流程总结
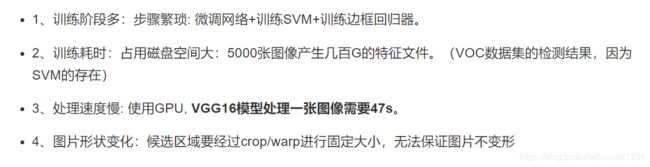
缺点
三、SPPNet
1.SPPNet介绍

SPPNet与RCNN对比


spatial pyramid pooling layer


映射


SPPNet 结果


代码实现
import tensorflow as tf
import math


def Spp_layer(feature_map, bins):
    ''' 使用 [3, 2, 1] denote 3*3, 2*2, 1*1 bins做金字塔赤化输出'''
    # get feature map shape
    batch_size, a, _, _ = feature_map.get_shape().as_list()
    pooling_out_all = []

    for layer in range(len(bins)):
        # 计算每个不同池化尺寸的输出
        k_size = math.ceil(a / bins[layer])
        stride = math.floor(a / bins[layer])
        pooling_out = tf.nn.max_pool(feature_map,
                                     ksize=[1, k_size, k_size, 1],
                                     strides=[1, stride, stride, 1],
                                     padding='VALID')
        pooling_out_resized = tf.reshape(pooling_out, [batch_size, -1])
        pooling_out_all[layer] = pooling_out_resized
        # 特征图合并输出结果
    feature_map_out = tf.concat(axis=1, values=pooling_out_all)
    return feature_map_out
2.SPPNet总结

四、Fast R-CNN

1.Fast R-CNN

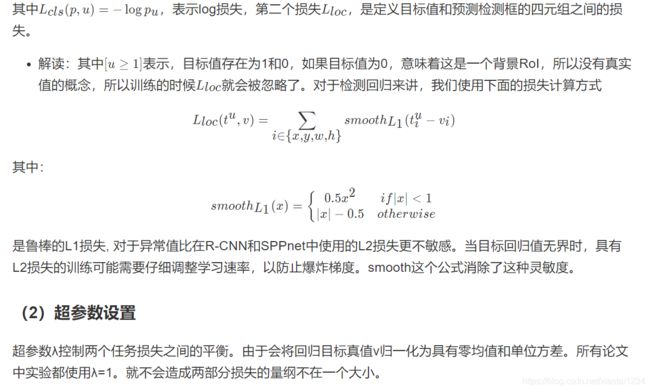
Fast R-CNN原理

RoI pooling


从预训练网络中进行训练


Fast RCNN检测
网络将图像(或图像金字塔,编码为图像列表)和待计算概率的R个候选框的列表作为输入。在测试的时候,R通常在2000左右。使用R-CNN算法的设置和对每个类别独立执行非最大抑制
2.Fast RCNN 效果


3.Fast R-CNN算法
五、Faster R-CNN
在Fast R-CNN还存在着瓶颈问题:Selective Search(选择性搜索)。要找出所有的候选框,那我们有没有一个更加高效的方法来求出这些候选框呢?
1.Faster R-CNN介绍

RPN网络
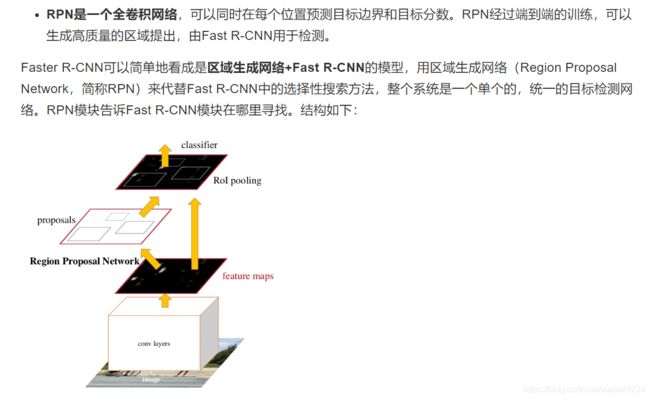

RPN原理


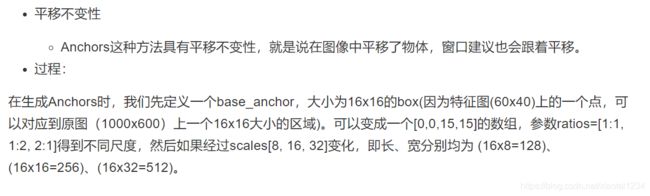
平移不变的anchor

2.Faster RCNN训练

RPN训练:


3.Faster R-CNN效果


4.Faster R-CNN总结

六、Faster RCNN接口介绍
1.COCO 数据集介绍
COCO数据集


下载

2.COCO API

格式

{
     "info":      #第一个info信息
          {       #数据集信息
                  "description": "COCO 2014 Dataset",
                  "url": "http://cocodataset.org",
                  "version": "1.0",
                  "year": 2014,
                  "contributor": "COCO Consortium",
                  "date_created": "2017/09/01"
         },
      "images":  #第二个图片信息,数组包含了多张图像
      [   {      #每张图像的具体信息
                  "license": 5,
                  "file_name": "COCO_train2014_000000057870.jpg",
                  "coco_url": "http://images.cocodataset.org/train2014/COCO_train2014_000000057870.jpg",
                  "height": 480,
                  "width": 640,
                  "date_captured": "2013-11-14 16:28:13",
                  "flickr_url": "http://farm4.staticflickr.com/3153/2970773875_164f0c0b83_z.jpg",
                  "id": 57870
           },
          ......
          ......   #此处省略很多图片
         {
                  "license": 4,
                  "file_name": "COCO_train2014_000000475546.jpg",
                  "http://images.cocodataset.org/train2014/COCO_train2014_000000475546.jpg",
                  "height": 375,
                  "width":500,;、
                  "date_captured": "2013-11-25 21:20:23",
                  "flickr_url": "http://farm1.staticflickr.com/167/423175046_6cd9d0205a_z.jpg",
                  "id": 475546
           }],         #图像描述结束,下面开始介绍licenses


    "licenses":
         [ {
                  "url": "http://creativecommons.org/licenses/by-nc-sa/2.0/",
                  "id": 1,
                  "name": "Attribution-NonCommercial-ShareAlike License"
           },
            .....#此处省略七个license
            .....
         {
                  "url": "http://creativecommons.org/licenses/by-nc-nd/2.0/",
                  "id": 8,
                  "name": "Attribution-NonCommercial-NoDerivs License"
         }],

      "annotations":
      [   {
                 "segmentation":[[312.29,562.89,402.25,511.49,400.96,425.38,398.39,372.69,
                                  388.11,332.85,318.71,325.14,295.58,305.86,269.88,314.86,
                                  258.31,337.99,217.19,321.29,182.49,343.13,141.37,348.27,
                                  132.37,358.55,159.36,377.83,116.95,421.53,167.07,499.92,
                                  232.61,560.32,300.72,571.89]],
                "area": 54652.9556,
                "iscrowd": 0,
                "image_id": 480023,
                "bbox": [116.95,305.86,285.3,266.03],
                "category_id": 58,"id": 86
          },
            .....#此处省略很多图像的分割标签
            .....
                "segmentation":[[312.29,562.89,402.25,511.49,400.96,425.38,398.39,372.69,
                                388.11,332.85,318.71,325.14,295.58,305.86,269.88,314.86,
                                258.31,337.99,217.19,321.29,182.49,343.13,141.37,348.27,
                                132.37,358.55,159.36,377.83,116.95,421.53,167.07,499.92,
                                232.61,560.32,300.72,571.89]],
              "area": 54652.9556,
              "iscrowd": 0,
              "image_id": 480023,
              "bbox": [116.95,305.86,285.3,266.03],
              "category_id": 58,
              "id": 86
          },
      "categories":#类别信息
     [   {
              "supercategory": "person",
              "id": 1,
              "name": "person"
          },
              .......#此处省略很多图像的类标签
              .......
          {
              "supercategory": "vehicle",
              "id": 2,
              "name": "bicycle"
          },
        {
              "supercategory": "kitchen",#大类
              "id": 50,
              "name": "spoon"
        }
利用 json 文件实例化 COCO API 对象

COCO接口获取数据代码
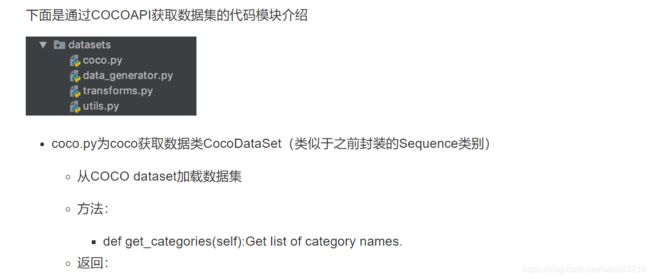

获取API
class CocoDataSet(object):
    def __init__(self,
                 dataset_dir,  # dataset_dir: The root directory of the COCO dataset.
                 subset,  # subset: What to load (train, val).
                 flip_ratio=0,  # flip_ratio: Float. The ratio of flipping an image and its bounding boxes.
                 pad_mode='fixed',  # pad_mode: Which padded method to use (fixed, non-fixed)
                 mean=(0, 0, 0),  # mean: Tuple. Image mean.
                 std=(1, 1, 1),  # Tuple. Image standard deviation.
                 scale=(1024, 800),  # Tuple of two integers.
                 debug=False):
获取2017数据集代码案例

import os
import tensorflow as tf
from tensorflow import keras
import numpy as np

from detection.datasets import coco, data_generator
import os
os.environ["TF_CPP_MIN_LOG_LEVEL"] = "2"

train_dataset = coco.CocoDataSet('./data/coco2017', 'train',
                                     flip_ratio=0.5,
                                     pad_mode='fixed',
                                     mean=(123.675, 116.28, 103.53),
                                     std=(1., 1., 1.),
                                     scale=(800, 1216))
train_generator = data_generator.DataGenerator(train_dataset)
train_tf_dataset = tf.data.Dataset.from_generator(
  train_generator, (tf.float32, tf.float32, tf.float32, tf.int32))
train_tf_dataset = train_tf_dataset.batch(1).prefetch(100).shuffle(100)

for (batch, inputs) in enumerate(train_tf_dataset):
  batch_imgs, batch_metas, batch_bboxes, batch_labels = inputs
  print(batch_imgs, batch_metas, batch_bboxes, batch_labels)
打印结果当中包含图片数据,批次元信息,GT位置信息,目标标签
3.Faster RCNN 训练以及预测
Faster RCNN流程图详解

开源keras Faster RCNN 模型代码结构

FaterRCNN 模型训练使用
from detection.models.detectors import faster_rcnn

# 2、建立模型
num_classes = len(train_dataset.get_categories())
model = faster_rcnn.FasterRCNN(num_classes=num_classes)
optimizer = keras.optimizers.SGD(1e-3, momentum=0.9, nesterov=True)

# 3、迭代训练
for epoch in range(1):

    loss_history = []
    for (batch, inputs) in enumerate(train_tf_dataset):

        batch_imgs, batch_metas, batch_bboxes, batch_labels = inputs
        with tf.GradientTape() as tape:
            rpn_class_loss, rpn_bbox_loss, rcnn_class_loss, rcnn_bbox_loss = model(
                (batch_imgs, batch_metas, batch_bboxes, batch_labels), training=True)

            loss_value = rpn_class_loss + rpn_bbox_loss + rcnn_class_loss + rcnn_bbox_loss

        grads = tape.gradient(loss_value, model.trainable_variables)
        optimizer.apply_gradients(zip(grads, model.trainable_variables))

        loss_history.append(loss_value.numpy())

        if batch % 10 == 0:
            print('迭代次数: %d, 批次数: %d, 损失: %f' % (epoch+1, batch+1, np.mean(loss_history)))

4.代码核心解析
模型主体过程
 def call(self, inputs, training=True):
        """

        :param inputs: [1, 1216, 1216, 3], [1, 11], [1, 14, 4], [1, 14]
        :param training:
        :return:
        """
        if training: # training
            imgs, img_metas, gt_boxes, gt_class_ids = inputs
        else: # inference
            imgs, img_metas = inputs
        # 1、主干网络计算,ResNet五层特征输出保留
        # [1, 304, 304, 256] => [1, 152, 152, 512]=>[1,76,76,1024]=>[1,38,38,2048]
        C2, C3, C4, C5 = self.backbone(imgs,
                                       training=training)
        # [1, 304, 304, 256] <= [1, 152, 152, 256]<=[1,76,76,256]<=[1,38,38,256]=>[1,19,19,256]
        # FPN进行处理金字塔特征
        P2, P3, P4, P5, P6 = self.neck([C2, C3, C4, C5],
                                       training=training)
        # 用于RPN计算
        rpn_feature_maps = [P2, P3, P4, P5, P6]
        # 用于后面的RCNN计算
        rcnn_feature_maps = [P2, P3, P4, P5]
        # [1, 369303, 2] [1, 369303, 2], [1, 369303, 4], includes all anchors on pyramid level of features
        # 2、RPN计算输出2000候选框
        # 得到输出结果
        rpn_class_logits, rpn_probs, rpn_deltas = self.rpn_head(
            rpn_feature_maps, training=training)
        # [369303, 4] => [215169, 4], valid => [6000, 4], performance =>[2000, 4],  NMS
        # 过滤
        proposals_list = self.rpn_head.get_proposals(
            rpn_probs, rpn_deltas, img_metas)
        # 进行区域分配GT,标记正负样本
        if training: # get target value for these proposal target label and target delta
            rois_list, rcnn_target_matchs_list, rcnn_target_deltas_list = \
                self.bbox_target.build_targets(
                    proposals_list, gt_boxes, gt_class_ids, img_metas)
        else:
            rois_list = proposals_list
        # rois_list only contains coordinates, rcnn_feature_maps save the 5 features data=>[192,7,7,256]
        # 对多层特征进行ROIpooling操作
        # Implements ROI Pooling on multiple levels of the feature pyramid.
        pooled_regions_list = self.roi_align(#
            (rois_list, rcnn_feature_maps, img_metas), training=training)
        # [192, 81], [192, 81], [192, 81, 4]
        # RCNN部分计算输出
        rcnn_class_logits_list, rcnn_probs_list, rcnn_deltas_list = \
            self.bbox_head(pooled_regions_list, training=training)
                # 3、RPN损失以及输出RCNN的损失计算
        if training:
            rpn_class_loss, rpn_bbox_loss = self.rpn_head.loss(
                rpn_class_logits, rpn_deltas, gt_boxes, gt_class_ids, img_metas)

            rcnn_class_loss, rcnn_bbox_loss = self.bbox_head.loss(
                rcnn_class_logits_list, rcnn_deltas_list,
                rcnn_target_matchs_list, rcnn_target_deltas_list)

            return [rpn_class_loss, rpn_bbox_loss,
                    rcnn_class_loss, rcnn_bbox_loss]
        else:
            detections_list = self.bbox_head.get_bboxes(
                rcnn_probs_list, rcnn_deltas_list, rois_list, img_metas)

            return detections_list
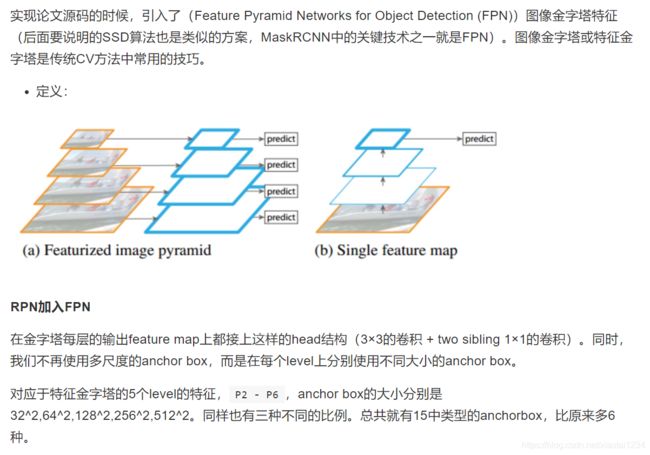
FPN(了解)
RPN

def call(self, inputs, training=True):
    '''
    Args
    ---
        inputs: [batch_size, feat_map_height, feat_map_width, channels]
            one level of pyramid feat-maps.

    Returns
    ---
        rpn_class_logits: [batch_size, num_anchors, 2]
        rpn_probs: [batch_size, num_anchors, 2]
        rpn_deltas: [batch_size, num_anchors, 4]
    '''

    layer_outputs = []

    for feat in inputs: # for every anchors feature maps
        """
        (1, 304, 304, 256)
        (1, 152, 152, 256)
        (1, 76, 76, 256)
        (1, 38, 38, 256)
        (1, 19, 19, 256)
        rpn_class_raw: (1, 304, 304, 6)
        rpn_class_logits: (1, 277248, 2)
        rpn_delta_pred: (1, 304, 304, 12)
        rpn_deltas: (1, 277248, 4)
        rpn_class_raw: (1, 152, 152, 6)
        rpn_class_logits: (1, 69312, 2)
        rpn_delta_pred: (1, 152, 152, 12)
        rpn_deltas: (1, 69312, 4)
        rpn_class_raw: (1, 76, 76, 6)
        rpn_class_logits: (1, 17328, 2)
        rpn_delta_pred: (1, 76, 76, 12)
        rpn_deltas: (1, 17328, 4)
        rpn_class_raw: (1, 38, 38, 6)
        rpn_class_logits: (1, 4332, 2)
        rpn_delta_pred: (1, 38, 38, 12)
        rpn_deltas: (1, 4332, 4)
        rpn_class_raw: (1, 19, 19, 6)
        rpn_class_logits: (1, 1083, 2)
        rpn_delta_pred: (1, 19, 19, 12)
        rpn_deltas: (1, 1083, 4)

        """
        # print(feat.shape)
        shared = self.rpn_conv_shared(feat)
        shared = tf.nn.relu(shared)

        x = self.rpn_class_raw(shared)
        # print('rpn_class_raw:', x.shape)
        rpn_class_logits = tf.reshape(x, [tf.shape(x)[0], -1, 2])
        rpn_probs = tf.nn.softmax(rpn_class_logits)
        # print('rpn_class_logits:', rpn_class_logits.shape)

        x = self.rpn_delta_pred(shared)
        # print('rpn_delta_pred:', x.shape)
        rpn_deltas = tf.reshape(x, [tf.shape(x)[0], -1, 4])
        # print('rpn_deltas:', rpn_deltas.shape)

        layer_outputs.append([rpn_class_logits, rpn_probs, rpn_deltas])
        # print(rpn_class_logits.shape, rpn_probs.shape, rpn_deltas.shape)
        """
        (1, 277248, 2) (1, 277248, 2) (1, 277248, 4)
        (1, 69312, 2) (1, 69312, 2) (1, 69312, 4)
        (1, 17328, 2) (1, 17328, 2) (1, 17328, 4)
        (1, 4332, 2) (1, 4332, 2) (1, 4332, 4)
        (1, 1083, 2) (1, 1083, 2) (1, 1083, 4)

        """

    outputs = list(zip(*layer_outputs))
    outputs = [tf.concat(list(o), axis=1) for o in outputs]
    rpn_class_logits, rpn_probs, rpn_deltas = outputs
    # (1, 369303, 2) (1, 369303, 2) (1, 369303, 4)
    # print(rpn_class_logits.shape, rpn_probs.shape, rpn_deltas.shape)

    return rpn_class_logits, rpn_probs, rpn_deltas
根据输出进行筛选proposals:过滤分数、进行NMS等操作
    def get_proposals(self,
                      rpn_probs,
                      rpn_deltas,
                      img_metas,
                      with_probs=False):
        '''
        Calculate proposals.

        Args
        ---
            rpn_probs: [batch_size, num_anchors, (bg prob, fg prob)]
            rpn_deltas: [batch_size, num_anchors, (dy, dx, log(dh), log(dw))]
            img_metas: [batch_size, 11]
            with_probs: bool.

        Returns
        ---
            proposals_list: list of [num_proposals, (y1, x1, y2, x2)] in
                normalized coordinates if with_probs is False.
                Otherwise, the shape of proposals in proposals_list is
                [num_proposals, (y1, x1, y2, x2, score)]

        Note that num_proposals is no more than proposal_count. And different
           images in one batch may have different num_proposals.
        '''
        anchors, valid_flags = self.generator.generate_pyramid_anchors(img_metas)
        # [369303, 4], [b, 11]
        # [b, N, (background prob, foreground prob)], get anchor's foreground prob, [1, 369303]
        rpn_probs = rpn_probs[:, :, 1]
        # [[1216, 1216]]
        pad_shapes = calc_pad_shapes(img_metas)

        proposals_list = [
            self._get_proposals_single(
                rpn_probs[i], rpn_deltas[i], anchors, valid_flags[i], pad_shapes[i], with_probs)
            for i in range(img_metas.shape[0])
        ]

        return proposals_list
计算RPN的损失,分类和回归损失:
def loss(self, rpn_class_logits, rpn_deltas, gt_boxes, gt_class_ids, img_metas):
  """

        :param rpn_class_logits: [N, 2]
        :param rpn_deltas: [N, 4]
        :param gt_boxes:  [GT_N]
        :param gt_class_ids:  [GT_N]
        :param img_metas: [11]
        :return:
        """
  # valid_flags indicates anchors located in padded area or not.
  anchors, valid_flags = self.generator.generate_pyramid_anchors(img_metas)

  # 进行anhor匹配
  rpn_target_matchs, rpn_target_deltas = self.anchor_target.build_targets(
    anchors, valid_flags, gt_boxes, gt_class_ids)

  rpn_class_loss = self.rpn_class_loss(
    rpn_target_matchs, rpn_class_logits)
  rpn_bbox_loss = self.rpn_bbox_loss(
    rpn_target_deltas, rpn_target_matchs, rpn_deltas)

  return rpn_class_loss, rpn_bbox_loss
测试输出
读取验证集合一张图片,输入模型进行预测输出
def test():

    train_dataset = coco.CocoDataSet('./data/coco2017', 'val')

    # 获取数据和模型
    train_generator = data_generator.DataGenerator(train_dataset)
    tf_dataset = tf.data.Dataset.from_generator(train_generator,
                                                (tf.float32, tf.float32, tf.float32, tf.float32))
    tf_dataset = tf_dataset.batch(1).prefetch(100).shuffle(100)
    num_classes = len(train_dataset.get_categories())
    model = faster_rcnn.FasterRCNN(num_classes=num_classes)

    for (batch, inputs) in enumerate(tf_dataset):
        img, img_meta, _, _ = inputs
        print(img, img_meta)

        detections_list = model((img, img_meta), training=False)

        print(detections_list)


if __name__ == '__main__':
    # train()
    test()
输出结果
[<tf.Tensor: id=10027, shape=(20, 6), dtype=float32, numpy=
array([[0.000e+00, 0.000e+00, 0.000e+00, 0.000e+00, 3.300e+01, 1.000e+00],
       [0.000e+00, 1.024e+03, 1.024e+03, 1.024e+03, 2.700e+01, 1.000e+00],
       [0.000e+00, 1.024e+03, 1.024e+03, 1.024e+03, 2.700e+01, 1.000e+00],
       [0.000e+00, 1.024e+03, 1.024e+03, 1.024e+03, 2.700e+01, 1.000e+00],
       [0.000e+00, 1.024e+03, 1.024e+03, 1.024e+03, 2.700e+01, 1.000e+00],
       [0.000e+00, 1.024e+03, 1.024e+03, 1.024e+03, 2.700e+01, 1.000e+00],
       [0.000e+00, 1.024e+03, 1.024e+03, 1.024e+03, 2.700e+01, 1.000e+00],
       [0.000e+00, 1.024e+03, 1.024e+03, 1.024e+03, 2.700e+01, 1.000e+00],
       [0.000e+00, 1.024e+03, 1.024e+03, 1.024e+03, 2.700e+01, 1.000e+00],
       [0.000e+00, 1.024e+03, 1.024e+03, 1.024e+03, 2.700e+01, 1.000e+00],
       [1.024e+03, 1.024e+03, 1.024e+03, 1.024e+03, 7.000e+00, 1.000e+00],
       [1.024e+03, 1.024e+03, 1.024e+03, 1.024e+03, 7.000e+00, 1.000e+00],
       [1.024e+03, 1.024e+03, 1.024e+03, 1.024e+03, 7.000e+00, 1.000e+00],
       [1.024e+03, 1.024e+03, 1.024e+03, 1.024e+03, 7.000e+00, 1.000e+00],
       [1.024e+03, 1.024e+03, 1.024e+03, 1.024e+03, 7.000e+00, 1.000e+00],
       [1.024e+03, 1.024e+03, 1.024e+03, 1.024e+03, 7.000e+00, 1.000e+00],
       [0.000e+00, 1.024e+03, 1.024e+03, 1.024e+03, 2.700e+01, 1.000e+00],
       [1.024e+03, 1.024e+03, 1.024e+03, 1.024e+03, 7.000e+00, 1.000e+00],
       [1.024e+03, 1.024e+03, 1.024e+03, 1.024e+03, 7.000e+00, 1.000e+00],
       [1.024e+03, 1.024e+03, 1.024e+03, 1.024e+03, 2.700e+01, 1.000e+00]],
      dtype=float32)>]
七、YOLO算法

1.YOLO介绍

YOLO结构


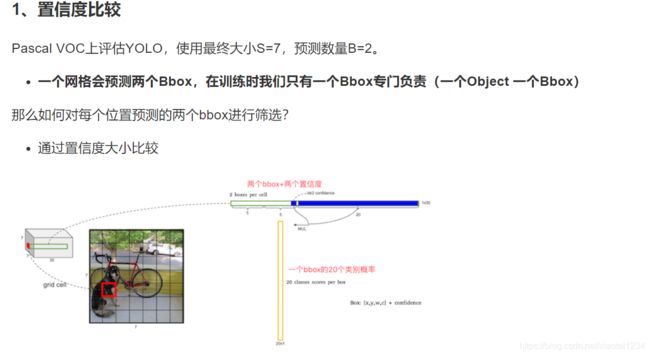
统一检测过程理解


单元格(grid cell)

网格输出筛选
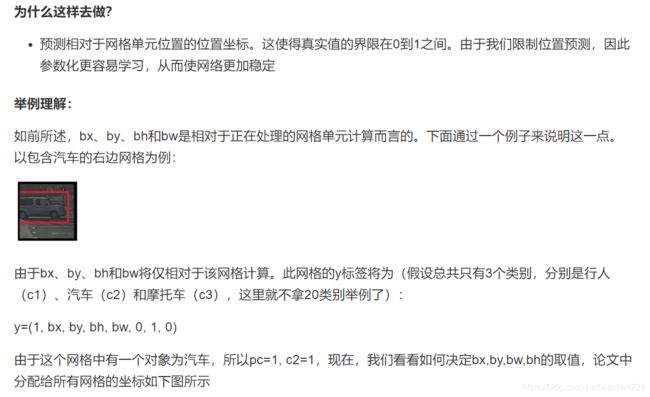


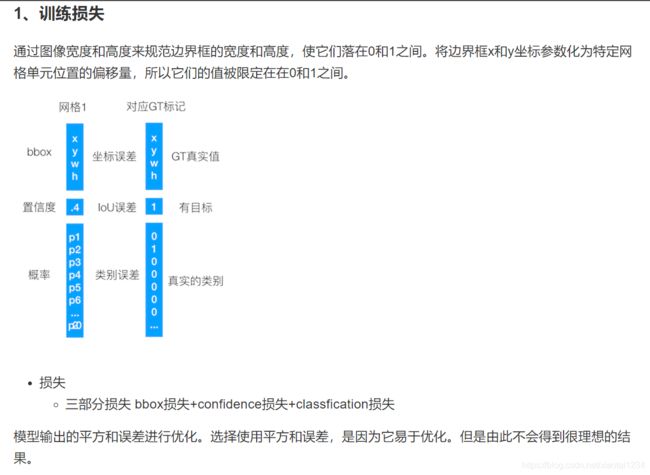
训练


2.与Faster R-CNN比较


3.YOLO总结

八、YOLOV2&V3
1.YOLOV2介绍

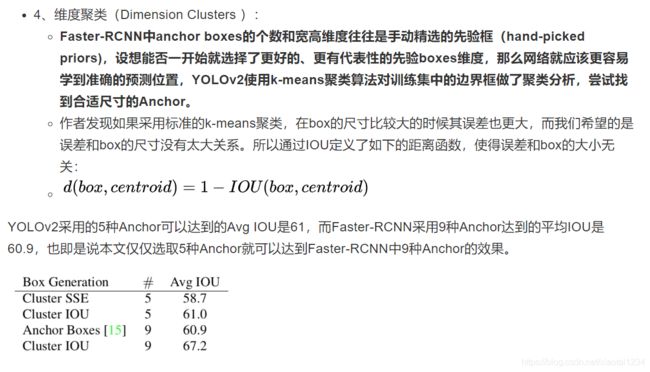
改进方法

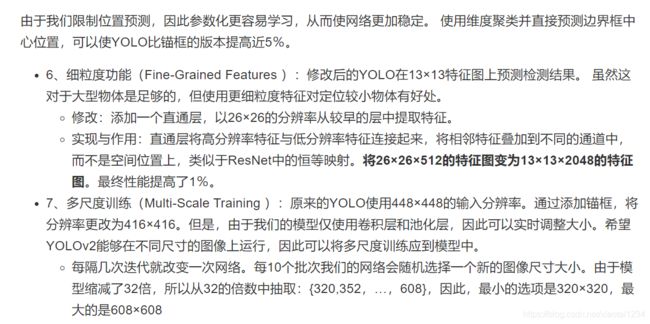
结构与训练


联合分类与检测训练-YOLO9000(了解)


总结

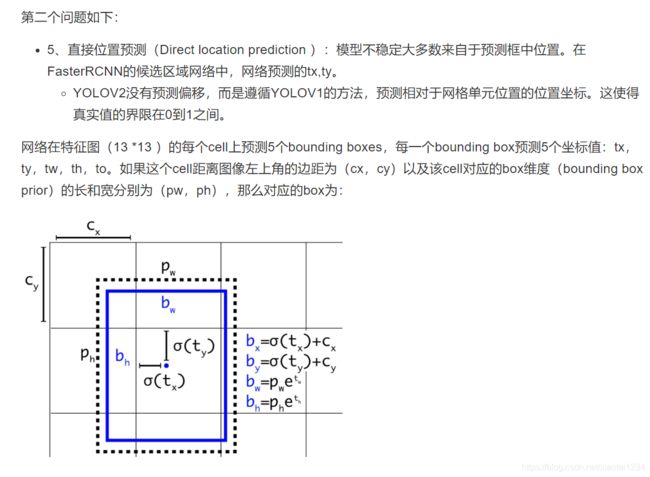
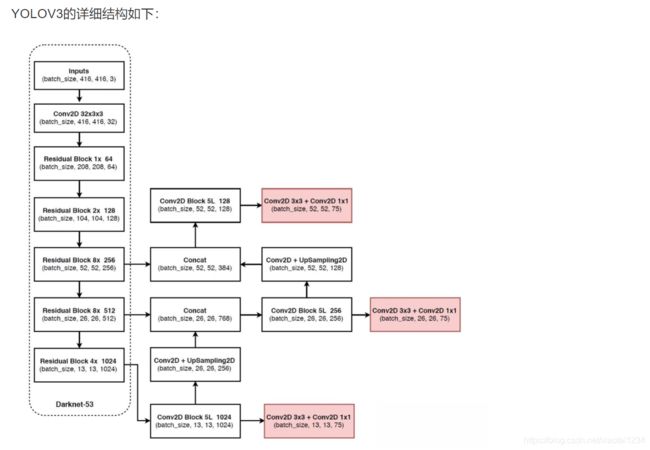
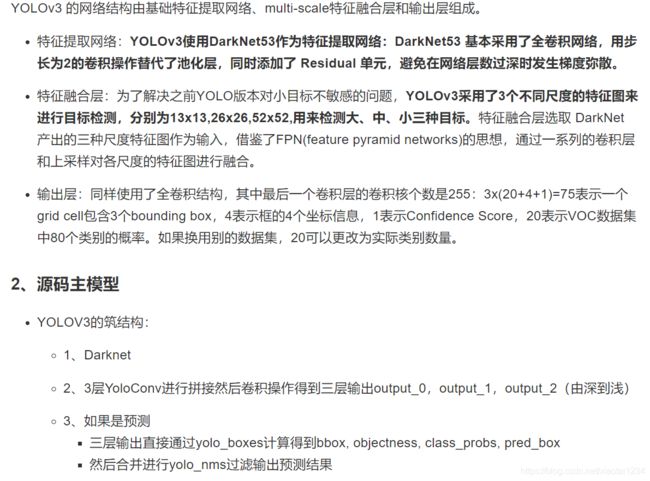
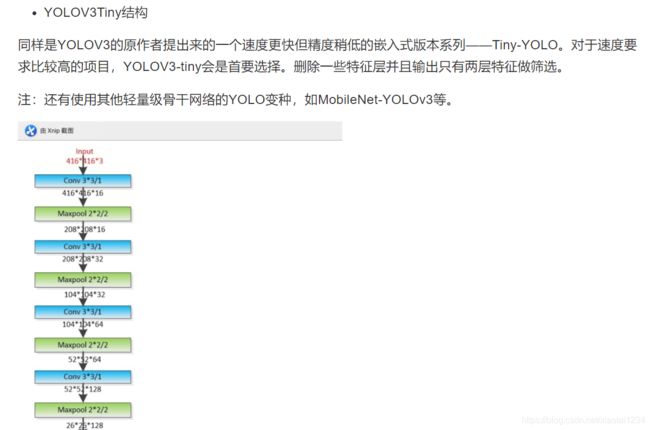
2.YOLOV3介绍

改进

总结

九、SSD算法原理
1.SSD
简介

结构

流程

Detector & classifier


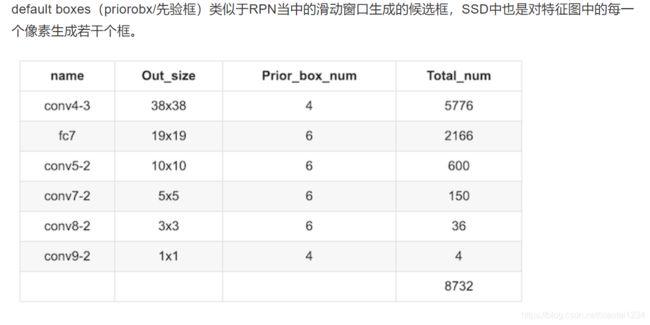
PriorBox层-default boxes


1、SSD网络prior_box:打印出来的形状为:
Tensor("concat_2:0", shape=(?, 7308, 8), dtype=float32)

# 其中某一层的结构输出
 layer {
  name: "conv6_2_mbox_priorbox"
  type: "PriorBox"
  bottom: "conv6_2"
  bottom: "data"
  top: "conv6_2_mbox_priorbox"
  prior_box_param {
    min_size: 111.0
    max_size: 162.0
    aspect_ratio: 2.0
    aspect_ratio: 3.0
    flip: true
    clip: false
    variance: 0.10000000149
    variance: 0.10000000149
    variance: 0.20000000298
    variance: 0.20000000298
    step: 32.0
    offset: 0.5
}
prior box使用过程


def decode(default_boxes, locs, variance=[0.1, 0.2]):
    """ 对default_boxes进行解码到坐标coordinates
    Args:
        default_boxes: tensor (num_default, 4)
                       of format (cx, cy, w, h)
        locs: tensor (batch_size, num_default, 4)
              of format (cx, cy, w, h)
        variance: variance for center point and size
    Returns:
        boxes: tensor (num_default, 4)
               of format (xmin, ymin, xmax, ymax)
    """
    # 解码过程
    locs = tf.concat([
        locs[..., :2] * variance[0] *
        default_boxes[:, 2:] + default_boxes[:, :2],
        tf.math.exp(locs[..., 2:] * variance[1]) * default_boxes[:, 2:]], axis=-1)

    # (cx, cy, w, h)->(xmin, ymin, xmax, ymax)
    boxes = transform_center_to_corner(locs)

    return boxes

def encode(default_boxes, boxes, variance=[0.1, 0.2]):
    """ Compute regression values
    Args:
        default_boxes: tensor (num_default, 4)
                       of format (cx, cy, w, h)
        boxes: tensor (num_default, 4)
               of format (xmin, ymin, xmax, ymax)
        variance: variance for center point and size
    Returns:
        locs: regression values, tensor (num_default, 4)
    """
    # (xmin, ymin, xmax, ymax)->(cx, cy, w, h)
    transformed_boxes = transform_corner_to_center(boxes)

    # 编码过程
    locs = tf.concat([
        (transformed_boxes[..., :2] - default_boxes[:, :2]
         ) / (default_boxes[:, 2:] * variance[0]),
        tf.math.log(transformed_boxes[..., 2:] / default_boxes[:, 2:]) / variance[1]],
        axis=-1)

    return locs

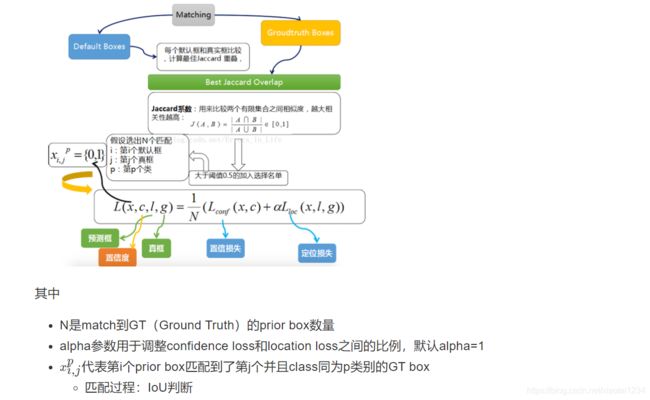
2.训练与测试流程
train流程
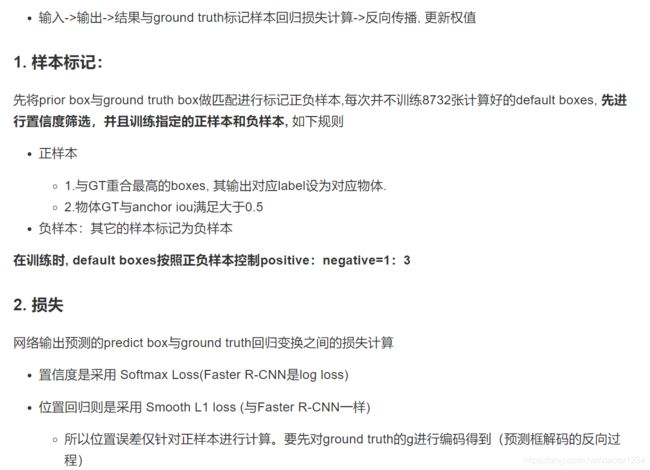

test流程

3.SSD实验与总结
实验


总结

十、案例:KITTI 人、车物体检测
1.KITTI 数据集介绍


2.YOLOV3源码实现分析
源码模型下载

YOLOV3-Tensorflow2.0源码分析

def YoloV3(size=None, channels=3, anchors=yolo_anchors,
           masks=yolo_anchor_masks, classes=80, training=False):
    x = inputs = Input([size, size, channels])

    x_36, x_61, x = Darknet(name='yolo_darknet')(x)

    # 下面通过YOLO的后续
    x = YoloConv(512, name='yolo_conv_0')(x)
    output_0 = YoloOutput(512, len(masks[0]), classes, name='yolo_output_0')(x)

    x = YoloConv(256, name='yolo_conv_1')((x, x_61))
    output_1 = YoloOutput(256, len(masks[1]), classes, name='yolo_output_1')(x)

    x = YoloConv(128, name='yolo_conv_2')((x, x_36))
    output_2 = YoloOutput(128, len(masks[2]), classes, name='yolo_output_2')(x)

    if training:
        return Model(inputs, (output_0, output_1, output_2), name='yolov3')

    boxes_0 = Lambda(lambda x: yolo_boxes(x, anchors[masks[0]], classes),
                     name='yolo_boxes_0')(output_0)
    boxes_1 = Lambda(lambda x: yolo_boxes(x, anchors[masks[1]], classes),
                     name='yolo_boxes_1')(output_1)
    boxes_2 = Lambda(lambda x: yolo_boxes(x, anchors[masks[2]], classes),
                     name='yolo_boxes_2')(output_2)

    outputs = Lambda(lambda x: yolo_nms(x, anchors, masks, classes),
                     name='yolo_nms')((boxes_0[:3], boxes_1[:3], boxes_2[:3]))

    return Model(inputs, outputs, name='yolov3')

def YoloV3Tiny(size=None, channels=3, anchors=yolo_tiny_anchors,
               masks=yolo_tiny_anchor_masks, classes=80, training=False):
    x = inputs = Input([size, size, channels])

    x_8, x = DarknetTiny(name='yolo_darknet')(x)

    x = YoloConvTiny(256, name='yolo_conv_0')(x)
    output_0 = YoloOutput(256, len(masks[0]), classes, name='yolo_output_0')(x)

    x = YoloConvTiny(128, name='yolo_conv_1')((x, x_8))
    output_1 = YoloOutput(128, len(masks[1]), classes, name='yolo_output_1')(x)

    if training:
        return Model(inputs, (output_0, output_1), name='yolov3')

    boxes_0 = Lambda(lambda x: yolo_boxes(x, anchors[masks[0]], classes),
                     name='yolo_boxes_0')(output_0)
    boxes_1 = Lambda(lambda x: yolo_boxes(x, anchors[masks[1]], classes),
                     name='yolo_boxes_1')(output_1)
    outputs = Lambda(lambda x: yolo_nms(x, anchors, masks, classes),
                     name='yolo_nms')((boxes_0[:3], boxes_1[:3]))
    return Model(inputs, outputs, name='yolov3_tiny')

# 1、重复若干层DarknetBlock,里面包含残差模块,输出包含三层特征
def Darknet(name=None):
    x = inputs = Input([None, None, 3])
    x = DarknetConv(x, 32, 3)
    x = DarknetBlock(x, 64, 1)
    x = DarknetBlock(x, 128, 2)  # skip connection
    x = x_36 = DarknetBlock(x, 256, 8)  # skip connection
    x = x_61 = DarknetBlock(x, 512, 8)
    x = DarknetBlock(x, 1024, 4)
    return tf.keras.Model(inputs, (x_36, x_61, x), name=name)

def DarknetBlock(x, filters, blocks):
    x = DarknetConv(x, filters, 3, strides=2)
    for _ in range(blocks):
        x = DarknetResidual(x, filters)
    return x

# 2、实现删除残差模块,进行若干层采样,并且输出只有两层特征
def DarknetTiny(name=None):
    x = inputs = Input([None, None, 3])
    x = DarknetConv(x, 16, 3)
    x = MaxPool2D(2, 2, 'same')(x)
    x = DarknetConv(x, 32, 3)
    x = MaxPool2D(2, 2, 'same')(x)
    x = DarknetConv(x, 64, 3)
    x = MaxPool2D(2, 2, 'same')(x)
    x = DarknetConv(x, 128, 3)
    x = MaxPool2D(2, 2, 'same')(x)
    x = x_8 = DarknetConv(x, 256, 3)  # skip connection
    x = MaxPool2D(2, 2, 'same')(x)
    x = DarknetConv(x, 512, 3)
    x = MaxPool2D(2, 1, 'same')(x)
    x = DarknetConv(x, 1024, 3)
    return tf.keras.Model(inputs, (x_8, x), name=name)

3.KITTI人车检测项目
项目目录与模块

项目步骤分析

4.数据集类型转换-KITTI数据集转换成TFRecords文件
TFRecord-TensorFlow 数据集存储格式

[
    {   # example 1 (tf.train.Example)
        'feature_1': tf.train.Feature,
        ...
        'feature_k': tf.train.Feature
    },
    ...
    {   # example N (tf.train.Example)
        'feature_1': tf.train.Feature,
        ...
        'feature_k': tf.train.Feature
    }
]
# 字典结构如
feature = {
                'image': tf.train.Feature(bytes_list=tf.train.BytesList(value=[image])),  # 图片是一个 Bytes 对象
                'label': tf.train.Feature(int64_list=tf.train.Int64List(value=[label]))  # 标签是一个 Int 对象
            }


import os
import tensorflow as tf
import os
os.environ["TF_CPP_MIN_LOG_LEVEL"] = "2"

train_cats_dir = './cats_vs_dogs/train/cats/'
train_dogs_dir = './cats_vs_dogs/train/dogs/'
tfrecord_file = './cats_vs_dogs/train.tfrecords'

train_cat_filenames = [train_cats_dir + filename for filename in os.listdir(train_cats_dir)]
train_dog_filenames = [train_dogs_dir + filename for filename in os.listdir(train_dogs_dir)]
train_filenames = train_cat_filenames + train_dog_filenames
train_labels = [0] * len(train_cat_filenames) + [1] * len(train_dog_filenames)  # 将 cat 类的标签设为0,dog 类的标签设为1

with tf.io.TFRecordWriter(tfrecord_file) as writer:
        for filename, label in zip(train_filenames, train_labels):
            # 1、读取数据集图片到内存,image 为一个 Byte 类型的字符串
            image = open(filename, 'rb').read()
            # 2、建立 tf.train.Feature 字典
            feature = {
                'image': tf.train.Feature(bytes_list=tf.train.BytesList(value=[image])),  # 图片是一个 Bytes 对象
                'label': tf.train.Feature(int64_list=tf.train.Int64List(value=[label]))  # 标签是一个 Int 对象
            }
            # 3、通过字典建立 Example
            example = tf.train.Example(features=tf.train.Features(feature=feature))
            # 4\将Example序列化并写入 TFRecord 文件
            writer.write(example.SerializeToString())

# 1、读取 TFRecord 文件
    raw_dataset = tf.data.TFRecordDataset(tfrecord_file)

    # 2、定义Feature结构,告诉解码器每个Feature的类型是什么
    feature_description = {
        'image': tf.io.FixedLenFeature([], tf.string),
        'label': tf.io.FixedLenFeature([], tf.int64),
    }

    # 3、将 TFRecord 文件中的每一个序列化的 tf.train.Example 解码
    def _parse_example(example_string):
        feature_dict = tf.io.parse_single_example(example_string, feature_description)
        feature_dict['image'] = tf.io.decode_jpeg(feature_dict['image'])  # 解码JPEG图片
        return feature_dict['image'], feature_dict['label']

    dataset = raw_dataset.map(_parse_example)

    for image, label in dataset:
        print(image, label)

KITTI数据集转换成TFRecords文件

import hashlib
import io
import os

import numpy as np
import PIL.Image as pil
from PIL import Image
import tensorflow as tf

import feature_parse
from IoU import iou
import argparse
import sys

parser = argparse.ArgumentParser()
parser.add_argument('--data_dir', type=str, default='../data/kitti/',
                    help='kitti数据集的位置')
parser.add_argument('--output_path', type=str, default='../data/kitti_tfrecords/',
                    help='TFRecord文件的输出位置')
parser.add_argument('--classes_to_use', default='car ,van ,truck ,pedestrian ,cyclist ,tram', help='KITTI中需要检测的类别')
parser.add_argument('--validation_set_size', type=int, default=500,
                    help='验证集数据集使用大小')
编写的主函数逻辑如下:
def convert_kitti_to_tfrecords(data_dir, output_path, classes_to_use,
                               validation_set_size):
    """
    将KITTI detection 转换成TFRecords.
    :param data_dir: 源数据目录
    :param output_path: 输出文件目录
    :param classes_to_use: 选择需要使用的类别
    :param validation_set_size: 验证集大小
    :return:
    """
    train_count = 0
    val_count = 0

    # 1、创建KITTI训练和验证集的tfrecord位置
    # 标注信息位置
    annotation_dir = os.path.join(data_dir,
                                  'training',
                                  'label_2')

    # 图片位置
    image_dir = os.path.join(data_dir,
                             'data_object_image_2',
                             'training',
                             'image_2')

    train_writer = tf.io.TFRecordWriter(output_path + 'train.tfrecord')
    val_writer = tf.io.TFRecordWriter(output_path + 'val.tfrecord')

    # 2、列出所有的图片,进行每张图片的内容和标注信息的获取,写入到tfrecords文件
    images = sorted(os.listdir(image_dir))
    for img_name in images:

        # (1)获取当前图片的编号数据,并拼接读取相应标注文件
        img_num = int(img_name.split('.')[0])

        # (2)读取标签文件函数
        # 整数需要进行填充成与标签文件相同的6位字符串
        img_anno = read_annotation_file(os.path.join(annotation_dir,
                                                     str(img_num).zfill(6) + '.txt'))

        # (3)过滤标签函数
        # 当前图片的标注中 过滤掉一些没有用的类别和dontcare区域的annotations
        annotation_for_image = filter_annotations(img_anno, classes_to_use)

        # (4)写入训练和验证集合TFRecord文件
        # 读取拼接的图片路径,然后与过滤之后的标注结果进行合并到一个example中
        image_path = os.path.join(image_dir, img_name)
        example = prepare_example(image_path, annotation_for_image)
        # 如果小于验证集数量大小就直接写入验证集,否则写入训练集
        is_validation_img = img_num < validation_set_size
        if is_validation_img:
            val_writer.write(example.SerializeToString())
            val_count += 1
        else:
            train_writer.write(example.SerializeToString())
            train_count += 1

    train_writer.close()
    val_writer.close()


def main(args):

    convert_kitti_to_tfrecords(
        data_dir=args.data_dir,
        output_path=args.output_path,
        classes_to_use=args.classes_to_use.split(','),
        validation_set_size=args.validation_set_size)


if __name__ == '__main__':

    args = parser.parse_args(sys.argv[1:])
    main(args)
读取读取标签文件函数
def read_annotation_file(filename):

    with open(filename) as f:
        content = f.readlines()
    # 分割解析内容
    content = [x.strip().split(' ') for x in content]
    # 保存内容到字典结构
    anno = dict()
    anno['type'] = np.array([x[0].lower() for x in content])
    anno['truncated'] = np.array([float(x[1]) for x in content])
    anno['occluded'] = np.array([int(x[2]) for x in content])
    anno['alpha'] = np.array([float(x[3]) for x in content])

    anno['2d_bbox_left'] = np.array([float(x[4]) for x in content])
    anno['2d_bbox_top'] = np.array([float(x[5]) for x in content])
    anno['2d_bbox_right'] = np.array([float(x[6]) for x in content])
    anno['2d_bbox_bottom'] = np.array([float(x[7]) for x in content])
    return anno
过滤标签函数
def filter_annotations(img_all_annotations, used_classes):
    """
    过滤掉一些没有用的类别和dontcare区域的annotations
    :param img_all_annotations: 图片的所有标注
    :param used_classes: 需要留下记录的列别
    :return:
    """
    img_filtered_annotations = {}

    # 1、过滤这个图片中标注的我们训练指定不需要的类别,把索引记录下来
    # 方便后面在处理对应的一些坐标时候使用
    relevant_annotation_indices = [
        i for i, x in enumerate(img_all_annotations['type']) if x in used_classes
    ]

    # 2、获取过滤后的下标对应某个标记物体的其它信息
    for key in img_all_annotations.keys():
        img_filtered_annotations[key] = (
            img_all_annotations[key][relevant_annotation_indices])

    # 3、如果dontcare在我们要获取的类别里面,也进行组合获取,然后过滤相关的bboxes不符合要求的
    if 'dontcare' in used_classes:
        dont_care_indices = [i for i,
                             x in enumerate(img_filtered_annotations['type'])
                             if x == 'dontcare']

        # bounding box的格式[y_min, x_min, y_max, x_max]
        all_boxes = np.stack([img_filtered_annotations['2d_bbox_top'],
                              img_filtered_annotations['2d_bbox_left'],
                              img_filtered_annotations['2d_bbox_bottom'],
                              img_filtered_annotations['2d_bbox_right']],
                             axis=1)

        # 计算bboxesIOU,比如这样的
        # Truck 0.00 0 -1.57 599.41 156.40 629.75 189.25 2.85 2.63 12.34 0.47 1.49 69.44 -1.56
        # DontCare -1 -1 -10 503.89 169.71 590.61 190.13 -1 -1 -1 -1000 -1000 -1000 -10
        # DontCare -1 -1 -10 511.35 174.96 527.81 187.45 -1 -1 -1 -1000 -1000 -1000 -10
        # DontCare -1 -1 -10 532.37 176.35 542.68 185.27 -1 -1 -1 -1000 -1000 -1000 -10
        # DontCare -1 -1 -10 559.62 175.83 575.40 183.15 -1 -1 -1 -1000 -1000 -1000 -10
        ious = iou(boxes1=all_boxes,
                   boxes2=all_boxes[dont_care_indices])

        # 删除所有 bounding boxes 与 dontcare region 重叠的区域
        if ious.size > 0:
            # 找出下标
            boxes_to_remove = np.amax(ious, axis=1) > 0.0
            for key in img_all_annotations.keys():
                img_filtered_annotations[key] = (
                    img_filtered_annotations[key][np.logical_not(boxes_to_remove)])

    return img_filtered_annotations
读取文件标准信息、过滤标注信息、进行构造example的feature字典
def prepare_example(image_path, annotations):
    """
    对一个图片的Annotations转换成tf.Example proto.
    :param image_path:
    :param annotations:
    :return:
    """
    # 1、读取图片内容,转换成数组格式
    with open(image_path, 'rb') as fid:
        encoded_png = fid.read()
    encoded_png_io = io.BytesIO(encoded_png)
    image = pil.open(encoded_png_io)
    image = np.asarray(image)

    # 2、构造协议中需要的字典键的值
    # sha256加密结果
    key = hashlib.sha256(encoded_png).hexdigest()

    # 进行坐标处理
    width = int(image.shape[1])
    height = int(image.shape[0])
    # 存储极坐标归一化格式
    xmin_norm = annotations['2d_bbox_left'] / float(width)
    ymin_norm = annotations['2d_bbox_top'] / float(height)
    xmax_norm = annotations['2d_bbox_right'] / float(width)
    ymax_norm = annotations['2d_bbox_bottom'] / float(height)

    # 其他信息,难度以及字符串类别
    difficult_obj = [0] * len(xmin_norm)
    classes_text = [x.encode('utf8') for x in annotations['type']]

    # 3、构造协议example
    example = tf.train.Example(features=tf.train.Features(feature={
        'image/height': feature_parse.int64_feature(height),
        'image/width': feature_parse.int64_feature(width),
        'image/filename': feature_parse.bytes_feature(image_path.encode('utf8')),
        'image/source_id': feature_parse.bytes_feature(image_path.encode('utf8')),
        'image/key/sha256': feature_parse.bytes_feature(key.encode('utf8')),
        'image/encoded': feature_parse.bytes_feature(encoded_png),
        'image/format': feature_parse.bytes_feature('png'.encode('utf8')),
        'image/object/bbox/xmin': feature_parse.float_list_feature(xmin_norm),
        'image/object/bbox/xmax': feature_parse.float_list_feature(xmax_norm),
        'image/object/bbox/ymin': feature_parse.float_list_feature(ymin_norm),
        'image/object/bbox/ymax': feature_parse.float_list_feature(ymax_norm),
        'image/object/class/text': feature_parse.bytes_list_feature(classes_text),
        'image/object/difficult': feature_parse.int64_list_feature(difficult_obj),
        'image/object/truncated': feature_parse.float_list_feature(
            annotations['truncated'])
    }))

    return example

十一、案例:KITTI人、车检测案例-训练、检测
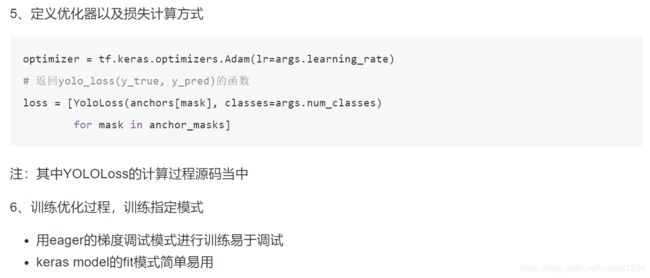
1.训练过程实现

import logging
import tensorflow as tf
import numpy as np
import cv2
import sys
import argparse
import os
os.environ["TF_CPP_MIN_LOG_LEVEL"] = "2"

from tensorflow.keras.callbacks import (
    ReduceLROnPlateau,
    EarlyStopping,
    ModelCheckpoint,
    TensorBoard
)
from yolov3_tf2.models import (
    YoloV3, YoloV3Tiny, YoloLoss,
    yolo_anchors, yolo_anchor_masks,
    yolo_tiny_anchors, yolo_tiny_anchor_masks
)
from yolov3_tf2.utils import freeze_all
import yolov3_tf2.dataset as dataset

parser = argparse.ArgumentParser()
parser.add_argument('--dataset', type=str, default='./data/kitti_tfrecords/train.tfrecord',
                    help='训练数据集路径')
parser.add_argument('--val_dataset', type=str, default='./data/kitti_tfrecords/val.tfrecord',
                    help='验证集目录')
parser.add_argument('--tiny', type=bool, default=False, help='加载的模型类型yolov3 or yolov3-tiny')
parser.add_argument('--weights', type=str, default='./checkpoints/yolov3_train_1.tf',
                    help='模型预训练权重路径')
parser.add_argument('--classes', type=str, default='./data/kitti.names',
                    help='类别文件路径')
parser.add_argument('--mode', type=str, default='fit', choices=['fit', 'eager_tf'],
                    help='fit: model.fit模式, eager_tf: 自定义GradientTape模式')
parser.add_argument('--transfer', type=str, default='none', choices=['none', 'darknet',
                                                                     'no_output', 'frozen',
                                                                     'fine_tune'],
                    help='none: 全部进行训练'
                         '迁移学习并冻结所有, fine_tune: 迁移并只冻结darknet')
parser.add_argument('--size', type=int, default=416,
                    help='图片大小')
parser.add_argument('--epochs', type=int, default=2,
                    help='迭代次数')
parser.add_argument('--batch_size', type=int, default=8,
                    help='每批次大小')
parser.add_argument('--learning_rate', type=float, default=1e-3,
                    help='学习率')
parser.add_argument('--num_classes', type=int, default=6,
                    help='类别数量')


# 2、获取传入参数的训练数据
if args.dataset:
    train_dataset = dataset.load_tfrecord_dataset(
        args.dataset, args.classes)
train_dataset = train_dataset.shuffle(buffer_size=1024)
train_dataset = train_dataset.batch(args.batch_size)
train_dataset = train_dataset.map(lambda x, y: (
    dataset.transform_images(x, args.size),
    dataset.transform_targets(y, anchors, anchor_masks, 6)))
train_dataset = train_dataset.prefetch(
    buffer_size=tf.data.experimental.AUTOTUNE)

# 3、获取传入参数的验证集数据
if args.val_dataset:
    val_dataset = dataset.load_tfrecord_dataset(
        args.val_dataset, args.classes)
val_dataset = val_dataset.batch(args.batch_size)
val_dataset = val_dataset.map(lambda x, y: (
    dataset.transform_images(x, args.size),
    dataset.transform_targets(y, anchors, anchor_masks, 6)))

# 4、判断是否进行迁移学习
if args.transfer != 'none':
    # 加载与训练模型'./data/yolov3.weights'
    model.load_weights(args.weights)
    if args.transfer == 'fine_tune':
        # 冻结darknet
        darknet = model.get_layer('yolo_darknet')
        freeze_all(darknet)
    elif args.mode == 'frozen':
        # 冻结所有层
        freeze_all(model)
    else:
        # 重置网络后端结构
        if args.tiny:
            init_model = YoloV3Tiny(
                args.size, training=True, classes=args.num_classes)
        else:
            init_model = YoloV3(
                args.size, training=True, classes=args.num_classes)

        # 如果迁移指的是darknet
        if args.transfer == 'darknet':
            # 获取网络的权重
            for l in model.layers:
                if l.name != 'yolo_darknet' and l.name.startswith('yolo_'):
                    l.set_weights(init_model.get_layer(
                        l.name).get_weights())
                else:
                    freeze_all(l)
        elif args.transfer == 'no_output':
            for l in model.layers:
                if l.name.startswith('yolo_output'):
                    l.set_weights(init_model.get_layer(
                        l.name).get_weights())
                else:
                    freeze_all(l)

# 需要从模型文件中导入utils中的freeze_all函数
def freeze_all(model, frozen=True):
    model.trainable = not frozen
    if isinstance(model, tf.keras.Model):
        for l in model.layers:
            freeze_all(l, frozen)
if args.mode == 'eager_tf':
    # 1、定义评估方式
    avg_loss = tf.keras.metrics.Mean('loss', dtype=tf.float32)
    avg_val_loss = tf.keras.metrics.Mean('val_loss', dtype=tf.float32)

    # 2、迭代优化
    for epoch in range(1, args.epochs + 1):
        for batch, (images, labels) in enumerate(train_dataset):
            with tf.GradientTape() as tape:
                # 1、计算模型输出和损失
                outputs = model(images, training=True)
                regularization_loss = tf.reduce_sum(model.losses)
                pred_loss = []
                for output, label, loss_fn in zip(outputs, labels, loss):
                    # 根据输出和标签计算出损失
                    pred_loss.append(loss_fn(label, output))

                # 计算总损失 = 平均损失 + regularization_loss
                total_loss = tf.reduce_sum(pred_loss) + regularization_loss

            # 计算梯度以及更新梯度
            grads = tape.gradient(total_loss, model.trainable_variables)
            optimizer.apply_gradients(
                zip(grads, model.trainable_variables))

            # 打印日志
            logging.info("{}_train_{}, {}, {}".format(
                epoch, batch, total_loss.numpy(),
                list(map(lambda x: np.sum(x.numpy()), pred_loss))))
            avg_loss.update_state(total_loss)

        # 验证数据集验证输出计算
        for batch, (images, labels) in enumerate(val_dataset):
            outputs = model(images)
            # 求损失
            regularization_loss = tf.reduce_sum(model.losses)
            pred_loss = []
            # 输出结果和标签计算损失
            for output, label, loss_fn in zip(outputs, labels, loss):
                pred_loss.append(loss_fn(label, output))
            total_loss = tf.reduce_sum(pred_loss) + regularization_loss

            # 打印总损失
            logging.info("{}_val_{}, {}, {}".format(
                epoch, batch, total_loss.numpy(),
                list(map(lambda x: np.sum(x.numpy()), pred_loss))))
            avg_val_loss.update_state(total_loss)

        logging.info("{}, train: {}, val: {}".format(
            epoch,
            avg_loss.result().numpy(),
            avg_val_loss.result().numpy()))
        # 保存模型位置
        avg_loss.reset_states()
        avg_val_loss.reset_states()
        model.save_weights(
            'checkpoints/yolov3_train_{}.tf'.format(epoch))
else:
    # 指定相关回调函数,自定义需求,对于检测来讲不需要太多的优化算法方式
    model.compile(optimizer=optimizer, loss=loss)

    callbacks = [
      EarlyStopping(patience=3, verbose=1),
      ModelCheckpoint('checkpoints/yolov3_train_{epoch}.tf',
                      verbose=1, save_weights_only=True),
      TensorBoard(log_dir='logs')
    ]

      history = model.fit(train_dataset,
                          epochs=args.epochs,
                          callbacks=callbacks,
                          validation_data=val_dataset)
2.测试过程实现

import time
import logging
import cv2
import numpy as np
import tensorflow as tf
import os
os.environ["TF_CPP_MIN_LOG_LEVEL"] = "2"

from yolov3_tf2.models import (
    YoloV3, YoloV3Tiny
)
from yolov3_tf2.dataset import transform_images
from yolov3_tf2.utils import draw_outputs
import argparse
import sys

parser = argparse.ArgumentParser()
parser.add_argument('--classes', type=str, default='./data/kitti.names',
                    help='类别配置路径')
parser.add_argument('--weights', type=str, default='./checkpoints/yolov3_train_1.tf',
                    help='训练好的模型位置')
parser.add_argument('--tiny', type=bool, default=False, help='加载的模型类型yolov3 or yolov3-tiny')
parser.add_argument('--size', type=int, default=416,
                    help='图片大小')
parser.add_argument('--image', type=str, default='./data/kitti/data_object_image_2/testing/image_2/000008.png',
                    help='输入预测图片的位置')
parser.add_argument('--output', type=str, default='./output.jpg',
                    help='输出图片结果的位置')
parser.add_argument('--num_classes', type=int, default=6,
                    help='总共类别数量')
整体过程实现逻辑:
def main(args):
    # 1、初始化模型并加载权重
    if args.tiny:
        yolo = YoloV3Tiny(classes=args.num_classes)
    else:
        yolo = YoloV3(classes=args.num_classes)

    yolo.load_weights(args.weights)
    logging.info('加载模型权重weights')

    # 加载目标类型
    class_names = [c.strip() for c in open(args.classes).readlines()]

    # 2、加载图片处理图片并使用模型进行预测
    img = tf.image.decode_image(open(args.image, 'rb').read(), channels=3)
    img = tf.expand_dims(img, 0)
    img = transform_images(img, args.size)

    # 记录时间
    t1 = time.time()
    boxes, scores, classes, nums = yolo(img)
    t2 = time.time()
    logging.info('耗时: {}'.format(t2 - t1))

    logging.info('检测结果:')
    print(boxes, scores, classes, nums)
    for i in range(nums[0]):
        logging.info('\t{}, {}, {}'.format(class_names[int(classes[0][i])],
                                           np.array(scores[0][i]),
                                           np.array(boxes[0][i])))
    # 3、显示图片并将图片框画出
    img = cv2.imread(args.image)
    img = draw_outputs(img, (boxes, scores, classes, nums), class_names)
    cv2.imwrite(args.output, img)
    logging.info('output saved to: {}'.format(args.output))


if __name__ == '__main__':
    args = parser.parse_args(sys.argv[1:])
    main(args)


def yolo_nms(outputs, anchors, masks, classes):
    # boxes, conf, type
    b, c, t = [], [], []

    for o in outputs:
        b.append(tf.reshape(o[0], (tf.shape(o[0])[0], -1, tf.shape(o[0])[-1])))
        c.append(tf.reshape(o[1], (tf.shape(o[1])[0], -1, tf.shape(o[1])[-1])))
        t.append(tf.reshape(o[2], (tf.shape(o[2])[0], -1, tf.shape(o[2])[-1])))

    bbox = tf.concat(b, axis=1)
    confidence = tf.concat(c, axis=1)
    class_probs = tf.concat(t, axis=1)

    scores = confidence * class_probs
    boxes, scores, classes, valid_detections = tf.image.combined_non_max_suppression(
        boxes=tf.reshape(bbox, (tf.shape(bbox)[0], -1, 1, 4)),
        scores=tf.reshape(
            scores, (tf.shape(scores)[0], -1, tf.shape(scores)[-1])),
        max_output_size_per_class=100,
        max_total_size=100,
        iou_threshold=0.5,
        score_threshold=0.5
    )

    return boxes, scores, classes, valid_detections