基于BERT的新闻文本分类
2017年Transformer模型横空出世,encoder-decoder的创新效果显著,2018年Google又提出了BERT预训练模型,可谓是大大推动了NLP的进步,关于transformer和BERT的文章网上已经有很多大佬写了,对于transformer不熟悉的同学可以先自学一波,本文主要用BERT结合微调实现一个包含十五个类别的新闻文本分类任务,菜鸟一枚,各位大佬多多指教!
准备工作
模型搭建5分钟,数据处理一小时。机器学习中数据处理的功夫是必不可少的,毕竟,数据决定模型的天花板嘛
我们先将本次要用到的所有库调用出来
import torch
import pandas as pd
import sklearn
from transformers import BertModel,BertTokenizer
import numpy as np
import torch.nn as nn
from sklearn.model_selection import train_test_split
from sklearn.linear_model import LogisticRegression
我们这次用于任务的数据来自新闻短文本数据集,另外,中文NLP数据集是一个可以用来搜索中文NLP数据集的网站,大家可以根据自己的任务需要搜索。
得到的数据集是tsv格式,可以将其转为txt,训练集数据如下:
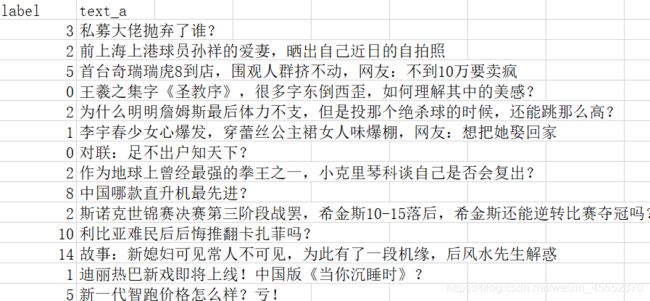
先读取训练集数据train.txt
train_set = pd.read_csv('./data/train.txt',delimiter='\t',error_bad_lines=False)
使用Transformers
Tranformers是HuggingFace社区提供的python第三方库,利用它可以很轻松地加载社区里的预训练模型,覆盖了多种语言和多种规模级别的模型,当然也包括中文的,Transformers官方文档介绍了详细的用法,比较适合新手

model_name = 'hfl/chinese-bert-wwm'
tokenizer = BertTokenizer.from_pretrained(model_name)
model = BertModel.from_pretrained(model_name)
上面的三步是使用transformers的最开始的三步,定义了model_name,tokenizer,model:
model_name:必须是transformers文档中包含的model才可以调用,本文采用的是Chinese-Bert-wwm模型,具体内容见GitHub,采用了Whole Word Masking (wwm),即全词mask,谈到mask,就要解释一下bert模型和bert模型是怎么用来做文本分类任务的。
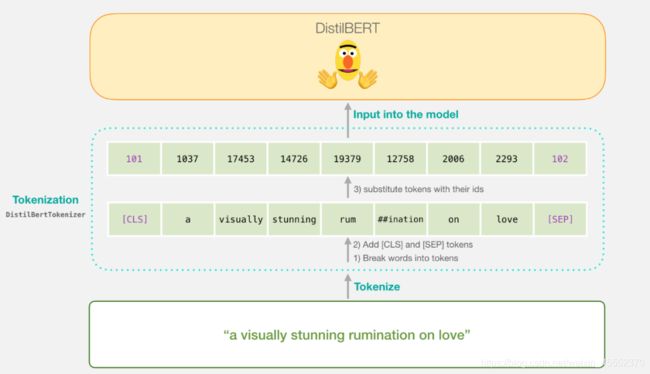
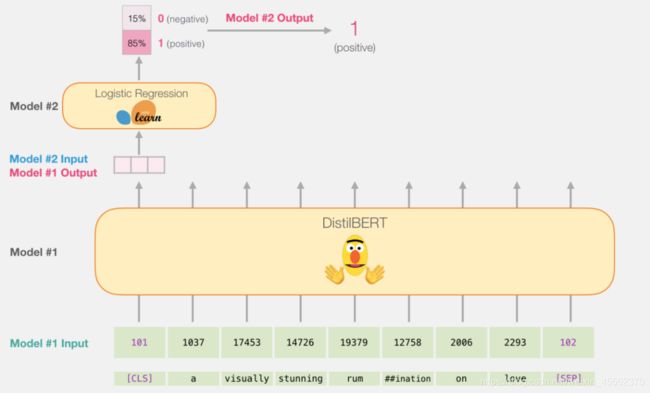
bert模型最擅长的工作本质上是“填空题”和“下一句推测”,由这两个功能可以去完成许多其他下游的任务。下面三张图可以阐明bert的输入输出基本过程:Bert输入为句段,可短可长,输入进模型的句段会经过tokenization,即我们定义tokenizer的目的,按照某种规则将句段分开并加入一些特殊字符,如[CLS],[SEP]等,再将其转化为id,即可送入模型
Bert内部的结构就不细讲了,它本质上是一个encoder,内部最核心的是采用了self-attetion架构,输出结果之后,对于文本分类任务来说,我们只关注[CLS]对应的输出结果即可,将其输出结果再送入一个逻辑回归活着全连接层进行分类输出即可。
定义模型
由于Bert本身的高度封装性和开源社区的再一步封装已经让我们的数据处理和模型微调已经简单了不少了。我们在BERT输出[CLS]后接一个Linear层用于分类,在反向传播时我们不仅会调整Linear的参数,也会调整BERT的参数使其更加适合分类任务,这个称为微调。
#采用bert微调策略,在反向传播时一同调整BERT和线性层的参数,使bert更加适合分类任务
class BertClassfication(nn.Module):
    def __init__(self):
        super(BertClassfication,self).__init__()
        self.model_name = 'hfl/chinese-bert-wwm'
        self.model = BertModel.from_pretrained(self.model_name)
        self.tokenizer = BertTokenizer.from_pretrained(self.model_name)
        self.fc = nn.Linear(768,15)     #768取决于BERT结构,2-layer, 768-hidden, 12-heads, 110M parameters

    def forward(self,x):               #这里的输入是一个list
        batch_tokenized = self.tokenizer.batch_encode_plus(x, add_special_tokens=True,
                                max_length=148, pad_to_max_length=True)      #tokenize、add special token、pad
        input_ids = torch.tensor(batch_tokenized['input_ids'])
        attention_mask = torch.tensor(batch_tokenized['attention_mask'])
        hiden_outputs = self.model(input_ids,attention_mask=attention_mask)
        outputs = hiden_outputs[0][:,0,:]     #[0]表示输出结果部分,[:,0,:]表示[CLS]对应的结果
        output = self.fc(outputs)
        return output
model = BertClassfication()
在BertClassfication同样也是先定义model_name,tokenizer,model。Linear层的输入为768,输出层为15,768是来自于Bert-base隐藏层的数量,15是输出类别。forward中,在送入之前定义的model中时,需要先得到input_ids和attention_mask,input_ids即可直接送入模型的ids,attention_mask是告诉模型哪些词是不用处理的,因为在tokenizer.batch_encode_plus中已经完成了句子长度的一致化,将短句子通过padding补齐到规定长度,所以要告诉模型哪些部分是padding的,哪些部分是关键信息。另外,对于bert的输出,output: torch.Size([3000,66,768]),请注意:我们使用[:,0,:]来提取序列第一个位置的输出向量,因为第一个位置是[CLS],比起其他位置,该向量应该更具有代表性。
数据的整理
#整理数据集
sentences = train_set['text_a'].values
targets = train_set['label'].values
train_features,test_features,train_targets,test_targets = train_test_split(sentences,targets)

batch_size = 64
batch_count = int(len(train_features) / batch_size)
batch_train_inputs, batch_train_targets = [], []
for i in range(batch_count):
    batch_train_inputs.append(train_features[i*batch_size : (i+1)*batch_size])
    batch_train_targets.append(train_targets[i*batch_size : (i+1)*batch_size])
利用sklearn库将训练集和测试集分开,并以batch_size=64处理好数据集
定义训练过程
#定义训练过程
bertclassfication = BertClassfication()
lossfuction = nn.CrossEntropyLoss()
optimizer = torch.optim.Adam(bertclassfication.parameters(),lr=2e-5)
epoch = 5
batch_count = batch_count
print_every_batch = 5
for _ in range(epoch):
    print_avg_loss = 0
    for i in range(batch_count):
        inputs = batch_train_inputs[i]
        targets = torch.tensor(batch_train_targets[i])
        optimizer.zero_grad()
        outputs = bertclassfication(inputs)
        loss = lossfuction(outputs,targets)
        loss.backward()
        optimizer.step()

        print_avg_loss += loss.item()
        if i % print_every_batch == (print_every_batch-1):
            print("Batch: %d, Loss: %.4f" % ((i+1), print_avg_loss/print_every_batch))
            print_avg_loss = 0
训练过程的代码不用过多解释,套路性较强,每逢5个batch打印出平均准确率,注意这里的loss的反向传播是对应于全连接层和BERT模型的,因此计算量其实不小,同时,在送入模型前,将数据转为方便处理的torch.tensor类型。
一开始在自己的笔记本上训练起来发现十分缓慢,后面将模型迁移到大厂的GPU上花了20大洋才完成训练(主要是配置环境和解决小bug浪费时间),GPU进行微调很快,五分钟之内训练完,到了第4个epoch时基本上loss已经是0.05级别了。
验证
微调结束后,看loss降低速度停止了,便开始对模型进行验证
#验证
hit = 0
total = len(test_features)
for i in range(total):
    outputs = model([test_features[i]])
    _,predict = torch.max(outputs,1)
    if predict==test_targets[i]:
        hit+=1
print('准确率为%.4f'%(hit/len(test_features)))
torch.max(outputs,1)选取outputs每行最大值,返回其值和其index,而这个index正是0-14之间,也就是模型给出的预测类别,由此去验证集上测试,多次验证最低准确率为84%,最高准确率为86%。感兴趣的可以自己再调调超参数,有更好的效果可以给我留言交流
效果呈现
模型训练完事之后,由于原数据集的label只有数字,没有中文注释,于是我自己人工注释了0-14这15个数字对应的类别
transform_dict = {0:'文学',1:'娱乐资讯',2:'体育',3:'财经',4:'房产与住宅',5:'汽车',6:'教育',
                  7:'科技与互联网',8:'军事',9:'旅游',10:'国际新闻与时政',11:'股票',12:'三农',
                  13:'电子竞技',14:'小说、故事与轶闻趣事' }
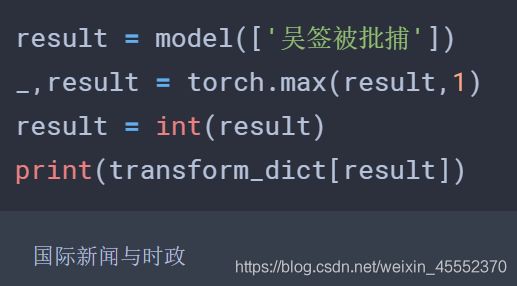
只需将模型的输出数字通过这个字典转换一下即可输出对应的类别了,效果如下:
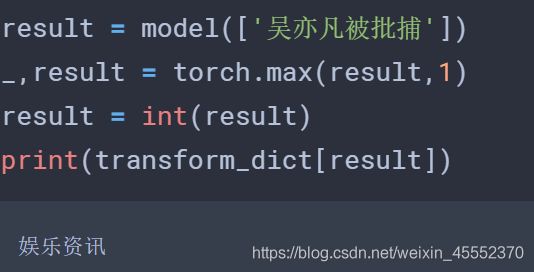
换成吴签就不行了,看来还是不够智能哈。
菜鸡一枚,很多地方没有讲清,各位大佬有啥指教或者更优的trick,希望在评论区多交流哈
参考链接
https://blog.csdn.net/a553181867/article/details/105389757
https://cloud.tencent.com/developer/article/1555590

