使用matplotlib绘制高级图表8
1、绘制等高线图
使用contour()和contourf()函数绘制和填充等高线图
import numpy as np
import matplotlib.pyplot as plt
# 计算高度
def calcu_elevation(x1, y1):
    h = (1-x1/2  + x1 ** 5 + y1 ** 3)  * np.exp(-x1** 2 - y1** 2)
    return h
n = 256
x = np.linspace(-2, 2, n)
y = np.linspace(-2, 2, n)
# 利用 meshgrid() 函数生成网格数据
x_grid, y_grid = np.meshgrid(x, y)
fig = plt.figure()
ax = fig.add_subplot(111)
# 绘制等高线
con = ax.contour(x_grid, y_grid, calcu_elevation(x_grid, y_grid), 8, colors='black')
# 填充等高线的颜色
ax.contourf(x_grid, y_grid, calcu_elevation(x_grid, y_grid), 8, alpha=0.75, cmap=plt.cm.copper)
# 为等高线添加文字标签
ax.clabel(con, inline=True, fmt='%1.1f', fontsize=10)
ax.set_xticks([])
ax.set_yticks([])
plt.show()
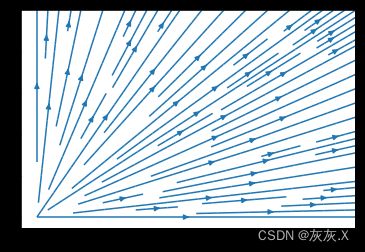
2、使用streamplot()函数绘制矢量场流线图
import numpy as np
import matplotlib.pyplot as plt
y, x = np.mgrid[0:5:50j, 0:5:50j]
u = x
v = y
fig = plt.figure()
ax = fig.add_subplot(111)
# 绘制矢量场流线图
ax.streamplot(x, y, u, v)
plt.show()
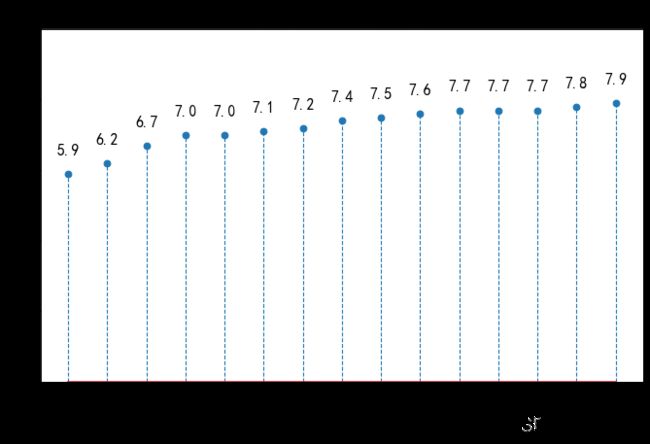
3、使用stem()函数绘制绘制棉棒图
import numpy as np
import matplotlib.pyplot as plt
plt.rcParams['font.sans-serif'] = 'SimHei'
plt.rcParams['axes.unicode_minus'] = False
x = np.arange(1, 16)
y = np.array([5.9, 6.2, 6.7, 7.0, 7.0, 7.1, 7.2, 7.4,
              7.5, 7.6, 7.7, 7.7, 7.7, 7.8, 7.9])
labels = np.array(['宝骏310', '宝马i3', '致享', '焕驰', '力帆530',
                   '派力奥', '悦翔V3', '乐风RV', '奥迪A1', '威驰FS',
                   '夏利N7', '启辰R30', '和悦A13RS', '致炫', '赛欧'])
fig = plt.figure(figsize=(10, 6), dpi= 80)
ax = fig.add_subplot(111)
# 绘制棉棒图
markerline, stemlines, baseline = ax.stem(x, y, linefmt='--',
                                          markerfmt='o', label='TestStem', use_line_collection=True)
# 设置棉棒图线段的属性
plt.setp(stemlines, lw=1)
ax.set_title('不同品牌轿车的燃料消耗量', fontdict={'size':18})
ax.set_ylabel('燃料消耗量(L/km)')
ax.set_xticks(x)
ax.set_xticklabels(labels, rotation=60)
ax.set_ylim([0, 10])
for temp_x, temp_y in zip(x, y):
    ax.text(temp_x, temp_y + 0.5, s='{}'.format(temp_y), ha='center', va='bottom', fontsize=14)
plt.show()
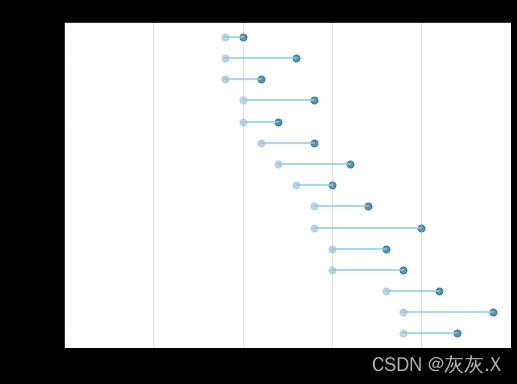
4、通过读取表数据进行绘制哑铃图
import pandas as pd
import matplotlib.pyplot as plt
import matplotlib.lines as mlines
plt.rcParams['font.sans-serif'] = 'SimHei'
plt.rcParams['axes.unicode_minus'] = False
df = pd.read_excel(r"C:\Users\admin\Desktop\health.xlsx")
df.sort_values('pct_2014', inplace=True)
df.reset_index(inplace=True)
df = df.sort_values(by="index")
def newline(p1, p2, color='black'):
    ax = plt.gca()     # 获取当前的绘图区域
    l = mlines.Line2D([p1[0], p2[0]], [p1[1],p2[1]], color='skyblue')
    ax.add_line(l)
    return l
fig, ax = plt.subplots(1, 1, figsize=(8, 6))
# 绘制散点
ax.scatter(y=df['index'], x=df['pct_2013'], s=50, color='#0e668b', alpha=0.7)
ax.scatter(y=df['index'], x=df['pct_2014'], s=50, color='#a3c4dc', alpha=0.7)
# 绘制线条
for i, p1, p2 in zip(df['index'], df['pct_2013'], df['pct_2014' ]):
    newline([p1, i], [p2, i])
ax.set_title("2013年与2014年美国部分城市人口PCT指标的变化率", fontdict={'size':12})
ax.set_xlim(0, .25)
ax.set_xticks([.05, .1, .15, .20])
ax.set_xticklabels(['5%', '10%', '15%', '20%'])
ax.set_xlabel('变化率')
ax.set_yticks(df['index'])
ax.set_yticklabels(df['city'])
ax.grid(alpha=0.5, axis='x')
plt.show()
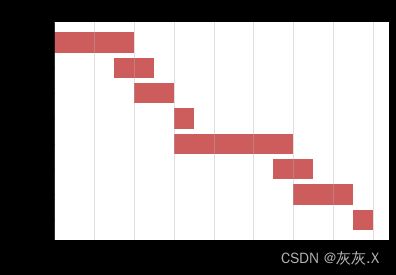
5、使用barh()函数绘制一个甘特图
import numpy as np
import matplotlib.pyplot as plt
ticks = np.array(['报告提交', '数据分析', '数据录入', '实地执行',
                  '问卷确定', '试访', '问卷设计', '项目确定'])
y_data = np.arange(1, 9)
x_data = np.array([0.5, 1.5, 1, 3, 0.5, 1, 1, 2])
fig,ax = plt.subplots(1, 1)
ax.barh(y_data, x_data, tick_label=ticks, left=[7.5, 6, 5.5, 3, 3, 2, 1.5, 0], color='#CD5C5C')
[ax.spines[i].set_visible(False) for i in ['top', 'right']]
ax.set_title("任务甘特图")
ax.set_xlabel("日期")
ax.grid(alpha=0.5, axis='x')
plt.show()
6、绘制人口金字塔
import numpy as np
import pandas as pd
import matplotlib.pyplot as plt
plt.rcParams['font.sans-serif'] = 'SimHei'
plt.rcParams['axes.unicode_minus'] = False
df = pd.read_excel(r'C:\Users\admin\Desktop\population.xlsx')
df_male = df.groupby(by='Gender').get_group('Male')
list_male = df_male['Number'].values.tolist()      #  将ndarray 转换为 list
df_female = df.groupby(by='Gender').get_group('Female')
list_female = df_female['Number'].values.tolist()  # 将ndarray 转换为 list
df_age = df.groupby('AgeGroup').sum()
count = df_age.shape[0]
y = np.arange(1, 11)
labels = []
for i in range(count):
    age = df_age.index[i]
    labels.append(age)
fig = plt.figure()
ax = fig.add_subplot(111)
# 绘制人口金字塔图
ax.barh(y, list_male, tick_label=labels, label=' 男', color='#6699FF')
ax.barh(y, list_female, tick_label=labels, label=' 女', color='#CC6699')
ax.set_ylabel("年龄段(岁)")
ax.set_xticks([-100000, -75000, -50000, -25000, 0, 25000, 50000, 75000, 100000])
ax.set_xticklabels(['100000', '75000', '50000', '25000',
                    '0', '25000', '50000', '75000', '100000'])
ax.set_xlabel("人数(个)")
ax.set_title('某城市人口金字塔')
ax.legend()
plt.show()
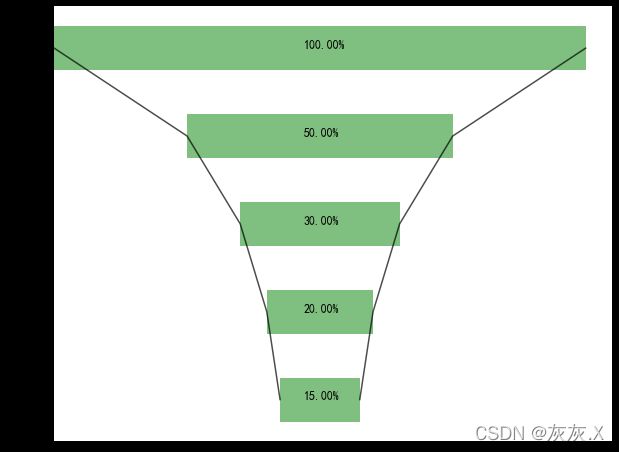
7、使用barh()绘制漏斗图
import numpy as np
import matplotlib.pyplot as plt
plt.rcParams['font.sans-serif'] = 'SimHei'
plt.rcParams['axes.unicode_minus'] = False
num = 5
height = 0.5
x1 = np.array([1000, 500, 300, 200, 150])    # 各环节的客户数量
x2 = np.array((x1.max() - x1) / 2)
x3 = [i +j for i, j in zip(x1, x2)]
x3 = np.array(x3)
y = -np.sort(-np.arange(num))               # 倒转y轴
labels=['访问商品', '加购物车', '生成订单', '支付订单', '完成交易']
fig = plt.figure(figsize=(10, 8))
ax = fig.add_subplot(111)
# 绘制条形图
rects1 = ax.barh(y, x3, height, tick_label=labels, color='g', alpha=0.5)
# 绘制辅助条形图
rects2 = ax.barh(y, x2, height, color='w', alpha=1)
ax.plot(x3, y, 'black', alpha=0.7)
ax.plot(x2, y, 'black', alpha=0.7)
# 添加无指向型注释文本
notes = []
for i in range(0, len(x1)):
    notes.append('%.2f%%'%((x1[i] / x1[0]) * 100))
for rect_one, rect_two, note in zip(rects1, rects2, notes):
    text_x = rect_two.get_width() + (rect_one.get_width() - rect_two.get_width()) / 2 - 30
    text_y = rect_one.get_y() + height / 2
    ax.text(text_x, text_y, note, fontsize=12)
# 隐藏轴脊和刻度
ax.set_xticks([])
for direction in ['top', 'left', 'bottom', 'right']:
    ax.spines[direction].set_color('none')
ax.yaxis.set_ticks_position('none')
plt.show()
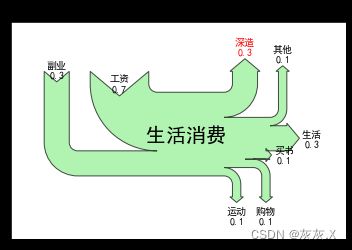
8、绘制桑基图
1、使用sankey()函数创建桑基图
2、使用sankey()中的add()为图形添加数据流量、标签等选项
3、使用sankey()中的finish()方法完成绘制
import matplotlib.pyplot as plt
from matplotlib.sankey import Sankey
plt.rcParams["font.sans-serif"] = ["SimHei"]
plt.rcParams["axes.unicode_minus"] = False
# 消费收入与支出数据
flows = [0.7, 0.3, -0.3, -0.1, -0.3, -0.1, -0.1, -0.1]
# 流的标签列表
labels = ["工资", "副业", "生活", "购物", "深造", "运动", "其他", "买书"]
# 流的方向
orientations = [1, 1, 0, -1, 1, -1, 1, 0]
# 创建 Sankey 类对象
sankey = Sankey()
# 为桑基图添加数据
sankey.add(flows=flows,                     # 收入与支出数据
           labels=labels,                   # 数据标签
           orientations=orientations,       # 标签显示的方向
           color="black",                   # 边缘线条颜色
           fc="lightgreen",                 # 填充颜色
           patchlabel="生活消费 ",          # 图表中心的标签
           alpha=0.7)                       # 透明度
# 桑基图绘制完成的对象
diagrams = sankey.finish()
diagrams[0].texts[4].set_color("r")         # 将下标为 4 的数据标签设为红色
diagrams[0].texts[4].set_weight("bold")     # 将下标为 4 的数据标签设为字体加粗
diagrams[0].text.set_fontsize(20)           # 将中心标签的字体大小设为20
diagrams[0].text.set_fontweight("bold")     # 将中心标签的字体设为加粗
plt.title("日常生活开支的桑基图")
plt.show()
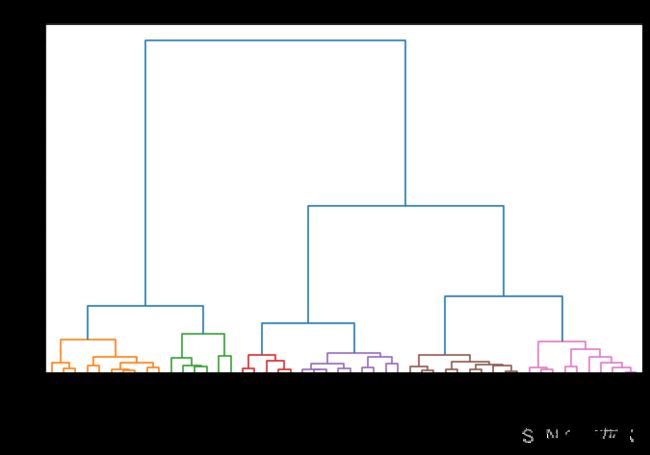
9、(通过读取excel表数据)绘制树状图
1、使用dendrogram()函数绘制树状图
2、linkage()函数将一维压缩距离矩阵或二维观测向量矩阵进行层次聚类或凝聚聚类
import pandas as pd
import matplotlib.pyplot as plt
import scipy.cluster.hierarchy as shc
plt.rcParams['font.sans-serif'] = ['SimHei']
plt.rcParams['axes.unicode_minus'] = False
df = pd.read_excel(r'G:\python数据可视化\10_《Python数据可视化》\源代码\素材\USArrests.xlsx')
plt.figure(figsize=(10, 6), dpi= 80)
plt.title("美国各州犯罪案件的树状图", fontsize=12)
# 绘制树状图
dend = shc.dendrogram(shc.linkage(df[['Murder', 'Assault', 'UrbanPop']], method='ward'),
                      labels=df.State.values, color_threshold=100)
plt.xticks(fontsize=10.5)
plt.ylabel('案例数量(个)')
plt.show()
10、使用matplotlib和pywaffle绘制华夫饼图
import matplotlib.pyplot as plt
from pywaffle import Waffle
plt.rcParams['font.sans-serif'] = 'SimHei'
plt.rcParams['axes.unicode_minus'] = False
# 绘制华夫饼图
plt.figure(FigureClass=Waffle, rows=10, columns=10,
           values=[95, 5],vertical=True, colors=['#20B2AA', '#D3D3D3'],
           title={'label': '电影《少年的你》上座率'},
           legend={'loc': 'upper right', 'labels': ['占座', '空座']}
)
plt.show()

