ICCV2021 | 单目3D目标检测框架GUPNet解析
作者 | Kwong 编辑 | 汽车人
原文链接:https://zhuanlan.zhihu.com/p/545796074
点击下方卡片,关注“自动驾驶之心”公众号
ADAS巨卷干货,即可获取
文章出自于ICCV2021:Geometry Uncertainty Projection Network for Monocular 3D Object Detection[1]。在本文中,笔者将先结合代码分析整个3D检测框架的输入输出流是怎么组织的,然后对文中关键的uncertainty模块给出个人的思考。
GUPNet的Github地址:https://github.com/SuperMHP/GUPNet
原作者@SuperMHP对文章的解读:单目3D物体检测——基于不确定度的几何投影模型
1GUPNet框架输入输出流
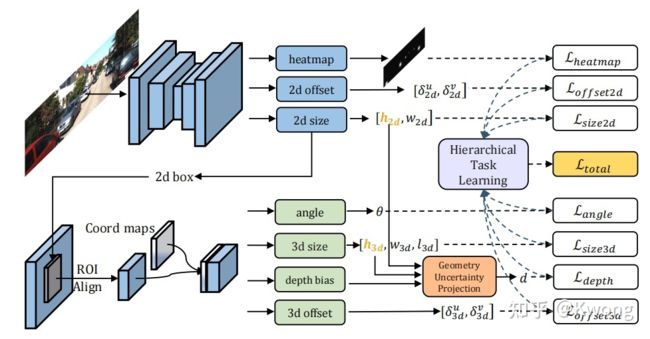
原文中的框架示意图为:
 图1:GUPNet原文框架
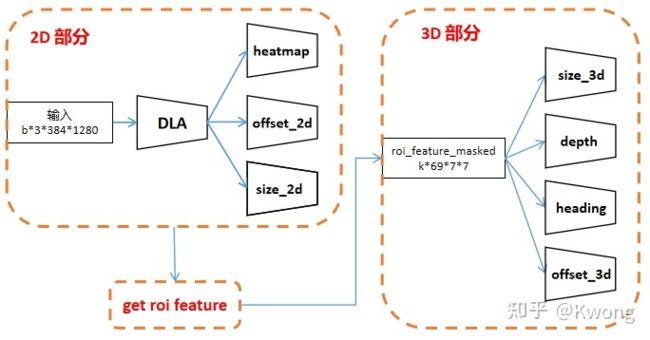
结合源码,我画了一下更详细的框图:
框架整体可分为三个部分:1.基于CenterNet的2D框预测部分用于输出热力图,2d中心点偏移量以及2d框的尺寸;2.提取出ROI的特征;3.利用所提取的ROI特征输入到不同的网络头以获得物体三维信息(尺寸,位置,偏转角度以及物体3d框中心在图像投影点的偏移量)
 图2:GUPNet框架
2D部分
 图3:2D部分的输入输出流
训练目标(self.max_objs是规定的每张图像中出现物体的最大数量,代码中规定为50):
# 2D目标检测 CenterNet所需的标签
heatmap = np.zeros((self.num_classes, features_size[1], features_size[0]), dtype=np.float32) # C * H * W
# 这里跟原始的Objects as points中的有点区别,原centernet是将尺寸和偏移量4个待估计的参数叠加到heatmap的通道中
size_2d = np.zeros((self.max_objs, 2), dtype=np.float32)
offset_2d = np.zeros((self.max_objs, 2), dtype=np.float32)
# 这里跟原始的Objects as points中的有点区别,原centernet是将尺寸和偏移量4个待估计的参数叠加到heatmap的通道中
size_2d = np.zeros((self.max_objs, 2), dtype=np.float32)
offset_2d = np.zeros
((self.max_objs, 2), dtype=np.float32)
在输入端,图像将缩放到384×1280的大小,然后经过DLA的backbone获得96×320,通道数为64的特征图。随后经过三个简单的网络头输出2d信息:
self.heatmap = nn.Sequential(nn.Conv2d(channels[self.first_level], self.head_conv, kernel_size=3, padding=1, bias=True),
                            nn.ReLU(inplace=True),
                            nn.Conv2d(self.head_conv, 3, kernel_size=1, stride=1, padding=0, bias=True))
self.offset_2d = nn.Sequential(nn.Conv2d(channels[self.first_level], self.head_conv, kernel_size=3, padding=1, bias=True),
                            nn.ReLU(inplace=True),
                            nn.Conv2d(self.head_conv, 2, kernel_size=1, stride=1, padding=0, bias=True))
self.size_2d = nn.Sequential(nn.Conv2d(channels[self.first_level], self.head_conv, kernel_size=3, padding=1, bias=True),
                            nn.ReLU(inplace=True),
                            nn.Conv2d(self.head_conv, 2, kernel_size=1, stride=1, padding=0, bias=True))
其中heatmap的三个通道对应kitti中'Pedestrian', 'Car', 'Cyclist'三个类别。对于offset_2d,其估计的是物体3dbox中心在图像中投影坐标指向2dbox中心的偏移量:
# process 3d bbox & get 3d center
center_2d = np.array([(bbox_2d[0] + bbox_2d[2]) / 2, (bbox_2d[1] + bbox_2d[3]) / 2], dtype=np.float32)  # W * H
center_3d = objects[i].pos + [0, -objects[i].h / 2, 0]  # real 3D center in 3D space
center_3d, _ = calib.rect_to_img(center_3d)  # project 3D center to image plane
center_3d = center_3d[0]  # shape adjustment
center_3d = affine_transform(center_3d.reshape(-1), trans)
center_3d /= self.downsample

# generate the center of gaussian heatmap [optional: 3d center or 2d center]
center_heatmap = center_3d.astype(np.int32) if self.use_3d_center else center_2d.astype(np.int32)
if center_heatmap[0] < 0 or center_heatmap[0] >= features_size[0]: continue
if center_heatmap[1] < 0 or center_heatmap[1] >= features_size[1]: continue

# generate the radius of gaussian heatmap
w, h = bbox_2d[2] - bbox_2d[0], bbox_2d[3] - bbox_2d[1]
radius = gaussian_radius((w, h))
radius = max(0, int(radius))

if objects[i].cls_type in ['Van', 'Truck', 'DontCare']:
    draw_umich_gaussian(heatmap[1], center_heatmap, radius)
    continue

cls_id = self.cls2id[objects[i].cls_type]
cls_ids[i] = cls_id
draw_umich_gaussian(heatmap[cls_id], center_heatmap, radius)

# encoding 2d/3d offset & 2d size
indices[i] = center_heatmap[1] * features_size[0] + center_heatmap[0]   # 用于coordmap 每个图片的indices长50(最多50个物体) 每个index是物体中心在特征图中的位置索引(行索引×宽度+列索引)
offset_2d[i] = center_2d - center_heatmap       # 偏移量编码成由3dbox投影到图像上的中心指向2dbox中心的向量
size_2d[i] = 1. * w, 1. * h
get ROI feature
在2D部分获得特征图后,进一步提取ROI特征以供后面使用。这一步较为复杂,下面将按顺序讲一下这个部分的细节
获得2dbox的中心位置
(1)构造coord_map,尺寸为b×2×96×320,每个位置存储其图像坐标系中的位置信息
BATCH_SIZE,_,HEIGHT,WIDE = feat.size()
device_id = feat.device
coord_map = torch.cat([torch.arange(WIDE).unsqueeze(0).repeat([HEIGHT,1]).unsqueeze(0),         # 类似于meshgrid的坐标图 对于某个位置可以得到它的具体位置信息
                torch.arange(HEIGHT).unsqueeze(-1).repeat([1,WIDE]).unsqueeze(0)],0).unsqueeze(0).repeat([BATCH_SIZE,1,1,1]).type(torch.float).to(device_id)
(2)加上2d偏移量得到2dbox的中心位置
box2d_centre = coord_map + ret['offset_2d']根据size_2d和box2d_center获得box2d_maps(b×5×96×320),其中第1列存储图像idx信息(提示样本来自同一个batch里的第几张图像),后面四列存储2dbox的左上角和右下角坐标
box2d_maps = torch.cat([box2d_centre-ret['size_2d']/2,box2d_centre+ret['size_2d']/2],1)         # 2d box左上角和右下角的坐标 (b, 4, h, w)
box2d_maps = torch.cat([torch.arange(BATCH_SIZE).unsqueeze(-1).unsqueeze(-1).unsqueeze(-1).repeat([1,1,HEIGHT,WIDE]).type(torch.float).to(device_id),box2d_maps],1)     # 往2d maps上加上batch信息 (b, 5, h, w)
根据物体的GT中心点索引inds,获取一个batch里面所有图像中包含的总数为k的物体在GT中心点处的box信息box2d_masked(k×5),从而后面可以根据2dbox提取ROIFeature
(1)首先,我们要获得inds,cls_ids,masks这三个信息:
if mode=='train':   #extract train structure in the train (only) and the val mode
    inds,cls_ids = targets['indices'],targets['cls_ids']    # inds指示object在特征图的哪个位置(按行优先展开后的索引)
    masks = targets['mask_2d']                              # masks shape(n, 50)指示存在的物体是否是关心的(有些太小或者被截断的不关心)
else:    #extract test structure in the test (only) and the val mode
    inds,cls_ids = _topk(_nms(torch.clamp(ret['heatmap'].sigmoid(), min=1e-4, max=1 - 1e-4)), K=K)[1:3] # K=50 ret['heatmap'](b*3*96*320)
    masks = torch.ones(inds.size()).type(torch.uint8).to(device_id)
在训练阶段,其GT初始化为:
cls_ids = np.zeros((self.max_objs), dtype=np.int64)
indices = np.zeros((self.max_objs), dtype=np.int64)
mask_2d = np.zeros((self.max_objs), dtype=np.uint8)
其中cls_ids表示类别标号,indices指示物体的中心点在特征图按行优先展开后的位置索引:
indices[i] = center_heatmap[1] * features_size[0] + center_heatmap[0] # 用于后面的coordmap 每个图片的indices长50(最多50个物体) 物体中心在特征图中的位置索引(行索引×宽度+列索引)mask_2d给出图像中的物体那些是我们所关心的:
#objects[i].trucation <=0.5 and objects[i].occlusion<=2 and (objects[i].box2d[3]-objects[i].box2d[1])>=25:
if objects[i].trucation <=0.5 and objects[i].occlusion<=2:
    mask_2d[i] = 1
在测试阶段,则根据网络输出的heatmap获得同一张图像中有最高2d置信度的前50个潜在物体中心点的位置索引和类别号(预测阶段将所有物体都视为关心的,因此masks的元素均为1)
# Objects as points文中From points to bounding boxes提到的做法
def _nms(heatmap, kernel=3):
    padding = (kernel - 1) // 2
    heatmapmax = nn.functional.max_pool2d(heatmap, (kernel, kernel), stride=1, padding=padding)
    keep = (heatmapmax == heatmap).float()      # 找出比8邻域值高的点作为初筛结果
    return heatmap * keep

def _topk(heatmap, K=50):
    batch, cat, height, width = heatmap.size()

    # batch * cls_ids * 50 找出每一类峰值最高的50个特征点位置作为初筛结果
    topk_scores, topk_inds = torch.topk(heatmap.view(batch, cat, -1), K)

    topk_inds = topk_inds % (height * width)
    topk_ys = (topk_inds / width).int().float()     # topk中心点行索引(y)
    topk_xs = (topk_inds % width).int().float()     # topk中心点列索引(x)

    # batch * 50 找出在三类中峰值最高的50个点作为中心点
    topk_score, topk_ind = torch.topk(topk_scores.view(batch, -1), K)
    topk_cls_ids = (topk_ind / K).int()     # 刚刚找出的这些点分别属于哪一个类别
    topk_inds = _gather_feat(topk_inds.view(batch, -1, 1), topk_ind).view(batch, K)     # top50个中心点索引
    topk_ys = _gather_feat(topk_ys.view(batch, -1, 1), topk_ind).view(batch, K)         # top50个中心点y(行)坐标
    topk_xs = _gather_feat(topk_xs.view(batch, -1, 1), topk_ind).view(batch, K)         # top50个中心点x(列)坐标

    return topk_score, topk_inds, topk_cls_ids, topk_xs, topk_ys

def _gather_feat(feat, ind, mask=None):
    '''
    Args:
        feat: tensor shaped in B * (H*W) * C
        ind:  tensor shaped in B * K (default: 50)
        mask: tensor shaped in B * K (default: 50)

    Returns: tensor shaped in B * K or B * sum(mask)
    '''
    dim  = feat.size(2)  # get channel dim
    ind  = ind.unsqueeze(2).expand(ind.size(0), ind.size(1), dim)  # B*len(ind) --> B*len(ind)*1 --> B*len(ind)*C
    feat = feat.gather(1, ind)  # B*(HW)*C ---> B*K*C       只包含感兴趣物体的特征
    if mask is not None:
        mask = mask.unsqueeze(2).expand_as(feat)  # B*50 ---> B*K*1 --> B*K*C
        feat = feat[mask]
        feat = feat.view(-1, dim)
    return feat
(2)获取一个batch中所有感兴趣物体的2dbox信息(用于提取ROI特征):
#get box2d of each roi region 获得一个batch里所有感兴趣物体的box2d信息 shape(all_obj_in_all_batchs, 5) 将图像索引(batch中的第几幅图像)信息cat到原特征图上的原因,为了能够区分第i个box2d是属于哪个图像里面的
box2d_masked = extract_input_from_tensor(box2d_maps,inds,mask)
其中调用的函数为:
def extract_input_from_tensor(input, ind, mask):
    input = _transpose_and_gather_feat(input, ind)  # B*C*H*W --> B*K*C  input(n,5,h,w)cat了batch信息的box左上角右下角的map 函数最终提取(最多50个)object的2dbox信息
    return input[mask.to(torch.bool)]  # B*K*C --> M * C     提取感兴趣物体的信息

def _transpose_and_gather_feat(feat, ind):
    '''
    Args:
        feat: feature maps shaped in B * C * H * W
        ind: indices tensor shaped in B * K
    Returns:
    '''
    feat = feat.permute(0, 2, 3, 1).contiguous()   # B * C * H * W ---> B * H * W * C
    feat = feat.view(feat.size(0), -1, feat.size(3))   # B * H * W * C ---> B * (H*W) * C
    feat = _gather_feat(feat, ind)     # B * len(ind) * C
    return feat
根据box2d_masked,进行RoiAlign,得到特征图roi_feature_masked(k×64×7×7)
import torchvision.ops.roi_align as roi_align
#get roi feature    shape (num_objects, feature_channel(64), 7, 7)
roi_feature_masked = roi_align(feat,box2d_masked,[7,7])
获得归一化的坐标图coord_maps(k×2×7×7)为特征图提供位置信息
将box2d_masked的坐标缩放回原图像尺寸的尺度,根据相机标定信息,用x=uz/f(z=1)得到归一化的box在0号相机坐标系的位置信息coords_in_camera_coord(k,5),然后得到归一化的坐标图为特征图提供位置信息coord_maps(k×2×7×7)
(1)获取图像的坐标范围(经过数据增强后坐标下限未必是0):
# image loading
img = self.get_image(index)
img_size = np.array(img.size)

# data augmentation for image
center = np.array(img_size) / 2
crop_size = img_size

if np.random.random() < self.random_crop:
    # 随机裁剪图像
    random_crop_flag = True
    crop_size = img_size * np.clip(np.random.randn()*self.scale + 1, 1 - self.scale, 1 + self.scale)
    center[0] += img_size[0] * np.clip(np.random.randn() * self.shift, -2 * self.shift, 2 * self.shift)
    center[1] += img_size[1] * np.clip(np.random.randn() * self.shift, -2 * self.shift, 2 * self.shift)

# add affine transformation for 2d images.
trans, trans_inv = get_affine_transform(center, crop_size, 0, self.resolution, inv=1)   # 得到原图像到修改后图像(尺寸变)的仿射矩阵trans
img = img.transform(tuple(self.resolution.tolist()),
                    method=Image.AFFINE,
                    data=tuple(trans_inv.reshape(-1).tolist()),     # 这里用trans_inv是因为PIL这个库逻辑 需要用逆的变换矩阵输入来做正变换
                    resample=Image.BILINEAR)
coord_range = np.array([center-crop_size/2,center+crop_size/2]).astype(np.float32)       # 原尺寸下坐标范围 (有些经裁剪后的样本坐标范围下限会出现负数)
(2)然后获得每一个ROI所在图像对应的坐标范围:
#get coord range of each roi
coord_ranges_mask2d = coord_ranges[box2d_masked[:,0].long()]
(3)将box2d_masked的坐标缩放回原图像尺寸的尺度
BATCH_SIZE,_,HEIGHT,WIDE = feat.size()
num_masked_bin = mask.sum()     # 所有batch感兴趣物体的总数

#map box2d coordinate from feature map size domain to original image size domain
box2d_masked = torch.cat([box2d_masked[:,0:1],
            box2d_masked[:,1:2]/WIDE  *(coord_ranges_mask2d[:,1,0:1]-coord_ranges_mask2d[:,0,0:1])+coord_ranges_mask2d[:,0,0:1],
            box2d_masked[:,2:3]/HEIGHT*(coord_ranges_mask2d[:,1,1:2]-coord_ranges_mask2d[:,0,1:2])+coord_ranges_mask2d[:,0,1:2],
            box2d_masked[:,3:4]/WIDE  *(coord_ranges_mask2d[:,1,0:1]-coord_ranges_mask2d[:,0,0:1])+coord_ranges_mask2d[:,0,0:1],
            box2d_masked[:,4:5]/HEIGHT*(coord_ranges_mask2d[:,1,1:2]-coord_ranges_mask2d[:,0,1:2])+coord_ranges_mask2d[:,0,1:2]],1)
(4)根据相机标定信息,利用 的投影关系得到每个2dbox在0号相机坐标系的位置信息coords_in_camera_coord(k×5),我认为归一化应该是体现在
roi_calibs = calibs[box2d_masked[:,0].long()]
#project the coordinate in the normal image to the camera coord by calibs
coords_in_camera_coord = torch.cat([self.project2rect(roi_calibs,torch.cat([box2d_masked[:,1:3],torch.ones([num_masked_bin,1]).to(device_id)],-1))[:,:2],
                                self.project2rect(roi_calibs,torch.cat([box2d_masked[:,3:5],torch.ones([num_masked_bin,1]).to(device_id)],-1))[:,:2]],-1)
coords_in_camera_coord = torch.cat([box2d_masked[:,0:1],coords_in_camera_coord],-1)
(5)特征图大小为7×7,其左上角与右下角的位置与2dbox的左上角和右下角相对应,在(4)的coords_in_camera_coord中我们只有特征图(0,0)和(6,6)位置的归一化坐标信息,为了获取其余位置的归一化坐标,进行均值插值以获得归一化的坐标图:
#generate coord maps Roi图没有位置信息 因此加入coord map shape(num_objs, 2, 7, 7)
coord_maps = torch.cat([torch.cat([coords_in_camera_coord[:,1:2]+i*(coords_in_camera_coord[:,3:4]-coords_in_camera_coord[:,1:2])/6 for i in range(7)],-1).unsqueeze(1).repeat([1,7,1]).unsqueeze(1),
                    torch.cat([coords_in_camera_coord[:,2:3]+i*(coords_in_camera_coord[:,4:5]-coords_in_camera_coord[:,2:3])/6 for i in range(7)],-1).unsqueeze(2).repeat([1,1,7]).unsqueeze(1)],1)
对物体类别信息进行编码获得cls_hots(k×3)
#concatenate coord maps with feature maps in the channel dim 类别编码信息 shape(num_objs, 3)
cls_hots = torch.zeros(num_masked_bin,self.cls_num).to(device_id)
cls_hots[torch.arange(num_masked_bin).to(device_id),cls_ids[mask.to(torch.bool)].long()] = 1.0
将归一化坐标图与进行广播后的类别编码图与原特征图进行通道连接,获得信息更加丰富的特征图
# shapes                        (num_objs,64,7,7)(num_objs,2,7,7)[(num_objs,3) boardcast to (num_objs,3,7,7)]  final(num_objs,69,7,7)
roi_feature_masked = torch.cat([roi_feature_masked,coord_maps,cls_hots.unsqueeze(-1).unsqueeze(-1).repeat([1,1,7,7])],1)
至此ROI特征提取完毕,可以输入到下一部分的3D网络获得物体三维信息了
3D部分
3D部分的输出是GUPNet较为复杂的一部分,我整理了一下以框图的形式进行展示(里面符号及其上下标的命名依据代码的变量名组织):
 图4:3D部分的输入输出流
为了方便对照代码变量与原文公式间的对应关系,这里列一个表格:
 表1:代码-示意图-论文变量对应
每个分支的结构为:
self.depth = nn.Sequential(nn.Conv2d(channels[self.first_level]+2+self.cls_num, self.head_conv, kernel_size=3, padding=1, bias=True),
                                nn.BatchNorm2d(self.head_conv),
                                nn.ReLU(inplace=True),nn.AdaptiveAvgPool2d(1),
                                nn.Conv2d(self.head_conv, 2, kernel_size=1, stride=1, padding=0, bias=True))
self.offset_3d = nn.Sequential(nn.Conv2d(channels[self.first_level]+2+self.cls_num, self.head_conv, kernel_size=3, padding=1, bias=True),
                                nn.BatchNorm2d(self.head_conv),
                                nn.ReLU(inplace=True),nn.AdaptiveAvgPool2d(1),
                                nn.Conv2d(self.head_conv, 2, kernel_size=1, stride=1, padding=0, bias=True))
self.size_3d = nn.Sequential(nn.Conv2d(channels[self.first_level]+2+self.cls_num, self.head_conv, kernel_size=3, padding=1, bias=True),
                                nn.BatchNorm2d(self.head_conv),
                                nn.ReLU(inplace=True),nn.AdaptiveAvgPool2d(1),
                                nn.Conv2d(self.head_conv, 4, kernel_size=1, stride=1, padding=0, bias=True))
self.heading = nn.Sequential(nn.Conv2d(channels[self.first_level]+2+self.cls_num, self.head_conv, kernel_size=3, padding=1, bias=True),
                                nn.BatchNorm2d(self.head_conv),
                                nn.ReLU(inplace=True),nn.AdaptiveAvgPool2d(1),
                                nn.Conv2d(self.head_conv, 24, kernel_size=1, stride=1, padding=0, bias=True))
heading & offset_3d分支
我们先从简单的分支开始分析,roi_feature经过heading分支后输出的是物体偏转角信息,其中12个分量是偏转角归类为某一个角度范围的概率(角度范围分类),另外12个分量对应不同范围上的残差(更精细的回归)。利用最大概率的类别加上其对应的残差可获得物体的偏转角。经过offset_3d分支后输出的是3d中心在图像平面上的偏移量,利用heatmap中估计得到的物体中心加上该偏移量得到3dbox中心在图像平面上的投影位置,利用相机标定信息可得到其在3d空间中的xy坐标,加上估计出来的物体深度z,便可得到物体的3d位置。
size_3d分支
该分支的输出有4个值,前3个值是物体三维尺寸的偏移量,物体的最终尺寸将由对应类别物体的平均尺寸加上偏移量得到物体的最终尺寸(其中包括物体的3d高度 ):
size3d_offset = self.size_3d(roi_feature_masked)[:,:,0,0]
h3d_log_std = size3d_offset[:,3:4]      # log形式的3d高度不确定度
size3d_offset = size3d_offset[:,:3]
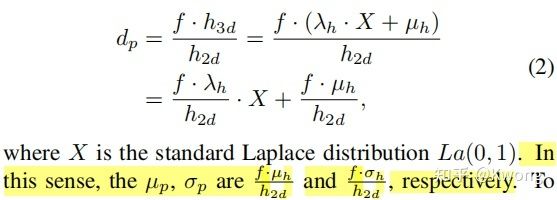
size_3d = (self.mean_size[cls_ids[mask.to(torch.bool)].long()]+size3d_offset) # 最终的size是通过平均尺寸加上偏移量来确定的depth_geo = size_3d[:,0]/box2d_height.squeeze()*roi_calibs[:,0,0] # 通过几何投影得到的物体景深第四个输出的值是:![]() 即物体3dbox高度的不确定度的log值,同由摄像机模型(或由论文中式2及其下面的解释)
即物体3dbox高度的不确定度的log值,同由摄像机模型(或由论文中式2及其下面的解释)
 图6:论文式2
我们可以得出物体景深的不确定度的log形式为:
depth_geo_log_std = (h3d_log_std.squeeze()+2*(roi_calibs[:,0,0].log()-box2d_height.log())).unsqueeze(-1)depth分支
该分支的输出 有两个值 和 ,其用于估计论文中式(3)中,可学习的用于修正的拉普拉斯分布 的参数,变量对应关系如表1所示:
 图7:论文式3
depth_net_out = self.depth(roi_feature_masked)[:,:,0,0]
depth_net_log_std = torch.logsumexp(torch.cat([depth_net_out[:,1:2],depth_geo_log_std],-1),-1,keepdim=True)
在推理阶段,估计出的方差(不确定度)通过负指数函数形成单调递减的映射,这样高方差的样本会有低置信度,然后结合heatmap中获得的2d置信度获得样本最终的置信度,代码中设置了阈值为0.2,只有置信度高于0.2的样本才会被认为是有效样本,置信度太低的样本会被筛走。

depth_score = (-(0.5*outputs['depth'].view(batch,K,-1)[:,:,1:2]).exp()).exp()       # 网络depth_net_out的第二项深度的不确定度 根据paper式(5)获得p_depth(depth Uncertainty-Confidence)
scores_2d = scores_2d.view(batch, K, 1)
scores_3d = scores_2d*depth_score           # paper式(6) p_3d=p_(3d|2d)*p_2d=p_depth*p_2d
2Uncertainty模块
文章[2][3][4]都是对深度学习、计算机视觉中不确定性的经典研究,本节以文[4]的2.4节作为参考,对GUPNet中的不确定性给出我的一些思考。
对不确定性建模,量化的意义在于去理解深度模型不知道的东西,比如输入数据的噪声以及模型参数对输出结果的影响。在贝叶斯建模中,主要的不确定性有两种,分别是偶然不确定性(Aleatoricuncertainty)和认知不确定性(epistemic uncertainty)。其中,偶然不确定性捕捉的是观测中的固有噪声比如传感器噪声和因运动所造成的噪声等等,认知不确定性解释了模型参数中的不确定性(比如一个猫狗分类模型,输入狮子图像(从没见过的分布中采样的样本)给网络,网络经过softmax后可能以高分数将其分类为猫,但结果的不确定性是很高的),只要给模型足够多数据,认知不确定性是可以解释得通的。
偶然不确定性可以分为同方差不确定性(homoscedasticuncertainty,对不同的输入数据,输出方差相同)和异方差不确定性(heteroscedasticuncertainty,不同的输入对应的输出方差是不同的,有些可能拥有更高的噪声)。异方差不确定性对于计算机视觉应用来说尤其重要,比如在深度回归中,纹理丰富,消失线明显的输入图像可以得到高置信度的预测结果,而若输入图像只有一堵特征很少的墙,输出会有很高的不确定性。
GUPNet建模的是异方差的偶然不确定性,建模方法为在模型的输出中建立一个分布,即假设模型的输出受服从拉普拉斯分布的随机噪声所干扰,这时我们感兴趣的是学习出不同输入与输出噪声方差间的映射关系。异方差回归假设观测噪声随着输入x的变化而变化。
以3dbox高度 的推理为例(后面的景深 推断同理),GUPNet假设网络对其预测的输出服从拉普拉斯分布,即受到拉普拉斯噪声干扰,对于拉普拉斯分布:


我们希望利用极大似然估计法估计出分布的参数,与此同时最大化能够预测得到GT的概率也是我们的目标,因此其似然函数为:

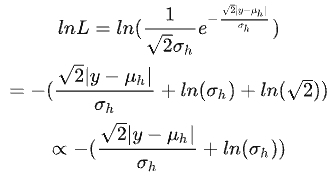
由于是异方差的偶然不确定性,每个样本对应的输出分布是独一无二的,因此与传统的极大似然估计不同,在最大化似然函数时,我们只有一个样本对,因此似然函数可简化为:

而:

我们希望用深度网络从单个样本对上估计出该分布,因此,最大化上式相当于最小化下式(loss),便可导出3dbox高度预测的损失函数:

同理可导出景深预测的损失(笔者水平有限,如若上述的推导或逻辑有问题,恳请指出)。

3参考
[1] Geometry Uncertainty Projection Network for Monocular 3D Object Detection https://openaccess.thecvf.com/content/ICCV2021/html/Lu_Geometry_Uncertainty_Projection_Network_for_Monocular_3D_Object_Detection_ICCV_2021_paper.html
[2] What Uncertainties Do We Need in Bayesian Deep Learning for Computer Vision? https://proceedings.neurips.cc/paper/2017/file/2650d6089a6d640c5e85b2b88265dc2b-Paper.pdf
[3] Uncertainty in Deep Learning https://mlg.eng.cam.ac.uk/yarin/thesis/thesis.pdf
[4] abGeometry and Uncertainty in Deep Learning for Computer Vision https://alexgkendall.com/media/papers/alex_kendall_phd_thesis_compressed.pdf
【自动驾驶之心】全栈技术交流群
自动驾驶之心是首个自动驾驶开发者社区,聚焦目标检测、语义分割、全景分割、实例分割、关键点检测、车道线、目标跟踪、3D感知、多传感器融合、SLAM、高精地图、规划控制、AI模型部署落地等方向;
加入我们:自动驾驶之心技术交流群汇总!
自动驾驶之心【知识星球】
想要了解更多自动驾驶感知(分类、检测、分割、关键点、车道线、3D感知、多传感器融合、目标跟踪)、自动驾驶定位建图(SLAM、高精地图)、自动驾驶规划控制、领域技术方案、AI模型部署落地实战、行业动态、岗位发布,欢迎扫描下方二维码,加入自动驾驶之心知识星球(三天内无条件退款),日常分享论文+代码,这里汇聚行业和学术界大佬,前沿技术方向尽在掌握中,期待交流!
