pytorch从零实现resnet
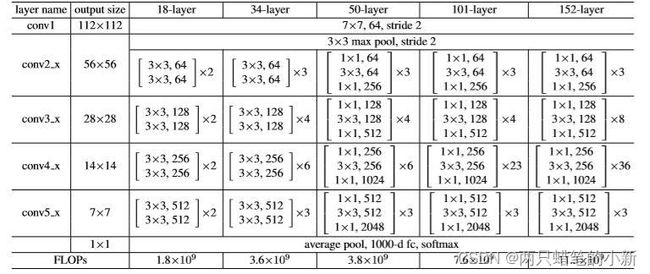
一、resnet的基本结构
观察可以发现,基本模块式是
二、构建BasicBlock
本次以LinkNet34为例子进行网络搭建,首先实现基础模块BasicBlock,基本内容是【CBR】*2
def BasicBlock(in_ch,out_ch,stride):
    return nn.Sequential(
            nn.Conv2d(in_ch, out_ch, 3, stride, padding=1, bias=False),
            nn.BatchNorm2d(out_ch),
            nn.ReLU(inplace=True),  # inplace = True原地操作,节省显存
            nn.Conv2d(out_ch, out_ch, 3, stride=1, padding=1, bias=False),
            nn.BatchNorm2d(out_ch),
            nn.ReLU(inplace=True),
        )
三、残差块的实现,
由于renset残差单元可能连接两个不同维度的特征图,所以要接一个降采样操作self.downsample = shortcut,有没有取决于输入维度与输出维度是否相同。
class ResidualBlock(nn.Module):
    # 实现子module:Residual Block
    def __init__(self, in_ch, out_ch, stride=1, shortcut=None):
        super(ResidualBlock, self).__init__()
        self.BasicBlock = BasicBlock(in_ch,out_ch,stride)
        self.downsample = shortcut

    def forward(self, x):
        out = self.BasicBlock(x)
        residual = x if self.downsample is None else self.downsample(x)
        out += residual
        return out
四、下面构造类class ResNet34(nn.Module)
1.构造类方法1
    def make_layer(self, in_ch, out_ch, block_num, stride=1):
        shortcut = None
        # 判断是否使用降采样 维度增加
        if not in_ch==out_ch:
            shortcut = nn.Sequential(
                nn.Conv2d(in_ch, out_ch, 1, stride, bias=False),  # 1x1卷积用于增加维度;stride=2用于减半size;为简化不考虑偏差
                nn.BatchNorm2d(out_ch))
        layers = []
        layers.append(ResidualBlock(in_ch, out_ch, stride, shortcut))
        for i in range(1, block_num):
            layers.append(ResidualBlock(out_ch, out_ch))  # 后面的几个ResidualBlock,shortcut直接相加
        return nn.Sequential(*layers)
2.构造类初始化代码
class ResNet34(nn.Module):
    # 实现主module:ResNet34
    def __init__(self, num_classes=1):
        super(ResNet34, self).__init__()
        self.init_block = nn.Sequential(
            nn.Conv2d(3, 64, 7, stride=2, padding=3, bias=False),
            nn.BatchNorm2d(64),
            nn.ReLU(inplace=True),
            nn.MaxPool2d(3, 2, 1)
        )
        self.layer1 = self.make_layer(64,   64, 3)
        self.layer2 = self.make_layer(64,  128, 4, stride=2)
        self.layer3 = self.make_layer(128, 256, 6, stride=2)
        self.layer4 = self.make_layer(256, 512, 3, stride=2)
        # 分类用的全连接
        self.avgpool = nn.AdaptiveAvgPool2d((1, 1))
        self.fc = nn.Linear(512, num_classes)
3.构造类前向传播代码
    def forward(self, x):
        x = self.init_block(x)
        x = self.layer1(x)
        x = self.layer2(x)
        x = self.layer3(x)
        x = self.layer4(x)
        x = self.avgpool(x)
        x = torch.flatten(x, 1)
        x = self.fc(x)
        return nn.Sigmoid()(x)  # 1x1,将结果化为(0~1)之间
五、测试性能:
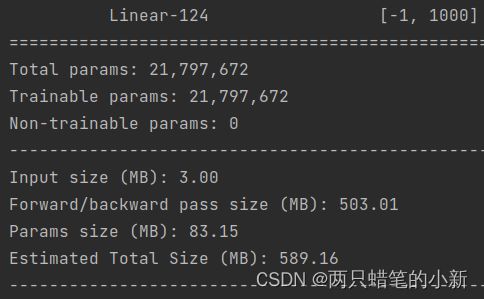
左边使用torchvision中的models库里面的resnet,有图使用自己构建的resnet,两个一模一样,
自己建的可以更清晰的看到内部网络的结构。
import torch.nn as nn
import torch
from torch.nn import functional as F
from torchsummary import summary
from torchvision import models

if __name__ == '__main__':

    resnet = models.resnet34(pretrained=False)
    summary(resnet.cuda(), (3, 512, 512))

    print('***************\n*****************\n')
    # MY RESNET
    resnet_my = ResNet34(num_classes=1000)
    summary(resnet_my.cuda(), (3, 512, 512))
六、如何节约GPU资源,减少使用的显存,
在本次试验中发现一些基本技巧,可以节约梯度求解时的资源占用量,请看这篇文章。
搭建深度学习网络时节约GPU显存的技巧_两只蜡笔的小新的博客-CSDN博客


