第一讲【ROS-SLAM】2D激光雷达 cartographer构建地图
系列文章目录
第一讲【ROS-SLAM】2D激光雷达 cartographer构建地图
第二讲 【cartographer】Ubuntu16.04 kinetic 最新版cartographer安装(2020/11/4更新)
第三讲 【cartographer】 添加功能以从RVIZ为纯本地化模式设置初始姿势
第四讲 【cartographer】纯定位 纯本地化 pure_localization
第五讲【cartographer】在仿真环境中 建图 纯定位
第六讲【cartographer】纯定位参数优化(初级篇)
文章目录
- 系列文章目录
- 前言
- 一、cartographer
-
- 1.cartographer安装
- 2. 测试cartographer是否安装成功
- 3.运行bag包
- 4.保存地图
- 5.测试激光雷达,致敬我们那年所遇到的坑
- 6.激光雷达参数
- 二、你问我都做了啥
-
- 1.修改雷达的发布话题
- 2.读入数据
- 我有一个梦想
- 总结
前言
Cartographer,是Google开源的一个ROS系统支持的2D和3D SLAM(simultaneous localization and mapping)库。
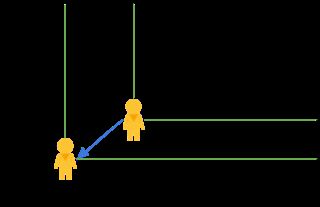
SLAM 算法结合来自多个传感器(比如,LIDAR、IMU 和 摄像头)的数据,同步计算传感器的位置并绘制传感器周围的环境。例如,使用该方法绘制住室的平面图:
拿着一台激光测距机站在房屋中央,在纸上画一 X ;
测量你所在位置到任一墙面的距离;
在墙面所在位置画一条线,并写下 X(你所在位置)与墙面之间的距离;
测量你所在位置到另一墙面的距离并画出代表墙面的直线;
现在,移动到房屋的另一位置;
因为墙面不会移动,你可以测量到上述两个墙面的距离,从而测定你的位置;
SLAM 是众多自动驾驶平台的重要组件,比如自动驾驶汽车、仓库中的自动叉车、扫地机器人、UAVs 等。
在产业界和学术界常见的传感器配置上,Cartographer 能实时建立全局一致的地图。
一、cartographer
1.cartographer安装
- ROS机器人操作系统学习教程
(有钱人专用)
https://download.csdn.net/download/wesigj/12602172
(穷人专用,狗头报名)
https://github.com/sychaichangkun/ROS-Academy-for-Beginners
上面是源码包,其中cartographer_demo文件夹有cartographer的src文件,我们只需要在~目录下mkdir catkin_test,复制src文件夹到此目录中,再安装编译,即可完成。
‘’’
当然,源码包可能会过时,下面是第二种安装方法:
https://blog.csdn.net/m0_37340621/article/details/103759792
## Cartographer安装编译

教程如下:

### 1.install wstool rosdep ninja

~~~sh
apt-get update
sudo apt-get install -y python-wstool python-rosdep ninja-build
~~~
### 2.Create cartographer workspace

由于编译方式的差异,我们另建一个carto的工作空间来单独编译和运行算法.

~~~sh
mkdir  ~/catkin_carto
解压本仓库的src.zip到 ~/catkin_carto/
#安装依赖
rosdep install --from-paths src --ignore-src --rosdistro=${ROS_DISTRO} -y
~~~

漫长的安装后,正确安装则会出现:

All required rosdeps installed successfully

### 3.Build and install

~~~sh
catkin_make_isolated --install --use-ninja
source install_isolated/setup.bash
~~~
2. 测试cartographer是否安装成功
## 仿真xbot运行cartographer建图操作步骤

- 1.启动仿真xbot:

cd ~/catkin_ws   #~/为ROS-Academy-for-Beginners-melodic代码工作空间
source devel/setup.bash
roslaunch robot_sim_demo robot_spawn.launch

- 2.启动Cartographer

cd ~/catkin_carto #~/catkin_carto为Cartographer代码工作空间
source install_isolated/setup.bash
roslaunch cartographer_ros cartographer_demo.launch

- 3.启动机器人控制代码,控制建图

cd ~/catkin_ws   #~/为ROS-Academy-for-Beginners-melodic代码工作空间
source devel/setup.bash
rosrun robot_sim_demo robot_keyboard_teleop.py
3.运行bag包
下载bag包
https://google-cartographer-ros.readthedocs.io/en/latest/data.html#d-cartographer-backpack-deutsches-museum
https://www.ncnynl.com/archives/201810/2783.html
测试bag包
**roslaunch cartographer_ros demo_backpack_2d.launch bag_filename:=**
后面添加bag包的文件地址,也可以直接将bag包拖过来喔
4.保存地图
使用bag包时,保存地图
rosrun map_server map_saver [-f mapname]
示例
rosrun map_server map_saver -f mymap
通常使用第二种方法保存地图
cartographer,手持激光雷达保存地图
# rosservice call /finish_trajectory 0 //停止接受传感器数据
# rosservice call /write_state /home/路径/***.pbstream //生成pbstream文件
# roslaunch cartographer_ros assets_writer_ros_map.launch bag_filenames:=${HOME}/Downloads/2020-04-29-11-25-22.bag pose_graph_filename:=${HOME}/Downloads/2020-04-29-11-25-22.bag.pbstream
!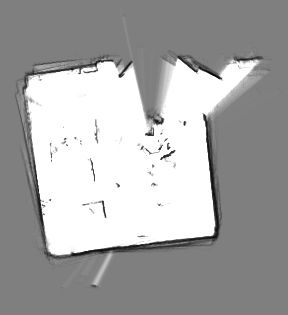
上图是我用雷达搞出来的第一张地图,泪目,蕾姆
5.测试激光雷达,致敬我们那年所遇到的坑
首先,激光雷达我们需要对它进行测试,确保能正常工作。 不同激光雷达有不同的测试方法,我只说 **坑** 你一定会遇到编译不了情况,因为有些msgs文件需要提前编译成头文件- 权限
chmod +x src/pavo_ros/cfg/pavo.cfg - 编译
catkin_make
或catkin_make +… - 添加环境
source devel/setup.bash - 文档
roslaunch pavo_ros pavo_scan_view.launch - 本地IP
10.10.10.100,子网掩码 - 修改参数配置
这部分坑了我一个上下午,我太难了

6.激光雷达参数
6.配置雷达参数
  打开pavo_ros/launch/pavo_scan.launch或pavo_ros/launch/pavo_pcd.launch文件,进行参数配置
  参数说明:
  1.enable_motor 使雷达电机转动或停止,false表示使其停止,true表示使其转动
  2.method 使用的去除雷达拖尾的方法,取值范围为0,1,2,3;0表示不去除拖尾,1表示适中方式,2表示较强去除,3表示强烈去除.default=0.
  3.frame_id 雷达id,default=laser_frame
  4.scan_topic 雷达的topic名称,default=scan
  5.angle_min 最小角度,单位度,取值范围 [-135,135],default=-135,即-135度
  6.angle_max 最大角度,单位度,取值范围 [-135,135],default=135,即135度
  7.range_min 最小距离,单位米,default=0.10
  8.range_max 最大距离,单位米,default=50.0
  9.inverted 是否设置翻转,取值范围true,false . default=false
  10.motor_speed 雷达转速,单位Hz,取值范围为10,15,20,25,30.default=15Hz
  11.merge_coef 多点合并,取值范围为1,2,4,8.default=2,即2点合并为1点
  12.host_ip 主机ip,默认为10.10.10.100.所要绑定的网卡IP地址,即通过PavoView设置的雷达目标上位机地址
  13.host_port 所要绑定的主机端口号,默认为2368.
  14.lidar_ip 所要连接的雷达IP地址,即通过PavoView设置的雷达IP地址,默认为10.10.10.101.
  15.lidar_port 所要连接的雷达端口号,默认为2368.
  16.switch_active_mode 自2.0.0版本开始,不用再设置主机的IP和port.若使用之前版本的雷达,需将此value设为true,并为host_ip和host_port赋值
是真的不多,和善的眼光
三个重要的重要参数
 1. frame_id 雷达id,default=laser_frame
 2. scan_topic 雷达的topic名称,default=scan
 3. remap from="/PavoScanNode/scan" to="/scan" /
网络上很多文章都有,但是我还是在这卡了半天。其实就改这几个就能直接使用雷达画地图了。
demo_revo_lds.launch
<launch>
  <param name="/use_sim_time" value="true" />

  <node name="cartographer_node" pkg="cartographer_ros"
      type="cartographer_node" args="
          -configuration_directory $(find cartographer_ros)/configuration_files
          -configuration_basename revo_lds.lua"
      output="screen">
    <remap from="scan" to="scan" />
  </node>

  <node name="cartographer_occupancy_grid_node" pkg="cartographer_ros"
      type="cartographer_occupancy_grid_node" args="-resolution 0.05" />

  <node name="rviz" pkg="rviz" type="rviz" required="true"
      args="-d $(find cartographer_ros)/configuration_files/demo_2d.rviz" />

</launch>
revo_lds.lua
include "map_builder.lua"
include "trajectory_builder.lua"

options = {
  map_builder = MAP_BUILDER,
  trajectory_builder = TRAJECTORY_BUILDER,
  map_frame = "map",
  tracking_frame = "laser_frame",
  published_frame = "laser_frame",
  odom_frame = "odom",
  provide_odom_frame = true,
  publish_frame_projected_to_2d = false,
  use_odometry = false,
  use_nav_sat = false,
  use_landmarks = false,
  num_laser_scans = 1,
  num_multi_echo_laser_scans = 0,
  num_subdivisions_per_laser_scan = 1,
  num_point_clouds = 0,
  lookup_transform_timeout_sec = 0.2,
  submap_publish_period_sec = 0.3,
  pose_publish_period_sec = 5e-3,
  trajectory_publish_period_sec = 30e-3,
  rangefinder_sampling_ratio = 1.,
  odometry_sampling_ratio = 1.,
  fixed_frame_pose_sampling_ratio = 1.,
  imu_sampling_ratio = 1.,
  landmarks_sampling_ratio = 1.,
}

MAP_BUILDER.use_trajectory_builder_2d = true

TRAJECTORY_BUILDER_2D.submaps.num_range_data = 35
TRAJECTORY_BUILDER_2D.min_range = 0.3
TRAJECTORY_BUILDER_2D.max_range = 8.
TRAJECTORY_BUILDER_2D.missing_data_ray_length = 1.
TRAJECTORY_BUILDER_2D.use_imu_data = false
TRAJECTORY_BUILDER_2D.use_online_correlative_scan_matching = true
TRAJECTORY_BUILDER_2D.real_time_correlative_scan_matcher.linear_search_window = 0.1
TRAJECTORY_BUILDER_2D.real_time_correlative_scan_matcher.translation_delta_cost_weight = 10.
TRAJECTORY_BUILDER_2D.real_time_correlative_scan_matcher.rotation_delta_cost_weight = 1e-1

POSE_GRAPH.optimization_problem.huber_scale = 1e2
POSE_GRAPH.optimize_every_n_nodes = 35
POSE_GRAPH.constraint_builder.min_score = 0.65

return options
pavo_scan.launch
<launch>
  <arg name="enable_motor"   default="true"/>
  <arg name="method"         default="0"/><!--设置使用的去除拖尾的方法,取值范围0,1,2,3;0表示不去除拖尾,1表示适中方式,2表示较强去除,3表示强烈去除,默认不开启去除拖尾-->

  <node name="PavoScanNode"    pkg="pavo_ros"  type="pavo_scan_node"  output="screen">
  <remap from="/PavoScanNode/scan" to="/scan" />
    <param name="frame_id"     type="string"   value="laser_frame"/><!--配置frame_id-->
    <param name="scan_topic"   type="string"   value="scan" /><!--设置激光雷达的topic名称-->
    <param name="angle_min"    type="double"   value="-135.00" /><!--设置最小角度,单位度.取值范围[-135,135].default=-135.0-->
    <param name="angle_max"    type="double"   value="135.00"/><!--设置最大角度,单位度.取值范围[-135,135].default=135.0-->
    <param name="range_min"    type="double"   value="0.10" /><!--设置最小距离,单位米,default=0.10-->
    <param name="range_max"    type="double"   value="50.0" /><!--设置最大距离,单位米,default=20-->
    <param name="inverted"     type="bool"     value="false"/><!--配置雷达是否倒装,倒装true,正装false-->
    <param name="enable_motor" type="bool"     value="$(arg enable_motor)"/><!--设置雷达启动和停止,启动true,停止false-->
    <param name="motor_speed"  type="int"      value="15" /><!--可配10,15,20,25,30Hz,default=15Hz-->
    <param name="merge_coef"   type="int"      value="2" /><!--可配1,2,4,8点合并,default=2,即两点合并为一点-->
    <param name="lidar_ip"     type="string"   value="10.10.10.101" /><!--所要连接的雷达IP地址,即通过PavoView设置的雷达IP地址-->
    <param name="lidar_port"   type="int"      value="2368" /><!--雷达ip默认为10.10.10.101,端口号默认为2368-->
    <param name="method"       type="int"      value="$(arg method)" />
    <param name="switch_active_mode"   type="bool"  value="false"/><!--自2.0.0版本开始,不用再设置主机的IP和port.若使用之前版本,需将此value设为true;并为host_ip和host_port赋值-->
    <!--param name="host_ip"      type="string"   value="10.10.10.100" /--><!--所要绑定的网卡IP地址,即通过PavoView设置的雷达目标上位机地址-->
    <!--param name="host_port"    type="int"      value="2368" /--><!--所要绑定的端口-->
  </node>
</launch>
二、你问我都做了啥
你猜
好了不皮了,和善的眼神
1.修改雷达的发布话题
**第一个参数**remap from="scan" to="scan" /
remap from="/PavoScanNode/scan" to="/scan" /
保证同时两个文件都重映射到scan
坑来了
这个/PavoScanNode/scan怎么来的呢?
其实,当我开启雷达的时候,只需要使用一个rostopic list就可以看到scan的话题了。
2.读入数据
**第二个参数**param name=“frame_id” type=“string” value=“laser_frame”/>
我们只需要将修改下面就可以了
map_frame = "map",
tracking_frame = "laser_frame",
published_frame = "laser_frame",
odom_frame = "odom",
正常情况下,下面是符合逻辑的
a) 在只使用激光雷达的时候(tracking_frame=”laser”, publish_frame=”laser”)
b) 使用里程计+激光雷达时(tracking_frame=”base_link”, publish_frame=”odom”)
c) 使用IMU+激光+里程计时(tracking_frame=”imu_link”, publish_frame=”odom”)
我有一个梦想
话说我有一个梦想,那就是中国14亿人,每人都赏我一块钱,那样我就有14亿了。你是不是也有这样的梦想呢?但是我想让她变成现实。 Saying that I have a dream, that is, 1.4 billion people in China, each of whom rewards me a RMB, then I will have 1.4 billion RMB. Do you have such a dream? But I want her to become a reality.总结
以上就是今天要讲的内容,本文介绍了cartographer的使用,而cartographer提供了能使我们快速便捷地SLAM建图的方法。便捷通道:
https://github.com/cartographer-project
https://google-cartographer-ros.readthedocs.io/en/latest/