2. QML使用View3D控件显示三维模型
1. View3D介绍
View3D控件和QML中其它控件类似,只是在其中可以显示三维模型,类似在界面中创建一个场景,所有的模型将在这个场景中被加载出来。
效果展示:
View3D三维模型加载
1.1 常用属性介绍
camera:相机(三维场景中加入相机,才能显示三维模型,控制相机的姿态进而控制三维模型的姿态)
PerspectiveCamera:透视相机,可以模拟人眼所看到的景象,可以显示物体的真是投影,用的较多
OrthographicCamera:正投影相机,平行投影没有视角缩放,可理解为2D相机
FrustumCamera:视锥体相机
CustomCamera:自定义相机
environment :设置场景环境,一般使用 SceneEnvironment
importScene:值类型为 Node 类型,用于设置需要渲染的东西,Node类型可以理解为一个Item,方便对多个组件进行控制。
renderMode :场景渲染模式
View3D.Offscreen
View3D.Underlay
View3D.Overlay
View3D.Inline
2. 场景中添加必要组件
在场景中除了添加相机外,还需要添加灯光和模型本身,如果不添加灯光,及时添加了模型,也无法显示,看到的时黑乎乎的屏幕。
2.1 灯光介绍
DirectionalLight:工作原理类似于太阳,可以在场景中均匀投射灯光
DirectionalLight {
	//eulerRotation:控制坐标轴的旋转角度
    eulerRotation.x: 200
    eulerRotation.y: 20
    //castsShadow设置为 true ,将会显示阴影效果
    castsShadow: true
}
PointLight:点光源,类似于将光源定位在某一个位置点,在这个位置点发射光线
PointLight {
    position: Qt.vector3d(100, 100, 150)	//设定光源的位置点
    castsShadow: true	//开启阴影效果
}
SpotLight :聚光灯,在某一个方向上发生光锥形式的光线,形式类似于家里安装的小射灯样式。
SpotLight {
    position: Qt.vector3d(50, 200, 50)
    eulerRotation.x: -90

    brightness: 5	//控制光源的强度,每一个光源都有这个属性
    ambientColor: Qt.rgba(0.1, 0.1, 0.1, 1.0)	//控制光源照亮前应用与材质的基色,每一个光源都有这个属性

    castsShadow: true
}
2.2 模型加载
加载模型使用 Model 组件,在这个组件中必须要设置的属性是 source 和 materials ,即模型路径来源和材质。
source:url (内置的几个模型可以直接以字符串形式给出,包括:“#Rectangle"矩形,”#Sphere"球体,“#Cube"立方体,”#Cone"圆锥体,"#Cylinder"圆柱体)
materials:CustomMaterial, DefaultMaterial, and PrincipledMaterial
例如:在一个 Node 组件中添加光照,模型
Node {
    id: standAloneScene
    //! [rootnode]

    DirectionalLight {
        ambientColor: Qt.rgba(1.0, 1.0, 1.0, 1.0)
    }

    Model {
        source: "#Cube"
        y: -104
        scale: Qt.vector3d(3, 3, 0.1)
        eulerRotation.x: -90
        materials: [
            DefaultMaterial {
                diffuseColor: Qt.rgba(0.8, 0.8, 0.8, 1.0)
            }
        ]
    }
 }
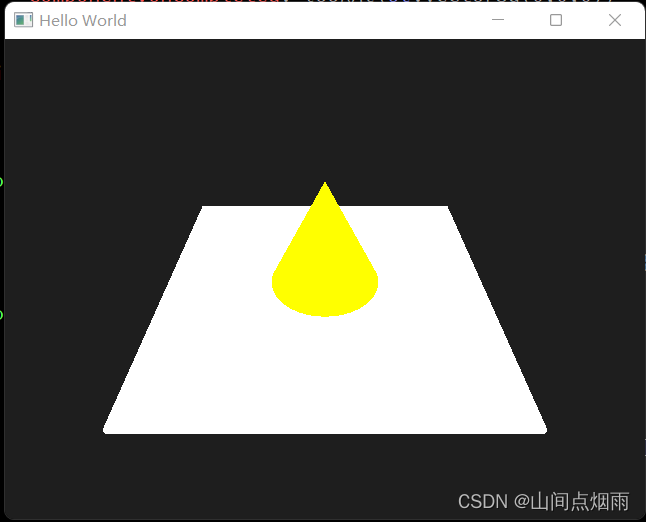
3. 加载三维模型框架一:
将上述的所有组件都单独写入到 View3D 组件中,这样有个缺点:不方便统一控制组件。示例代码如下:
import QtQuick 2.15
import QtQuick.Window 2.15
import Qt.labs.qmlmodels 1.0
import QtQuick.Controls 2.5
import QtQuick.Controls 1.4
import QtQuick.Layouts 1.15
import QtQuick.Controls.Styles 1.4
import QtQuick3D 1.15

ApplicationWindow {
    id:root
    width: 640
    height: 480
    visible: true
    title: qsTr("Hello World")

    View3D{
        anchors.fill: parent

        environment: SceneEnvironment{  //设定渲染环境
            clearColor: "#1e1e1e"
            backgroundMode: SceneEnvironment.Color
        }

        PerspectiveCamera{              //设定相机
            position: Qt.vector3d(0,250,300)
            Component.onCompleted: lookAt(Qt.vector3d(0,0,0))
        }

        DirectionalLight{               //设定光源
            ambientColor: Qt.rgba(1.0,1.0,1.0,1.0)
        }

        Model{                          //加载模型一
            position: Qt.vector3d(0,0,0)
            source: "#Cone"
            materials: [PrincipledMaterial{baseColor: "yellow";}]
        }
        Model{                          //加载模型二
            position: Qt.vector3d(0,-10,0)
            scale: Qt.vector3d(3,3,0.05)
            eulerRotation.x:90
            source: "#Cube"
            materials: [PrincipledMaterial{baseColor: "white";}]
        }
    }
 }
3.1 运行效果:
4. 加载三维模型框架二:
以设置属性的方式,将相关组件设定为 View3D 的属性值,此时需要用到上述提及到的 Node 组件,便于对组件统一控制。示例代码如下:
import QtQuick 2.15
import QtQuick.Window 2.14
import QtQuick3D 1.15
import QtQuick.Controls 2.14

Window {
    id: window
    width: 1280
    height: 720
    visible: true
    title: "View3Ds with Different Cameras"

    Node {	//节点,不可见控件
        id: standAloneScene

        DirectionalLight {
            ambientColor: Qt.rgba(1.0, 1.0, 1.0, 1.0)
        }

        OrthographicCamera {
            id: cameraOrthographicLeft
            x: -600
            eulerRotation.y: -90
        }

        Model {
            source: "#Cube"
            y: -104
            scale: Qt.vector3d(3, 3, 0.1)
            eulerRotation.x: -90
            materials: [
                DefaultMaterial {
                    diffuseColor: Qt.rgba(0.8, 0.8, 0.8, 1.0)
                }
            ]
        }

        Model {
            source: "teapot.mesh"
            y: -100
            scale: Qt.vector3d(50, 50, 50)
            materials: [
                PrincipledMaterial {
                    baseColor: "#41cd52"
                    metalness: 0.75
                    roughness: 0.1
                    specularAmount: 1.0
                    indexOfRefraction: 2.5
                    opacity: 1.0
                }
            ]

            PropertyAnimation on eulerRotation.y {	//添加旋转动画
                loops: Animation.Infinite
                duration: 5000
                to: 0
                from: -360
            }
        }

    }

    Rectangle {
        id: topLeft
        anchors.centerIn: parent
        width: parent.width * 0.5
        height: parent.height * 0.5
        color: "#848895"
        border.color: "black"

        View3D {
            id: topLeftView
            anchors.fill: parent
            importScene: standAloneScene
            camera: cameraOrthographicLeft
        }
         Label {
            text: "三维模型加载"
            anchors.top: parent.top
            anchors.left: parent.left
            anchors.margins: 10
            color: "#222840"
            font.pointSize: 14
        }
    }
}
4.1 运行效果:
View3D三维模型加载