一,SpringMVC入门
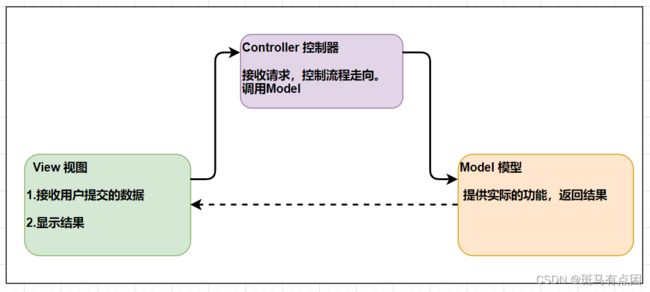
0 MVC设计模式
View(视图):页面(jsp、html),接收用户数据和显示结果。
Controller(控制器):action,接收请求,决定程序执行流程。
Model(模型):(service、dao、entity)提供实际的功能。
MVC模型的优势:
- 组成部分相互独立,弱耦合的关系。
- 提高代码的复用性,不同的终端的视图和控制器可以复用同1个模型。
- 提高程序的灵活性,通过controller可以非常方便将视图和模型组合起来。
1 SpringMVC引言
SpringMVC是一个MVC框架,用于简化Controller(控制器)的开发。用于替换原有的Servlet技术。
1.1 Servlet存在的问题
- 编码繁琐,开发效率低(必须要继承父类,重写service方法,一个类最多提供一个服务方法)
- 收参过程麻烦(需要手动编写收参并完成类型转换)
- 数据传输编码繁琐(需要手动将数据保存到作用域中)
- 跳转编码方式不统一(请求转发和重定向有不同的方法)
- 1个Servlet类只能定义一个服务方法,项目体量一大,编码量大大增加
1.2 SpringMVC 要解决的问题
SpringMVC和Servlet一样需要解决如下的问题,但相较于Servlet提供了简化:
| 开发中的问题 | 解决方案 |
|---|---|
| 怎么编码服务方法 | ? |
| 怎么配置C的请求路径 | ? |
| 怎么在C中接收参数 | ? |
| 如何跳转 | ? |
| 数据传输(C–>V) | ? |
2 第1个SpringMVC程序
-
环境搭建
-
新建web项目
-
导入依赖
pom.xml <dependency> <groupId>org.springframeworkgroupId> <artifactId>spring-webmvcartifactId> <version>5.2.8.RELEASEversion> dependency> -
引入配置文件 springmvc-servlet.xml
springmvc-servlet.xml本质就是一个spring框架的配置文件
建议放置到main/resources根目录下
-
初始化配置
web.xml
   <servlet>
       <servlet-name>DispatcherServletservlet-name>
       <servlet-class>org.springframework.web.servlet.DispatcherServletservlet-class>
       <init-param>

           <param-name>contextConfigLocationparam-name>
           <param-value>classpath:springmvc-servlet.xmlparam-value>
       init-param>

       <load-on-startup>1load-on-startup>
   servlet>
   <servlet-mapping>
       <servlet-name>DispatcherServletservlet-name>

       <url-pattern>*.dourl-pattern>
   servlet-mapping>
springmvc-servlet.xml
<mvc:annotation-driven/> <context:component-scan base-package="com.bz.controller"/> -
-
编码和配置
/* SpringMVC中编写控制器:不需要实现或继承任何父类型 服务方法基本格式要求: Model包含返回结果 View要跳转的视图 ModelAndView 包含着返回数据以及要跳转的视图 public ModelAndView 任意方法名(形参列表任意) throws 任意类型异常{ } */ @Controller//标识当前类是一个控制器 public class FirstController { //服务方法 @RequestMapping("/hello.do") public ModelAndView hello(){ System.out.println("hello world"); ModelAndView mav = new ModelAndView(); //设置跳转路径(视图名) forward:表示请求转发 redirect:表示重定向 mav.setViewName("forward:/index.jsp"); //mav.setViewName("redirect:/index.jsp"); return mav; } } -
访问
http://localhost:8989/项目名/requestMapping注解值
示例:http://localhost:8989/springmvc-day01/hello.do
RequestMapping的使用细节:
-
用在类上,方法的访问路径将添加统一的前缀
@Controller @RequestMapping("/first") public class FirstController { @RequestMapping("/hello.do") public ModelAndView hello(){ System.out.println("hello world"); ModelAndView mav = new ModelAndView(); mav.setViewName("forward:/index.jsp"); return mav; } } http://localhost:8989/springmvc-day01/first/hello.do -
RequestMapping中的路径值,可以省略
/和.do@Controller @RequestMapping("first") public class FirstController { @RequestMapping("hello") public ModelAndView hello(){ System.out.println("hello world"); ModelAndView mav = new ModelAndView(); mav.setViewName("forward:/index.jsp"); return mav; } } 注意:访问时仍要添加.do后缀 http://localhost:8989/springmvc-day01/first/hello.do -
可以设定处理的请求方式
@Controller
@RequestMapping("first")
public class FirstController {
    @RequestMapping(value="hello",method = {RequestMethod.POST})
    public ModelAndView hello(){
        System.out.println("hello world");
        ModelAndView mav = new ModelAndView();
        mav.setViewName("forward:/index.jsp")
        return mav;
    }
}
说明:此时,只能通过post方式请求服务方法
3 SpringMVC收参
收参:在Controller中获取请求携带的参数。
3.1 简单类型数据(基本类型+String)
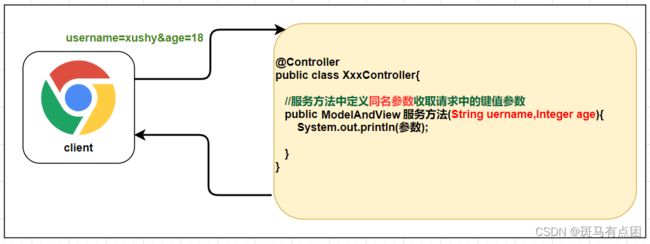
要求:在服务方法中定义和参数名同名的参数即可!!!
@RequestMapping("/primitive")
public ModelAndView primitive(String name,Integer age){
    System.out.println("name = [" + name + "], age = [" + age + "]");
    return new ModelAndView("forward:/index.jsp");
}
/primitive.do?name=xiaohei&age=18
注意:参数如果是原始的基本类型,请求中没有相关数据,会出现异常。如果允许相关参数不存在,则可以定义包装类型参数,默认值为null。
3.2 对象类型
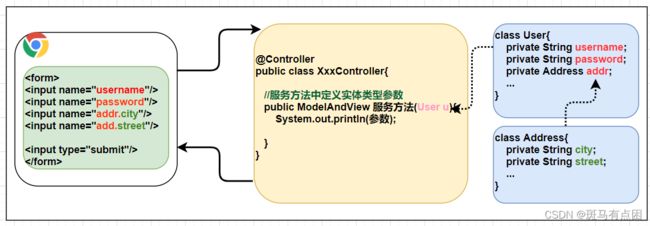
要求: 请求中的参数名要和对象的属性名保持一致!!! 对象类型中的属性必须要提供get/set方法.
${pageContext.request.contextPath}是JSP取得绝对路径的方法,等价于<%=request.getContextPath()%> 。
也就是取出部署的应用程序名或者是当前的项目名称
页面:
<form action="${pageContext.request.contextPath}/data/object.do">
    id: <input type="text" name="id" id=""> <br>
    name: <input type="text" name="name" id=""> <br>
    password: <input type="text" name="password" id=""> <br>
    city: <input type="text" name="addr.city" id=""> <br>
    street: <input type="text" name="addr.street" id=""> <br>
    <input type="submit" value="提交">
form>
Controller:
@RequestMapping("/object")
public ModelAndView object(User user,Integer id,String name,String password){
    System.out.println("user = [" + user + "], id = [" + id + "], name = [" + name + "], password = [" + password + "]");
    return new ModelAndView("forward:/index.jsp");
}
3.3 @RequestParam注解
RequestParam注解修饰服务方法的参数,对请求中的数据绑定到方法的参数,做精细的配置。
RequestParam有以下几个属性:
    value:请求中的参数名
    required:参数是否是必须的
    defaultValue:默认值

@RequestMapping("/primitive")
public ModelAndView primitive(@RequestParam(value="username",required = false,defaultValue = "xiaohei") String name, Integer age, Double score){
    System.out.println("name = [" + name + "], age = [" + age + "], score = [" + score + "]");
    return new ModelAndView("forward:/index.jsp");
}
3.4 简单元素的数组和List
@RequestMapping("/arrayList")
public ModelAndView arrayList(int[] array, @RequestParam("list") List<Integer> list) {
    System.out.println("array = " + Arrays.toString(array)+ ", list = " + list);
    return  new ModelAndView("forward:/index.jsp");
}

注意:一定要使用RequestParam注解描述List,否则List无法实例化
/arrayList.do?array=1&array=2&list=2&list=3
3.5 对象元素的数组和List
objectList.html
<form action="/springmvc-day01/data/list2.do">
    用户1 <br>
    用户名: <input type="text" name="us[0].username" id=""> <br>
    密码: <input type="password" name="us[0].password" id=""> <br>
    <hr>
    用户2 <br>
    用户名: <input type="text" name="us[1].username" id=""> <br>
    密码: <input type="password" name="us[1].password" id=""> <br>
    <hr>
    用户3 <br>
    用户名: <input type="text" name="us[2].username" id=""> <br>
    密码: <input type="password" name="us[2].password" id=""> <br>
    <hr>
    用户4 <br>
    用户名: <input type="text" name="us[3].username" id=""> <br>
    密码: <input type="password" name="us[3].password" id=""> <br>
    <hr>
    <input type="submit" value="提交">
form>
DataController.java
@RequestMapping("list2")
public ModelAndView testArrayList2(UserVO uv){
    System.out.println("DataController.testArrayList2");
    System.out.println("uv = " + uv);
    return new ModelAndView("forward:/index.jsp");
}
UserVO.java
public class UserVO implements Serializable {
    private List<User> us = new ArrayList<>();
	...
}
收集对象数组或者对象集合时,不能直接定义数组或集合参数。需要将其包装成一个VO!
3.6 获取Servlet API
当服务方法中需要使用Servlet API中定义的类型的对象时,可以直接在服务方法中定义相关类型的形参。
@RequestMapping("/servletapi")
public String servletapi(HttpServletRequest req,
                               HttpServletResponse resp,
                               HttpSession session){
    System.out.println("req = " + req);
    System.out.println("resp = " + resp);
    System.out.println("session = " + session);
    return "forward:/index.jsp";
}
此时,借助于Servlet中的request和Session2个作用域可以完成 C->V 的数据传输。
4 跳转
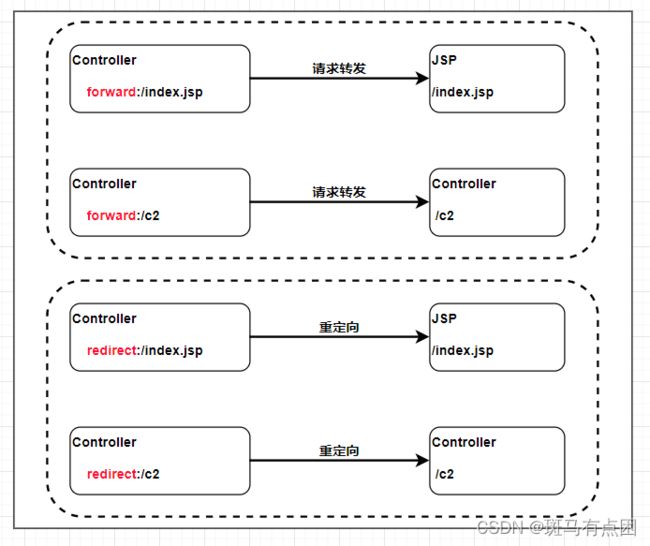
SpringMVC是对Servlet技术的封装。和Servlet一样,SpringMVC中跳转分为2大类共4小种:
- 请求转发
- Controller–请求转发–>JSP
- Controller–请求转发–>Controller
- 重定向
- Controller–重定向–>JSP
- Controller–重定向–>Controller
4.1 ModelAndView(了解)
ModelAndView(模型和视图),在MVC模型中跳转结果就是一个视图。
@Controller
@RequestMapping("/jump")
public class JumpController {
    //1 请求转发到jsp
    @RequestMapping("/forwardJsp")
    public ModelAndView forwardJsp(){
        System.out.println("JumpController.forwardJsp");
        return new ModelAndView("forward:/page/index.jsp");
    }
    //url-pattern = uri-项目名
    //url   http://ip:port/项目名/url-pattern
    //uri   /项目名/url-pattern
    //2 请求转发到Controller
    @RequestMapping("/forwardController")
    public ModelAndView forwardController(){
        System.out.println("JumpController.forwardController");
        return new ModelAndView("forward:/jump/forwardJsp.do");
    }
    //3 重定向到jsp
    @RequestMapping("/redirectJsp")
    public ModelAndView redirectJsp(){
        System.out.println("JumpController.redirectJsp");
        return new ModelAndView("redirect:/page/index.jsp");
    }

    //4 重定向到Controller
    @RequestMapping("/redirectController")
    public ModelAndView redirectController(){
        System.out.println("JumpController.redirectController");
        return new ModelAndView("redirect:/jump/redirectJsp.do");
    }
}
请求转发到jsp的简化开发方式:
-
controller中控制方法只需要返回jsp的名字
@RequestMapping("/internalResourceViewResolver") public ModelAndView internalResourceViewResolver(){ System.out.println("ModelAndViewController.internalResourceViewResolver"); return new ModelAndView("index"); } -
在xml中配置jsp的位置
<mvc:annotation-driven/>


<bean class="org.springframework.web.servlet.view.InternalResourceViewResolver">
    <property name="prefix" value="/page/"/>
    <property name="suffix" value=".jsp"/>
bean>
访问 controller后,请求转发到/page/index.jsp
4.2 字符串返回值[重点]
@Controller
@RequestMapping("/jumpstr")
public class JumpStringController {
    //1 请求转发到jsp
    @RequestMapping("/forwardJsp")
    public String forwardJsp(){
        System.out.println("JumpController.forwardJsp");
        return "forward:/page/index.jsp";
    }
    //url-pattern = uri-项目名
    //url   http://ip:port/项目名/url-pattern
    //uri   /项目名/url-pattern
    //2 请求转发到Controller
    @RequestMapping("/forwardController")
    public String forwardController(){
        System.out.println("JumpController.forwardController");
        return "forward:/jumpstr/forwardJsp.do";
    }
    //3 重定向到jsp
    @RequestMapping("/redirectJsp")
    public String redirectJsp(){
        System.out.println("JumpController.redirectJsp");
        return "redirect:/page/index.jsp";
    }

    //4 重定向到Controller
    @RequestMapping("/redirectController")
    public String redirectController(){
        System.out.println("JumpController.redirectController");
        return "redirect:/jumpstr/redirectJsp.do";
    }

    //5 简化请求转发到jsp的开发
    @RequestMapping("/internalResourceViewResolver")
    public String internalResourceViewResolver(){
        System.out.println("JumpController.internalResourceViewResolver");
        return "index";
    }
}
5 解决收参乱码
5.1 乱码的原因和解决方案
GET方式:
-
从Tomcat8.0开始,get方法提交数据,默认使用utf-8编解码。
-
tomcat7.0及其以下版本,针对get方式乱码,需要在tomcat/conf/server.xml中配置
<Connector URIEncoding="utf-8" connectionTimeout="20000" maxThreads="2000" port="8989" protocol="HTTP/1.1" redirectPort="8443"/>
在上面标签中,添加URIEncoding="utf-8"
POST方式:
post方式需要编码解决
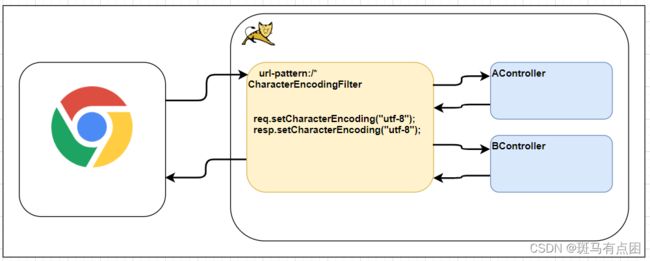
req.setCharacterEncoding("utf-8");
5.2 SpringMVC针对Post乱码解决方案
web.xml添加 CharacterEncodingFilter 过滤器.
<filter>
    <filter-name>CharacterEncodingFilterfilter-name>
    <filter-class>org.springframework.web.filter.CharacterEncodingFilterfilter-class>
    <init-param>
        <param-name>encodingparam-name>
        <param-value>utf-8param-value>
    init-param>
filter>
<filter-mapping>
    <filter-name>CharacterEncodingFilterfilter-name>
    <url-pattern>/*url-pattern>
filter-mapping>
6 SpringMVC替换Servlet
7 Spring整合SpringMVC[重点]
7.1 整合效果
Spring整合MyBatis的效果:
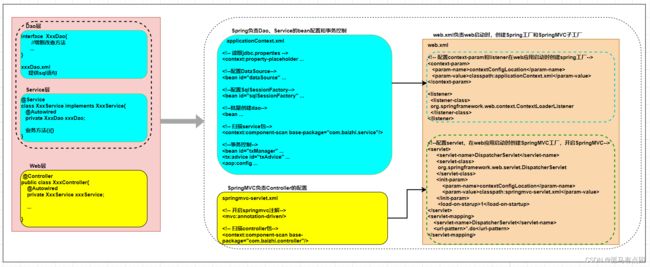
- Spring负责Dao、Service对象的创建,事务的控制(applicationContext.xml);SpringMVC负责Controller的创建(springmvc-servlet.xml)。
- SpringMVC作为Spring的子框架,可以使用到Spring创建的Service对象(web.xml)。
7.2 SSM项目开发步骤
-
搭建开发环境
-
新建一个web项目
-
导入依赖
jdbc驱动
连接池依赖
mybatis相关依赖
servlet+jsp+jstl依赖
spring依赖
spring整合mybaits依赖
springmvc依赖
<dependency> <groupId>mysqlgroupId> <artifactId>mysql-connector-javaartifactId> <version>8.0.23version> dependency> <dependency> <groupId>com.alibabagroupId> <artifactId>druidartifactId> <version>1.0.24version> dependency> <dependency> <groupId>org.springframeworkgroupId> <artifactId>spring-contextartifactId> <version>5.2.8.RELEASEversion> dependency> <dependency> <groupId>org.aspectjgroupId> <artifactId>aspectjweaverartifactId> <version>1.9.5version> dependency> <dependency> <groupId>org.mybatisgroupId> <artifactId>mybatisartifactId> <version>3.5.4version> dependency> <dependency> <groupId>org.slf4jgroupId> <artifactId>slf4j-log4j12artifactId> <version>1.7.30version> dependency> <dependency> <groupId>org.springframeworkgroupId> <artifactId>spring-jdbcartifactId> <version>5.2.8.RELEASEversion> dependency> <dependency> <groupId>org.mybatisgroupId> <artifactId>mybatis-springartifactId> <version>2.0.4version> dependency> <dependency> <groupId>javax.servletgroupId> <artifactId>javax.servlet-apiartifactId> <version>4.0.1version> <scope>providedscope> dependency> <dependency> <groupId>javax.servlet.jspgroupId> <artifactId>javax.servlet.jsp-apiartifactId> <version>2.3.3version> <scope>providedscope> dependency> <dependency> <groupId>jstlgroupId> <artifactId>jstlartifactId> <version>1.2version> dependency> <dependency> <groupId>taglibsgroupId> <artifactId>standardartifactId> <version>1.1.2version> dependency> <dependency> <groupId>cn.hutoolgroupId> <artifactId>hutool-allartifactId> <version>5.2.3version> dependency> <dependency> <groupId>junitgroupId> <artifactId>junitartifactId> <scope>testscope> <version>4.12version> dependency> <dependency> <groupId>org.springframeworkgroupId> <artifactId>spring-testartifactId> <version>5.2.8.RELEASEversion> dependency> <dependency> <groupId>org.springframeworkgroupId> <artifactId>spring-webmvcartifactId> <version>5.2.8.RELEASEversion> dependency> -
导入配置文件
log4j.properties
jdbc.properties
xxxMapper.xml
springmvc-servlet.xml
applicationContext.xml
-
配置文件初始化
web.xml
<context-param>
    <param-name>contextConfigLocationparam-name>
    <param-value>classpath:applicationContext.xmlparam-value>
context-param>
<listener>
    <listener-class>org.springframework.web.context.ContextLoaderListenerlistener-class>
listener>


<servlet>
    <servlet-name>DispatcherServletservlet-name>
    <servlet-class>org.springframework.web.servlet.DispatcherServletservlet-class>
    <init-param>

        <param-name>contextConfigLocationparam-name>
        <param-value>classpath:springmvc-servlet.xmlparam-value>
    init-param>

    <load-on-startup>1load-on-startup>
servlet>
<servlet-mapping>
    <servlet-name>DispatcherServletservlet-name>
    <url-pattern>*.dourl-pattern>
servlet-mapping>
springmvc-servlet.xml
<context:component-scan base-package="com.bz.controller"/>


<mvc:annotation-driven/>
-
-
建表
-
实体
-
mapper
-
service
-
test
-
controller+jsp
-
集成测试
applicationContext.xml
<context:component-scan base-package="com.bz.mapper,com.bz.service"/>

<context:property-placeholder location="classpath:jdbc.properties"/>

<bean id="druidDataSource" class="com.alibaba.druid.pool.DruidDataSource">
    <property name="driverClassName" value="${jdbc.driverClassName}"/>
    <property name="url" value="${jdbc.url}"/>
    <property name="username" value="${jdbc.username}"/>
    <property name="password" value="${jdbc.password}"/>
bean>


<bean id="sqlSessionFactory" class="org.mybatis.spring.SqlSessionFactoryBean">

    <property name="dataSource" ref="druidDataSource"/>

    <property name="typeAliasesPackage" value="com.bz.entity"/>
    <property name="mapperLocations">

        <list>

            <value>classpath:com/bz/mapper/*Mapper.xmlvalue>
        list>
    property>
bean>


<bean class="org.mybatis.spring.mapper.MapperScannerConfigurer">

    <property name="basePackage" value="com.bz.mapper"/>
bean>


<bean id="txManager" class="org.springframework.jdbc.datasource.DataSourceTransactionManager">
    <property name="dataSource" ref="druidDataSource"/>
bean>
<tx:advice transaction-manager="txManager" id="txAdvice">
    <tx:attributes>

        <tx:method name="show*" read-only="true"/>

        <tx:method name="*" propagation="REQUIRED" timeout="10000" isolation="READ_COMMITTED" />
    tx:attributes>
tx:advice>


<aop:config>
    <aop:pointcut id="servicePointCut" expression="execution(* com.bz.service.*.*(..))"/>
    <aop:advisor advice-ref="txAdvice" pointcut-ref="servicePointCut"/>
aop:config>
springmvc-servlet.xml
<context:component-scan base-package="com.bz.controller"/>


<mvc:annotation-driven/>


<bean class="org.springframework.web.servlet.view.InternalResourceViewResolver">
    <property name="prefix" value="/page/"/>
    <property name="suffix" value=".jsp"/>
bean>
源码地址:https://download.csdn.net/download/qq_36827283/87401618
