运筹系列59:用python进行GPU编程总结
1. GPU硬件架构
简单理解,GPU就是很多很多非常弱的cpu在做并行计算。个人桌面电脑CPU只有2到8个CPU核心,GPU却有上千个核心。在英伟达的设计理念里,CPU和主存被称为Host,GPU被称为Device。Host和Device概念会贯穿整个英伟达GPU编程。

GPU核心在做计算时,只能直接从显存中读写数据,程序员需要在代码中指明哪些数据需要从内存和显存之间相互拷贝。这些数据传输都是在总线上,因此总线的传输速度和带宽成了部分计算任务的瓶颈。Intel的CPU目前不支持NVLink,只能使用PCI-E技术。
Turing 图灵:2018年发布,消费显卡:GeForce 2080 Ti
Volta 伏特:2017年末发布,专业显卡:Telsa V100 (16或32GB显存 5120个核心)
Pascal 帕斯卡:2016年发布,专业显卡:Telsa P100(12或16GB显存 3584个核心)
2. 核心编程原理
2.1 准备工作
首先要安装cudatoolkit:
$ conda install cudatoolkit
nvidia-smi命令查看显卡情况,比如这台机器上几张显卡,CUDA版本,显卡上运行的进程等。我这里是一台16GB显存版的Telsa P100机器。

在python中如下查看:

运行一个程序后,某个GPU就被锁定了,默认使用device 0,使用
CUDA_VISIBLE_DEVICES='1'
来切换GPU。如果没有GPU,可以使用下面的语句来模拟GPU
export NUMBA_ENABLE_CUDASIM=1
2.2 运行步骤
下面举个简单的打印例子:
from numba import cuda

def cpu_print():
    print("print by cpu.")

@cuda.jit
def gpu_print():
    # GPU核函数
    print("print by gpu.")

def main():
    gpu_print[1, 2]()
    cuda.synchronize()
    cpu_print()

if __name__ == "__main__":
    main()
运行CUDA_VISIBLE_DEVICES='0' python gpu_print.py运行扯断代码,得到:
print by gpu.
print by gpu.
print by cpu.
在GPU函数上添加@cuda.jit装饰符,表示该函数是一个在GPU设备上运行的函数,GPU函数又被称为核函数。
主函数调用GPU核函数时,需要添加如[1, 2]这样的执行配置,这个配置是在告知GPU以多大的并行粒度同时进行计算。gpu_print1, 2表示同时开启2个线程并行地执行gpu_print函数,函数将被并行地执行2次。
GPU核函数的启动方式是异步的:启动GPU函数后,CPU不会等待GPU函数执行完毕才执行下一行代码。必要时,需要调用cuda.synchronize(),告知CPU等待GPU执行完核函数后,再进行CPU端后续计算。这个过程被称为同步,也就是GPU执行流程图中的红线部分。如果不调用cuda.synchronize()函数,执行结果也将改变,"print by cpu.将先被打印。虽然GPU函数在前,但是程序并没有等待GPU函数执行完,而是继续执行后面的cpu_print函数,由于CPU调用GPU有一定的延迟,反而后面的cpu_print先被执行,因此cpu_print的结果先被打印了出来。
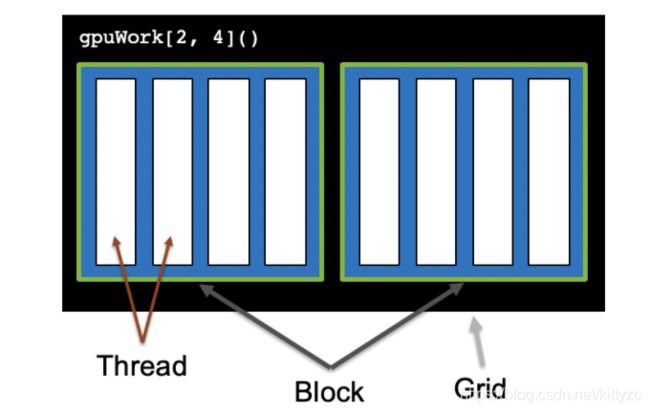
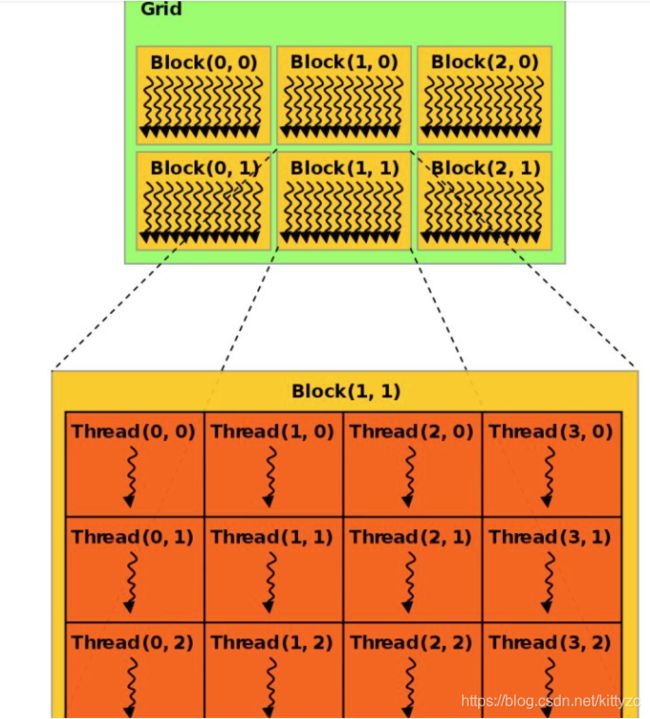
CUDA将核函数所定义的运算称为线程(Thread),多个线程组成一个块(Block),多个块组成网格(Grid)。这样一个grid可以定义成千上万个线程,也就解决了并行执行上万次操作的问题。例如,把前面的程序改为并行执行8次:可以用2个block,每个block中有4个thread。原来的代码可以改为gpu_print2, 4,其中方括号中第一个数字表示整个grid有多少个block,方括号中第二个数字表示一个block有多少个thread。
CUDA提供了一系列内置变量,以记录thread和block的大小及索引下标。以[2, 4]这样的配置为例:blockDim.x变量表示block的大小是4,即每个block有4个thread,threadIdx.x变量是一个从0到blockDim.x - 1(4-1=3)的索引下标,记录这是第几个thread;gridDim.x变量表示grid的大小是2,即每个grid有2个block,blockIdx.x变量是一个从0到gridDim.x - 1(2-1=1)的索引下标,记录这是第几个block。

某个thread在整个grid中的位置编号为:threadIdx.x + blockIdx.x * blockDim.x,这个公式在cuda编程里面经常能看到

下面这个例子可以展示cpu和gpu运行的差别:
from numba import cuda

def cpu_print(N):
    for i in range(0, N):
        print(i)

@cuda.jit
def gpu_print(N):
    idx = cuda.threadIdx.x + cuda.blockIdx.x * cuda.blockDim.x
    if (idx < N):
        print(idx)

def main():
    print("gpu print:")
    gpu_print[2, 4](8)
    cuda.synchronize()
    print("cpu print:")
    cpu_print(8)

if __name__ == "__main__":
    main()
输出:
gpu print:
0
1
2
3
4
5
6
7
cpu print:
0
1
2
3
4
5
6
7
这份代码打印了8个数字,核函数有一个参数N,N = 8,假如我们只想打印5个数字呢?当前的执行配置共2 * 4 = 8个线程,线程数8与要执行的次数5不匹配,不过我们已经在代码里写好了if (idx < N)的判断语句,判断会帮我们过滤不需要的计算。我们只需要把N = 5传递给gpu_print函数中就好,CUDA仍然会启动8个thread,但是大于等于N的thread不进行计算。注意,当线程数与计算次数不一致时,一定要使用这样的判断语句,以保证某个线程的计算不会影响其他线程的数据。
上面我们讨论的并行,都是线程级别的,即CUDA开启多个线程,并行执行核函数内的代码。GPU最多就上千个核心,同一时间只能并行执行上千个任务。当我们处理千万级别的数据,整个大任务无法被GPU一次执行,所有的计算任务需要放在一个队列中,排队顺序执行。CUDA将放入队列顺序执行的一系列操作称为流(Stream)。如图所示,将数据拷贝和函数计算重叠起来的,形成流水线,能获得非常大的性能提升。实际上,流水线作业的思想被广泛应用于CPU和GPU等计算机芯片设计上,以加速程序。

默认情况下,CUDA使用0号流,又称默认流。不使用多流时,所有任务都在默认流中顺序执行,效率较低。在使用多流之前,必须先了解多流的一些规则:
- 给定流内的所有操作会按序执行。
- 非默认流之间的不同操作,无法保证其执行顺序。
- 所有非默认流执行完后,才能执行默认流;默认流执行完后,才能执行其他非默认流。
总之,某个流内的操作是顺序的,非默认流之间是异步的,默认流有阻塞作用。
2.3 参数配置
block运行在SM上,不同硬件架构(Turing、Volta、Pascal…)的CUDA核心数不同,一般需要根据当前硬件来设置block的大小blockDim(执行配置中第二个参数)。一个block中的thread数最好是32、128、256的倍数。注意,限于当前硬件的设计,CUDA的执行配置:[gridDim, blockDim]中,block大小不能超过1024,gridDim最大为一个32位整数的最大值,也就是2,147,483,648,大约二十亿。这个数字已经非常大了,足以应付绝大多数的计算。
grid的大小gridDim(执行配置中第一个参数),即一个grid中block的个数可以由总次数N除以blockDim,并向上取整。
例如,我们想并行启动1000个thread,可以将blockDim设置为128,1000 ÷ 128 = 7.8,向上取整为8。使用时,执行配置可以写成gpuWork8, 128,CUDA共启动8 * 128 = 1024个thread,实际计算时只使用前1000个thread,多余的24个thread不进行计算。
另一方面,如果启动的线程数不够,会导致后面的数据无法计算。以[2, 4]的执行配置为例,该执行配置中整个grid只能并行启动8个线程,假如我们要并行计算的数据是32,会发现后面8号至31号数据共计24个数据无法被计算。
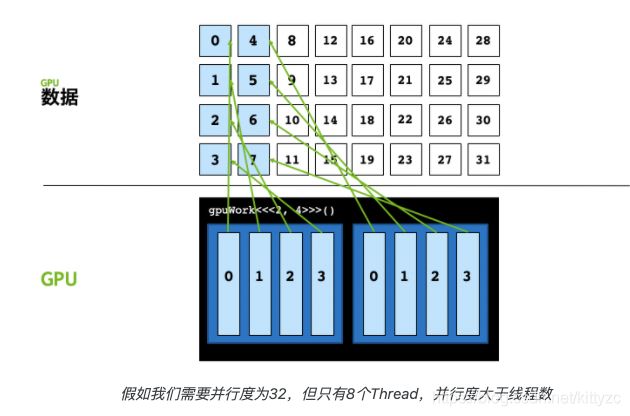
这种情况下,需要再额外写一个for循环,每次能处理的数量叫做stride,计算公式为:gridStride = cuda.gridDim.x * cuda.blockDim.x
from numba import cuda

@cuda.jit
def gpu_print(N):
    idxWithinGrid = cuda.threadIdx.x + cuda.blockIdx.x * cuda.blockDim.x
    gridStride = cuda.gridDim.x * cuda.blockDim.x
    # 从 idxWithinGrid 开始
    # 每次以整个网格线程总数为跨步数
    for i in range(idxWithinGrid, N, gridStride):
        print(i)

def main():
    gpu_print[2, 4](32)
    cuda.synchronize()

if __name__ == "__main__":
    main()
for循环的步长是网格中线程总数,这也是为什么将这种方式称为网格跨步。在上面的例子中,网格总线程数为8,那么0号线程将计算第0、8、16…号的数据。这里我们也不用再明确使用if (idx < N) 来判断是否越界,因为for循环也有这个判断。
2.4 数据拷贝和流
Numba对Numpy的比较友好,编程中一定要使用Numpy的数据类型。用到的比较多的内存分配函数有:
cuda.device_array(): 在设备上分配一个空向量,类似于numpy.empty()
cuda.to_device():将主机的数据拷贝到设备
ary = np.arange(10)
device_ary = cuda.to_device(ary)
cuda.copy_to_host():将设备的数据拷贝回主机
host_ary = device_ary.copy_to_host()
当需要反复拷贝数据时,可以考虑使用多流。如果想使用多流时,必须先定义流:
stream = numba.cuda.stream()
CUDA的数据拷贝以及核函数都有专门的stream参数来接收流,以告知该操作放入哪个流中执行:
numba.cuda.to_device(obj, stream=0, copy=True, to=None)
numba.cuda.copy_to_host(self, ary=None, stream=0)
核函数调用的地方除了要写清执行配置,还要加一项stream参数:
kernel[blocks_per_grid, threads_per_block, stream=0]
根据这些函数定义也可以知道,不指定stream参数时,这些函数都使用默认的0号流。
对于程序员来说,需要将数据和计算做拆分,分别放入不同的流里,构成一个流水线操作。
将之前的向量加法的例子改为多流处理,完整的代码为:
from numba import cuda
import numpy as np
import math
from time import time

@cuda.jit
def vector_add(a, b, result, n):
    idx = cuda.threadIdx.x + cuda.blockDim.x * cuda.blockIdx.x
    if idx < n :
        result[idx] = a[idx] + b[idx]

def main():
    n = 20000000
    x = np.random.uniform(10,20,n)
    y = np.random.uniform(10,20,n)
    # x = np.arange(n).astype(np.int32)
    # y = 2 * x

    start = time()
    # 使用默认流
    # Host To Device
    x_device = cuda.to_device(x)
    y_device = cuda.to_device(y)
    z_device = cuda.device_array(n)
    z_streams_device = cuda.device_array(n)

    threads_per_block = 1024
    blocks_per_grid = math.ceil(n / threads_per_block)

    # Kernel
    vector_add[blocks_per_grid, threads_per_block](x_device, y_device, z_device, n)

    # Device To Host
    default_stream_result = z_device.copy_to_host()
    cuda.synchronize()
    print("gpu vector add time " + str(time() - start))

    start = time()

    # 使用5个流
    number_of_streams = 5
    # 每个流处理的数据量为原来的 1/5
    # 符号//得到一个整数结果
    segment_size = n // number_of_streams

    # 创建5个cuda stream
    stream_list = list()
    for i in range (0, number_of_streams):
        stream = cuda.stream()
        stream_list.append(stream)

    threads_per_block = 1024
    # 每个stream的处理的数据变为原来的1/5
    blocks_per_grid = math.ceil(segment_size / threads_per_block)
    streams_result = np.empty(n)

    # 启动多个stream
    for i in range(0, number_of_streams):
        # 传入不同的参数,让函数在不同的流执行

        # Host To Device
        x_i_device = cuda.to_device(x[i * segment_size : (i + 1) * segment_size], stream=stream_list[i])
        y_i_device = cuda.to_device(y[i * segment_size : (i + 1) * segment_size], stream=stream_list[i])

        # Kernel
        vector_add[blocks_per_grid, threads_per_block, stream_list[i]](
                x_i_device,
                y_i_device,
                z_streams_device[i * segment_size : (i + 1) * segment_size],
                segment_size)

        # Device To Host
        streams_result[i * segment_size : (i + 1) * segment_size] = z_streams_device[i * segment_size : (i + 1) * segment_size].copy_to_host(stream=stream_list[i])

    cuda.synchronize()
    print("gpu streams vector add time " + str(time() - start))

    if (np.array_equal(default_stream_result, streams_result)):
        print("result correct")

if __name__ == "__main__":
    main()
2.5 共享内存

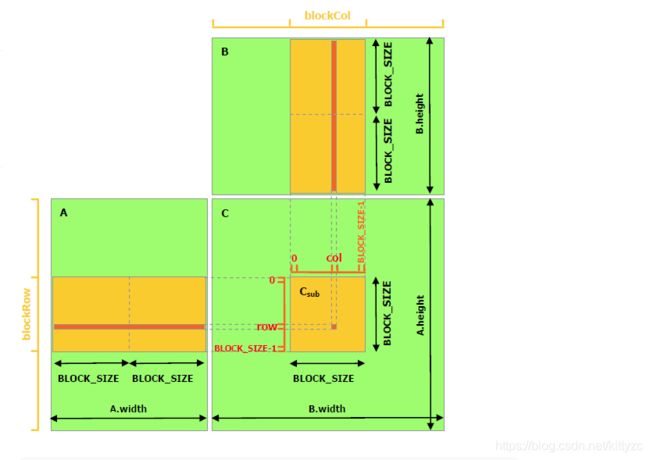
一个C = AB的矩阵乘法运算,需要我们把A的某一行与B的某一列的所有元素一一相乘,求和后,将结果存储到结果矩阵C的(row, col)上。在这种实现中,每个线程都要读取A的一整行和B的一整列,共计算M行*P列。以计算第row行为例,计算C[row, 0]、C[row, 1]…C[row, p-1]这些点时都需要从显存的Global Memory中把整个第row行读取一遍。可以算到,A矩阵中的每个点需要被读 B.width 次,B矩阵中的每个点需要被读 A.height 次。代码如下:
from numba import cuda
import numpy as np
import math
from time import time

@cuda.jit
def matmul(A, B, C):
    """  矩阵乘法 C = A * B
    """
    # Numba库提供了更简易的计算方法
    # x, y = cuda.grid(2)
    # 具体计算公式如下
    row = cuda.threadIdx.x + cuda.blockDim.x * cuda.blockIdx.x
    col = cuda.threadIdx.y + cuda.blockDim.y * cuda.blockIdx.y


    if row < C.shape[0] and col < C.shape[1]:
        tmp = 0.
        for k in range(A.shape[1]):
            tmp += A[row, k] * B[k, col]
        C[row, col] = tmp

def main():
    # 初始化矩阵
    M = 6000
    N = 4800
    P = 4000
    A = np.random.random((M, N)) # 随机生成的 [M x N] 矩阵
    B = np.random.random((N, P)) # 随机生成的 [N x P] 矩阵

    start = time()
    A = cuda.to_device(A)
    B = cuda.to_device(B)
    C_gpu = cuda.device_array((M, P))

    # 执行配置
    threads_per_block = (16, 16)
    blocks_per_grid_x = int(math.ceil(A.shape[0] / threads_per_block[0]))
    blocks_per_grid_y = int(math.ceil(B.shape[1] / threads_per_block[1]))
    blocksPerGrid = (blocks_per_grid_x, blocks_per_grid_y)

    # 启动核函数
    matmul[blocksPerGrid, threads_per_block](A, B, C_gpu)

    # 数据拷贝
    C = C_gpu.copy_to_host()
    cuda.synchronize()

    print("gpu matmul time :" + str(time() - start))

    start = time()
    C_cpu = np.empty((M, P), np.float)
    np.matmul(A, B, C_cpu)
    print("cpu matmul time :" + str(time() - start))

    # 验证正确性
    if np.allclose(C_cpu, C):
        print("gpu result correct")

if __name__ == "__main__":
    main()
可以将多次访问的数据放到Shared Memory中,减少重复读取的次数,并充分利用Shared Memory的延迟低的优势。接下来的程序利用了Shared Memory来做矩阵乘法。这个实现中,跟未做优化的版本相同的是,每个Thread计算结果矩阵中的一个元素,不同的是,每个CUDA Block会以一个 BLOCK_SIZE * BLOCK_SIZE 子矩阵为基本的计算单元。具体而言,需要声明Shared Memory区域,数据第一次会从Global Memory拷贝到Shared Memory上,接下来可多次重复利用Shared Memory上的数据。
from numba import cuda, float32
import numpy as np
import math
from time import time

# thread per block
# 每个block有 BLOCK_SIZE x BLOCK_SIZE 个元素
BLOCK_SIZE = 16

@cuda.jit
def matmul(A, B, C):
    """  矩阵乘法 C = A * B
    """
    row = cuda.threadIdx.x + cuda.blockDim.x * cuda.blockIdx.x
    col = cuda.threadIdx.y + cuda.blockDim.y * cuda.blockIdx.y

    if row < C.shape[0] and col < C.shape[1]:
        tmp = 0.
        for k in range(A.shape[1]):
            tmp += A[row, k] * B[k, col]
        C[row, col] = tmp

@cuda.jit
def matmul_shared_memory(A, B, C):
    """
    使用Shared Memory的矩阵乘法 C = A * B
    """
    # 在Shared Memory中定义向量
    # 向量可被整个Block的所有Thread共享
    # 必须声明向量大小和数据类型
    sA = cuda.shared.array(shape=(BLOCK_SIZE, BLOCK_SIZE), dtype=float32)
    sB = cuda.shared.array(shape=(BLOCK_SIZE, BLOCK_SIZE), dtype=float32)

    tx = cuda.threadIdx.x
    ty = cuda.threadIdx.y
    row = cuda.threadIdx.x + cuda.blockDim.x * cuda.blockIdx.x
    col = cuda.threadIdx.y + cuda.blockDim.y * cuda.blockIdx.y

    if row >= C.shape[0] and col >= C.shape[1]:
        # 当(x, y)越界时退出
        return

    tmp = 0.
    # 以一个 BLOCK_SIZE x BLOCK_SIZE 为单位
    for m in range(math.ceil(A.shape[1] / BLOCK_SIZE)):
        sA[tx, ty] = A[row, ty + m * BLOCK_SIZE]
        sB[tx, ty] = B[tx + m * BLOCK_SIZE, col]
        # 线程同步,等待Block中所有Thread预加载结束
        # 该函数会等待所有Thread执行完之后才执行下一步
        cuda.syncthreads()
        # 此时已经将A和B的子矩阵拷贝到了sA和sB

        # 计算Shared Memory中的向量点积
        # 直接从Shard Memory中读取数据的延迟很低
        for n in range(BLOCK_SIZE):
            tmp += sA[tx, n] * sB[n, ty]

        # 线程同步,等待Block中所有Thread计算结束
        cuda.syncthreads()

    # 循环后得到每个BLOCK的点积之和
    C[row, col] = tmp

def main():
    # 初始化矩阵
    M = 6000
    N = 4800
    P = 4000
    A = np.random.random((M, N)) # 随机生成的 [M x N] 矩阵
    B = np.random.random((N, P)) # 随机生成的 [N x P] 矩阵

    A_device = cuda.to_device(A)
    B_device = cuda.to_device(B)
    C_device = cuda.device_array((M, P)) # [M x P] 矩阵

    # 执行配置
    threads_per_block = (BLOCK_SIZE, BLOCK_SIZE)
    blocks_per_grid_x = int(math.ceil(A.shape[0] / BLOCK_SIZE))
    blocks_per_grid_y = int(math.ceil(B.shape[1] / BLOCK_SIZE))
    blocks_per_grid = (blocks_per_grid_x, blocks_per_grid_y)

    start = time()
    matmul[blocks_per_grid, threads_per_block](A_device, B_device, C_device)
    cuda.synchronize()
    print("matmul time :" + str(time() - start))

    start = time()
    matmul_shared_memory[blocks_per_grid, threads_per_block](A_device, B_device, C_device)
    cuda.synchronize()
    print("matmul with shared memory time :" + str(time() - start))
    C = C_device.copy_to_host()

if __name__ == "__main__":
    main()
3. numba要点
3.1 基本操作
使用@cuda.jit定义可以并行执行的核函数,传入包含并行数据的输入数据和结果(输出也可以是输入),执行时需要定义block数目和每个block中的thread数目,
kernelname[gridsize, blocksize](arguments)
下面是个简单例子:
@cuda.jit
def cudakernel0(array):
    for i in range(array.size):
        array[i] += 0.5

array = np.array([0, 1], np.float32)
print('Initial array:', array)

print('Kernel launch: cudakernel0[1, 1](array)')
cudakernel0[1, 1](array)

print('Updated array:',array)
返回
Initial array: [0. 1.]
Kernel launch: cudakernel0[1, 1](array)
Updated array: [0.5 1.5]
这里只使用了一个thread,在这个thread里面用了for循环。
下面有几个常用的函数:
cuda.to_device(x):从cpu转存到gpu
cuda.copy_to_host(x):从gpu转存到cpu
cuda.device_array(shape=(n,), dtype=np.float32)创建gpu上的数组
注意cuda上面的数组一定是连续数组,比如下面的例子:
from numba import vectorize
import math
points = np.random.multivariate_normal([0,0], [[1.,0.9], [0.9,1.]], int(1e7)).astype(np.float32)
@vectorize(['float32(float32, float32)'],target='cuda')
def gpu_arctan2(y, x):
    theta = math.atan2(y,x)
    return theta
x = points[:,0]
y = points[:,1]
%time theta = gpu_arctan2(y, x)
会报错,需要改成:
x = np.ascontiguousarray(points[:,0])
y = np.ascontiguousarray(points[:,1])
%time theta = gpu_arctan2(y, x)
3.2 控制threads总数
当GPU的threads数目大于1时,会并行执行操作:
array = np.array([0, 1], np.float32)
print('Initial array:', array)

gridsize = 1024
blocksize = 1024
print("Grid size: {}, Block size: {}".format(gridsize, blocksize))

print("Total number of threads:", gridsize * blocksize)

print('Kernel launch: cudakernel0[gridsize, blocksize](array)')
cudakernel0[gridsize, blocksize](array)

print('Updated array:',array)
结果非常奇怪,因为不同的thread在给同一个数据执行+0.5的操作。一般来说,我们需要在核函数中设置,当线程编号大于并行数目时,直接return
3.3 grid、block和thread
这3者是抽象的并行处理概念。在核函数中,对grid执行for,跨度为blockthread,在for循环中执行并行函数,一次处理blockthread个。在并行函数中,需要用cuda.grid函数来定位当前数据的位置。
下面的例子中,cuda.gird(1)表示数据是一维的。
@cuda.jit
def cudakernel1(array):
    thread_position = cuda.grid(1)
    array[thread_position] += 0.5

array = np.array([0, 1], np.float32)
print('Initial array:', array)

print('Kernel launch: cudakernel1[1, 2](array)')
cudakernel1[1, 2](array)

print('Updated array:',array)
结果为:
Initial array: [0. 1.]
Kernel launch: cudakernel1[1, 2](array)
Updated array: [0.5 1.5]
如果thread数目小于并行数的话,后面的数据会无法处理:
array = np.array([0, 1], np.float32)
print('Initial array:', array)

print('Kernel launch: cudakernel1[1, 1](array)')
cudakernel1[1, 1](array)

print('Updated array:',array)
返回的是:
Initial array: [0. 1.]
Kernel launch: cudakernel1[1, 1](array)
Updated array: [0.5 1. ]
3.4 并行度下标
首先定义blockDim = thread,gridDim = block,numba中可以通过cuda.blockDim.x和cuda.gridDim.x方式来获取位置。
注意dim可以设置三个维度,函数为 (cuda.blockDim.x, cuda.blockDim.y, cuda.blockDim.z) 和 (cuda.gridDim.x, cuda.gridDim.y, cuda.gridDim.z),默认值都为1。
kernel_name[(griddimx, griddimy, griddimz), (blockdimx, blockdimy, blockdimz)](arguments)
注意前面说过,thread的最大数目为1024,因此blockdimxblockdimyblockdimz不能大于1024。
在这种情况下,并行度的下标为:
(cuda.blockIdx.x * cuda.blockDim.x + cuda.threadIdx.x,
 cuda.blockIdx.y * cuda.blockDim.y + cuda.threadIdx.y,
 cuda.blockIdx.z * cuda.blockDim.z + cuda.threadIdx.z)
为了简写,可以用cuda.grid(3)代替上面的tuple,同理可以用 cuda.grid(2) 代替 (cuda.blockIdx.x * cuda.blockDim.x + cuda.threadIdx.x, cuda.blockIdx.y * cuda.blockDim.y + cuda.threadIdx.y),用cuda.grid(1) 代替cuda.blockIdx.x * cuda.blockDim.x + cuda.threadIdx.x,因此之前的核函数展开为:
@cuda.jit
def cudakernel1b(array):
    thread_position = cuda.blockIdx.x * cuda.blockDim.x + cuda.threadIdx.x
    array[thread_position] += 0.5
3.5 一维例子:多项式计算
a = np.random.randn(2048 * 1024).astype(np.float32)  # our array
p = np.float32(range(1, 10))   # the coefficients of a polynomial in descending order

# Let's evaluate the polynomial X**8 + 2 X**7 + 3 X**6 + ... + 8 X + 9 on each cell of the array:
%timeit np.polyval(p, a)  # coefficients first, in descending order, array next

@cuda.jit
def cuda_polyval(result, array, coeffs):
    # Evaluate a polynomial function over an array with Horner's method.
    # The coefficients are given in descending order.
    i = cuda.grid(1) # equivalent to i = cuda.blockIdx.x * cuda.blockDim.x + cuda.threadIdx.x
    val = coeffs[0]
    for coeff in coeffs[1:]:
        val = val * array[i] + coeff
    result[i] = val

array = np.random.randn(2048 * 1024).astype(np.float32)
coeffs = np.float32(range(1, 10))
result = np.empty_like(array)
cuda_polyval[2048, 1024](result, array, coeffs)
numpy_result = np.polyval(coeffs, array)
print('Maximum relative error compared to numpy.polyval:', np.max(np.abs(numpy_result - result) / np.abs(numpy_result)))
如果我们把数据拷贝剥离,可以发现计算只用了359us:
d_array = cuda.to_device(array)
d_coeffs = cuda.to_device(coeffs)
d_result = cuda.to_device(result)
%timeit cuda_polyval[2048, 1024](d_result, d_array, d_coeffs)
3.6 二维例子:图像卷积
在下面的例子中,image是需要并行处理的数据,result是输出数据
from numba import cuda
import numpy as np

@cuda.jit
def convolve(result, mask, image):
    # expects a 2D grid and 2D blocks,
    # a mask with odd numbers of rows and columns, (-1-)
    # a grayscale image

    # (-2-) 2D coordinates of the current thread:
    i, j = cuda.grid(2)

    # (-3-) if the thread coordinates are outside of the image, we ignore the thread:
    image_rows, image_cols = image.shape
    if (i >= image_rows) or (j >= image_cols):
        return

    # To compute the result at coordinates (i, j), we need to use delta_rows rows of the image
    # before and after the i_th row,
    # as well as delta_cols columns of the image before and after the j_th column:
    delta_rows = mask.shape[0] // 2
    delta_cols = mask.shape[1] // 2

    # The result at coordinates (i, j) is equal to
    # sum_{k, l} mask[k, l] * image[i - k + delta_rows, j - l + delta_cols]
    # with k and l going through the whole mask array:
    s = 0
    for k in range(mask.shape[0]):
        for l in range(mask.shape[1]):
            i_k = i - k + delta_rows
            j_l = j - l + delta_cols
            # (-4-) Check if (i_k, j_k) coordinates are inside the image:
            if (i_k >= 0) and (i_k < image_rows) and (j_l >= 0) and (j_l < image_cols):
                s += mask[k, l] * image[i_k, j_l]
    result[i, j] = s
import skimage.data
from skimage.color import rgb2gray

%matplotlib inline
import matplotlib.pyplot as plt

full_image = rgb2gray(skimage.data.coffee()).astype(np.float32) / 255
plt.figure()
plt.imshow(full_image, cmap='gray')
plt.title("Full size image:")
image = full_image[150:350, 200:400].copy() # We don't want a view but an array and therefore use copy()
plt.figure()
plt.imshow(image, cmap='gray')
plt.title("Part of the image we use:")
plt.show()
# We preallocate the result array:
result = np.empty_like(image)

# We choose a random mask:
mask = np.random.rand(13, 13).astype(np.float32)
mask /= mask.sum()  # We normalize the mask
print('Mask shape:', mask.shape)
print('Mask first (3, 3) elements:\n', mask[:3, :3])

# We use blocks of 32x32 pixels:
blockdim = (32, 32)
print('Blocks dimensions:', blockdim)

# We compute grid dimensions big enough to cover the whole image:
griddim = (image.shape[0] // blockdim[0] + 1, image.shape[1] // blockdim[1] + 1)
print('Grid dimensions:', griddim)

# We apply our convolution to our image:
convolve[griddim, blockdim](result, mask, image)

# We plot the result:
plt.figure()
plt.imshow(image, cmap='gray')
plt.title("Before convolution:")
plt.figure()
plt.imshow(result, cmap='gray')
plt.title("After convolution:")
plt.show()
注意:
Blocks dimensions: (32, 32)
Grid dimensions: (7, 7)
因此可以处理的数据数量为773232>图片尺寸200200
3.7 block的用处:share memory
在同一个block内可以共享同一个share memory,数据传输速度远高于全局显存。不过share memory的size并不大,存不了太多东西,比如一个gtx1070的共享内存仅仅为48kB。
我们用卷积的例子来展示share memory的用法,在上面的例子中,每一个block处理32×32尺寸的图像,卷积核为13×13,因此需要44×44的共享内存保存result,同时13×13的卷积核也保存在共享内存中。
使用cuda.syncthreads()保证在share memory填满之前不进行计算,下面只展示核心代码:
……
shared_image_rows = blockdim[0] + mask_rows - 1
shared_image_cols = blockdim[1] + mask_cols - 1
shared_image_size = shared_image_rows * shared_image_cols
@cuda.jit
def smem_convolve(result, mask, image):
    i, j = cuda.grid(2)
    shared_image = cuda.shared.array(shared_image_size, float32)
    shared_mask = cuda.shared.array(mask_size, float32)

    # Fill shared mask
    if (cuda.threadIdx.x < mask_rows) and (cuda.threadIdx.y < mask_cols):
        shared_mask[cuda.threadIdx.x + cuda.threadIdx.y * mask_rows] = mask[cuda.threadIdx.x, cuda.threadIdx.y]

    # Fill shared image
    # Each thread fills four cells of the array
    row_corner = cuda.blockDim.x * cuda.blockIdx.x - delta_rows
    col_corner = cuda.blockDim.y * cuda.blockIdx.y - delta_cols
    even_idx_x = 2 * cuda.threadIdx.x
    even_idx_y = 2 * cuda.threadIdx.y
    odd_idx_x = even_idx_x + 1
    odd_idx_y = even_idx_y + 1
    for idx_x in (even_idx_x, odd_idx_x):
        if idx_x < shared_image_rows:
            for idx_y in (even_idx_y, odd_idx_y):
                if idx_y < shared_image_cols:
                    point = (row_corner + idx_x, col_corner + idx_y)
                    if (point[0] >= 0) and (point[1] >= 0) and (point[0] < image_rows) and (point[1] < image_cols):
                        shared_image[idx_x + idx_y * shared_image_rows] = image[point]
                    else:
                        shared_image[idx_x + idx_y * shared_image_rows] = float32(0)
    cuda.syncthreads()

    # The result at coordinates (i, j) is equal to
    # sum_{k, l} mask[k, l] * image[threadIdx.x - k + 2 * delta_rows,
    #                               threadIdx.y - l + 2 * delta_cols]
    # with k and l going through the whole mask array:
    s = float32(0)
    for k in range(mask_rows):
        for l in range(mask_cols):
            i_k = cuda.threadIdx.x - k + mask_rows - 1
            j_l = cuda.threadIdx.y - l + mask_cols - 1
            s += shared_mask[k + l * mask_rows] * shared_image[i_k + j_l * shared_image_rows]

    if (i < image_rows) and (j < image_cols):
        result[i, j] = s
3.8 共享内存例子:矩阵乘法
首先是普通版的矩阵乘法:
@cuda.jit
def matmul(A, B, C):
    row, col = cuda.grid(2)
    if row < C.shape[0] and col < C.shape[1]:
        tmp = 0.
        for k in range(A.shape[1]):
            tmp += A[row, k] * B[k, col]
        C[row, col] = tmp
调用部分为:
import math
# Initialize the data arrays
A = np.full((24, 12), 3, np.float) # matrix containing all 3's
B = np.full((12, 22), 4, np.float) # matrix containing all 4's

# Copy the arrays to the device
A_global_mem = cuda.to_device(A)
B_global_mem = cuda.to_device(B)

# Allocate memory on the device for the result
C_global_mem = cuda.device_array((24, 22))

# Configure the blocks
threadsperblock = (16, 16)
blockspergrid_x = int(math.ceil(A.shape[0] / threadsperblock[0]))
blockspergrid_y = int(math.ceil(B.shape[1] / threadsperblock[1]))
blockspergrid = (blockspergrid_x, blockspergrid_y)

# Start the kernel
matmul[blockspergrid, threadsperblock](A_global_mem, B_global_mem, C_global_mem)

# Copy the result back to the host
C = C_global_mem.copy_to_host()

print(C)
耗时为:
CPU times: user 288 ms, sys: 0 ns, total: 288 ms
Wall time: 288 ms
这段代码里面,A_global_mem和B_global_mem都是全局显存,而代码中调用次数非常多(比如说,A_global_mem的每一行被调用了B.shape[1]次)
使用共享内存的原理图如下。每一个thread负责计算一小块C,为了简单起见,我们设置B的宽度为TPB(threads per block)
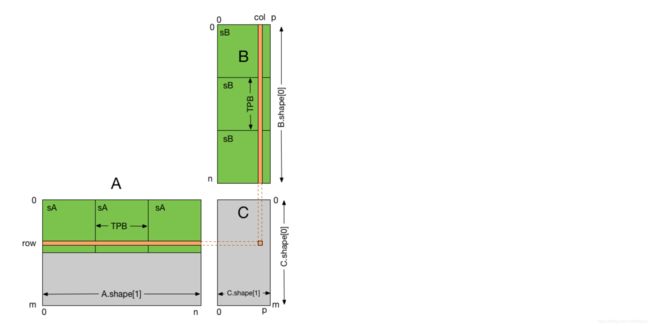
下面是使用共享内存的代码:
# Controls threads per block and shared memory usage.
# The computation will be done on blocks of TPBxTPB elements.
TPB = 16

@cuda.jit
def fast_matmul(A, B, C):
    """
    Perform matrix multiplication of C = A * B
    Each thread computes one element of the result matrix C
    """

    # Define an array in the shared memory
    # The size and type of the arrays must be known at compile time
    sA = cuda.shared.array(shape=(TPB, TPB), dtype=float32)
    sB = cuda.shared.array(shape=(TPB, TPB), dtype=float32)

    x, y = cuda.grid(2) # 这里是并行部分

    # 这里的下标用来加载共享内存
    tx = cuda.threadIdx.x
    ty = cuda.threadIdx.y

    if x >= C.shape[0] and y >= C.shape[1]:
        # Quit if (x, y) is outside of valid C boundary
        return

    # Each thread computes one element in the result matrix.
    # The dot product is chunked into dot products of TPB-long vectors.
    tmp = 0.
    # 从一个个计算变为i个块计算
    for i in range(int(A.shape[1] / TPB)):
        # Preload data into shared memory
        # 加载第i块的共享内存
        sA[tx, ty] = A[x, ty + i * TPB]
        sB[tx, ty] = B[tx + i * TPB, y]

        # Wait until all threads finish preloading
        cuda.syncthreads()

        # Computes partial product on the shared memory
        # 第i块内部进行计算
        for j in range(TPB):
            tmp += sA[tx, j] * sB[j, ty]

        # Wait until all threads finish computing
        cuda.syncthreads()

    C[x, y] = tmp

# The data array
A = numpy.full((TPB*2, TPB*3), 3, numpy.float) # [32 x 48] matrix containing all 3's
B = numpy.full((TPB*3, TPB*1), 4, numpy.float) # [48 x 16] matrix containing all 4's

A_global_mem = cuda.to_device(mat1)
B_global_mem = cuda.to_device(mat2)
C_global_mem = cuda.device_array((TPB*2, TPB*1)) # [32 x 16] matrix result

# Configure the blocks
threadsperblock = (TPB, TPB)
blockspergrid_x = int(math.ceil(A.shape[0] / threadsperblock[1]))
blockspergrid_y = int(math.ceil(B.shape[1] / threadsperblock[0]))
blockspergrid = (blockspergrid_x, blockspergrid_y)

# Start the kernel
fast_matmul[blockspergrid, threadsperblock](A_global_mem, B_global_mem, C_global_mem)
res = C_global_mem.copy_to_host()

print(res)
耗时为
CPU times: user 184 ms, sys: 0 ns, total: 184 ms
Wall time: 185 ms
3.9 编译
用numba.pycc,下面是个例子:
import numpy
from math import sqrt
from numba.pycc import CC
from numba import njit

cc = CC('my_module') #my_module就是我们编译之后的pyd文件的名字,也是我们后续import mu_module的库名

# Uncomment the following line to print out the compilation steps
#cc.verbose = True


@cc.export('multf', 'f8(f8, f8)') #这里支类似与c中的多态,根据输入数据的数据类型设置不同的函数名
@cc.export('multi', 'i4(i4, i4)')#我们在调用的时候,根据输入数据的数据类型分开调用my_module.multi和my_module.multf
@njit
def mult(a, b):
    for i in range(1000):
        a*b
    return a * b

@cc.export('square', 'f8(f8)') #意义同上
@njit
def square(a):
    return a ** 2

if __name__ == "__main__":
    cc.compile() #通过cc.compile进行编译
接下来就可以愉快的调用了。
import my_module
%timeit my_module.multi(500,500)

@njit
def mult(a, b):

    return a * b

%timeit mult(500,500)
4. Array加速
4.1 numpy的ufunc介绍
Array加速的关键是使用ufunc
import math
x = np.arange(int(1e6))
%timeit np.sqrt(x)
%timeit [math.sqrt(xx) for xx in x]
结果为:
100 loops, best of 3: 2.73 ms per loop
10 loops, best of 3: 178 ms per loop
在cpu下,使用ufunc就比逐个计算要快了100倍左右。
4.2 numba的ufunc
用numba可以实现numpy的ufunc功能:
from numba import vectorize
@vectorize
def cpu_sqrt(x):
    return math.sqrt(x)

%timeit cpu_sqrt(x)
2.44 ms ± 534 ns per loop (mean ± std. dev. of 7 runs, 100 loops each)
同样可以转移到GPU上进行计算
@vectorize(['float32(float32)'],target='cuda')
def gpu_sqrt(x):
    return math.sqrt(x)

x_gpu = cuda.to_device(x.astype(np.float32))
%timeit gpu_sqrt(x_gpu)
结果如下:
996 µs ± 1.02 µs per loop (mean ± std. dev. of 7 runs, 1000 loops each)
也可以设置多组参数数据类型,这样当你输入错误的数据类型的时候会自动给你报错:
@vectorize([‘int32(int32, int32)’,
‘int64(int64, int64)’,
‘float32(float32, float32)’,
‘float64(float64, float64)’])
4.3 numba的guvectorize
如果我们的输入参数不是数字而是一个数组类型的数据怎么办?"vectorize"只能支持单元素的函数,这个时候我们可以使用“guvectorize”.
@guvectorize('int64[:], int64, int64[:]', '(n),()->(n)')
def g(x, y, result):
    for i in range(x.shape[0]):
        result[i] = x[i] + y
相对于vectorize来说可以支持数组的输入不过有一个坑就是,函数不能用return,函数类型类型与c中的“void”函数不能返回值,所以这里的输入输出通过参数中的 ‘(n),()->(n)’ 这一项来指定,其中(n)表示1维切样本数为n的,‘()’表示无维则为单元素,“-》”左边代表输入,右边代表输出。
下面是复杂例子:
@guvectorize('float64[:,:], float64[:,:], float64[:,:]',
            '(m,n),(n,p)->(m,p)',target = 'cuda')
def matmul_gpu(A, B, C):
    m, n = A.shape
    n, p = B.shape
    for i in range(m):
        for j in range(p):
            C[i, j] = 0
            for k in range(n):
                C[i, j] += A[i, k] * B[k, j]

%time matmul_gpu(A_global_mem, B_global_mem, C_global_mem)
结果为:
CPU times: user 0 ns, sys: 0 ns, total: 0 ns
Wall time: 997 µs
速度巨快无比,比自己写kernel快多了。
4.4 其他
下面的库也可以为array加速:
mars
CuPy
PyTorch
PyArrow
mpi4py
ArrayViews
JAX
The RAPIDS stack: cuDF,cuML,cuSignal,RMM
在cpu上也有一些加速技巧:英特尔提供了一个简短的矢量数学库(SVML),其中包含大量优化的超越函数,可用作编译器内在函数。 如果环境中存在icc_rt包(或者SVML库只是可定位的!),那么Numba会自动配置LLVM后端以尽可能使用SVML内部函数。 SVML提供每个内在函数的高精度版本和低精度版本,并且使用的版本通过使用fastmath关键字来确定。 默认使用精度高于1 ULP的高精度,但如果fastmath设置为True,则使用内在函数的低精度版本(4个ULP内的)。
大概的意思就是SVML针对LLVM背后的一些函数做了进一步的优化以提高LLVM编译后的程序运行的性能。
conda install -c numba icc_rt
下面是对比测试结果

使用nogil可以去除python的gil锁,只有当Numba可以在nopython模式下编译函数时才会释放GIL,否则将打印编译警告。
cache 启用基于文件的高速缓存,以便在以前的调用中编译该函数时缩短编译时间。缓存保存在__pycache__包含源文件的目录的子目录中。
fastmath允许使用LLVM文档中描述的其他不安全的浮点变换。此外,如果安装英特尔SVML更快,但使用一些数学内在函数的不太准确的版本(内部的答案)。
parallel 自动并行化许多常见的Numpy构造以及相邻并行操作的融合,以最大化缓存局部性。
error_model 控制除以零行为。将它设置为’python’会导致被零除以引发像CPython这样的异常。将其设置为’numpy’会导致被零除以将结果设置为+/- inf或nan。
numpy也可以定义简单的数据类型,比用class快很多:
particle_dtype = numpy.dtype({'names':['x','y','z','m','phi'],
                             'formats':[numpy.double,
                                        numpy.double,
                                        numpy.double,
                                        numpy.double,
                                        numpy.double]})
5 随机数生成
5.1 cpu上并行化生成随机数,然后送入到gpu
from numba import prange,njit
@njit
def getRandos(n):
    for i in prange(n):
        a = np.random.rand()
%timeit getRandos(1000000000)
%timeit np.random.rand(1000000000)
结果为:
1.87 s ± 2.45 ms per loop (mean ± std. dev. of 7 runs, 1 loop each)
11.9 s ± 1.63 ms per loop (mean ± std. dev. of 7 runs, 1 loop each)
10亿个随机数并行也就不到2秒,还行。
5.2 使用cuda的库函数
这里使用mars库来进行一下对比,首先是并行化:
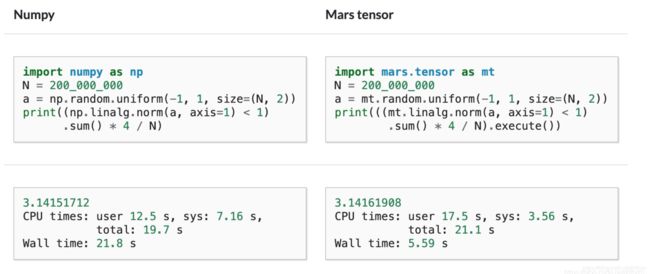
cuda和mars的功能类似,注意cuda安装需要用conda install -c conda-forge cupy
转移到GPU上速度变慢了。

5.3 使用numba的随机数发生器
库为numba.cuda.random。目前有4个:
numba.cuda.random.xoroshiro128p_uniform_float32
numba.cuda.random.xoroshiro128p_uniform_float64
numba.cuda.random.xoroshiro128p_normal_float32
numba.cuda.random.xoroshiro128p_normal_float64
使用方法也很简单,首先需要给每个thread新建一个state:
rng_states = create_xoroshiro128p_states(threads_per_block * blocks, seed=1)
然后就可以在线程中调用:
x = xoroshiro128p_uniform_float32(rng_states, thread_id)
下面是两个例子,分别与第1节和第2节对应:
@cuda.jit
def generate_random(rng_states,out):
    thread_id = cuda.grid(1)
   out[thread_id]=xoroshiro128p_uniform_float32(rng_states,thread_id)
会报错显存溢出。
所以要加上stride,写for循环处理:
@cuda.jit
def generate_random(rng_states,out):
    thread_id = cuda.grid(1)
    for i in range(1000):
        out[thread_id*64+i]=xoroshiro128p_uniform_float32(rng_states,thread_id)
N = 1000000000
threads_per_block = 64
blocks = 15625
rng_states = create_xoroshiro128p_states(1000000, seed=1)
out = np.zeros(N, dtype=np.float32)
rng_states = cuda.to_device(rng_states)
out = cuda.to_device(out)
%time generate_random[blocks, threads_per_block](rng_states,out)
第二个例子如下
from numba import cuda
from numba.cuda.random import create_xoroshiro128p_states, xoroshiro128p_uniform_float32
import numpy as np

@cuda.jit
def compute_pi(rng_states, iterations, out):
    """Find the maximum value in values and store in result[0]"""
    thread_id = cuda.grid(1)

    # Compute pi by drawing random (x, y) points and finding what
    # fraction lie inside a unit circle
    inside = 0
    for i in range(iterations):
        x = xoroshiro128p_uniform_float32(rng_states, thread_id)
        y = xoroshiro128p_uniform_float32(rng_states, thread_id)
        if x**2 + y**2 <= 1.0:
            inside += 1

    out[thread_id] = 4.0 * inside / iterations

threads_per_block = 64
blocks = 625
rng_states = create_xoroshiro128p_states(threads_per_block * blocks, seed=1)
out = np.zeros(threads_per_block * blocks, dtype=np.float32)
%time compute_pi[blocks, threads_per_block](rng_states, 5000, out)
print('pi:', out.mean())
结果为:
CPU times: user 212 ms, sys: 0 ns, total: 212 ms
Wall time: 211 ms
pi: 3.141532
或者用stride,这种方式对随机数发生器的利用率有点低:
from numba import cuda
from numba.cuda.random import create_xoroshiro128p_states, xoroshiro128p_uniform_float32
import numpy as np
@cuda.jit
def generate_random2(rng_states,out):
    thread_id = cuda.grid(1)
    stride=cuda.gridsize(1)
    if thread_id > out.shape[0]:
        return
    for i in range(thread_id,out.shape[0],stride):
        out[i]=xoroshiro128p_uniform_float32(rng_states,i)
N = 100000000
threads_per_block = 64
blocks = N//threads_per_block+1
rng_states = create_xoroshiro128p_states(N, seed=1)
out = np.zeros(N, dtype=np.float32)
%time generate_random2[blocks, threads_per_block](rng_states,out)
结果为:
CPU times: user 352 ms, sys: 324 ms, total: 676 ms
Wall time: 678 ms
N为1000000000时报显存溢出了。
