- nginx自动续期ssl证书
穆雄雄
运维nginxssl运维
大家好,我是雄雄,欢迎关注微信公众号:雄雄的小课堂。前言前年,阿里将免费的ssl证书从一年调整成了三个月;去年,腾讯将免费的ssl证书从一年调整成了三个月;以前一年申请一次,都觉得麻烦,现在三个月就得申请一次,尤其是项目比较多,用的子级域名也多的情况下,得天天看短信哪个ssl证书到期了,很是头疼。好在,也是有解决方法的。✅解决方法之前也在github上看了看,有类似的shell脚本可以实现自动续签
- 宝塔面板申请SSL安全证书一直显示“待域名确认”?如何处理解决?
青云网运维
宝塔面板教程WordPress教程
现在越来越多的站点加入到https的大军中来了,主要还是有很多免费的SSL证书可以申请,还有很多平台可以帮助我们一键申请域名证书,比如宝塔面板就支持这样的操作(运维大神可以右上角关闭了,我们小白喜欢用面板),如果还有不了解宝塔面板怎么使用的小伙伴,可以看下我总结的系列教程,保证从新手变老鸟:【宝塔面板精选教程汇总】宝塔面板教程(1)基于云服务器搭建宝塔面板教程最全详解宝塔面板教程(2)宝塔面板添加
- 【Apache Paimon】-- 13 -- 利用 paimon-flink-action 同步 mysql 表数据
oo寻梦in记
ApachePaimonapacheflinkmysqlapachepaimon
利用PaimonSchemaEvolution核心特性同步变更的mysql表结构和数据1、背景信息在Paimon诞生以前,若mysql/pg等数据源的表结构发生变化时,我们有几种处理方式(1)人工通知(比如常规的使用邮件),然后运维人员手动同步到数据仓库中(2)使用flink消费DDLbinlog,然后自动更新Hive的外部表和内部表schema那么现在,有了Paimon,我们可以利用其特性,自动
- docker-compose部署onlyoffice8.3.0并支持ssl,且支持通过nginx代理,关闭JWT配置
luopeng207663436
dockersslnginx
编写docker-compose文件mkdir-p/data/onlyoffice&&echo"version:'3'services:onlyoffice:container_name:OnlyOfficeimage:onlyoffice/documentserver:8.3.0restart:alwaysports:-8088:80-64431:443environment:TZ:Asia/S
- [Yocto] stm32mp1 Linux系统构建
山猫Show
Yoctoyocto
硬件需求我将尝试解释这些教程中每个步骤发生的情况,以便您可以将说明推广到几乎任何单板计算机(假设构建系统支持该板)。但是,对于演示,我将使用以下平台:STM32MP157D-DK1您还需要一张SD卡。STM32MP157D-DK1套件应随附一张SD卡。此外,您还需要一个能够提供5V、3A的USB-C电源。软件需求这个项目需要Linux,因为我们使用的所有工具都必须在Linux中运行。我将展示在Ub
- 5大升级 vs 0顾虑:Nginx Plus新特性解读,企业级功能增强全揭秘
墨瑾轩
一起学学Nginx【一】nginxgithubgit
关注墨瑾轩,带你探索编程的奥秘!超萌技术攻略,轻松晋级编程高手技术宝库已备好,就等你来挖掘订阅墨瑾轩,智趣学习不孤单即刻启航,编程之旅更有趣在当今这个瞬息万变的互联网世界里,NginxPlus就像是一个不断进化的超级英雄,每次更新都带来了新的能力和更强大的力量。今天,我们将深入探讨NginxPlus的最新特性,看看它如何为企业提供更加稳健、高效的服务。准备好迎接这场技术盛宴了吗?让我们一起揭开Ng
- 使用Kettle定时同步数据库的数据(详细实例操作)
故里2130
包教会专栏数据库
数据库的数据同步、迁移在我们运维软件中,经常使用,而且非常的频繁。同步、迁移数据的工具非常多,比如Navicat、SqlServer等等,甚至很多公司,都是自己写的定时同步软件。今天,我们介绍一款Java开源免费的数据库同步软件,功能非常强大。本节只演示,定时同步数据库的数据,从test数据库定时同步到test1数据库的教程。(坑很多)1.首先下载安装包,进行解压。路径:迅雷云盘2.然后进入目录中
- Linux mount命令
A星空123
Linux总结linux运维服务器
Linuxmount命令是经常会使用到的命令,它用于挂载Linux系统外的文件。一、挂载功能介绍挂载方法:mountDECEMOUNT_POINT命令使用格式:mount[-fnrsvw][-tvfstype][-ooptions]devicedirdevice:指明要挂载的设备;(1)设备文件:例如/dev/sda5(2)卷标:-L'LABEL',例如-L'MYDATA'(3)UUID,-U'U
- 关于跨域和端口问题
Mayer999
Javanginx
写在文章之前nginx相信大家并不陌生,但nginx到底有什么用,和tomcat有什么区别,笔者最近遇到了这些问题,在此总结下。还有关于跨域和前后端交互不清楚的,相信会有所收获。环境:开发工具:IntellijIDEA2019.3jdk:1.8.0_181springboot:2.1.11springcloud:Finchley.RC1一、端口问题1.1nginx解决端口问题域名问题解决了,但是现
- Ubuntu 下 nginx-1.24.0 源码分析 - ngx_conf_add_dump
若云止水
nginxlinux
ngx_conf_add_dump定义在src\core\ngx_conf_file.cstaticngx_int_tngx_conf_add_dump(ngx_conf_t*cf,ngx_str_t*filename){off_tsize;u_char*p;uint32_thash;ngx_buf_t*buf;ngx_str_node_t*sn;ngx_conf_dump_t*cd;hash=n
- Ubuntu 下 nginx-1.24.0 源码分析 - ngx_fd_info
若云止水
nginx运维
ngx_fd_info定义在src\os\unix\ngx_files.h#definengx_fd_info(fd,sb)fstat(fd,sb)fstat()是POSIX标准中定义的一个系统调用函数,用于获取与已打开文件描述符关联的文件状态信息。它通过填充一个structstat结构体来返回文件的元数据(如大小、权限、时间戳等)。以下是详细解释:函数原型#include#include#inc
- Ubuntu 下 nginx-1.24.0 源码分析 - ngx_conf_t
若云止水
ubuntunginx数据库
ngx_conf_t定义在src/core/ngx_core.htypedefstructngx_conf_sngx_conf_t;ngx_conf_s定义在src/core/ngx_conf_file.hstructngx_conf_s{char*name;ngx_array_t*args;ngx_cycle_t*cycle;ngx_pool_t*pool;ngx_pool_t*temp_poo
- Ubuntu 下 nginx-1.24.0 源码分析 - ngx_get_full_name 函数
若云止水
nginx运维
ngx_get_full_name声明在src/core/ngx_file.hngx_int_tngx_get_full_name(ngx_pool_t*pool,ngx_str_t*prefix,ngx_str_t*name);定义在src\core\ngx_file.cngx_int_tngx_get_full_name(ngx_pool_t*pool,ngx_str_t*prefix,ngx
- Ubuntu 下 nginx-1.24.0 源码分析 - ngx_file_t
若云止水
nginx数据库运维
ngx_file_t定义在src/core/ngx_core.htypedefstructngx_file_sngx_file_t;ngx_file_s定义在src/core/ngx_file.hstructngx_file_s{ngx_fd_tfd;ngx_str_tname;ngx_file_info_tinfo;off_toffset;off_tsys_offset;ngx_log_t*lo
- 基于 Elasticsearch 和 Milvus 的 RAG 运维知识库的架构设计和部署落地实现指南
ViniJack
AImilvus运维rag落地方案知识库
最近在整理一些业务场景的架构设计和部署落地实现指南先放一个【基于RAG的运维知识库(ElasticSearch+Milvus)的详细实现指南】,其中包含了详尽的技术实现细节、可运行的示例代码、原理分析、优缺点分析和应用场景分析。架构描述:基于RAG的运维知识库(ElasticSearch+Milvus)部署指南1.极其详细的部署步骤(包含详尽的技术实现细节和分步骤、可运行的示例代码-也只能给示例代
- Linux系统关于Qt platform plugin “xcb“缺失的解决
chase。
Bug调试linuxqtdebian
之前在Debian10.0系统中安装图形库(如QT)相关时出现xcb缺失、xinerama缺失的问题。qt.qpa.plugin:CouldnotloadtheQtplatformplugin"xcb"in""eventhoughitwasfound.libxcb-xinerama.so.0:cannotopensharedobjectfile:Nosuchfileordirectory在~/.b
- 01基础 4、Shell 脚本
睡神之首
#Linux基础linux运维
shell学习目标1.Shell基本概述2.Shell的变量定义3.Shell数值运算4.Shell的流程控制if语句5.Shell的循环语句forwhile循环6.Shell的数组函数7.Shell内置命令8.Shell正则表达式AwkGrepSedShellshell概述1、shell是命令解释器,shell存在Linux系统的最外层,shell连接系统,负责和用户对话,用户输入用户名和密码登
- 用nginx正向代理https网站
大地爱
nginxhttps运维
目录1.缘起2.部署nginx3.测试3.1http测试3.2https测试4给centos设置代理访问外网1.缘起最近碰到了一个麻烦事情,就是公司的centos测试服务器放在内网环境,而且不能直接上外网,导致无法通过yum安装软件,非常捉急。幸好,内网还是有可以可以访问外网的机器,所以就想到应该可以利用nginx搭建一个代理服务器,然后centos通过这个nginx来访问外网。当然,如果只是代理
- 使用Idea创建springboot项目
奔跑吧邓邓子
SpringBoot深入浅出常见问题解答(FAQ)高效运维javaidea
提示:“奔跑吧邓邓子”的高效运维专栏聚焦于各类运维场景中的实际操作与问题解决。内容涵盖服务器硬件(如IBMSystem3650M5)、云服务平台(如腾讯云、华为云)、服务器软件(如Nginx、Apache、GitLab、Redis、Elasticsearch、Kubernetes、Docker等)、开发工具(如Git、HBuilder)以及网络安全(如挖矿病毒排查、SSL证书配置)等多个方面。无论
- python的pip如何升级
一代码动乾坤
pythonpythonpip开发语言
升级pip的方法如下:打开命令行工具。在Windows系统中,可以通过按下Win+R键,然后输入"cmd"来打开命令提示符;在Mac或Linux系统中,可以直接打开终端。检查当前pip版本。在终端或命令行中输入以下命令:pip--version,这将显示当前安装的版本号。升级pip。使用以下命令来升级pip:pipinstall--upgradepip,这将会检查并安装最新版本的pip,如果已经
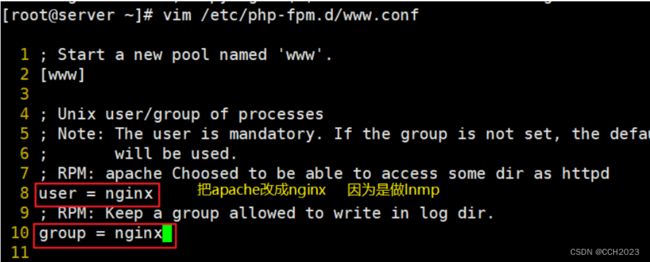
- 使用Dockerfile搭建ubuntu20.04 + php8.2镜像
编写Dockerfile最近在部署项目事,想做一个基于ubuntu20.04,搭建nginx+php8.*的镜像。但是在制作的过程中遇到了很多坑,记录下来供后续参考学习。修改镜像过程大概分为了6个模块:模块一:对ubuntu20.04官方镜像重新构造。模块二:在基础镜像添加php8.*的源模块三:安装nginx、php以及相关依赖。模块四:设置nginx、php配置文件模块五:编写nginx、ph
- 基于 Linux 系统(迅为 iTOP-4412)设计的倒车雷达系统
鱼弦
Linux系统编程与驱动开发linux运维服务器
鱼弦:公众号:红尘灯塔,CSDN博客专家、内容合伙人、新星导师、全站领域优质创作者、51CTO(Top红人+专家博主)、github开源爱好者(go-zero源码二次开发、游戏后端架构https://github.com/Peakchen)基于Linux系统(迅为iTOP-4412)设计的倒车雷达系统介绍倒车雷达系统是一种辅助驾驶系统,它通过超声波传感器检测车辆后方障碍物,并通过声音或视觉信号向驾
- 【北京迅为】iTOP-RK3568OpenHarmony系统南向驱动开发-第5章 UART接口运作机制
北京迅为
鸿蒙harmonyos鸿蒙嵌入式硬件人工智能RK3568
瑞芯微RK3568芯片是一款定位中高端的通用型SOC,采用22nm制程工艺,搭载一颗四核Cortex-A55处理器和MaliG522EE图形处理器。RK3568支持4K解码和1080P编码,支持SATA/PCIE/USB3.0外围接口。RK3568内置独立NPU,可用于轻量级人工智能应用。RK3568支持安卓11和linux系统,主要面向物联网网关、NVR存储、工控平板、工业检测、工控盒、卡拉OK
- VMware NSX 4.2.1.3 下载 - 网络安全虚拟化平台
vmware
VMwareNSX4.2.1.3-网络安全虚拟化平台构建具有网络连接和安全性的云智能网络,跨多种云环境支持一致的策略、运维和自动化。请访问原文链接:https://sysin.org/blog/vmware-nsx-4/查看最新版。原创作品,转载请保留出处。作者主页:sysin.orgVMwareNSX4.2.1.3|10FEB2025|Build24533884VMwareNSX4.2.1.2|
- Docker网络与数据卷持久化
由于格式和图片解析问题,为了更好的阅读体验,可以前往阅读原文docker中网络的概念也是非常重要,它对于容器资源的隔离也起着非常重要的作用。你有没有在启动一个容器后查看它的ip,假如你启动了一个nignx容器,你想在主机上访问它,首先得知道他的ip地址,可以通过以下方式获取:dockerinspectnginx|grep-A20Networks#..."Networks":{"bridge":{#
- WGCLOUD 和 WGCAT 有什么区别
WGCLOUD是运维监控软件,WGCAT是工单管理软件不过,这两个产品都是同一个团队(WGCLOUD团队)开发的,WGCAT是团队近期发布的一款工单管理系统
- 控制对文件的访问
上邪o_O
linux运维
什么是文件系统权限?它是如何工作的?如何查看文件的权限?文件系统权限是一种安全机制,用于控制用户和组对文件和目录的访问权限。它规定了不同用户角色(所有者、所属组、其他用户)对文件或目录可以执行的操作,如读取、写入和执行。Linux系统为每个文件和目录分配了三组权限,分别对应文件的所有者、所属组和其他用户。每组权限包含读取(r)、写入(w)和执行(x)三种基本权限。当用户尝试访问文件或目录时,系统会
- wordpress使用CorePress主题设置项总结
linlinlove2
wordpress二次开发wordpress主题开发
宝塔面板设置软件商店中安装的软件有:(宝塔网站加速3.1)(Nginx1.18.0)(MySql5.6.50)(PHP-5.6)(phpMyAdmin4.4)(Python项目管理器1.9)(又拍云存储4.5)(Linux工具箱1.4)(宝塔SSH终端1.0)(Nginx免费防火墙5.3)网站:首次添加站点选择自动创建数据库网站–>SSL:申请免费Let’sEncrypt证书,并开启强制https
- Linux 学习必杀技:从菜鸟到高手的蜕变密码
羑悻的小杀马特.
linux学习运维服务器Linux
踏入Linux奇幻世界,借C++利刃,解锁文件、进程、网络等核心编程奥秘。附实用学习法与精选好书,助你从菜鸟一跃成Linux高手。一、本篇介绍:在当今的技术领域,Linux操作系统以其开源、稳定、高效等特性,占据着至关重要的地位。无论是服务器领域、嵌入式系统,还是云计算、大数据等新兴技术,Linux都发挥着核心作用。对于初学者来说,掌握Linux系统不仅能拓宽职业道路,还能深入理解计算机系统的底层
- Nginx反向代理出现502 Bad Gateway问题的解决方案
m0_74824496
面试学习路线阿里巴巴nginxgateway运维
??前言前一阵子写了一篇“关于解决调用百度翻译API问题”的博客,近日在调用其他API时又遇到一些棘手的问题,于是写下这篇博客作为记录。??问题描述在代理的遇到过很多错误码,其中出现频率最高的就是502,说实话,当时我是在网上找了好久,也一直在问chatgpt,但是收效甚微,依然没什么头绪和进展。网上关于502错误码的原因大致分为两种:网络问题和上游服务器的问题。网络问题我很快就排查完了,在终端中
- apache ftpserver-CentOS config
gengzg
apache
<server xmlns="http://mina.apache.org/ftpserver/spring/v1"
xmlns:xsi="http://www.w3.org/2001/XMLSchema-instance"
xsi:schemaLocation="
http://mina.apache.o
- 优化MySQL数据库性能的八种方法
AILIKES
sqlmysql
1、选取最适用的字段属性 MySQL可以很好的支持大数据量的存取,但是一般说来,数据库中的表越小,在它上面执行的查询也就会越快。因此,在创建表的时候,为了获得更好的 性能,我们可以将表中字段的宽度设得尽可能小。例如,在定义邮政编码这个字段时,如果将其设置为CHAR(255),显然给数据库增加了不必要的空间,甚至使用VARCHAR这种类型也是多余的,因为CHAR(6)就可以很
- JeeSite 企业信息化快速开发平台
Kai_Ge
JeeSite
JeeSite 企业信息化快速开发平台
平台简介
JeeSite是基于多个优秀的开源项目,高度整合封装而成的高效,高性能,强安全性的开源Java EE快速开发平台。
JeeSite本身是以Spring Framework为核心容器,Spring MVC为模型视图控制器,MyBatis为数据访问层, Apache Shiro为权限授权层,Ehcahe对常用数据进行缓存,Activit为工作流
- 通过Spring Mail Api发送邮件
120153216
邮件main
原文地址:http://www.open-open.com/lib/view/open1346857871615.html
使用Java Mail API来发送邮件也很容易实现,但是最近公司一个同事封装的邮件API实在让我无法接受,于是便打算改用Spring Mail API来发送邮件,顺便记录下这篇文章。 【Spring Mail API】
Spring Mail API都在org.spri
- Pysvn 程序员使用指南
2002wmj
SVN
源文件:http://ju.outofmemory.cn/entry/35762
这是一篇关于pysvn模块的指南.
完整和详细的API请参考 http://pysvn.tigris.org/docs/pysvn_prog_ref.html.
pysvn是操作Subversion版本控制的Python接口模块. 这个API接口可以管理一个工作副本, 查询档案库, 和同步两个.
该
- 在SQLSERVER中查找被阻塞和正在被阻塞的SQL
357029540
SQL Server
SELECT R.session_id AS BlockedSessionID ,
S.session_id AS BlockingSessionID ,
Q1.text AS Block
- Intent 常用的用法备忘
7454103
.netandroidGoogleBlogF#
Intent
应该算是Android中特有的东西。你可以在Intent中指定程序 要执行的动作(比如:view,edit,dial),以及程序执行到该动作时所需要的资料 。都指定好后,只要调用startActivity(),Android系统 会自动寻找最符合你指定要求的应用 程序,并执行该程序。
下面列出几种Intent 的用法
显示网页:
- Spring定时器时间配置
adminjun
spring时间配置定时器
红圈中的值由6个数字组成,中间用空格分隔。第一个数字表示定时任务执行时间的秒,第二个数字表示分钟,第三个数字表示小时,后面三个数字表示日,月,年,< xmlnamespace prefix ="o" ns ="urn:schemas-microsoft-com:office:office" />
测试的时候,由于是每天定时执行,所以后面三个数
- POJ 2421 Constructing Roads 最小生成树
aijuans
最小生成树
来源:http://poj.org/problem?id=2421
题意:还是给你n个点,然后求最小生成树。特殊之处在于有一些点之间已经连上了边。
思路:对于已经有边的点,特殊标记一下,加边的时候把这些边的权值赋值为0即可。这样就可以既保证这些边一定存在,又保证了所求的结果正确。
代码:
#include <iostream>
#include <cstdio>
- 重构笔记——提取方法(Extract Method)
ayaoxinchao
java重构提炼函数局部变量提取方法
提取方法(Extract Method)是最常用的重构手法之一。当看到一个方法过长或者方法很难让人理解其意图的时候,这时候就可以用提取方法这种重构手法。
下面是我学习这个重构手法的笔记:
提取方法看起来好像仅仅是将被提取方法中的一段代码,放到目标方法中。其实,当方法足够复杂的时候,提取方法也会变得复杂。当然,如果提取方法这种重构手法无法进行时,就可能需要选择其他
- 为UILabel添加点击事件
bewithme
UILabel
默认情况下UILabel是不支持点击事件的,网上查了查居然没有一个是完整的答案,现在我提供一个完整的代码。
UILabel *l = [[UILabel alloc] initWithFrame:CGRectMake(60, 0, listV.frame.size.width - 60, listV.frame.size.height)]
- NoSQL数据库之Redis数据库管理(PHP-REDIS实例)
bijian1013
redis数据库NoSQL
一.redis.php
<?php
//实例化
$redis = new Redis();
//连接服务器
$redis->connect("localhost");
//授权
$redis->auth("lamplijie");
//相关操
- SecureCRT使用备注
bingyingao
secureCRT每页行数
SecureCRT日志和卷屏行数设置
一、使用securecrt时,设置自动日志记录功能。
1、在C:\Program Files\SecureCRT\下新建一个文件夹(也就是你的CRT可执行文件的路径),命名为Logs;
2、点击Options -> Global Options -> Default Session -> Edite Default Sett
- 【Scala九】Scala核心三:泛型
bit1129
scala
泛型类
package spark.examples.scala.generics
class GenericClass[K, V](val k: K, val v: V) {
def print() {
println(k + "," + v)
}
}
object GenericClass {
def main(args: Arr
- 素数与音乐
bookjovi
素数数学haskell
由于一直在看haskell,不可避免的接触到了很多数学知识,其中数论最多,如素数,斐波那契数列等,很多在学生时代无法理解的数学现在似乎也能领悟到那么一点。
闲暇之余,从图书馆找了<<The music of primes>>和<<世界数学通史>>读了几遍。其中素数的音乐这本书与软件界熟知的&l
- Java-Collections Framework学习与总结-IdentityHashMap
BrokenDreams
Collections
这篇总结一下java.util.IdentityHashMap。从类名上可以猜到,这个类本质应该还是一个散列表,只是前面有Identity修饰,是一种特殊的HashMap。
简单的说,IdentityHashMap和HashM
- 读《研磨设计模式》-代码笔记-享元模式-Flyweight
bylijinnan
java设计模式
声明: 本文只为方便我个人查阅和理解,详细的分析以及源代码请移步 原作者的博客http://chjavach.iteye.com/
import java.util.ArrayList;
import java.util.Collection;
import java.util.HashMap;
import java.util.List;
import java
- PS人像润饰&调色教程集锦
cherishLC
PS
1、仿制图章沿轮廓润饰——柔化图像,凸显轮廓
http://www.howzhi.com/course/retouching/
新建一个透明图层,使用仿制图章不断Alt+鼠标左键选点,设置透明度为21%,大小为修饰区域的1/3左右(比如胳膊宽度的1/3),再沿纹理方向(比如胳膊方向)进行修饰。
所有修饰完成后,对该润饰图层添加噪声,噪声大小应该和
- 更新多个字段的UPDATE语句
crabdave
update
更新多个字段的UPDATE语句
update tableA a
set (a.v1, a.v2, a.v3, a.v4) = --使用括号确定更新的字段范围
- hive实例讲解实现in和not in子句
daizj
hivenot inin
本文转自:http://www.cnblogs.com/ggjucheng/archive/2013/01/03/2842855.html
当前hive不支持 in或not in 中包含查询子句的语法,所以只能通过left join实现。
假设有一个登陆表login(当天登陆记录,只有一个uid),和一个用户注册表regusers(当天注册用户,字段只有一个uid),这两个表都包含
- 一道24点的10+种非人类解法(2,3,10,10)
dsjt
算法
这是人类算24点的方法?!!!
事件缘由:今天晚上突然看到一条24点状态,当时惊为天人,这NM叫人啊?以下是那条状态
朱明西 : 24点,算2 3 10 10,我LX炮狗等面对四张牌痛不欲生,结果跑跑同学扫了一眼说,算出来了,2的10次方减10的3次方。。我草这是人类的算24点啊。。
然后么。。。我就在深夜很得瑟的问室友求室友算
刚出完题,文哥的暴走之旅开始了
5秒后
- 关于YII的菜单插件 CMenu和面包末breadcrumbs路径管理插件的一些使用问题
dcj3sjt126com
yiiframework
在使用 YIi的路径管理工具时,发现了一个问题。 <?php
- 对象与关系之间的矛盾:“阻抗失配”效应[转]
come_for_dream
对象
概述
“阻抗失配”这一词组通常用来描述面向对象应用向传统的关系数据库(RDBMS)存放数据时所遇到的数据表述不一致问题。C++程序员已经被这个问题困扰了好多年,而现在的Java程序员和其它面向对象开发人员也对这个问题深感头痛。
“阻抗失配”产生的原因是因为对象模型与关系模型之间缺乏固有的亲合力。“阻抗失配”所带来的问题包括:类的层次关系必须绑定为关系模式(将对象
- 学习编程那点事
gcq511120594
编程互联网
一年前的夏天,我还在纠结要不要改行,要不要去学php?能学到真本事吗?改行能成功吗?太多的问题,我终于不顾一切,下定决心,辞去了工作,来到传说中的帝都。老师给的乘车方式还算有效,很顺利的就到了学校,赶巧了,正好学校搬到了新校区。先安顿了下来,过了个轻松的周末,第一次到帝都,逛逛吧!
接下来的周一,是我噩梦的开始,学习内容对我这个零基础的人来说,除了勉强完成老师布置的作业外,我已经没有时间和精力去
- Reverse Linked List II
hcx2013
list
Reverse a linked list from position m to n. Do it in-place and in one-pass.
For example:Given 1->2->3->4->5->NULL, m = 2 and n = 4,
return
- Spring4.1新特性——页面自动化测试框架Spring MVC Test HtmlUnit简介
jinnianshilongnian
spring 4.1
目录
Spring4.1新特性——综述
Spring4.1新特性——Spring核心部分及其他
Spring4.1新特性——Spring缓存框架增强
Spring4.1新特性——异步调用和事件机制的异常处理
Spring4.1新特性——数据库集成测试脚本初始化
Spring4.1新特性——Spring MVC增强
Spring4.1新特性——页面自动化测试框架Spring MVC T
- Hadoop集群工具distcp
liyonghui160com
1. 环境描述
两个集群:rock 和 stone
rock无kerberos权限认证,stone有要求认证。
1. 从rock复制到stone,采用hdfs
Hadoop distcp -i hdfs://rock-nn:8020/user/cxz/input hdfs://stone-nn:8020/user/cxz/运行在rock端,即源端问题:报版本
- 一个备份MySQL数据库的简单Shell脚本
pda158
mysql脚本
主脚本(用于备份mysql数据库): 该Shell脚本可以自动备份
数据库。只要复制粘贴本脚本到文本编辑器中,输入数据库用户名、密码以及数据库名即可。我备份数据库使用的是mysqlump 命令。后面会对每行脚本命令进行说明。
1. 分别建立目录“backup”和“oldbackup” #mkdir /backup #mkdir /oldbackup
- 300个涵盖IT各方面的免费资源(中)——设计与编码篇
shoothao
IT资源图标库图片库色彩板字体
A. 免费的设计资源
Freebbble:来自于Dribbble的免费的高质量作品。
Dribbble:Dribbble上“免费”的搜索结果——这是巨大的宝藏。
Graphic Burger:每个像素点都做得很细的绝佳的设计资源。
Pixel Buddha:免费和优质资源的专业社区。
Premium Pixels:为那些有创意的人提供免费的素材。
- thrift总结 - 跨语言服务开发
uule
thrift
官网
官网JAVA例子
thrift入门介绍
IBM-Apache Thrift - 可伸缩的跨语言服务开发框架
Thrift入门及Java实例演示
thrift的使用介绍
RPC
POM:
<dependency>
<groupId>org.apache.thrift</groupId>