无人机上仅使用CPU实时运行Yolov5(OpenVINO实现)(上篇)
Intel CPU在运行视觉导航等算法时实时性要优于Nvidia等平台,如Jetson Tx2,NX。而Nvidia平台在运行深度学习算法方面具有很大优势,两种平台各有利弊。但是,Intel OpenVINO的推出允许NUC平台实时运行深度学习模型,如目前最流行的目标检测程序Yolov5,这样就太好了,仅使用Intel无人机平台就可以完成各种任务。本教程将教你用Prometheus在Intel无人机平台部署Yolov5目标检测。
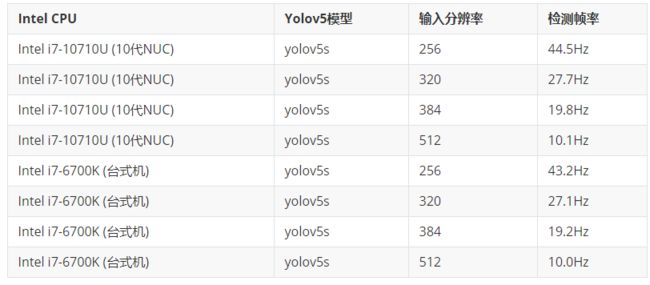
先来个速度测试,仅使用Intel CPU,没有模型压缩与剪枝等算法,也不依赖其他任何加速硬件。
一、安装OpenVINO
官网教程:
https://docs.openvinotoolkit.org/latest/openvino_docs_install_guides_installing_openvino_linux.html
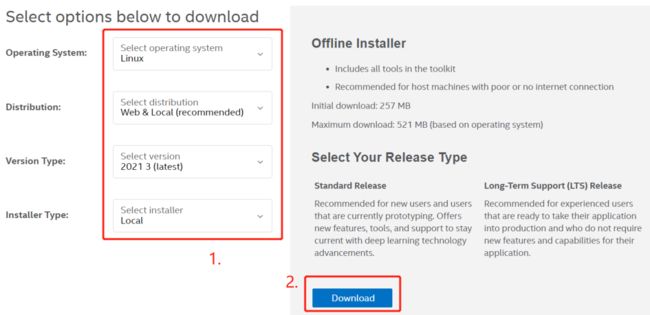
1. 下载安装包
地址:
https://software.intel.com/content/www/us/en/develop/tools/openvino-toolkit/download.html?operatingsystem=linux&distributions=webdownload&version=2021%203%20(latest)&options=offline
2. 如果之前安装过openvino,重命名或删除以下文件:
~/inference_engine_samples_build
~/openvino_models
3. 打开终端,解压安装包并进入解压路径
cd ~/Downloads/
tar -xvzf l_openvino_toolkit_p_.tgz
cd l_openvino_toolkit_p_
4. 安装OpenVINO
sudo ./install_GUI.sh
5. 安装软件依赖
cd /opt/intel/openvino_2021/install_dependencies
sudo -E ./install_openvino_dependencies.sh
6. 配置模型优化器
cd /opt/intel/openvino_2021/deployment_tools/model_optimizer/install_prerequisites
sudo ./install_prerequisites.sh
如果下载很慢,可以修改
~/.pip/pip.conf,转到国内源[global] index-url = http://mirrors.aliyun.com/pypi/simple/ [install] trusted-host = mirrors.aliyun.com
二、配置Yolov5,运行演示程序
1. 下载Prometheus子模块Yolov5,并配置
sudo apt install python3-pip cd/ ./Scripts/install_detection_yolov5openvino.sh
2. 下载模型权重或训练自己的模型
以官方权重为例
cd/Modules/object_detection_yolov5openvino/weights wget https://github.com/ultralytics/yolov5/releases/download/v3.0/yolov5s.pt
3. 将.pt权重文件转换为.onnx文件
运行命令:
cd/Modules/object_detection_yolov5openvino python3 models/export.py --weights weights/yolov5s.pt --img 384 --batch 1
4. 将.onnx文件转换为IR文件
cd/Modules/object_detection_yolov5openvino python3 /opt/intel/openvino_2021/deployment_tools/model_optimizer/mo.py --input_model weights/yolov5s.onnx --model_name weights/yolov5s -s 255 --reverse_input_channels --output Conv_487,Conv_471,Conv_455
5. 运行演示程序
cd/ ./Scripts/start_yolov5openvino_server.sh # Ctrl+t 打开一个新的命令行页面,并运行: roslaunch prometheus_detection yolov5_intel_openvino.launch
运行结果如下:
6. 输入ROS-Launch参数
以
其中:
-
output_topic:检测结果输出话题(消息类型:
-
MultiDetectionInfo.msg) -
camera_parameters:相机参数文件(为了估计视线角误差、目标位置)
-
object_names_txt:目标类别描述
txt问题(具体见:/Modules/object_detection/py_nodes/yolov5_openvion_client/class_desc/coco.txt
7. 输出ROS话题解析
默认输出话题,消息类型:
##`MultiDetectionInfo.msg`
Header header
## 检测到的目标数量
int32 num_objs
## 每个目标的检测结果
DetectionInfo[] detection_infos
##`DetectionInfo.msg`
## 是否检测到目标
bool detected
## 目标类别名称
string object_name
## 类别ID
int32 category
## 0表示相机坐标系, 1表示机体坐标系, 2表示惯性坐标系
int32 frame
## 目标位置[相机系下:右方x为正,下方y为正,前方z为正]
float32[3] position
## 目标姿态-欧拉角-(z,y,x)
float32[3] attitude
## 目标姿态-四元数-(qx,qy,qz,qw)
float32[4] attitude_q
## 视线角度[相机系下:右方x角度为正,下方y角度为正]
float32[2] sight_angle
## 偏航角误差
float32 yaw_error
注意:
默认情况下每个目标仅有detected, object_name, category, frame,sight_angle的输出。
如果想输出position,需要在类别描述文件如
m)。
如上图,以人(person)为例,设置宽度0.5m,高度1.8m
然后,需要修改源代码,这里以高度估计人距离摄像机的距离,并以此估计position。
源代码位置:
112-114行)
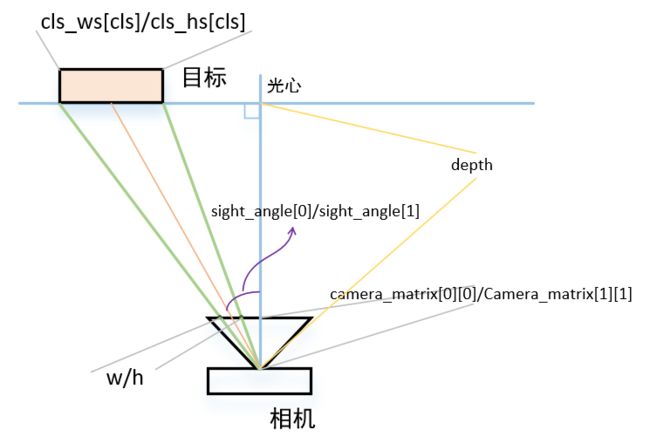
cls==0用来判断是否为类别—person,cls_hs[cls]用来读取目标高度(读到的数就是我们写在coco.txt里的1.8m),camera_matrix[1][1]为垂直方向像素焦距(由相机标定参数文件决定),h物体的像素高度(为实时检测结果,并被归一化到0-1)
附:目标位置测量原理
到此,各位看官们,上篇
Yolov5-OpenVINO(X86)
上面的环境部署到此结束,也欢迎关注开源自主无人机项目“Prometheus”,在此附上链接 “https://github.com/amov-lab/Prometheus.git” 。
阅读 1651


