【图像分类】基于OpenVINO实现PyTorch ResNet50图像分类
博客主页: virobotics的CSDN博客:LabVIEW深度学习、人工智能博主
所属专栏:『LabVIEW深度学习实战』
上期文章: 使用LabVIEW AI视觉工具包快速实现SIFT特征检测(含源码)
如觉得博主文章写的不错或对你有所帮助的话,还望大家多多支持呀! 欢迎大家✌关注、点赞、✌收藏、订阅专栏
文章目录
- 前言
- 一、ResNet简介
-
- 1.1 ResNet概念及特点
- 1.2 ResNet完整结构
- 1.3 ResNet50 网络模型
- 二、环境搭建
-
- 2.1 部署本项目时所用环境
- 2.2 LabVIEW工具包下载及安装
- 三、LabVIEW OpenVINO实现resnet50图像分类
-
- 3.1 模型获取及转换为onnx
- 3.2 LabVIEW OpenVINO调用 resnet50实现图像分类(openvino_resnet.vi.vi)
- 四、项目源码
- 总结
前言
前面博文给大家介绍了OpenVINO工具包及具体的安装,今天我们一起来看一下,如何使用LabVIEW OpenVINO工具包实现resnet50的推理部署。
一、ResNet简介
1.1 ResNet概念及特点
ResNet在2015名声大噪,何恺明推出的ResNet在ISLVRC和COCO上横扫所有选手,获得冠军,而且影响了2016年DL在学术界和工业界的发展方向。ResNet在网络结构上做了大创新,而不再是简单的堆积层数,它对每层的输入做一个reference, 学习形成残差函数, 而不是学习一些没有reference的函数。这种残差函数更容易优化,能使网络层数大大加深。
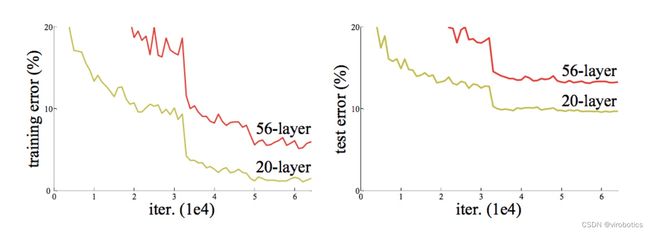
我们知道,在计算机视觉里,特征的“等级”随增网络深度的加深而变高,研究表明,网络的深度是实现好的效果的重要因素。然而梯度弥散/爆炸成为训练深层次的网络的障碍,导致无法收敛。有一些方法可以弥补,如归一初始化,各层输入归一化,使得可以收敛的网络的深度提升为原来的十倍。然而,虽然收敛了,但网络却开始退化了,即增加网络层数却导致更大的误差, 如下图。 这种deep plain net收敛率十分低下。

1.2 ResNet完整结构
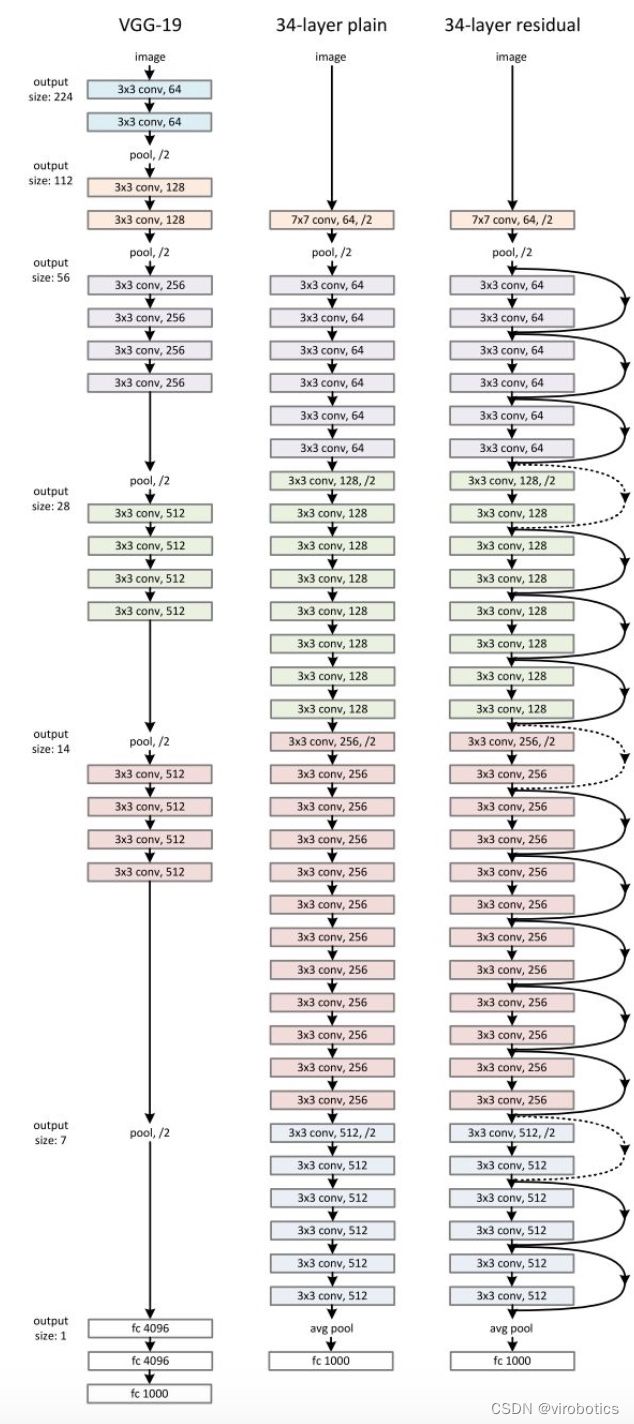
ResNet比起VGG19这样的网络深很多,但是运算量是少于VGG19等的。如下图所示为其完整结构:
1.3 ResNet50 网络模型
ResNet50是ResNet中的一种, ResNet50 网络中包含了 49 个卷积层、一个全连接层。如图下图所示,ResNet50网络结构可以分成七个部分,第一部分不包含残差块,主要对输入进行卷积、正则化、激活函数、最大池化的计算。第二、三、四、五部分结构都包含了残差块,图中的绿色图块不会改变残差块的尺寸,只用于改变残差块的维度。在ResNet50网络结构中 ,残差块都有三层卷积,那网络总共有1+3×(3+4+6+3)=49个卷积层,加上最后的全连接层总共是 50 层,这也是ResNet50 名称的由来。网络的输入为 224×224×3,经过前五部分的卷积计算,输出为 7×7×2048,池化层会将其转化成一个特征向量,最后分类器会对这个特征向量进行计算并输出类别概率。

二、环境搭建
2.1 部署本项目时所用环境
- 操作系统:Windows10
- python:3.6及以上
- LabVIEW:2018及以上 64位版本
- AI视觉工具包:techforce_lib_opencv_cpu-1.0.0.98.vip【1.0.0.98及以上版本均可】
- OpenVINO工具包:virobotics_lib_openvino-1.0.0.9.vip【1.0.0.9及以上版本均可】
2.2 LabVIEW工具包下载及安装
- AI视觉工具包下载与安装参考:
https://blog.csdn.net/virobotics/article/details/123656523 - AI视觉工具包介绍:
https://blog.csdn.net/virobotics/article/details/123522165 - OpenVINO工具包下载与安装参考:
https://blog.csdn.net/virobotics/article/details/130226410 - LabVIEW OpenVINO AI加速工具包介绍:
https://blog.csdn.net/virobotics/article/details/130220080
三、LabVIEW OpenVINO实现resnet50图像分类
3.1 模型获取及转换为onnx
- 安装pytorch和torchvision
- 获取torchvision中的模型:resnet50(我们获取预训练好的模型):
original_model = models.resnet50(pretrained=True)
- 转onnx
def get_pytorch_onnx_model(original_model):
    # define the directory for further converted model save
    onnx_model_path = "A:\\code\\pytorch\\image_classfier"
    # define the name of further converted model
    onnx_model_name = "resnet50.onnx"

    # create directory for further converted model
    os.makedirs(onnx_model_path, exist_ok=True)

    # get full path to the converted model
    full_model_path = os.path.join(onnx_model_path, onnx_model_name)

    # generate model input
    generated_input = Variable(
        torch.randn(1, 3, 224, 224)
    )

    # model export into ONNX format
    torch.onnx.export(
        original_model,
        generated_input,
        full_model_path,
        verbose=True,
        input_names=["input"],
        output_names=["output"],
        opset_version=11
    )

    return full_model_path
完整获取模型及转换python代码如下:
import os
import torch
import torch.onnx
from torch.autograd import Variable
from torchvision import models


def get_pytorch_onnx_model(original_model):
    # define the directory for further converted model save
    onnx_model_path = "A:\\code\\pytorch\\image_classfier"
    # define the name of further converted model
    onnx_model_name = "resnet50.onnx"

    # create directory for further converted model
    os.makedirs(onnx_model_path, exist_ok=True)

    # get full path to the converted model
    full_model_path = os.path.join(onnx_model_path, onnx_model_name)

    # generate model input
    generated_input = Variable(
        torch.randn(1, 3, 224, 224)
    )

    # model export into ONNX format
    torch.onnx.export(
        original_model,
        generated_input,
        full_model_path,
        verbose=True,
        input_names=["input"],
        output_names=["output"],
        opset_version=11
    )

    return full_model_path


def main():
    # initialize PyTorch MobileNetV2
    original_model = models.resnet50(pretrained=True)

    # get the path to the converted into ONNX PyTorch model
    full_model_path = get_pytorch_onnx_model(original_model)
    print("PyTorch resnet50 model was successfully converted: ", full_model_path)


if __name__ == "__main__":
    main()
3.2 LabVIEW OpenVINO调用 resnet50实现图像分类(openvino_resnet.vi.vi)
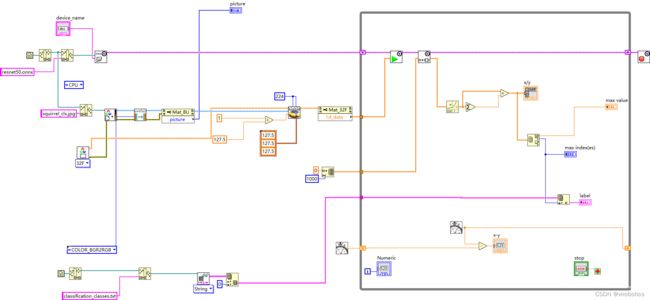
ImageNet (image-net.org),本课程使用到的模型是基于ILSVRC的1000种物体分类模型,如下图所示为在LabVIEW中部署ResNet50实现图像分类,使用OpenVINO实现加速。
注意:请将整个项目工程放置到不含有中文的路径中,否则会出现无法运行的情况。

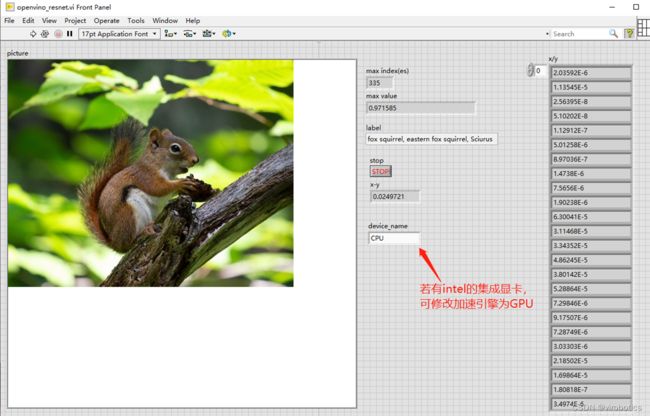
运行结果如下,可以看到可以准确分类,因为我们调用的模型为与训练模型,所以只能分类1000种,如需更多分类,可以重新训练模型。

四、项目源码
码字不易,如需源码,请一键三连并订阅本专栏后评论区留下邮箱
总结
以上就是今天要给大家分享的内容,希望对大家有用。我们下篇文章见~
创作不易,如果文章对你有帮助,欢迎✌关注、点赞、✌收藏、订阅专栏
推荐阅读
LabVIEW图形化的AI视觉开发平台(非NI Vision),大幅降低人工智能开发门槛
LabVIEW图形化的AI视觉开发平台(非NI Vision)VI简介
LabVIEW AI视觉工具包OpenCV Mat基本用法和属性
手把手教你使用LabVIEW人工智能视觉工具包快速实现图像读取与采集
手把手教你使用LabVIEW OpenCV dnn实现图像分类
手把手教你使用LabVIEW TensorRT实现图像分类实战(含源码)
技术交流 · 一起学习 · 咨询分享,请联系
