springboot+vue集成Kaptcha实现验证码登录(完整简易版)
第一步 1、添加pom依赖
            com.github.penggle
            kaptcha
            2.3.2
第二步 2、添加一个 KaptchaConfig类,注意加上 @Configuration 注解 声明为配置类 全部跟我一样即可
package com.qingge.springboot.config;
import com.google.code.kaptcha.impl.DefaultKaptcha;
import com.google.code.kaptcha.util.Config;
import org.springframework.context.annotation.Bean;
import org.springframework.context.annotation.Configuration;
import org.springframework.stereotype.Component;

import java.util.Properties;
@Configuration
@Component
public class KaptchaConfig {
    @Bean
    public DefaultKaptcha getDefaultKaptcha(){
        com.google.code.kaptcha.impl.DefaultKaptcha defaultKaptcha = new com.google.code.kaptcha.impl.DefaultKaptcha();
        Properties properties = new Properties();
        // 图片边框
        properties.put("kaptcha.border", "no");
        // 字体颜色
        properties.put("kaptcha.textproducer.font.color", "black");
        // 图片宽
        properties.put("kaptcha.image.width", "160");
        // 图片高
        properties.put("kaptcha.image.height", "40");
        // 字体大小
        properties.put("kaptcha.textproducer.font.size", "30");
        // 验证码长度
        properties.put("kaptcha.textproducer.char.space", "5");
        // 字体
        properties.setProperty("kaptcha.textproducer.font.names", "宋体,楷体,微软雅黑");
        Config config = new Config(properties);
        defaultKaptcha.setConfig(config);
        return defaultKaptcha;
    }
}
第三步 3、创建controller类,这里我命名为CheckController ,全部跟我一样即可
package com.qingge.springboot.controller;


import com.google.code.kaptcha.impl.DefaultKaptcha;
import org.apache.tomcat.util.http.fileupload.ByteArrayOutputStream;
import org.springframework.web.bind.annotation.GetMapping;
import org.springframework.web.bind.annotation.RequestMapping;
import org.springframework.web.bind.annotation.RestController;

import javax.annotation.Resource;
import javax.imageio.ImageIO;
import javax.servlet.ServletOutputStream;
import javax.servlet.http.HttpServletRequest;
import javax.servlet.http.HttpServletResponse;
import java.awt.image.BufferedImage;

@RestController
@RequestMapping("/check")
public class CheckController {

    @Resource
    private DefaultKaptcha defaultKaptcha;

    public String getCheckCode() {
        return CheckCode;
    }

    public void setCheckCode(String checkCode) {
        CheckCode = checkCode;
    }

    private String CheckCode;

    @GetMapping
    public void defaultKaptcha(HttpServletRequest httpServletRequest, HttpServletResponse httpServletResponse) throws Exception {
        byte[] captchaOutputStream = null;
        ByteArrayOutputStream imgOutputStream = new ByteArrayOutputStream();
        try {
            //生产验证码字符串并保存到session中
            String verifyCode = defaultKaptcha.createText();
            httpServletRequest.getSession().setAttribute("verifyCode", verifyCode);

            this.setCheckCode(verifyCode);
            BufferedImage challenge = defaultKaptcha.createImage(verifyCode);
            ImageIO.write(challenge, "jpg", imgOutputStream);
        } catch (IllegalArgumentException e) {
            httpServletResponse.sendError(HttpServletResponse.SC_NOT_FOUND);
            return;
        }
        captchaOutputStream = imgOutputStream.toByteArray();
        httpServletResponse.setHeader("Cache-Control", "no-store");
        httpServletResponse.setHeader("Pragma", "no-cache");
        httpServletResponse.setDateHeader("Expires", 0);
        httpServletResponse.setContentType("image/jpeg");
        ServletOutputStream responseOutputStream = httpServletResponse.getOutputStream();
        responseOutputStream.write(captchaOutputStream);
        responseOutputStream.flush();
        responseOutputStream.close();
    }


}
第四步 4、添加一个实体类,用于接收前端传过来的参数,跟据你自己的实际的来
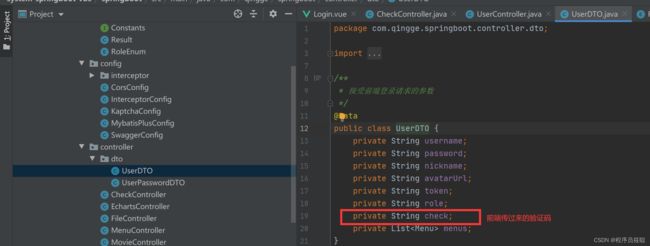
package com.qingge.springboot.controller.dto;
import com.qingge.springboot.entity.Menu;
import lombok.Data;
import java.util.List;
/**
* 接受前端登录请求的参数
*/
@Data
public class UserDTO {
private String username;
private String password;
private String nickname;
private String avatarUrl;
private String token;
private String role;
private String check;
private List第五步 5、在你原有的登录接口上进行添加判断条件

 @Resource
    private CheckController checkCode;

    // 新增或者更新

    @PostMapping("/login")  //登入接口
    public Result login(@RequestBody UserDTO userDTO) {  //RequestBody将前端传过来的值映射成Java对象

        String username = userDTO.getUsername();
        String password = userDTO.getPassword();
        if (StrUtil.isBlank(username) || StrUtil.isBlank(password)||StrUtil.isBlank(userDTO.getCheck())) {  // isBlank 判断是否为空
            return Result.error(Constants.CODE_400,"参数错误");
        }
//        String kaptchaCode = session.getAttribute("verifyCode") + "";
        String kaptchaCode = checkCode.getCheckCode();
        String rightCode = userDTO.getCheck();
        if (kaptchaCode.equals(rightCode)){
            UserDTO dto = userService.login(userDTO);
            return Result.success(dto);
        }else {
            return Result.error(Constants.CODE_401,"验证码输入有误");
        }
    }
第六步 6,用postman测试
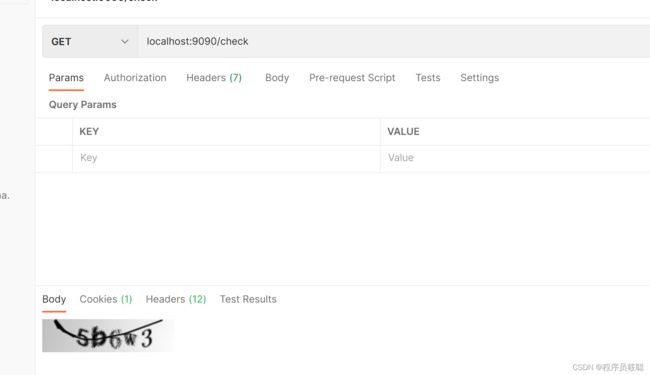
是 ok 的。
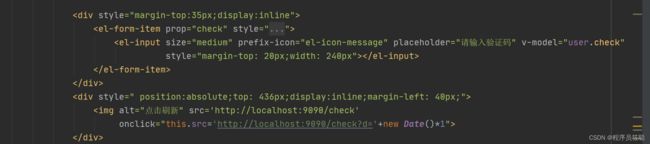
第八步 8、前端登录界面添加图形验证码的容器,这里也是根据你自己实际情况来。

第九步 9、测试
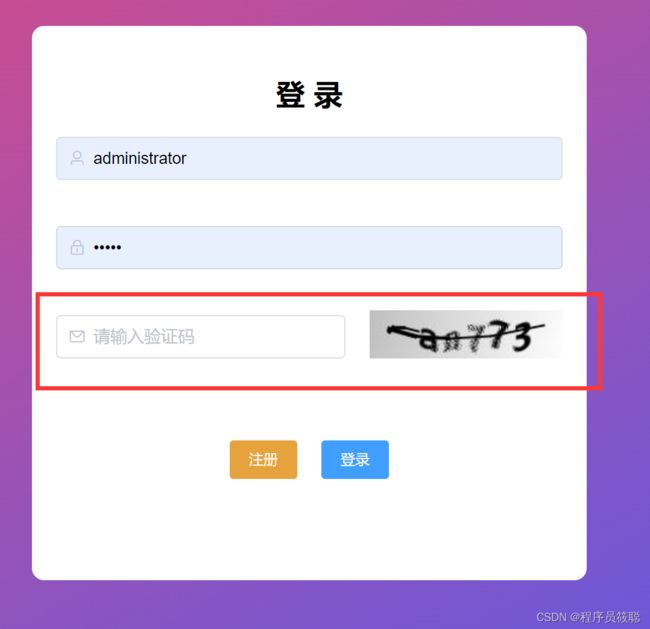
是正常的,
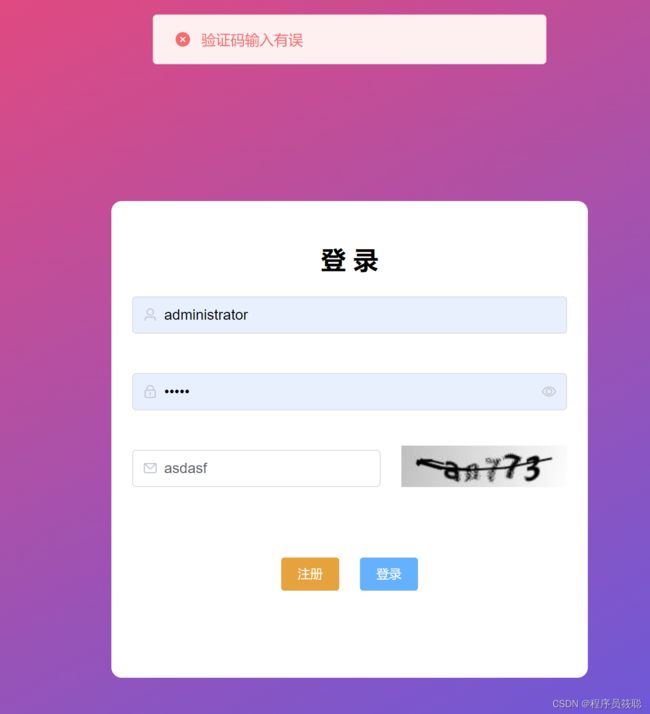
判断逻辑也是正常的,成功页面不好截图,因为成功了就跳转页面了。有问题给我留言吧!
最后,创作不易,如果对您有帮助,可以给我个点赞加关注嘛,不定期更新优质文章,帮助您解决各类开发难题。