【Unity】2019 UDRP 7.3 CustomPass 物体描边效果

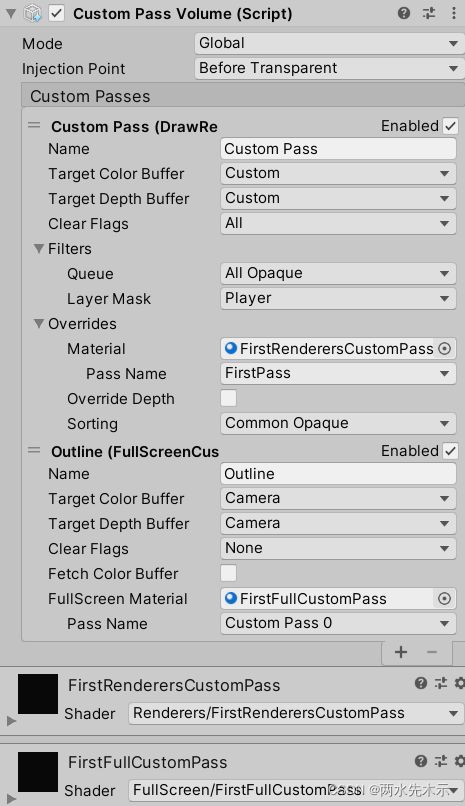
右键创建空物体,添加Custom Pass Volume,添加1个DrawRenderersCustomPass

紧接着创建材质球和着色器,赋值到Material上。
Shader "Renderers/FirstRenderersCustomPass"
{
    Properties
    {
        _Color("Color", Color) = (1,1,1,1)
        _ColorMap("ColorMap", 2D) = "white" {}

        // Transparency
        _AlphaCutoff("Alpha Cutoff", Range(0.0, 1.0)) = 0.5
    }

    HLSLINCLUDE

    #pragma target 4.5
    #pragma only_renderers d3d11 ps4 xboxone vulkan metal switch

    // #pragma enable_d3d11_debug_symbols

    //enable GPU instancing support
    #pragma multi_compile_instancing

    ENDHLSL

    SubShader
    {
        Pass
        {
            Name "FirstPass"
            Tags { "LightMode" = "FirstPass" }

            Blend Off
            ZWrite On
            ZTest LEqual

            Cull Back

            HLSLPROGRAM

            // Toggle the alpha test
            #define _ALPHATEST_ON

            // Toggle transparency
            // #define _SURFACE_TYPE_TRANSPARENT

            // Toggle fog on transparent
            #define _ENABLE_FOG_ON_TRANSPARENT

            // List all the attributes needed in your shader (will be passed to the vertex shader)
            // you can see the complete list of these attributes in VaryingMesh.hlsl
            #define ATTRIBUTES_NEED_TEXCOORD0
            #define ATTRIBUTES_NEED_NORMAL
            #define ATTRIBUTES_NEED_TANGENT

            // List all the varyings needed in your fragment shader
            #define VARYINGS_NEED_TEXCOORD0
            #define VARYINGS_NEED_TANGENT_TO_WORLD

            #include "Packages/com.unity.render-pipelines.high-definition/Runtime/RenderPipeline/RenderPass/CustomPass/CustomPassRenderers.hlsl"

            TEXTURE2D(_ColorMap);
            float4 _ColorMap_ST;
            float4 _Color;

            // If you need to modify the vertex datas, you can uncomment this code
            // Note: all the transformations here are done in object space
            // #define HAVE_MESH_MODIFICATION
            // AttributesMesh ApplyMeshModification(AttributesMesh input, float3 timeParameters)
            // {
            //     input.positionOS += input.normalOS * 0.0001; // inflate a bit the mesh to avoid z-fight
            //     return input;
            // }

            // Put the code to render the objects in your custom pass in this function
            void GetSurfaceAndBuiltinData(FragInputs fragInputs, float3 viewDirection, inout PositionInputs posInput, out SurfaceData surfaceData, out BuiltinData builtinData)
            {
//				float2 colorMapUv = TRANSFORM_TEX(fragInputs.texCoord0.xy, _ColorMap);
//				float4 result = SAMPLE_TEXTURE2D(_ColorMap, s_trilinear_clamp_sampler, colorMapUv) * _Color;
//                float opacity = result.a;
//                float3 color = result.rgb;
//
//#ifdef _ALPHATEST_ON
//                DoAlphaTest(opacity, _AlphaCutoff);
//#endif

                // Write back the data to the output structures
                ZERO_INITIALIZE(BuiltinData, builtinData); // No call to InitBuiltinData as we don't have any lighting
                builtinData.opacity = 1;
                builtinData.emissiveColor = float3(0, 0, 0);
                surfaceData.color = _Color;
            }

            #include "Packages/com.unity.render-pipelines.high-definition/Runtime/RenderPipeline/ShaderPass/ShaderPassForwardUnlit.hlsl"

            #pragma vertex Vert
            #pragma fragment Frag

            ENDHLSL
        }
    }
}

将你想要描边的物体设置到LayerMask指定的层级,如果没有任何物体在这个层级里是没有任何描边效果的!
这个着色器用于渲染出一张Target层的物体白色底图,具体可看FrameDebugg(找到CustomPass)
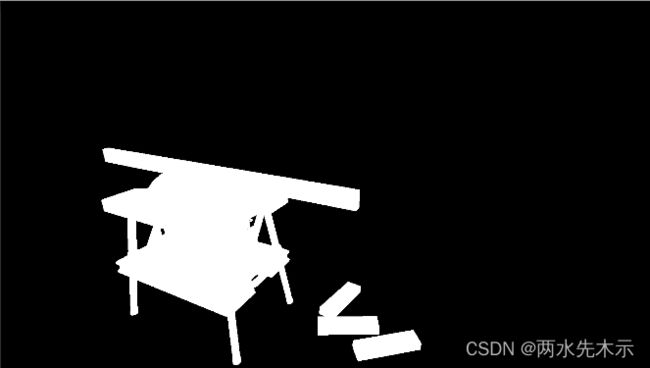
这张图片会缓存在CustomPass里,提供下一个FullCustomPass进行处理。
+ 第二个CustomPass, FullCustomPass如下:

注意和第一个CustomPass它的Target Color Buffer和Target Depth Buffer都是Camera,第一个是选择Custom输出到CustomPass里。
第二个着色器:
Shader "FullScreen/FirstFullCustomPass"
{
	Properties
	{
		_SamplePrecision("Sampling Precision", Range(1, 3)) = 1
		_OutlineWidth("Outline Width", Float) = 2
		_OuterColor("Outer Color", Color) = (1, 1, 0, 1)

		 _InnerColor("Inner Color", Color) = (1, 1, 0, 1)
		_Texture("Texture", 2D) = "black" { }
		_TextureSize("Texture Pixels Size", float) = 32
		_BehindAlpha("Behind Alpha", float) = 1
	}
    HLSLINCLUDE

    #pragma vertex Vert

    #pragma target 4.5
    #pragma only_renderers d3d11 ps4 xboxone vulkan metal switch

    #include "Packages/com.unity.render-pipelines.high-definition/Runtime/RenderPipeline/RenderPass/CustomPass/CustomPassCommon.hlsl"

    // The PositionInputs struct allow you to retrieve a lot of useful information for your fullScreenShader:
    // struct PositionInputs
    // {
    //     float3 positionWS;  // World space position (could be camera-relative)
    //     float2 positionNDC; // Normalized screen coordinates within the viewport    : [0, 1) (with the half-pixel offset)
    //     uint2  positionSS;  // Screen space pixel coordinates                       : [0, NumPixels)
    //     uint2  tileCoord;   // Screen tile coordinates                              : [0, NumTiles)
    //     float  deviceDepth; // Depth from the depth buffer                          : [0, 1] (typically reversed)
    //     float  linearDepth; // View space Z coordinate                              : [Near, Far]
    // };

    // To sample custom buffers, you have access to these functions:
    // But be careful, on most platforms you can't sample to the bound color buffer. It means that you
    // can't use the SampleCustomColor when the pass color buffer is set to custom (and same for camera the buffer).
    // float4 SampleCustomColor(float2 uv);
    // float4 LoadCustomColor(uint2 pixelCoords);
    // float LoadCustomDepth(uint2 pixelCoords);
    // float SampleCustomDepth(float2 uv);

    // There are also a lot of utility function you can use inside Common.hlsl and Color.hlsl,
    // you can check them out in the source code of the core SRP package.

#define c45 0.707107
#define c225 0.9238795
#define s225 0.3826834

#define MAXSAMPLES 16
		static float2 offsets[MAXSAMPLES] = {
			float2(1, 0),
			float2(-1, 0),
			float2(0, 1),
			float2(0, -1),

			float2(c45, c45),
			float2(c45, -c45),
			float2(-c45, c45),
			float2(-c45, -c45),

			float2(c225, s225),
			float2(c225, -s225),
			float2(-c225, s225),
			float2(-c225, -s225),
			float2(s225, c225),
			float2(s225, -c225),
			float2(-s225, c225),
			float2(-s225, -c225)
	};
	float _SamplePrecision;
	float _OutlineWidth;
	float4 _OuterColor;
	float4 _InnerColor;
	float _BehindAlpha;

	TEXTURE2D(_Texture);
	float4 _Texture_ST;

	float _TextureSize;

    float4 FullScreenPass(Varyings varyings) : SV_Target
    {
        UNITY_SETUP_STEREO_EYE_INDEX_POST_VERTEX(varyings);
        float depth = LoadCameraDepth(varyings.positionCS.xy);
        PositionInputs posInput = GetPositionInput(varyings.positionCS.xy, _ScreenSize.zw, depth, UNITY_MATRIX_I_VP, UNITY_MATRIX_V);

		//CustomColorBuffer中本次处理的像素的颜色值
		float4 c = LoadCustomColor(posInput.positionSS);

		//调整采样次数以4, 8, 16幂次增长
		int sampleCount = min(2 * pow(2, _SamplePrecision), MAXSAMPLES);

		//计算每像素之间的uv差
		float2 uvOffsetPerPixel = 1.0 / _ScreenSize.xy;

		float4 outline = 0;
		for (uint i = 0; i < sampleCount; ++i)
		{
			//取sampleCount次采样中的最大值
			outline = max(SampleCustomColor(posInput.positionNDC + uvOffsetPerPixel * _OutlineWidth * offsets[i]), outline);
		}

		//去掉原本纯色块的部分
		//outline *= _OuterColor * (1 - c.a);

		//读取CustomDepthBuffer
		float d = LoadCustomDepth(posInput.positionSS);

		//进行深度的判断,如果判定为被遮挡则用我们设置的透明度,反之则为0。
		//0.000001为bias,避免浮点数的精度问题导致的误差。
		float alphaFactor = (depth > d + 0.000001) ? _BehindAlpha : 0;
		//对InnerColorTexture进行采样
		float4 innerColor = SAMPLE_TEXTURE2D(_Texture, s_trilinear_repeat_sampler, posInput.positionSS / _TextureSize) * _InnerColor;

		innerColor.a *= alphaFactor;

		float4 output = 0;
		//将描边赋值给output
		output = lerp(output, _OuterColor * float4(outline.rgb, 1), outline.a);
		//将纯色色块覆盖的区域以InnerColor替代
		output = lerp(output, innerColor * float4(c.rgb, 1), c.a);

		return output;
    }

    ENDHLSL

    SubShader
    {
        Pass
        {
            Name "Custom Pass 0"

            ZWrite Off
            ZTest Always
            Blend SrcAlpha OneMinusSrcAlpha
            Cull Off

            HLSLPROGRAM
                #pragma fragment FullScreenPass
            ENDHLSL
        }
    }
    Fallback Off
}
第二个着色器就是从CustomPass里采样的Target层物体白色底图,然后针对它进行一个范围内采样取最大值颜色来作为它的颜色,也就是说会对白色底图进行扩大一层,扩大范围_OutlineWidth控制;为了显示出被遮挡的Target层物体部分,做了一个将当前相机渲染Depth和CustomDepth做一个比较,代码中depth>d 即摄像机深度 大于 Custom深度(即Target层物体深度)时代表Target层物体被遮挡(注意这里和Unity的深度是相反的,越近摄像机越大深度,如果有一个物体深度比另一个物体深度大,说明那个物体比另一个物体更近摄像机,也就是另一个物体被挡住了),因此得到一个值alphaFactor代表被挡住部分的透明度系数,被挡住的Target层物体系数即_BehindAlpha,它会作为从_Texture(一张代表被遮挡物体的纹理)的透明度,也就是被遮挡的部分会被显示出这个贴图,而没被遮挡的部分则会显示出摄像机原图(简称A图 ps:innerColor是一张只有被遮挡部分贴图的描边物体效果图,可以想象成是描边物体部分区域的图像,但只有被遮挡部分是显示出一张被遮挡贴图颜色的,其余部分透明度是0,它最后和float4(c.rgb,1)混合,但是是没有被遮挡部分区域的描边物体还是透明度为0,所以它最终会显示出摄像机原图,而c.rgb只会影响被遮挡部分的颜色)。
最后进行了一个混合,将外边框颜色 和 A图 进行c.a混合(c.a是原始白色区域透明度)
float4 output = 0;
//将描边赋值给output
output = lerp(output, _OuterColor * float4(outline.rgb, 1), outline.a);
//将纯色色块覆盖的区域以InnerColor替代
output = lerp(output, innerColor * float4(c.rgb, 1), c.a);
output就是我们最终要输出到屏幕的颜色,第一次lerp是以outline即白色底图的透明度进行一个从黑色到外边框颜色的底图过渡,也就是如果白色底图是纯不透明的则是完全就是变成了一个把白色变成了外边框颜色的底图。
第二次lerp是使用c.a,其中c是CustomPass图片(即白色区域),c.a就是白色区域的alpha值,注意这里很巧妙,要注意outline.a和c.a的区别,outline是扩大后的白色区域,c是原始白色区域,且outline和c的共同区域肯定是有alpha值的,c以外的区域alpha肯定是0,因此第二个lerp用c.a,当c.a为0时,使用外边框颜色;当c.a有值时,渐变到A图 * c.rgb,最终呈现出的描边+透露出被遮挡部分。 上面所说的“白色”其实是可以自定义的在第一个DrawCustomPass就有一个颜色让你设置是什么颜色,它会影响Target层物体(被描边的物体)被遮挡部分颜色。(之前说整体颜色是错误的,因为上方已经说明 innerColor没有被遮挡部分的透明度依然是0)
精髓就在于扩大范围的是outline,而缓存在CustomPass区域的白色区域还是原来的,那么多出来的那部分肯定是透明度为0的。
其中被遮挡纹理底图(斜线图)在
GitHub - alelievr/HDRP-Custom-Passes: A bunch of custom passes made for HDRP
找到DiagonalStripes.psd
2022年1月11日补充说明:第二个FullCustomPass处理后的output结果只是一张只有Target层物体的描边效果图,它还会和摄像机原图进行一个混合处理,也就是Blend SrcAlpha OneMinusSrcAlpha,相当于将描边效果图和原图进行合并了,因为描边效果图除了所需描边的物体以外的区域都是alpha为0的,因此那些区域就直接使用原图进行输出到屏幕了。