【学习记录】win10搭建YOLOX训练自己的VOC数据集
我是目录:
-
- 前言:
- 1.yolox的训练配置
- 2.yolox源码
- 3.必要的环境
-
- 配置yolox所需环境
- 1.安装依赖库
- 2.安装yolox
- 3.安装apex
- 4.下载预训练模型
- 4.准备自己的数据集
-
- 构建VOC数据集
- 5.训练
- 6.测试
- 总结:
前言:
基于VOC数据集的yolox踩坑记录,包括环境配置,数据集的制作,模型训练和检测。
1.yolox的训练配置
1.1 300epoch的训练长度,其中,前5个epoch使用warmup学习率策略;
优化器使用标配的SGD;
1.2 多尺度训练:448-832,不再是以往的320-608了。这应该是追求large input size的涨点。
1.3 Backbone就是v3所使用的DarkNet-53。
1.4 预测部分加入了IoU-aware分支,这一点应该是和PP-YOLO是对齐的
1.5 损失函数:obj分支和cls分支还是使用BCE,reg分支则使用IoU loss;
1.6 使用EMA训练技巧(这个很好用,可以加快模型的收敛速度);
1.7 数据增强仅使用RandomHorizontalFlip、ColorJitter以及多尺度训练,不使用RandomResizedCrop,作者认为RandomResizedCrop和Mosaic有点重合了。由于后续会上Mosaic Augmentation,所以这里暂时先不要了。
2.yolox源码
链接: link.
3.必要的环境
win10+python3.7+cuda11.1
配置yolox所需环境
1.安装依赖库
pip install -r requirements.txt
# TODO: Update with exact module version
numpy
torch>=1.7
opencv_python
loguru
scikit-image
tqdm
torchvision
Pillow
thop
ninja
tabulate
tensorboard

# verified versions
onnx==1.8.1
onnxruntime==1.8.0
onnx-simplifier==0.3.5
2.安装yolox
python setup.py install
3.安装apex
apex下载地址,
cd到apex-master,
python setup.py install
4.下载预训练模型
model,
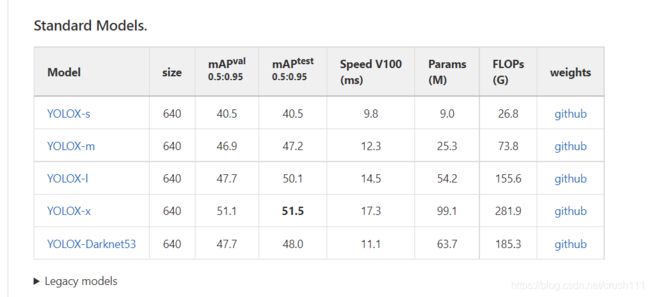
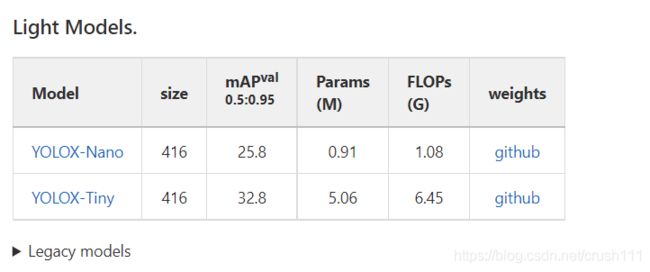
预训练模型包括标准(standard)和轻量(light)。在yolox文件夹下创建一个weights用于存放模型。


4.准备自己的数据集
构建VOC数据集
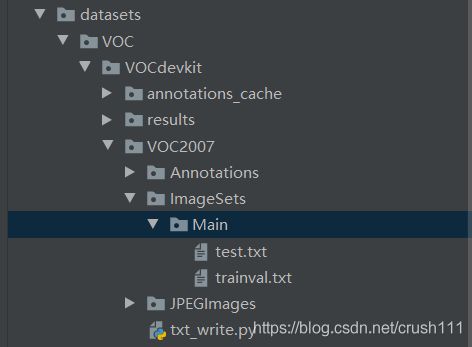
voc数据集的格式如下:

其中,annotation用于存放xml格式的标签文件,JPEGimage用于存放原始图片。由于我自己是用的labelme做的标签,生成的是json格式的标签文件。所以这里有一个json convert to xml的动作。
import os
from typing import List, Any
import numpy as np
import codecs
import json
from glob import glob
import cv2
import shutil
from sklearn.model_selection import train_test_split
labelme_path = "before/json/" # json文件夹路径
saved_path = "before/xml/" # xml保存路径
if not os.path.exists(saved_path + "Annotations"):
os.makedirs(saved_path + "Annotations")
files = glob(labelme_path + "*.json")
files = [i.replace("\\", "/").split("/")[-1].split(".json")[0] for i in files]
print(files)
for json_file_ in files:
json_filename = labelme_path + json_file_ + ".json"
json_file = json.load(open(json_filename, "r", encoding="utf-8"))
height, width, channels = 720, 1280, 3
with codecs.open(saved_path + "Annotations/" + json_file_ + ".xml", "w", "utf-8") as xml:
xml.write('\n' )
xml.write('\t' + 'WH_data' + '\n')
xml.write('\t' + json_file_ + ".png" + '\n') # 更改图片后缀
xml.write('\t\n' )
xml.write('\t\tWH Data \n')
xml.write('\t\tWH \n')
xml.write('\t\tflickr \n')
xml.write('\t\tNULL \n')
xml.write('\t\n')
xml.write('\t\n' )
xml.write('\t\tNULL \n')
xml.write('\t\tWH \n')
xml.write('\t\n')
xml.write('\t\n' )
xml.write('\t\t' + str(width) + '\n')
xml.write('\t\t' + str(height) + '\n')
xml.write('\t\t' + str(channels) + '\n')
xml.write('\t\n')
xml.write('\t\t0 \n')
for multi in json_file["shapes"]:
points = np.array(multi["points"])
labelName = multi["label"]
xmin = min(points[:, 0])
xmax = max(points[:, 0])
ymin = min(points[:, 1])
ymax = max(points[:, 1])
label = multi["label"]
if xmax <= xmin:
pass
elif ymax <= ymin:
pass
else:
xml.write('\t)
xml.write('\t\t' + labelName + '\n')
xml.write('\t\tUnspecified \n')
xml.write('\t\t1 \n')
xml.write('\t\t0 \n')
xml.write('\t\t\n' )
xml.write('\t\t\t' + str(int(xmin)) + '\n')
xml.write('\t\t\t' + str(int(ymin)) + '\n')
xml.write('\t\t\t' + str(int(xmax)) + '\n')
xml.write('\t\t\t' + str(int(ymax)) + '\n')
xml.write('\t\t\n')
xml.write('\t\n')
print(json_filename, xmin, ymin, xmax, ymax, label)
xml.write('')
接下来运行txt_write.py,划分数据集,并写入main文件夹下,生成trainval.txt和test.txt。
import os
import random

trainval_percent = 0.1
train_percent = 0.9
xmlfilepath = 'F:/YOLOX-main/YOLOX-main/datasets/VOC/VOCdevkit/VOC2007/Annotations'
txtsavepath = 'F:/YOLOX-main/YOLOX-main/datasets/VOC/VOCdevkit/VOC2007/ImageSets'
total_xml = os.listdir(xmlfilepath)

num = len(total_xml)
list = range(num)
tv = int(num * trainval_percent)
tr = int(tv * train_percent)
trainval = random.sample(list, tv)
train = random.sample(trainval, tr)

ftest = open('F:/YOLOX-main/YOLOX-main/datasets/VOC/VOCdevkit/VOC2007/ImageSets/test.txt', 'w')
ftrain = open('F:/YOLOX-main/YOLOX-main/datasets/VOC/VOCdevkit/VOC2007/ImageSets/trainval.txt', 'w')

for i in list:
    name = total_xml[i][:-4] + '\n'
    if i in trainval:
        ftest.write(name)
    else:
        ftrain.write(name)

ftrain.close()
ftest.close()
完成之后,把VOC copy到datasets文件夹下,至此完成VOC数据集的制作。
5.训练
1.修改 yolox/data/dataloading.py,line25

2.修改exps/example/yolox_voc/yolox_voc_s.py,line31

3.修改exps/example/yolox_voc/yolox_voc_s.py,line14,
num_classes为自己数据的类。不包括背景。

4.修改yolox/data/datasets/voc_classes.py为自己的类别。
5.修改yolox/evaluators/voc_eval.py,添加root为annotation的绝对路径。
root = r'F:/yolox/YOLOX-main/YOLOX-main/datasets/VOC/VOCdevkit/VOC2007/Annotations/'
def parse_rec(filename):
    """ Parse a PASCAL VOC xml file """
    tree = ET.parse(root + filename)
6.开始训练
python tools/train.py -f exps/example/yolox_voc/yolox_voc_s.py -d 1 -b 4 --fp16 -o -c yolox_s.pth.tar
设备条件有限,一直报cuda out of memory 的错,于是调小了batch_size,载入更轻量的预训练模型,去掉了–fp16 -o。
python tools/train.py -f exps/example/yolox_voc/yolox_voc_s.py -d 1 -b 4 -c weights/yolox_nano.pth.tar
效果是这样的,在这里我只标注了200张图片,设置了300个epoch。这里大概跑了2个小时,跑完之后,会在yolox的目录下生成yolox-output,值得注意的是lastest和best.pth两个权重文件。

如果要断点续练的话,需要修改train.py的resume为TRUE,权重文件改为lastest或best.pth。
python tools/train.py -f exps/example/yolox_voc/yolox_voc_s.py -d 1 -b 4 -c YOLOX_outputs/yolox_voc_s/latest_ckpt.pth.tar
6.测试
测试时需要修改tools下的demo.py。
1.import处from yolox.data.datasets.voc_classes import VOC_CLASSES

2.
python tools/demo.py video -f exps/example/yolox_voc/yolox_voc_s.py -c YOLOX_outputs/yolox_voc_s/best_ckpt.pth --33d37a437.jpg --conf 0.3 --nms 0.65 --tsize 640 --save_result --device gpu
批量检测:
python tools/demo.py image -f exps/example/yolox_voc/yolox_voc_s.py -c YOLOX_outputs/yolox_voc_s/best_ckpt.pth --path test/ --conf 0.3 --nms 0.65 --tsize 640 --save_result --device gpu
5.检测结果被保存在…目录下![]()


