HBase
一 HBase简介与环境部署
1.1 HBase简介&在Hadoop生态中的地位
1.1.1 什么是HBase
- HBase是一个分布式的、面向列的开源数据库
- HBase是Google BigTable的开源实现
- HBase不同于一般的关系数据库, 适合非结构化数据存储
1.1.2 BigTable
- BigTable是Google设计的分布式数据存储系统,用来处理海量的数据的一种非关系型的数据库。
- 适合大规模海量数据,PB级数据;
- 分布式、并发数据处理,效率极高;
- 易于扩展,支持动态伸缩
- 适用于廉价设备;
- 不适用于传统关系型数据的存储;
1.1.3 面向列的数据库
-
关系型数据库
ID UserName Password 1 Tom 123456 2 Mike 123456 -
列式数据库
RowKey Column Family rk_id cf:col1=1 cf:col2=2 rk_username cf:name1=Tom cf:name2=Mike rk_pwd cf:pwd1=123456 cf:pwd2=123456
1.1.4 什么是非结构化数据存储
- 结构化数据
- 适合用二维表来展示的数据
- 非结构化数据
- 非结构化数据是数据结构不规则或不完整
- 没有预定义的数据模型
- 不方便用数据库二维逻辑表来表现
- 办公文档、文本、图片、XML, HTML、各类报表、图像和音频/视频信息等
1.1.5 HBase在Hadoop生态中的地位
1.1.6 HBase与HDFS
- HBase建立在Hadoop文件系统上, 利用了HDFS的容错能力
- HBase提供对数据的随机实时读/写访问功能
- HBase内部使用哈希表, 并存储索引, 可以快速查找HDFS中数据
1.1.7 HBase使用场景
- 瞬间写入量很大
- 大量数据需要长期保存, 且数量会持续增长
- HBase不适合有join, 多级索引, 表关系复杂的数据模型
1.2 HBase数据存储模型&与关系型数据库的区别
1.2.1 ACID定义
- 指数据库事务正确执行的四个基本要素的缩写
- 原子性 A
- 整个事务中的所有操作,要么全部完成,要么全部不完成,不可能停滞在中间某个环节。事务在执行过程中发生错误,会被回滚(Rollback)到事务开始前的状态,就像这个事务从来没有执行过一样。
- 一致性 C
- 一个事务可以封装状态改变(除非它是一个只读的)。事务必须始终保持系统处于一致的状态,不管在任何给定的时间并发事务有多少。
- 隔离性 I
- 隔离状态执行事务,使它们好像是系统在给定时间内执行的唯一操作。如果有两个事务,运行在相同的时间内,执行相同的功能,事务的隔离性将确保每一事务在系统中认为只有该事务在使用系统。这种属性有时称为串行化,为了防止事务操作间的混淆,必须串行化或序列化请求,使得在同一时间仅有一个请求用于同一数据。
- 持久性 D
- 在事务完成以后,该事务对数据库所作的更改便持久的保存在数据库之中,并不会被回滚。
- HBase
- HBase 支持特定场景下的 ACID,即对行级别的 操作保证完全的 ACID
- 原子性 A
1.2.2 CAP定理
-
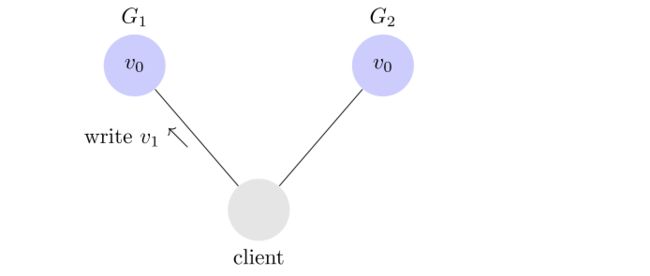
分布式系统的最大难点,就是各个节点的状态如何同步。CAP 定理是这方面的基本定理,也是理解分布式系统的起点。
-
一致性(所有节点在同一时间具有相同的数据)
-
可用性(保证每个请求不管成功或失败都有响应,但不保证获取的数据的正确性)
-
分区容错性(系统中任意信息的丢失或失败不会影响系统的运行,系统如果不能在某个时限内达成数据一致性,就必须在上面两个操作之间做出选择)
- hbase是CAP中的CP系统,即hbase是强一致性的
-
1.2.3 Hbase表结构
-
NameSpace: 关系型数据库的"数据库"(database)
-
表(table):用于存储管理数据,具有稀疏的、面向列的特点。HBase中的每一张表,就是所谓的大表(Bigtable),可以有上亿行,上百万列。对于为值为空的列,并不占用存储空间,因此表可以设计的非常稀疏。
-
行(Row):在表里面,每一行代表着一个数据对象,每一行都是以一个行键(Row Key)来进行唯一标识的, 行键并没有什么特定的数据类型, 以二进制的字节来存储
-
列(Column): HBase的列由 Column family 和 Column qualifier 组成, 由冒号: 进行行间隔, 如 family: qualifier
-
行键(RowKey):类似于MySQL中的主键,HBase根据行键来快速检索数据,一个行键对应一条记录。与MySQL主键不同的是,HBase的行键是天然固有的,每一行数据都存在行键。
-
列族(ColumnFamily):是列的集合。列族在表定义时需要指定,而列在插入数据时动态指定。列中的数据都是以二进制形式存在,没有数据类型。在物理存储结构上,每个表中的每个列族单独以一个文件存储。一个表可以有多个列簇。
-
列修饰符(Column Qualifier) : 列族中的数据通过列标识来进行映射, 可以理解为一个键值对(key-value), 列修饰符(Column Qualifier) 就是key 对应关系型数据库的列
-
时间戳(TimeStamp):是列的一个属性,是一个64位整数。由行键和列确定的单元格,可以存储多个数据,每个数据含有时间戳属性,数据具有版本特性。可根据版本(VERSIONS)或时间戳来指定查询历史版本数据,如果都不指定,则默认返回最新版本的数据。
-
区域(Region):HBase自动把表水平划分成的多个区域,划分的区域随着数据的增大而增多。
1.2.4 HBase 与 传统关系数据库的区别
| HBase | 关系型数据库 | |
|---|---|---|
| 数据库大小 | PB级别 | GB TB |
| 数据类型 | Bytes | 丰富的数据类型 |
| 事务支持 | ACID只支持单个Row级别 | 全面的ACID支持, 对Row和表 |
| 索引 | 只支持Row-key | 支持 |
| 吞吐量 | 百万写入/秒 | 数千写入/秒 |
- 关系型数据库中数据示例
| ID | FILE NAME | FILE PATH | FILE TYPE | FILE SIZE | CREATOR |
|---|---|---|---|---|---|
| 1 | file1.txt | /home | txt | 1024 | tom |
| 2 | file2.txt | /home/pics | jpg | 5032 | jerry |
- 同样数据保存到列式数据库中
| RowKey | FILE INFO | SAVE INFO |
|---|---|---|
| 1 | name:file1.txt type:txt size:1024 | path:/home/pics creator:Jerry |
| 2 | name:file2.jpg type:jpg size:5032 | path:/home creator:Tom |
- 行数据库&列数据库存储方式比较
1.2.5 HBase 的安装
-
下载安装包 http://archive.cloudera.com/cdh5/cdh/5/hbase-1.2.0-cdh5.7.0.tar.gz
-
配置伪分布式环境
-
环境变量配置
export HBASE_HOME=/usr/local/development/hbase-1.2.4 export PATH=$HBASE_HOME/bin:$PATH -
配置hbase-env.sh
export JAVA_HOME=/usr/local/development/jdk1.7.0_15 export HBASE_MANAGES_ZK=false --如果你是使用hbase自带的zk就是true,如果使用自己的zk就是false -
配置hbase-site.xml
<property> <name>hbase.rootdirname> --hbase持久保存的目录 <value>hdfs://hadoop001:8020/opt/hbasevalue> property> <property> <name>hbase.cluster.distributedname> --是否是分布式 <value>truevalue> property> <property> <name>hbase.zookeeper.property.clientPortname> --指定要连接zk的端口 <value>2181value> property> <property> <name>hbase.zookeeper.property.dataDirname> <value>/home/hadoop/app/hbase/zkDatavalue> property> -
启动hbase(启动的hbase的时候要保证hadoop集群已经启动)
/hbase/bin/start-hbase.sh -
输入hbase shell(进入shell命令行)
-
1.3 HBase 基础架构
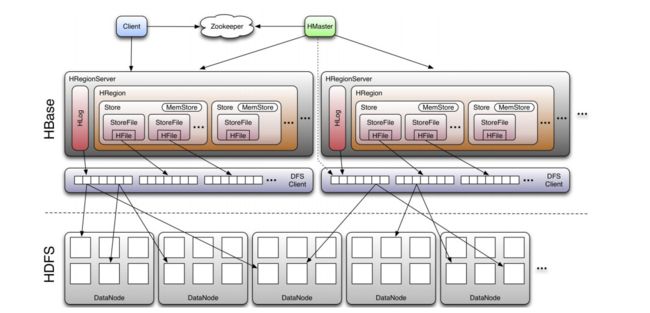
1.3.1 Client
- ①与zookeeper通信, 找到数据入口地址
- ②使用HBase RPC机制与HMaster和HRegionServer进行通信;
- ③Client与HMaster进行通信进行管理类操作;
- ④Client与HRegionServer进行数据读写类操作。
1.3.2 Zookeeper
- ①保证任何时候,集群中只有一个running master,避免单点问题;
- ②存贮所有Region的寻址入口,包括-ROOT-表地址、HMaster地址;
- ③实时监控Region Server的状态,将Region server的上线和下线信息,实时通知给Master;
- ④存储Hbase的schema,包括有哪些table,每个table有哪些column family。
1.3.3 HMaster
可以启动多个HMaster,通过Zookeeper的Master Election机制保证总有一个Master运行。
角色功能:
- ①为Region server分配region;
- ②负责region server的负载均衡;
- ③发现失效的region serve并重新分配其上的region;
- ④HDFS上的垃圾文件回收;
- ⑤处理用户对表的增删改查操作。
1.3.4 HRegionServer
HBase中最核心的模块,主要负责响应用户I/O请求,向HDFS文件系统中读写数据。
作用:
- ①维护Master分配给它的region,处理对这些region的IO请求;
- ②负责切分在运行过程中变得过大的region。
- 此外,HRegionServer管理一系列HRegion对象,每个HRegion对应Table中一个Region,HRegion由多个HStore组成,每个HStore对应Table中一个Column Family的存储,Column Family就是一个集中的存储单元,故将具有相同IO特性的Column放在一个Column Family会更高效。
1.3.5 HStore
- HBase存储的核心,由MemStore和StoreFile组成。
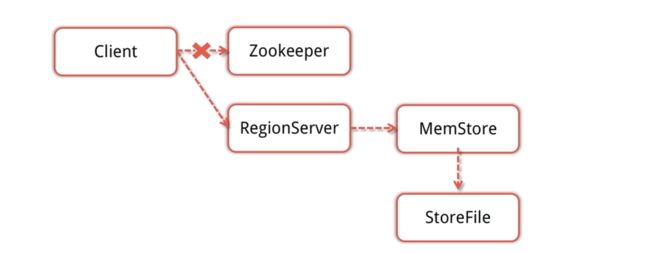
- 用户写入数据的流程为:client访问ZK, ZK返回RegionServer地址-> client访问RegionServer写入数据 -> 数据存入MemStore,一直到MemStore满 -> Flush成StoreFile
1.3.6 HRegion
- 一个表最开始存储的时候,是一个region。
- 一个Region中会有个多个store,每个store用来存储一个列簇。如果只有一个column family,就只有一个store。
- region会随着插入的数据越来越多,会进行拆分。默认大小是10G一个。
1.3.7 HLog
- 在分布式系统环境中,无法避免系统出错或者宕机,一旦HRegionServer意外退出,MemStore中的内存数据就会丢失,引入HLog就是防止这种情况。
1.3.8 HBase模块协作
- HBase启动
- HMaster启动, 注册到Zookeeper, 等待RegionServer汇报
- RegionServer注册到Zookeeper, 并向HMaster汇报
- 对各个RegionServer(包括失效的)的数据进行整理, 分配Region和meta信息
- RegionServer失效
- HMaster将失效RegionServer上的Region分配到其他节点
- HMaster更新hbase: meta 表以保证数据正常访问
- HMaster失效
- 处于Backup状态的其他HMaster节点推选出一个转为Active状态
- 数据能正常读写, 但是不能创建删除表, 也不能更改表结构
二 HBase实战
2.1 HBase Shell命令实战
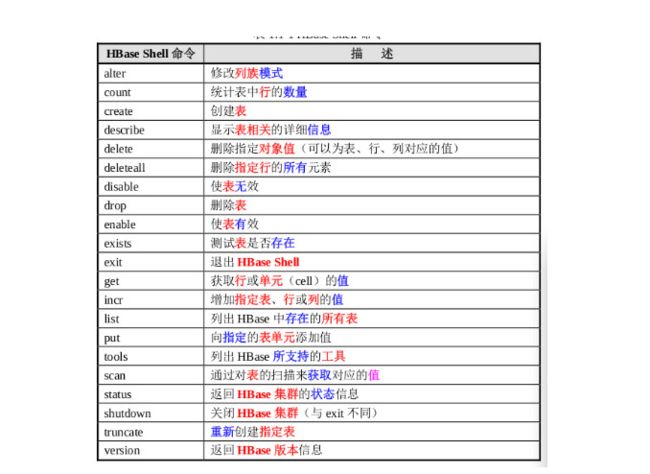
- HBase DDL 和 DML 命令
| 名称 | 命令表达式 |
|---|---|
| 创建表 | create '表名', '列族名1','列族名2','列族名n' |
| 添加记录 | put '表名','行名','列名:','值 |
| 查看记录 | get '表名','行名' |
| 查看表中的记录总数 | count '表名' |
| 删除记录 | delete '表名', '行名','列名' |
| 删除一张表 | 第一步 disable '表名' 第二步 drop '表名' |
| 查看所有记录 | scan "表名称" |
| 查看指定表指定列所有数据 | scan '表名' ,{COLUMNS=>'列族名:列名'} |
| 更新记录 | 重写覆盖 |
- 连接集群
hbase shell
- 创建表
create 'user','base_info'
- 删除表
disable 'user'
drop 'user'
- 创建名称空间
create_namespace 'test'
- 展示现有名称空间
list_namespace
- 创建表的时候添加namespace
create 'test:user','base_info'
- 显示某个名称空间下有哪些表
list_namespace_tables 'test'
- 插入数据
put 'user','rowkey_10','base_info:username','Tom'
put 'user','rowkey_10','base_info:birthday','2014-07-10'
put 'user','rowkey_10','base_info:sex','1'
put 'user','rowkey_10','base_info:address','Tokyo'

put 'user','rowkey_16','base_info:username','Mike'
put 'user','rowkey_16','base_info:birthday','2014-07-10'
put 'user','rowkey_16','base_info:sex','1'
put 'user','rowkey_16','base_info:address','beijing'

put 'user','rowkey_22','base_info:username','Jerry'
put 'user','rowkey_22','base_info:birthday','2014-07-10'
put 'user','rowkey_22','base_info:sex','1'
put 'user','rowkey_22','base_info:address','Newyork'

put 'user','rowkey_24','base_info:username','Nico'
put 'user','rowkey_24','base_info:birthday','2014-07-10'
put 'user','rowkey_24','base_info:sex','1'
put 'user','rowkey_24','base_info:address','shanghai'

put 'user','rowkey_25','base_info:username','Rose'
put 'user','rowkey_25','base_info:birthday','2014-07-10'
put 'user','rowkey_25','base_info:sex','1'
put 'user','rowkey_25','base_info:address','Soul'
- 查询表中的所有数据
scan 'user'
- 查询某个rowkey的数据
get 'user','rowkey_16'
- 查询某个列簇的数据
get 'user','rowkey_16','base_info'
get 'user','rowkey_16','base_info:username'
get 'user', 'rowkey_16', {COLUMN => ['base_info:username','base_info:sex']}
- 删除表中的数据
delete 'user', 'rowkey_16', 'base_info:username'
- 清空数据
truncate 'user'
- 操作列簇
alter 'user', NAME => 'f2'
alter 'user', 'delete' => 'f2'
- 命令表
可以通过HbaseUi界面查看表的信息
端口60010打不开的情况,是因为hbase 1.0 以后的版本,需要自己手动配置,在文件 hbase-site
hbase.master.info.port
60010
2.2 HBase表设计
-
设计HBase表时需要注意的特点
- HBase中表的索引是通过rowkey实现的
- 在表中是通过Row key的字典顺序来对数据进行排序的, 表中Region的划分通过起始Rowkey和结束Rowkey来决定的
- 所有存储在HBase中的数据都是二进制字节, 没有数据类型
- 原子性只在行内保证, HBase表中没有多行事务
- 列族(Column Family)在表创建之前就要定义好
- 列族中的列标识(Column Qualifier)可以在表创建后动态插入数据的时候添加
- 不同的column family保存在不同的文件中。
-
如何设计HBase表
- Row key的结构该如何设置, Row key中又该包含什么样的信息
- 表中应该有多少的列族
- 列族中应该存储什么样的数据
- 每个列族中存储多少列数据
- 列的名字分别是什么
- cell中应该存储什么样的信息
- 每个cell中存储多少个版本信息
-
DDI 目的是为了克服HBase架构上的缺陷(join繁琐 只有row key索引等)
- Denormalization (反规范化, 解决join麻烦的问题)
- Duplication (数据冗余)
- Intelligent keys(通过row key设计实现 索引 排序对读写优化)
2.3 HBase表设计案例: 社交应用互粉信息表
-
设计表保存应用中用户互粉的信息
- 读场景:
- 某用户都关注了哪些用户
- 用户A有没有关注用户B
- 谁关注了用户A
- 写场景
- 用户关注了某个用户
- 用户取消关注了某个用户
- 读场景:
-
设计1:
- colunm qulifier(列名) 1: 2:
-
设计2
- 添加了一个 count 记录当前的最后一个记录的列名
-
设计3
- 列名 user_id
-
最终设计(DDI)
- 解决谁关注了用户A问题
- ① 设计一张新表, 里面保存某个用户和他的粉丝
- ② 在同一张表中同时记录粉丝列表的和用户关注的列表, 并通过Rowkey来区分
- 01_userid: 用户关注列表
- 02_userid: 粉丝列表
- 上两种设计方案的问题(事务)
- 解决谁关注了用户A问题
-
案例总结
- Rowkey是HBase表结构设计中很重要的环节, 直接影响到HBase的效率和性能
- HBase的表结构比传统关系型数据库更灵活, 能存储任何二进制数据,无需考虑数据类型
- 利用列标识(Column Qualifier)来存储数据
- 衡量设计好坏的简单标准 是否会全表查询
三 SQL on HBase
3.1 Hive on HBase
-
HBase 用于在线业务服务, 不适合做统计分析
-
Hive 适合数据分析 统计
-
CDH5之前需要配置 CDH5之后不需要配置
-
Hive 表与HBase表之间需要建立映射关系
CREATE TABLE hbase_table_1(key int, value string) STORED BY 'org.apache.hadoop.hive.hbase.HBaseStorageHandler' WITH SERDEPROPERTIES ("hbase.columns.mapping"=":key,cf1:val") TBLPROPERTIES("hbase.table.name"="xyz");不支持load data导入数据, 要用insert 方式创建新表加载数据
load data local inpath '/home/1.txt' overwrite into table a; insert overwrite tabale hbase_a select * from a; -
hive on HBase实战
- 创建student表通过hive中创建在hbase中也会同时创建
CREATE TABLE student (no string, classno string, stuno string, score int ) STORED BY 'org.apache.hadoop.hive.hbase.HBaseStorageHandler' WITH SERDEPROPERTIES ("hbase.columns.mapping" = ":key,stuinfo:classno,stuinfo:stuno,stuinfo:score") TBLPROPERTIES ("hbase.table.name"="student");- 从之前的student2表中insert数据
insert overwrite table student select reverse(classno) as key,classno,stuno,score from student1; -
hive on HBase使用场景
- 数据导入
- 不适合数据分析
四 Python Hbase 开发实战
4.1HappyBase操作Hbase
-
什么是HappyBase
- HappyBase is a developer-friendly Python library to interact with Apache HBase. HappyBase is designed for use in standard HBase setups, and offers application developers a Pythonic API to interact with HBase. Below the surface, HappyBase uses the Python Thrift library to connect to HBase using its Thrift gateway, which is included in the standard HBase 0.9x releases.
-
HappyBase 是FaceBook员工开发的操作HBase的python库, 其基于Python Thrift, 但使用方式比Thrift简单, 已被广泛应用
-
启动hbase thrift server : hbase-daemon.sh start thrift
-
安装happy base
- pip install happybase
-
使用happy base时可能出现的问题(windows系统)
- happybase1.0在win下不支持绝对路径
- 解决方案:将488行的url_scheme == ”改为url_scheme in (‘代码盘符’, ”)
-
如何使用HappyBase
- 建立连接
import happybase connection = happybase.Connection('somehost')- 当连接建立时, 会自动创建一个与 HBase Thrift server的socket链接. 可以通过参数禁止自动链接, 然后再需要连接是调用
Connection.open():
connection = happybase.Connection('somehost', autoconnect=False) # before first use: connection.open()Connection这个类提供了一个与HBase交互的入口, 比如获取HBase中所有的表:Connection.tables():
print(connection.tables())- 操作表
- Table类提供了大量API, 这些API用于检索和操作HBase中的数据。 在上面的示例中,我们已经使用Connection.tables()方法查询HBase中的表。 如果还没有任何表,可使用Connection.create_table()创建一个新表:
connection.create_table('users',{'cf1': dict()})-
创建表之后可以传入表名获取到Table类的实例:
table = connection.table('mytable') -
查询操作
# api table.scan() #全表查询 table.row(row_keys[0]) # 查询一行 table.rows(row_keys) # 查询多行 #封装函数 def show_rows(table, row_keys=None): if row_keys: print('show value of row named %s' % row_keys) if len(row_keys) == 1: print(table.row(row_keys[0])) else: print(table.rows(row_keys)) else: print('show all row values of table named %s' % table.name) for key, value in table.scan(): print(key, value)- 插入数据
#api table.put(row_key, {cf:cq:value}) def put_row(table, column_family, row_key, value): print('insert one row to hbase') #put 'user','rowkey_10','base_info:username','Tom' #{'cf:cq':’数据‘} table.put(row_key, {'%s:name' % column_family:'name_%s' % value}) def put_rows(table, column_family, row_lines=30): print('insert rows to hbase now') for i in range(row_lines): put_row(table, column_family, 'row_%s' % i, i)- 删除数据
#api table.delete(row_key, cf_list) #函数封装 def delete_row(table, row_key, column_family=None, keys=None): if keys: print('delete keys:%s from row_key:%s' % (keys, row_key)) key_list = ['%s:%s' % (column_family, key) for key in keys] table.delete(row_key, key_list) else: print('delete row(column_family:) from hbase') table.delete(row_key)- 删除表
#api conn.delete_table(table_name, True) #函数封装 def delete_table(table_name): pretty_print('delete table %s now.' % table_name) conn.delete_table(table_name, True)- 完整代码
import happybase
hostname = ‘192.168.199.188’
table_name = ‘users’
column_family = ‘cf’
row_key = ‘row_1’
conn = happybase.Connection(hostname)
def show_tables():
print(‘show all tables now’)
tables = conn.tables()
for t in tables:
print t
def create_table(table_name, column_family):
print(‘create table %s’ % table_name)
conn.create_table(table_name, {column_family:dict()})
def show_rows(table, row_keys=None):
if row_keys:
print(‘show value of row named %s’ % row_keys)
if len(row_keys) == 1:
print table.row(row_keys[0])
else:
print table.rows(row_keys)
else:
print(‘show all row values of table named %s’ % table.name)
for key, value in table.scan():
print key, value
def put_row(table, column_family, row_key, value):
print(‘insert one row to hbase’)
table.put(row_key, {‘%s:name’ % column_family:‘name_%s’ % value})
def put_rows(table, column_family, row_lines=30):
print(‘insert rows to hbase now’)
for i in range(row_lines):
put_row(table, column_family, ‘row_%s’ % i, i)
def delete_row(table, row_key, column_family=None, keys=None):
if keys:
print(‘delete keys:%s from row_key:%s’ % (keys, row_key))
key_list = [‘%s:%s’ % (column_family, key) for key in keys]
table.delete(row_key, key_list)
else:
print(‘delete row(column_family:) from hbase’)
table.delete(row_key)
def delete_table(table_name):
pretty_print(‘delete table %s now.’ % table_name)
conn.delete_table(table_name, True)
def pool():
pretty_print(‘test pool connection now.’)
pool = happybase.ConnectionPool(size=3, host=hostname)
with pool.connection() as connection:
print connection.tables()
def main():
# show_tables()
# create_table(table_name, column_family)
# show_tables()
table = conn.table(table_name)
show_rows(table)
put_rows(table, column_family)
show_rows(table)
#
# # 更新操作
# put_row(table, column_family, row_key, 'xiaoh.me')
# show_rows(table, [row_key])
#
# # 删除数据
# delete_row(table, row_key)
# show_rows(table, [row_key])
#
# delete_row(table, row_key, column_family, ['name'])
# show_rows(table, [row_key])
#
# counter(table, row_key, column_family)
#
# delete_table(table_name)
if name == “main”:
main()
### 4.2 HappyBase案例

- 用户行为分析案例 通过HBase记录用户行为

- 建表

  ```sql
  create 'user_profile','action'
  ```

- 表说明

  - user_X 作为rowkey
  - 对某件物品(用kwXXXXX关键词表示)做了什么操作作为cq,比如
    - s search
    - c click
    - a add to shopping cart
    - o order
    - p pay

- 录入数据

```sql
put 'user_profile', 'user1', 'action:s','kw1'
put 'user_profile', 'user1', 'action:s','kw188'
put 'user_profile', 'user1', 'action:s','kw123'

put 'user_profile', 'user1', 'action:s','kw2'
put 'user_profile', 'user1', 'action:c','kw288'
put 'user_profile', 'user1', 'action:s','kw222'

put 'user_profile', 'user1', 'action:o','kw1'
- python代码
class HBaseManager:

    config = {
        'BATCH_SIZE':1000
    }

    def __init__(self, host='localhost',port=9090, namespace='default', table_name=''):
        """ Connect to HBase server.
        This will use the host, namespace, table name, and batch size as defined in
        the global variables above.
        """
        self.conn = happybase.Connection(host = host,port=port,
            table_prefix = namespace,table_prefix_separator=':')
        self.conn.open()
        self.table = self.conn.table(table_name)
        self.batch = self.table.batch(batch_size = self.config['BATCH_SIZE'])

    def append_row(self,rowkey,family,col,content):
        self.table.put(rowkey, { '%s:%s' % (family,col) : content } )

    def close(self):
        self.conn.close()

    def filter_rows(self,filter=None):
        if filter:
            rs = self.table.scan(filter=filter)
            return rs
        else :
            rs = self.table.scan()
            return rs
from hbasemanager import HBaseManager
hbase = HBaseManager(host='192.168.10.202',namespace='default',table_name='user_profile')

# hbase.append_row('rk0001','cf','name','zhang')
hbase.append_row('user1', 'action','s', 'kw1')
hbase.append_row('user1', 'action','s', 'kw188')
hbase.append_row('user1', 'action','s', 'kw123')

hbase.append_row('user2', 'action','s', 'kw2')
hbase.append_row('user2', 'action','c', 'kw288')
hbase.append_row('user2', 'action','s', 'kw222')

hbase.append_row('user1','action','o', 'kw1')

# --哪个用户通过点击广告(c),值包含88
# scan 'user_profile', FILTER=>"ColumnPrefixFilter('c') AND ValueFilter(=,'substring:88')"
filter = "ColumnPrefixFilter('c') AND ValueFilter(=,'substring:88')"
# for user,action in hbase.filter_rows(filter):
#     print user,action

for user,action in hbase.filter_rows():
    print (user,action)
HBase使用场景
- HBase适合做什么, 不适合做什么
- 适合场景(大型互联网公司都用HBase)
- 表数据量大(至少亿级别以上) 写入量大(每天千万级别以上)
- append型业务(比如日志,聊天记录等)
- 读取量相对少(读取:写入<=1/10)
- 读取场景简单、不经常变化、无排序要求
- 无跨行跨表事务要求
- 不适合场景
- HBase仅支持行级事务(银行业务基本不用HBase)
- 类似DW等全量读取(hive), 不太适合
- 适合场景(大型互联网公司都用HBase)


