SpringCloud 学习笔记
❤ 作者主页:Java技术一点通的博客
❀ 个人介绍:大家好,我是Java技术一点通!( ̄▽ ̄)~*
记得关注、点赞、收藏、评论⭐️⭐️⭐️
认真学习,共同进步!!!
第一章 SpringCloud简介
一、 软件架构演进
-
单体架构

-
垂直架构

-
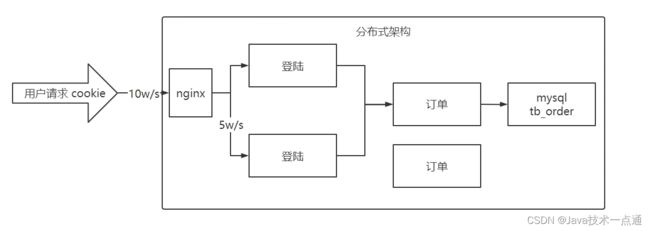
分布式架构
-
SOA架构

-
微服务架构

二、微服务架构
1. 微服务理念
(1) "微服务”一词源 于 Martin Fowler的名为 Microservices的博文,可以在他的官方博客上找到http://martinfowler.com/articles/microservices.html
(2) 微服务是系统架构上的一种设计风格,它的主旨是将一个原本独立的系统拆分成多个小型服务,这些小型服务都在各自独立的进程中运行,服务之间一般通过 HTTP 的 RESTfuL API 进行通信协作。
restfull 风格: 数据的增删改查,使用http的不同方式。数据传输用json。
-
查询 GET ip:port/user/1
-
新增 POST ip:port/user json{username:itlils,age:18}
-
修改 PUT ip:port/user/1 json{username:itlils,age:19}
-
删除 DELETE ip:port/user/1
(3) 由于有了轻量级的通信协作基础,所以这些微服务可以使用不同的语言来编写。大厂,各种语言混用。
cloud官网: https://spring.io/


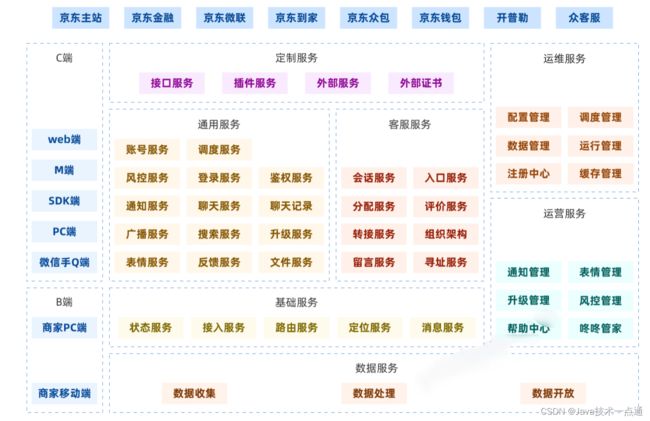
2. 现在大型互联网公司,都在使用微服务架构
- 京东的促销节架构:

- 阿里的架构:

- 京东物流的架构:
3. springcloud组件


第二章 走进springcloud
一、了解springcloud
-
Spring Cloud 是一系列框架的有序集合。
-
Spring Cloud 并没有重复制造轮子,它只是将目前各家公司开发的比较成熟、经得起实际考验的服务框架组合起来。
netflix eureka 1.1,alibaba 2.2
-
通过 Spring Boot 风格进行再封装,屏蔽掉了复杂的配置和实现原理,最终给开发者留出了一套简单易懂、易部署和易维护的分布式系统开发工具包。
-
它利用Spring Boot的开发便利性巧妙地简化了分布式系统基础设施的开发,如服务发现注册、配置中心、消息总线、负载均衡、 断路器、数据监控等,都可以用Spring Boot的开发风格做到一键启动和部署。
-
Spring Cloud项目官方网址:https://spring.io/projects/spring-cloud
-
Spring Cloud 版本命名方式采用了伦敦地铁站的名称,同时根据字母表的顺序来对应版本时间顺序,比如:最早的Release版本:Angel,第二个Release版本:Brixton,然后是Camden、Dalston、Edgware,Finchley,Greenwich,Hoxton。
目前最新的是2021.0.1版本。

二、 cloud与boot版本对应关系

三、 cloud与dubbo对比
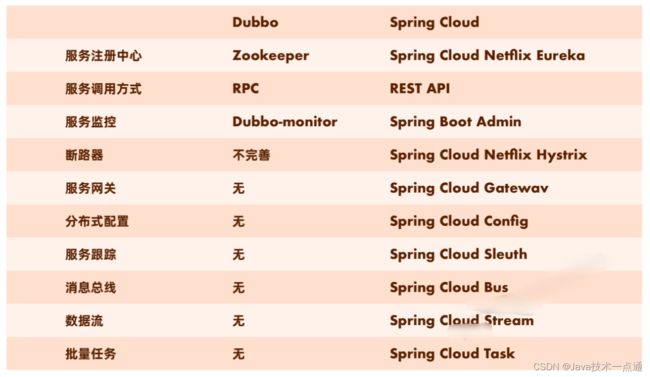
相同点: Spring Cloud 与 Dubbo 都是实现微服务有效的工具。
不同点:
-
Dubbo 只是实现了服务治理,而 Spring Cloud 子项目分别覆盖了微服务架构下的众多部件。
-
Dubbo 使用 RPC 通讯协议,Spring Cloud 使用 RESTful 完成通信,Dubbo 效率略高于 Spring Cloud。
小结:
-
微服务就是将项目的各个模块拆分为可独立运行、部署、测试的架构设计风格。
-
Spring 公司将其他公司中微服务架构常用的组件整合起来,并使用 SpringBoot 简化其开发、配置。称为 Spring Cloud。
-
Spring Cloud 与 Dubbo都是实现微服务有效的工具。Dubbo 性能更好,而 Spring Cloud 功能更全面。Dubbo 已经融入到spingcloudAlibaba这一套。
第三章 停更/升级/替换

第四章 微服务架构编码构建

一、 搭建 Provider 和 Consumer 服务
1. 父工程 spring-cloud-parent
-
创建spring-cloud-parent父工程

-
使用utf-8编码:

-
maven设置:

-
pom.xml
    4.0.0

    org.example
    spring-cloud-parent
    1.0.0


        org.springframework.boot
        spring-boot-starter-parent
        2.2.11.RELEASE


        8
        8
        UTF-8
        UTF-8
2. 提供者 eureka-provider
-
创建 eureka-provider子模块

-
引入依赖
org.springframework.boot spring-boot-starter-web -
application.yml
server: port: 8000 -
创建启动类
@SpringBootApplication public class ProviderApplication { public static void main(String[] args) { SpringApplication.run(ProviderApplication.class,args); } } -
实体类
public class Goods implements Serializable { private int id;//商品id private String title;//商品名 private double price;//价格 private int count;//库存 public Goods() { } public Goods(int id, String title, double price, int count) { this.id = id; this.title = title; this.price = price; this.count = count; } public int getId() { return id; } public void setId(int id) { this.id = id; } public String getTitle() { return title; } public void setTitle(String title) { this.title = title; } public double getPrice() { return price; } public void setPrice(double price) { this.price = price; } public int getCount() { return count; } public void setCount(int count) { this.count = count; } @Override public String toString() { return "Goods{" + "id=" + id + ", title='" + title + '\'' + ", price=" + price + ", count=" + count + '}'; } } -
controller层
@RestController @RequestMapping("goods") public class GoodsController { @Autowired private GoodsService goodsService; @GetMapping("findById/{id}") public Goods findById(@PathVariable("id") int id) { Goods goods = goodsService.findById(id); return goods; } } -
service层
@Service public class GoodsService { @Autowired private GoodsDao goodsDao; public Goods findById(int id) { Goods goods = goodsDao.findById(id); return goods; } } -
dao层
@Repository public class GoodsDao { public Goods findById(int id) { return new Goods(id, "手机", 2000, 1000); } } -
测试
访问:http://localhost:8000/goods/findById/1
3. 消费者 eureka-consumer
-
创建 eureka-consumer子模块

-
引入依赖
org.springframework.boot spring-boot-starter-web -
application.yml
server: port: 9000 -
创建启动类
@SpringBootApplication public class ConsumerApplication{ public static void main(String[] args) { SpringApplication.run(ConsumerApplication.class,args); } } -
实体类
public class Goods implements Serializable { private int id;//商品id private String title;//商品名 private double price;//价格 private int count;//库存 public Goods() { } public Goods(int id, String title, double price, int count) { this.id = id; this.title = title; this.price = price; this.count = count; } public int getId() { return id; } public void setId(int id) { this.id = id; } public String getTitle() { return title; } public void setTitle(String title) { this.title = title; } public double getPrice() { return price; } public void setPrice(double price) { this.price = price; } public int getCount() { return count; } public void setCount(int count) { this.count = count; } @Override public String toString() { return "Goods{" + "id=" + id + ", title='" + title + '\'' + ", price=" + price + ", count=" + count + '}'; } } -
controller层
@RestController @RequestMapping("/order") public class OrderController { @GetMapping("/add/{id}") public Goods add(@PathVariable("id") Integer id) { //业务逻辑 //1查询商品 //2减库存 //3支付 //4物流 return new Goods(); } } -
测试
访问:http://localhost:9000/order/add/2
二、使用 RestTemplate 完成远程调用
- Spring提供的一种简单便捷的模板类,用于在 java 代码里访问 restful 服务。
- 其功能与 HttpClient 类似,但是 RestTemplate 实现更优雅,使用更方便。
在 eureka-consumer 模块中添加 RestTemplate 类:
@Configuration
public class RestTemplateConfig {

    @Bean
    public RestTemplate restTemplate() {
        return new RestTemplate();
    }
}
OrderController
@RestController
@RequestMapping("/order")
public class OrderController {

    @Autowired
    private RestTemplate restTemplate;

    @GetMapping("/add/{id}")
    public Goods add(@PathVariable("id") Integer id) {
        /*
            远程调用eureka—provider服务中的findById接口:使用RestTemplate
            1. 定义Bean  restTemplate
            2. 注入Bean
            3. 调用方法
         */

        String url = "http://localhost:8000/goods/findById/"+id;

        Goods goods = restTemplate.getForObject(url, Goods.class);

        return goods;
    }
}
测试:
启动 eureka-provider 和 eureka-consumer 两个服务,访问:http://localhost:9000/order/add/8

第五章 Eureka服务注册与发现
一、Eureka
概念:
-
Eureka 是 Netflix 公司开源的一个服务注册与发现的组件 。
-
Eureka 和其他 Netflix 公司的服务组件(例如负载均衡、熔断器、网关等) 一起,被 Spring Cloud 社区整合为Spring-Cloud-Netflix 模块。
-
Eureka 包含两个组件:Eureka Server (注册中心) 和 Eureka Client (服务提供者、服务消费者)。
操作:

nbgsp;
二、 搭建 Eureka Server 服务
(1)创建 eureka-server 模块
(2) 引入 SpringCloud 和 euraka-server 相关依赖
(3)完成 Eureka Server 相关配置
(4)启动该模块
父工程pom
    4.0.0

    org.example
    spring-cloud-parent
    pom
    1.0.0

        eureka-provider
        eureka-consumer
        eureka-server


        org.springframework.boot
        spring-boot-starter-parent
        2.3.4.RELEASE


        8
        8
        UTF-8
        UTF-8

        Hoxton.SR10


                org.springframework.cloud
                spring-cloud-dependencies
                ${spring-cloud.version}
                pom
                import
eureka-server工程
-
引入依赖
org.springframework.boot spring-boot-starter-web org.springframework.cloud spring-cloud-starter-netflix-eureka-server -
创建启动类
@SpringBootApplication // 启用EurekaServer @EnableEurekaServer public class EurekaApplication { public static void main(String[] args) { SpringApplication.run(EurekaApplication.class,args); } } -
application.yml
server: port: 8761 # eureka 配置 # eureka 一共有4部分 配置 # 1. dashboard:eureka的web控制台配置 # 2. server:eureka的服务端配置 # 3. client:eureka的客户端配置 # 4. instance:eureka的实例配置 eureka: instance: hostname: localhost # 主机名 client: service-url: defaultZone: http://${eureka.instance.hostname}:${server.port}/eureka # eureka服务端地址,将来客户端使用该地址和eureka进行通信 register-with-eureka: false # 是否将自己的路径 注册到eureka上。eureka server 不需要的,eureka provider client 需要 fetch-registry: false # 是否需要从eureka中抓取路径。eureka server 不需要的,eureka consumer client 需要 -
测试
启动项目后,访问:http://localhost:8761/

三、 改造 Provider 和 Consumer 称为 Eureka Client
(1)引 eureka-client 相关依赖
(2)完成 eureka client 相关配置
(3)启动 测试
eureka-provider 工程
-
引入依赖
org.springframework.cloud spring-cloud-starter-netflix-eureka-client -
启动类上添加注解
@EnableEurekaClient -
application.yml
server:
  port: 8001


eureka:
  instance:
    hostname: localhost # 主机名
  client:
    service-url:
      defaultZone: http://localhost:8761/eureka # eureka服务端地址,将来客户端使用该地址和eureka进行通信
spring:
  application:
    name: eureka-provider # 设置当前应用的名称。将来会在eureka中Application显示。将来需要使用该名称来获取路径
eureka-comsumer 工程
-
引入依赖
org.springframework.cloud spring-cloud-starter-netflix-eureka-client -
启动类上添加注解
@EnableEurekaClient -
application.yml
server:
  port: 9000

eureka:
  instance:
    hostname: localhost # 主机名
  client:
    service-url:
      defaultZone: http://localhost:8761/eureka # eureka服务端地址,将来客户端使用该地址和eureka进行通信
spring:
  application:
    name: eureka-consumer # 设置当前应用的名称。将来会在eureka中Application显示。将来需要使用该名称来获取路径
四、 通过Eureka调用
Consumer 模块
@RestController
@RequestMapping("/order")
public class OrderController {

    @Autowired

    private RestTemplate restTemplate;

    @Autowired
    private DiscoveryClient discoveryClient;

    @GetMapping("/add/{id}")
    public Goods add(@PathVariable("id") Integer id) {

        //服务发现
        List instances = discoveryClient.getInstances("EUREKA-PROVIDER");
        if(instances==null||instances.size()<=0){
            return null;
        }
        //通过某个策略拿到一个实例
        ServiceInstance serviceInstance = instances.get(0);
        String host = serviceInstance.getHost();
        int port = serviceInstance.getPort();
        System.out.println(host);
        System.out.println(port);

        String url="http://"+host+":"+port+"/goods/findById/"+id;
        Goods goods = restTemplate.getForObject(url, Goods.class);

        return goods;

    }
}

五、 Euraka配置详解
Eureka包含四个部分的配置:
instance:当前Eureka Instance实例信息配置client:Eureka Client客户端特性配置server:Eureka Server注册中心特性配置dashboard:Eureka Server注册中心仪表盘配置
1、实例信息配置
eureka:
    instance:
        hostname: localhost # 主机名
        prefer-ip-address: # 是否将自己的ip注册到eureka中,默认false 注册 主机名
        ip-address: # 设置当前实例ip
        instance-id: # 修改instance-id显示
        lease-renewal-interval-in-seconds: 30 # 每一次eureka client 向 eureka server发送心跳的时间间隔
        lease-expiration-duration-in-seconds: 90 # 如果90秒内eureka server没有收到eureka client的心跳包,则剔除该服务
Eureka Instance的配置信息全部保存在org.springframework.cloud.netflix.eureka.EurekaInstanceConfigBean配置类里,实际上它是com.netflix.appinfo.EurekaInstanceConfig的实现类,替代了netflix的com.netflix.appinfo.CloudInstanceConfig的默认实现。
Eureka Instance的配置信息全部以eureka.instance.xxx的格式配置。
配置列表:
appname = unknown
应用名,首先获取spring.application.name的值,如果取值为空,则取默认unknown。

appGroupName = null
应用组名

instanceEnabledOnit = false
实例注册到Eureka上是,是否立刻开启通讯。有时候应用在准备好服务之前需要一些预处理。

nonSecurePort = 80
非安全的端口

securePort = 443
安全端口

nonSecurePortEnabled = true
是否开启非安全端口通讯

securePortEnabled = false
是否开启安全端口通讯

leaseRenewalIntervalInSeconds = 30
实例续约间隔时间

leaseExpirationDurationInSeconds = 90
实例超时时间,表示最大leaseExpirationDurationInSeconds秒后没有续约,Server就认为他不可用了,随之就会将其剔除。

virtualHostName = unknown
虚拟主机名,首先获取spring.application.name的值,如果取值为空,则取默认unknown。

instanceId
注册到eureka上的唯一实例ID,不能与相同appname的其他实例重复。

secureVirtualHostName = unknown
安全虚拟主机名,首先获取spring.application.name的值,如果取值为空,则取默认unknown。

metadataMap = new HashMap();
实例元数据,可以供其他实例使用。比如spring-boot-admin在监控时,获取实例的上下文和端口。

dataCenterInfo = new MyDataCenterInfo(DataCenterInfo.Name.MyOwn);
实例部署的数据中心。如AWS、MyOwn。

ipAddress=null
实例的IP地址

statusPageUrlPath = "/actuator/info"
实例状态页相对url

statusPageUrl = null
实例状态页绝对URL

homePageUrlPath = "/"
实例主页相对URL

homePageUrl = null
实例主页绝对URL

healthCheckUrlUrlPath = "/actuator/health"
实例健康检查相对URL

healthCheckUrl = null
实例健康检查绝对URL

secureHealthCheckUrl = null
实例安全的健康检查绝对URL

namespace = "eureka"
配置属性的命名空间(Spring Cloud中被忽略)

hostname = null
主机名,不配置的时候讲根据操作系统的主机名来获取

preferIpAddress = false
是否优先使用IP地址作为主机名的标识
2、客户端特性配置
eureka:
    client:
        service-url:
       		 # eureka服务端地址,将来客户端使用该地址和eureka进行通信
        	defaultZone:
        register-with-eureka: # 是否将自己的路径 注册到eureka上。
        fetch-registry: # 是否需要从eureka中抓取数据。
Eureka Client客户端特性配置是对作为Eureka客户端的特性配置,包括Eureka注册中心,本身也是一个Eureka Client。
Eureka Client特性配置全部在org.springframework.cloud.netflix.eureka.EurekaClientConfigBean中,实际上它是com.netflix.discovery.EurekaClientConfig的实现类,替代了netxflix的默认实现。
Eureka Client客户端特性配置全部以eureka.client.xxx的格式配置。
配置列表:
enabled=true
是否启用Eureka client。

registryFetchIntervalSeconds=30
定时从Eureka Server拉取服务注册信息的间隔时间

instanceInfoReplicationIntervalSeconds=30
定时将实例信息(如果变化了)复制到Eureka Server的间隔时间。(InstanceInfoReplicator线程)

initialInstanceInfoReplicationIntervalSeconds=40
首次将实例信息复制到Eureka Server的延迟时间。(InstanceInfoReplicator线程)

eurekaServiceUrlPollIntervalSeconds=300
拉取Eureka Server地址的间隔时间(Eureka Server有可能增减)

proxyPort=null
Eureka Server的代理端口

proxyHost=null
Eureka Server的代理主机名

proxyUserName=null
Eureka Server的代理用户名

proxyPassword=null
Eureka Server的代理密码

eurekaServerReadTimeoutSeconds=8
从Eureka Server读取信息的超时时间

eurekaServerConnectTimeoutSeconds=5
连接Eureka Server的超时时间

backupRegistryImpl=null
Eureka Client第一次启动时获取服务注册信息的调用的回溯实现。Eureka Client启动时首次会检查有没有BackupRegistry的实现类,如果有实现类,则优先从这个实现类里获取服务注册信息。

eurekaServerTotalConnections=200
Eureka client连接Eureka Server的链接总数

eurekaServerTotalConnectionsPerHost=50
Eureka client连接单台Eureka Server的链接总数

eurekaServerURLContext=null
当Eureka server的列表在DNS中时,Eureka Server的上下文路径。如http://xxxx/eureka。

eurekaServerPort=null
当Eureka server的列表在DNS中时,Eureka Server的端口。

eurekaServerDNSName=null
当Eureka server的列表在DNS中时,且要通过DNSName获取Eureka Server列表时,DNS名字。

region="us-east-1"
实例所属区域。

eurekaConnectionIdleTimeoutSeconds = 30
Eureka Client和Eureka Server之间的Http连接的空闲超时时间。

heartbeatExecutorThreadPoolSize=2
心跳(续约)执行器线程池大小。

heartbeatExecutorExponentialBackOffBound=10
心跳执行器在续约过程中超时后的再次执行续约的最大延迟倍数。默认最大延迟时间=10 * eureka.instance.leaseRenewalIntervalInSeconds

cacheRefreshExecutorThreadPoolSize=2
cacheRefreshExecutord的线程池大小(获取注册信息)

cacheRefreshExecutorExponentialBackOffBound=10
cacheRefreshExecutord的再次执行的最大延迟倍数。默认最大延迟时间=10 *eureka.client.registryFetchIntervalSeconds

serviceUrl= new HashMap();serviceUrl.put(DEFAULT_ZONE, DEFAULT_URL);
Eureka Server的分区地址。默认添加了一个defualtZone。也就是最常用的配置eureka.client.service-url.defaultZone=xxx

registerWithEureka=true
是否注册到Eureka Server。

preferSameZoneEureka=true
是否使用相同Zone下的Eureka server。

logDeltaDiff=false
是否记录Eureka Server和Eureka Client之间注册信息的差异

disableDelta=false
是否开启增量同步注册信息。

fetchRemoteRegionsRegistry=null
获取注册服务的远程地区,以逗号隔开。

availabilityZones=new HashMap()
可用分区列表。用逗号隔开。

filterOnlyUpInstances = true
是否只拉取UP状态的实例。

fetchRegistry=true
是否拉取注册信息。

shouldUnregisterOnShutdown = true
是否在停止服务的时候向Eureka Server发起Cancel指令。

shouldEnforceRegistrationAtInit = false
是否在初始化过程中注册服务。
3、注册中心端配置
eureka:
    server: #是否开启自我保护机制,默认true
        enable-self-preservation:
        eviction-interval-timer-in-ms: 120 2月#清理间隔(单位毫秒,默认是60*1000)
	instance:
        lease-renewal-interval-in-seconds: 30 # 每一次eureka client 向 eureka server发送心跳的时间间隔
        lease-expiration-duration-in-seconds: 90 # 如果90秒内eureka server没有收到eureka client的心跳包,则剔除该服务
Eureka Server注册中心端的配置是对注册中心的特性配置。Eureka Server的配置全部在org.springframework.cloud.netflix.eureka.server.EurekaServerConfigBean里,实际上它是com.netflix.eureka.EurekaServerConfig的实现类,替代了netflix的默认实现。
Eureka Server的配置全部以eureka.server.xxx的格式进行配置。
配置列表:
enableSelfPreservation=true
是否开启自我保护

renewalPercentThreshold = 0.85
自我保护续约百分比阀值因子。如果实际续约数小于续约数阀值,则开启自我保护

renewalThresholdUpdateIntervalMs = 15 * 60 * 1000
续约数阀值更新频率。

peerEurekaNodesUpdateIntervalMs = 10 * 60 * 1000
Eureka Server节点更新频率。

enableReplicatedRequestCompression = false
是否启用复制请求压缩。

waitTimeInMsWhenSyncEmpty=5 * 60 * 1000
当从其他节点同步实例信息为空时等待的时间。

peerNodeConnectTimeoutMs=200
节点间连接的超时时间。

peerNodeReadTimeoutMs=200
节点间读取信息的超时时间。

peerNodeTotalConnections=1000
节点间连接总数。

peerNodeTotalConnectionsPerHost = 500;
单个节点间连接总数。

peerNodeConnectionIdleTimeoutSeconds = 30;
节点间连接空闲超时时间。

retentionTimeInMSInDeltaQueue = 3 * MINUTES;
增量队列的缓存时间。

deltaRetentionTimerIntervalInMs = 30 * 1000;
清理增量队列中过期的频率。

evictionIntervalTimerInMs = 60 * 1000;
剔除任务频率。

responseCacheAutoExpirationInSeconds = 180;
注册列表缓存超时时间(当注册列表没有变化时)

responseCacheUpdateIntervalMs = 30 * 1000;
注册列表缓存更新频率。

useReadOnlyResponseCache = true;
是否开启注册列表的二级缓存。

disableDelta=false。
是否为client提供增量信息。

maxThreadsForStatusReplication = 1;
状态同步的最大线程数。

maxElementsInStatusReplicationPool = 10000;
状态同步队列的最大容量。

syncWhenTimestampDiffers = true;
当时间差异时是否同步。

registrySyncRetries = 0;
注册信息同步重试次数。

registrySyncRetryWaitMs = 30 * 1000;
注册信息同步重试期间的时间间隔。

maxElementsInPeerReplicationPool = 10000;
节点间同步事件的最大容量。

minThreadsForPeerReplication = 5;
节点间同步的最小线程数。

maxThreadsForPeerReplication = 20;
节点间同步的最大线程数。

maxTimeForReplication = 30000;
节点间同步的最大时间,单位为毫秒。

disableDeltaForRemoteRegions = false;
是否启用远程区域增量。

remoteRegionConnectTimeoutMs = 1000;
远程区域连接超时时间。

remoteRegionReadTimeoutMs = 1000;
远程区域读取超时时间。

remoteRegionTotalConnections = 1000;
远程区域最大连接数

remoteRegionTotalConnectionsPerHost = 500;
远程区域单机连接数

remoteRegionConnectionIdleTimeoutSeconds = 30;
远程区域连接空闲超时时间。

remoteRegionRegistryFetchInterval = 30;
远程区域注册信息拉取频率。

remoteRegionFetchThreadPoolSize = 20;
远程区域注册信息线程数。
4、仪表盘配置
eureka:
    dashboard:
        enabled: true # 是否启用eureka web控制台
        path: / # 设置eureka web控制台默认访问路径
注册中心仪表盘的配置主要是控制注册中心的可视化展示。以eureka.dashboard.xxx的格式配置。
-
path="/" :仪表盘访问路径 -
enabled=true: 是否启用仪表盘
-
改造 provider
server: port: 8000 eureka: instance: hostname: localhost # 主机名 prefer-ip-address: true # 将当前实例的ip注册到eureka server 中。默认是false 注册主机名 ip-address: 127.0.0.1 # 设置当前实例的ip instance-id: ${eureka.instance.ip-address}:${spring.application.name}:${server.port} # 设置web控制台显示的 实例id lease-renewal-interval-in-seconds: 3 # 每隔3 秒发一次心跳包 lease-expiration-duration-in-seconds: 9 # 如果9秒没有发心跳包,服务器呀,你把我干掉吧~ client: service-url: defaultZone: http://localhost:8761/eureka # eureka服务端地址,将来客户端使用该地址和eureka进行通信 spring: application: name: eureka-provider # 设置当前应用的名称。将来会在eureka中Application显示。将来需要使用该名称来获取路径 -
改造consumer
server: port: 9000 eureka: instance: hostname: localhost # 主机名 client: service-url: defaultZone: http://localhost:8761/eureka # eureka服务端地址,将来客户端使用该地址和eureka进行通信 spring: application: name: eureka-consumer # 设置当前应用的名称。将来会在eureka中Application显示。将来需要使用该名称来获取路径 -
改造server
server:
  port: 8761

# eureka 配置
# eureka 一共有4部分 配置
# 1. dashboard:eureka的web控制台配置
# 2. server:eureka的服务端配置
# 3. client:eureka的客户端配置
# 4. instance:eureka的实例配置


eureka:
  instance:
    hostname: localhost # 主机名
  client:
    service-url:
      defaultZone: http://${eureka.instance.hostname}:${server.port}/eureka # eureka服务端地址,将来客户端使用该地址和eureka进行通信
    register-with-eureka: false # 是否将自己的路径 注册到eureka上。eureka server 不需要的,eureka provider client 需要
    fetch-registry: false # 是否需要从eureka中抓取路径。eureka server 不需要的,eureka consumer client 需要
  server:
    enable-self-preservation: false # 关闭自我保护机制
    eviction-interval-timer-in-ms: 3000 # 检查服务的时间间隔
六、高可用

(1) 准备两个Eureka Server
(2) 分别进行配置,相互注册
(3) Eureka Client 分别注册到这两个 Eureka Server中
创建eureka-server1
server:
  port: 8761


eureka:
  instance:
    hostname: eureka-server1 # 主机名
  client:
    service-url:
      defaultZone: http://eureka-server2:8762/eureka
    register-with-eureka: true # 是否将自己的路径 注册到eureka上。eureka server 不需要的,eureka provider client 需要
    fetch-registry: true # 是否需要从eureka中抓取路径。eureka server 不需要的,eureka consumer client 需要


spring:
  application:
    name: eureka-server-ha
创建eureka-server2
server:
  port: 8762


eureka:
  instance:
    hostname: eureka-server2 # 主机名
  client:
    service-url:
      defaultZone: http://eureka-server1:8761/eureka

    register-with-eureka: true # 是否将自己的路径 注册到eureka上。eureka server 不需要的,eureka provider client 需要
    fetch-registry: true # 是否需要从eureka中抓取路径。eureka server 不需要的,eureka consumer client 需要
spring:
  application:
    name: eureka-server-ha
修改:C:\Windows\System32\drivers\etc\hosts
在hosts文件中添加:127.0.0.1 eureka-server1 127.0.0.1 eureka-server2

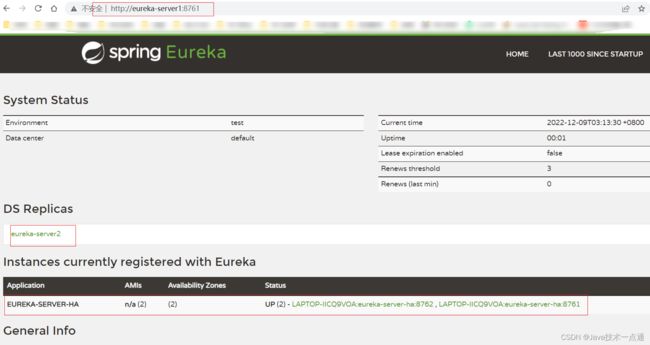
测试:
启动 eureka-servere1 和 eureka-server2

eureka-provider
server:
  port: 8000


eureka:
  instance:
    hostname: localhost # 主机名
    prefer-ip-address: true # 将当前实例的ip注册到eureka server 中。默认是false 注册主机名
    ip-address: 127.0.0.1 # 设置当前实例的ip
    instance-id: ${eureka.instance.ip-address}:${spring.application.name}:${server.port} # 设置web控制台显示的 实例id
    lease-renewal-interval-in-seconds: 3 # 每隔3 秒发一次心跳包
    lease-expiration-duration-in-seconds: 9 # 如果9秒没有发心跳包,服务器呀,你把我干掉吧~
  client:
    service-url:
      defaultZone: http://eureka-server1:8761/eureka,http://eureka-server2:8762/eureka # eureka服务端地址,将来客户端使用该地址和eureka进行通信
spring:
  application:
    name: eureka-provider # 设置当前应用的名称。将来会在eureka中Application显示。将来需要使用该名称来获取路径
eureka-consumer
server:
  port: 9000


eureka:
  instance:
    hostname: localhost # 主机名
  client:
    service-url:
      defaultZone:  http://eureka-server1:8761/eureka,http://eureka-server2:8762/eureka  # eureka服务端地址,将来客户端使用该地址和eureka进行通信
spring:
  application:
    name: eureka-consumer # 设置当前应用的名称。将来会在eureka中Application显示。将来需要使用该名称来获取路径
测试: 访问 http://localhost:9000/order/add/2

高可用测试:停掉一个eureka,依然可以访问consumer。
eureka不更新了,所以淘汰了。
第六章 Zookeeper服务注册与发现
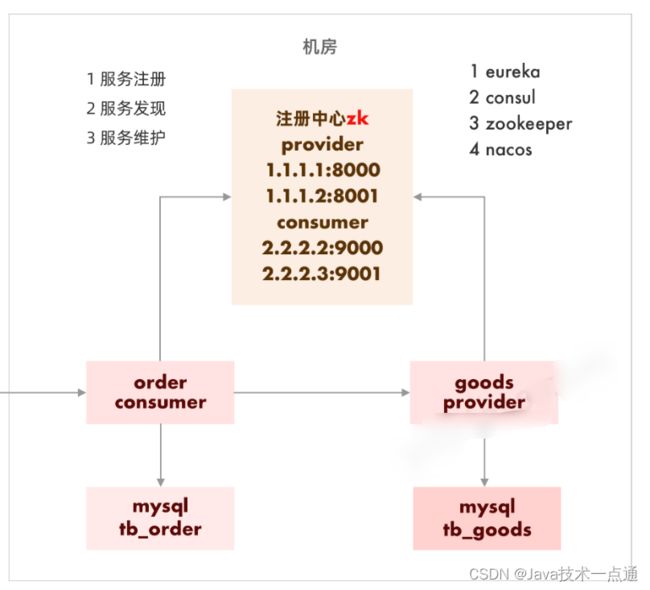
有的老项目以前是dubbo,升级到微服务,使用zookeeper做注册中心。
zookeeper是一个分布式协调工具,可以实现注册中心功能。
实质: 注册中心换成zk。
1. 安装zookeeper
-
下载:https://zookeeper.apache.org/

-
zoo.cfg
# The number of milliseconds of each tick tickTime=2000 # The number of ticks that the initial # synchronization phase can take initLimit=10 # The number of ticks that can pass between # sending a request and getting an acknowledgement syncLimit=5 # the directory where the snapshot is stored. # do not use /tmp for storage, /tmp here is just # example sakes. dataDir=D:/zookeeper-3.4.13/data # the port at which the clients will connect clientPort=2181 # the maximum number of client connections. # increase this if you need to handle more clients #maxClientCnxns=60 # # Be sure to read the maintenance section of the # administrator guide before turning on autopurge. # # http://zookeeper.apache.org/doc/current/zookeeperAdmin.html#sc_maintenance # # The number of snapshots to retain in dataDir #autopurge.snapRetainCount=3 # Purge task interval in hours # Set to "0" to disable auto purge feature #autopurge.purgeInterval=1 -
启动 bin目录下
zkServer.cmd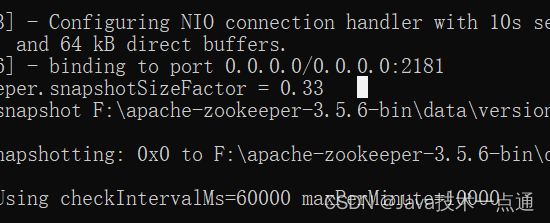
2. zookeeper-provider
-
引入依赖
org.springframework.cloud spring-cloud-starter-zookeeper-discovery org.apache.zookeeper zookeeper org.apache.zookeeper zookeeper 3.4.9 org.slf4j slf4j-log4j12 org.springframework.boot spring-boot-starter-web -
application.yml
server: port: 8004 spring: application: name: zookeeper-provider cloud: zookeeper: connect-string: 127.0.0.1:2181 # zk地址 -
启动类
@SpringBootApplication @EnableDiscoveryClient //开启发现客户端 public class ProviderApplication { public static void main(String[] args) { SpringApplication.run(ProviderApplication.class,args); } } -
复制
eureka-provider模块中业务逻辑的代码

3. zookeeper-consumer
-
引入依赖
org.springframework.cloud spring-cloud-starter-zookeeper-discovery org.apache.zookeeper zookeeper org.apache.zookeeper zookeeper 3.4.9 org.slf4j slf4j-log4j12 org.springframework.boot spring-boot-starter-web -
application.yml
server: port: 8005 spring: application: name: zookeeper-consumer cloud: zookeeper: connect-string: 127.0.0.1:2181 # zk地址 -
启动类
@SpringBootApplication @EnableDiscoveryClient //开启发现客户端 public class ConsumerApplication { public static void main(String[] args) { SpringApplication.run(ConsumerApplication.class,args); } } -
复制
eureka-consumer模块中业务逻辑的代码
-
修改controller层
Listinstances = discoveryClient.getInstances("zookeeper-provider"); -
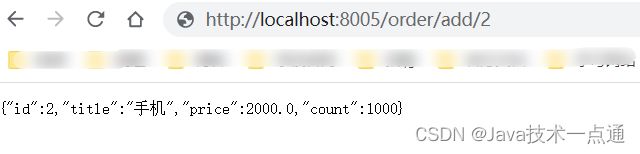
测试
访问:http://localhost:8005/order/add/2
第七章 Consul服务注册与发现
一、Consul是什么
- Consul 是由 HashiCorp 基于 GoLanguage 语言开发的,支持多数据中心,分布式高可用的服务发布和注册服务软件。
- 用于实现分布式系统的服务发现与配置。
- 使用起来也较 为简单。具有天然可移植性(支持Linux、windows和Mac OS X);安装包仅包含一个可执行文件,方便部署 。
- Consul官网:https://www.consul.io/
- Consul中文文档:https://www.springcloud.cc/spring-cloud-consul.html
二、Consul怎么用
1. 安装Consul
启动:在安装包的目录下打开命令窗口输入:consul.exe agent -dev


2. 搭建 consul-provider
-
引入依赖
org.springframework.cloud spring-cloud-starter-consul-discovery org.springframework.boot spring-boot-starter-web -
application.yml
server: port: 8006 spring: application: name: consul-provider cloud: consul: host: 127.0.0.1 port: 8500 discovery: service-name: ${spring.application.name} -
启动类
@SpringBootApplication @EnableDiscoveryClient public class ProviderApplication { public static void main(String[] args) { SpringApplication.run(ProviderApplication.class,args); } } -
复制相关的业务逻辑代码

-
启动

3. 搭建 consul-consumer
-
引入依赖
org.springframework.cloud spring-cloud-starter-consul-discovery org.springframework.boot spring-boot-starter-web -
application.yml
server: port: 8007 spring: application: name: consul-consumer cloud: consul: host: 127.0.0.1 port: 8500 discovery: service-name: ${spring.application.name} -
启动类
@SpringBootApplication @EnableDiscoveryClient public class ConsumerApplication { public static void main(String[] args) { SpringApplication.run(ConsumerApplication.class,args); } } -
复制相关的业务逻辑代码

-
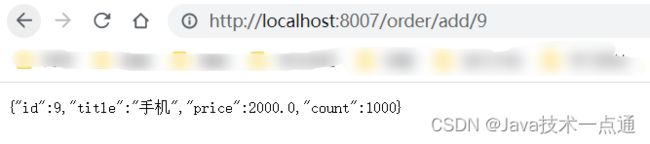
启动

最终测试调用成功即可:http://localhost:8007/order/add/9
三、 三个注册中心的异同
| 组件 | 语言 | cap | 健康检查 | 暴露接口 | cloud集成 |
|---|---|---|---|---|---|
| eureka | java | ap | 支持 | http | 已经集成 |
| zookeeper | java | cp | 支持 | tcp | 已经集成 |
| consul | go | cp | 支持 | http | 已经集成 |
cap:
-
consustency强一致性 -
avalibility可用性 -
partition tolerance分区容忍性
第八章 Ribbon负载均衡服务调用
一、Ribbon是什么
Netflix公司推出的http和TCP的客户端负载均衡工具。
ribbon:
-
简化远程调用代码
-
内置很多负载均衡算法
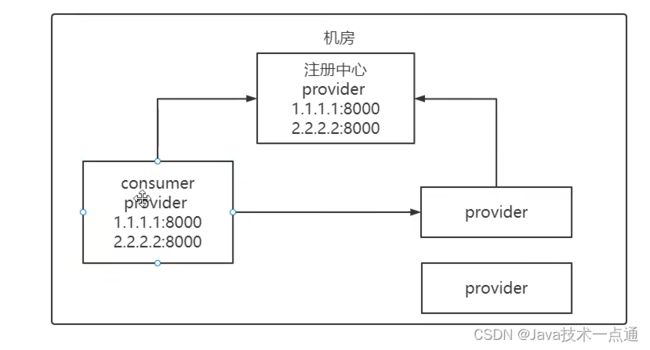
1. 服务端负载均衡
负载均衡算法在服务端,服务端维护服务列表。

2. 客户端负载均衡
-
负载均衡算法在客户端
-
客户端维护服务列表
二、如何使用
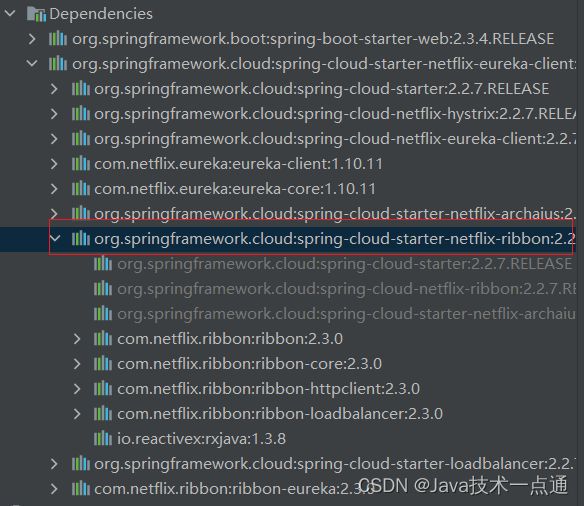
-
引入依赖
      org.springframework.cloud
      spring-cloud-starter-netflix-ribbon
新版的eureka依赖里面集成了Ribbon依赖,所以可以不引用。
-
声明restTemplate时@LoadBalanced
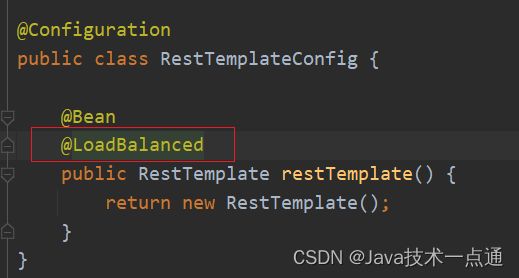
-
restTemplate请求远程服务时,ip端口替换为服务名
String url="http://EUREKA-PROVIDER/goods/findById/"+id;
Goods goods = restTemplate.getForObject(url, Goods.class);
测试:
-
启动2个provider
controller

idea设置 能启动两份 provider:


-
多次访问consumer


多次刷新,发现:ribbon客户端,默认使用轮询算法,经行负载均衡调用。
三、ribbon 负载均衡策略
| 内置负载均衡规则类 | 规则描述 |
|---|---|
| RoundRobinRule | 简单轮询服务列表来选择服务器。它是Ribbon默认的负载均衡规则。 |
| AvailabilityFilteringRule | 对以下两种服务器进行忽略:(1)在默认情况下,这台服务器如果3次连接失败,这台服务器就会被设置为“短路”状态。短路状态将持续30秒,如果再次连接失败,短路的持续时间就会几何级地增加。注意:可以通过修改配置loadbalancer. |
| WeightedResponseTimeRule | 为每一个服务器赋予一个权重值。服务器响应时间越长,这个服务器的权重就越小。这个规则会随机选择服务器,这个权重值会影响服务器的选择。 |
| ZoneAvoidanceRule | 以区域可用的服务器为基础进行服务器的选择。使用Zone对服务器进行分类,这个Zone可以理解为一个机房、一个机架等。 |
| BestAvailableRule | 忽略哪些短路的服务器,并选择并发数较低的服务器。 |
| RandomRule | 随机选择一个可用的服务器。 |
| Retry | 重试机制的选择逻辑 |
四、 设置ribbon 负载均衡策略
1. 代码
consumer工程
-
MyRule 返回想要的规则即可
@Configuration public class MyRule { @Bean public IRule rule(){ return new RandomRule(); } } -
启动类
@RibbonClient(name ="EUREKA-PROVIDER",configuration = MyRule.class) -
测试
总结:
-
irule的具体实现类,看到他带的几个策略的写法。
-
仿照策略的写法,自己写策略。
-
调用不同的其他微服务时,可以采用不同的策略。
2. 配置
consumer工程
- application.yml
EUREKA-PROVIDER: #远程服务名
  ribbon:
    NFLoadBalancerRuleClassName: com.netflix.loadbalancer.RandomRule #策略
作用:方便运维修改,重启。随时切换策略。
第九章、OpenFeign服务接口调用
一、概述
- Feign 是一个声明式的 REST 客户端,它用了基于接口的注解方式,很方便实现客户端像调用本地接口方法一样,进行远程调用。
- Feign 最初由 Netflix 公司提供,但不支持SpringMVC注解,后由 SpringCloud 对其封装,支持了SpringMVC注解,让使用者更易于接受。
- 官方文档: https://cloud.spring.io/spring-cloud-static/Hoxton.SR1/reference/htmlsingle/#spring-cloud-openfeign
二、快速入门
-
在消费端引入 open-feign 依赖
org.springframework.cloud spring-cloud-starter-openfeign -
编写Feign调用接口
@FeignClient("eureka-provider") public interface GoodsFeign { @GetMapping("/goods/findById/{id}") public Goods findById(@PathVariable("id") Integer id); } -
在启动类 添加 @EnableFeignClients 注解,开启Feign功能
@EnableFeignClients -
测试调用
@RestController @RequestMapping("/order") public class OrderController { @Autowired GoodsFeign goodsFeign; @GetMapping("/add/{id}") public Goods add(@PathVariable("id") Integer id) { //feign调用 Goods goods = goodsFeign.findById(id); return goods; } } -
测试
三、其他设置
1. 超时设置
-
Feign 底层依赖于 Ribbon 实现负载均衡和远程调用。
-
Ribbon默认1秒超时。
-
超时配置: application.yml中
# 设置Ribbon的超时时间 ribbon: ConnectTimeout: 1000 # 连接超时时间 默认1s ReadTimeout: 3000 # 逻辑处理的超时时间 默认1s -
测试
- 连接超时,provider都停掉

- 逻辑处理的超时时间
provider@GetMapping("findById/{id}") public Goods findById(@PathVariable("id") int id) { Goods goods = goodsService.findById(id); goods.setTitle(goods.getTitle()+"|端口号:"+port); //模拟业务逻辑比较繁忙 try { Thread.sleep(5000); } catch (InterruptedException e) { e.printStackTrace(); } return goods; }

2. 日志记录
-
Feign 只能记录 debug 级别的日志信息
-
设置日志级别
# 设置当前的日志级别 debug,feign只支持记录debug级别的日志 logging: level: com.itcoder: debug -
定义Feign日志级别Bean
@Configuration public class FeignLogConfig { /* 1.NONE,不记录 2.BASIC,记录基本的请求行,响应状态码数据 3.HEADERS,记录基本的请求行,响应状态码数据,记录响应头信息 4.FULL;记录完成的请求 响应数据 */ @Bean public Logger.Level level(){ return Logger.Level.FULL; } } -
启用该Bean
GoodsFeign@FeignClient(value = "eureka-provider",configuration = FeignLogConfig.class)

第十章 Hystrix断路器
一、概述
重点: 能让服务的调用方,够快的知道被调方挂了!不至于说让用户在等待。
Hystix 是 Netflix 开源的一个延迟和容错库,用于隔离访问远程服务、第三方库,防止出现级联失败(雪崩)。
雪崩: 一个服务失败,导致整条链路的服务都失败的情形。
Hystix 主要功能
- 隔离
- 降级
- 熔断
- 限流

隔离
-
线程池隔离
没有hystrix,a重试100次,才知道c挂了!

使用了hystrix,更细分线程池,只需要重试40次,让a更快的知道c挂了

-
信号量隔离
没有hystrix,a一个带着认证信息的线程,重试100次,才知道c挂了!

使用了hystrix,更细分线程池,一个带着认证信息的线程,只需要重试40次,让a更快的知道c挂了

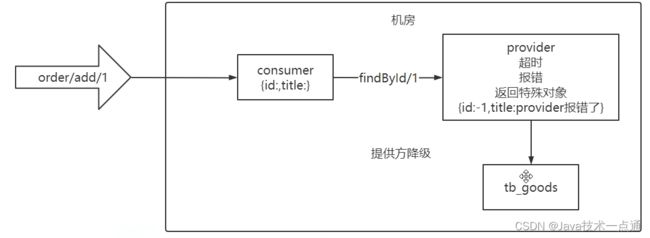
降级
服务提供方降级(异常,超时)
消费方降级

熔断
限流
是有限流,但是,项目一般不用。nginx或者网关限流。
二、服务降级
服务提供方
-
在服务提供方,引入 hystrix 依赖
org.springframework.cloud spring-cloud-starter-netflix-hystrix -
方法
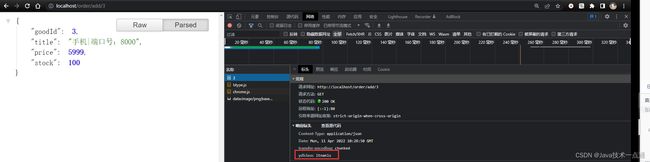
/** 定义降级方法 返回特殊对象 * 1方法的返回值要和原方法一致 * 2方法参数和原方法一样 */ public Goods findById_fallback(Integer id){ Goods goods=new Goods(); goods.setGoodId(-1); goods.setTitle("provider提供方降级!"); goods.setPrice(-9.9); goods.setStock(-10); return goods; } -
使用 @HystrixCommand 注解配置降级方法
@GetMapping("/findById/{id}") @HystrixCommand(fallbackMethod = "findById_fallback",commandProperties = { //设置Hystrix的超时时间,默认1s @HystrixProperty(name="execution.isolation.thread.timeoutInMilliseconds",value = "3000") }) public Goods findById(@PathVariable("id") Integer id){ Goods goods = goodsService.findById(id); goods.setTitle(goods.getTitle()+"|端口号:"+port); //模拟出异常 // int a=1/0; //模拟业务逻辑比较繁忙 try { Thread.sleep(5000); } catch (InterruptedException e) { e.printStackTrace(); } return goods; } -
在启动类上开启Hystrix功能:
@EnableCircuitBreaker -
测试:http://localhost:9000/order/add/10
- 出错,服务方降级了

- 3000超时,服务方降级了

服务消费方
-
feign 组件已经集成了 hystrix 组件
-
定义feign 调用接口实现类,复写方法,即 降级方法
@Component public class GoodsFeignCallback implements GoodsFeign{ @Override public Goods findById(Integer id) { Goods goods=new Goods(); goods.setGoodId(-2); goods.setTitle("调用方降级了!"); goods.setPrice(-5.5); goods.setStock(-5); return goods; } } -
在 @FeignClient 注解中使用 fallback 属性设置降级处理类
@FeignClient(value = "EUREKA-PROVIDER",configuration = FeignLogConfig.class,fallback = GoodsFeignCallback.class) public interface GoodsFeign { @GetMapping("/goods/findById/{id}") public Goods findById(@PathVariable("id") Integer id); } -
配置开启
# 开启feign对hystrix的支持 feign: hystrix: enabled: true -
测试:停掉provider

三、熔断

测试:
provider
@RestController
@RequestMapping("/goods")
public class GoodsController {
    @Autowired
    GoodsService goodsService;
    @Value("${server.port}")
    int port;

    @GetMapping("/findById/{id}")
    @HystrixCommand(fallbackMethod = "findById_fallback",commandProperties = {
            //设置Hystrix的超时时间,默认1s
            @HystrixProperty(name="execution.isolation.thread.timeoutInMilliseconds",value = "3000")
    })
    public Goods findById(@PathVariable("id") Integer id){
        Goods goods = goodsService.findById(id);
        goods.setTitle(goods.getTitle()+"|端口号:"+port);

        if(id==1){
            //模拟出异常
            int a=1/0;
        }

        //模拟出异常
//        int a=1/0;

        //模拟业务逻辑比较繁忙
//        try {
//            Thread.sleep(5000);
//        } catch (InterruptedException e) {
//            e.printStackTrace();
//        }
        return goods;
    }

    /** 定义降级方法   返回特殊对象
     *  1方法的返回值要和原方法一致
     *  2方法参数和原方法一样
     */
    public Goods findById_fallback(Integer id){
        Goods goods=new Goods();
        goods.setGoodId(-1);
        goods.setTitle("provider提供方降级!");
        goods.setPrice(-9.9);
        goods.setStock(-10);

        return goods;
    }
}
访问两个接口
- http://localhost:9000/order/add/10

-
多次访问 http://localhost:9000/order/add/1

由于多次访问失败,会出现降级,打开断路器,拒绝了其他所有的请求。 -
导致10也不能访问了

-
再过一会儿,半开状态

Hystrix 熔断机制,用于监控微服务调用情况,当失败的情况达到预定的阈值(5秒失败20次),会打开断路器,拒绝所有请求,直到服务恢复正常为止。
circuitBreaker.sleepWindowInMilliseconds:监控时间
circuitBreaker.requestVolumeThreshold:失败次数
circuitBreaker.errorThresholdPercentage:失败率
提供者controller中:
 @HystrixCommand(fallbackMethod = "findOne_fallback",commandProperties = {
            //设置Hystrix的超时时间,默认1s
            @HystrixProperty(name="execution.isolation.thread.timeoutInMilliseconds",value = "3000"),
            //监控时间 默认5000 毫秒
            @HystrixProperty(name="circuitBreaker.sleepWindowInMilliseconds",value = "5000"),
            //失败次数。默认20次
            @HystrixProperty(name="circuitBreaker.requestVolumeThreshold",value = "20"),
            //失败率 默认50%
            @HystrixProperty(name="circuitBreaker.errorThresholdPercentage",value = "50")

    })
四、熔断监控

Hystrix 提供了 Hystrix-dashboard 功能,用于实时监控微服务运行状态。
但是Hystrix-dashboard只能监控一个微服务。
Netflix 还提供了 Turbine ,进行聚合监控。

Turbine聚合监控
1. 搭建监控模板
-
创建监控模块
创建hystrix-monitor模块,使用Turbine聚合监控多个Hystrix dashboard功能。 -
引入Turbine聚合监控起步依赖
org.springframework.cloud spring-cloud-starter-netflix-hystrix-dashboard org.springframework.cloud spring-cloud-starter-netflix-turbine org.springframework.boot spring-boot-starter-actuator org.springframework.cloud spring-cloud-starter-netflix-eureka-client org.springframework.boot spring-boot-starter-test test org.springframework.boot spring-boot-maven-plugin -
修改application.yml
spring: application: name: hystrix-monitor server: port: 8769 turbine: combine-host-port: true # 配置需要监控的服务名称列表 app-config: EUREKA-PROVIDER,EUREKA-CONSUMER cluster-name-expression: "'default'" aggregator: cluster-config: default #instanceUrlSuffix: /actuator/hystrix.stream eureka: client: serviceUrl: defaultZone: http://localhost:8761/eureka/ hystrix: dashboard: proxy-stream-allow-list: "*" -
创建启动类
@SpringBootApplication
@EnableEurekaClient
@EnableTurbine //开启Turbine 很聚合监控功能
@EnableHystrixDashboard //开启Hystrix仪表盘监控功能
public class HystrixMonitorApp {
    public static void main(String[] args) {
        SpringApplication.run(HystrixMonitorApp.class,args);
    }
}
2. 修改被监控模块
需要分别修改 hystrix-provider 和 hystrix-consumer 模块:
-
导入依赖
org.springframework.boot spring-boot-starter-actuator org.springframework.cloud spring-cloud-starter-netflix-hystrix org.springframework.cloud spring-cloud-starter-netflix-hystrix-dashboard -
配置Bean
此处为了方便,将其配置在启动类中。@Bean public ServletRegistrationBean getServlet() { HystrixMetricsStreamServlet streamServlet = new HystrixMetricsStreamServlet(); ServletRegistrationBean registrationBean = new ServletRegistrationBean(streamServlet); registrationBean.setLoadOnStartup(1); registrationBean.addUrlMappings("/actuator/hystrix.stream"); registrationBean.setName("HystrixMetricsStreamServlet"); return registrationBean; } -
启动类上添加注解
@EnableHystrixDashboard // 开启Hystrix仪表盘监控功能
3. 测试
启动服务:
-
eureka-server
-
hystrix-provider
-
hystrix-consumer
-
hystrix-monitor
访问:
在浏览器访问http://localhost:8769/hystrix/ 进入Hystrix Dashboard界面

- 实心圆:它有颜色和大小之分,分别代表实例的监控程度和流量大小。如上图所示,它的健康度从绿色、黄色、橙色、红色递减。通过该实心圆的展示,我们就可以在大量的实例中快速的发现故障实例和高压力实例。
- 曲线:用来记录 2 分钟内流量的相对变化,我们可以通过它来观察到流量的上升和下降趋势。
第十一章、zuul路由网关
zuul核心人员走了两个,zuul2的研发过久,spring公司等不及,自己研发的Gateway网关。
https://github.com/Netflix/zuul/wiki
第十二章 Gateway新一代网关
功能: 路由+过滤。
一、 概述
官方文档:
https://cloud.spring.io/spring-cloud-static/spring-cloud-gateway/2.2.1.RELEASE/reference/html/
不使用网关存在的问题:
- 客户端需要记录不同微服务地址,增加客户端的复杂性
- 每个后台微服务都需要认证
- http 发请求,涉及到跨域
- 后台新增微服务,不能动态知道地址

使用了网关的话:
-
网关旨在为微服务架构提供一种简单而有效的统一的API路由管理方式。
-
在微服务架构中,不同的微服务可以有不同的网络地址,各个微服务之间通过互相调用完成用户请求,客户端可能通过调用N个微服务的接口完成一个用户请求。
-
网关就是系统的入口,封装了应用程序的内部结构,为客户端提供统一服务,一些与业务本身功能无关的公共逻辑可以在这里实现,诸如认证、鉴权、监控、缓存、负载均衡、流量管控、路由转发等。
-
在目前的网关解决方案里,有Nginx+ Lua、Netflix Zuul/zuul2 、Spring Cl。

二、快速入门
-
搭建网关模块 api-gateway-server
-
引入依赖
org.springframework.cloud spring-cloud-starter-gateway org.springframework.cloud spring-cloud-starter-netflix-eureka-client -
创建启动类
@SpringBootApplication @EnableEurekaClient public class ApiGatewayApp { public static void main(String[] args) { SpringApplication.run(ApiGatewayApp.class,args); } } -
编写配置文件
server: port: 80 spring: application: name: api-gateway-server cloud: # 网关配置 gateway: # 路由配置:转发规则 routes: #集合。 # id: 唯一标识。默认是一个UUID # uri: 转发路径 # predicates: 条件,用于请求网关路径的匹配规则 # filters:配置局部过滤器的 - id: eureka-provider # 静态路由 # uri: http://localhost:8001/ # 动态路由 uri: lb://GATEWAY-PROVIDER predicates: - Path=/goods/** filters: - AddRequestParameter=username,zhangsan - id: eureka-consumer # uri: http://localhost:9000 uri: lb://GATEWAY-CONSUMER predicates: - Path=/order/** # 微服务名称配置 discovery: locator: enabled: true # 设置为true 请求路径前可以添加微服务名称 lower-case-service-id: true # 允许为小写 eureka: client: service-url: defaultZone: http://localhost:8761/eureka -
测试
三、 静态路由
uri: http://localhost:8000/
四、动态路由

1. 引入eureka-client配置
-
pom
org.springframework.cloud spring-cloud-starter-netflix-eureka-client -
yml
eureka:
  client:
    service-url:
      defaultZone: http://localhost:8761/eureka
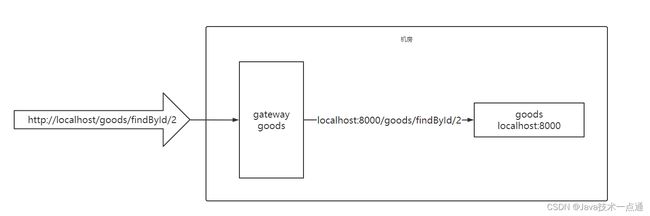
2. 修改uri属性:uri: lb://服务名称
uri: lb://eureka-provider
3. 测试
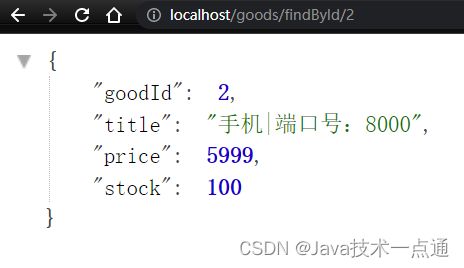
访问:http://localhost/goods/findById/2

五、微服务名称配置
application.yml
spring:
  cloud:
    # 网关配置
    gateway:
    # 微服务名称配置
      discovery:
        locator:
          enabled: true # 设置为true 请求路径前可以添加微服务名称
          lower-case-service-id: true # 允许为小写
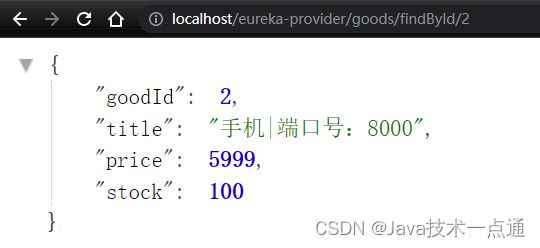
测试:http://localhost/eureka-provider/goods/findById/2
六、过滤器
(1)两个维度:
-
内置过滤器 自定义过滤器
-
局部过滤器 全局过滤器
(2)过滤器种类:
-
内置局部过滤器
-
内置全局过滤器
-
自定义局部过滤器
-
自定义全局过滤器
-
Gateway 支持过滤器功能,对请求或响应进行拦截,完成一些通用操作。
-
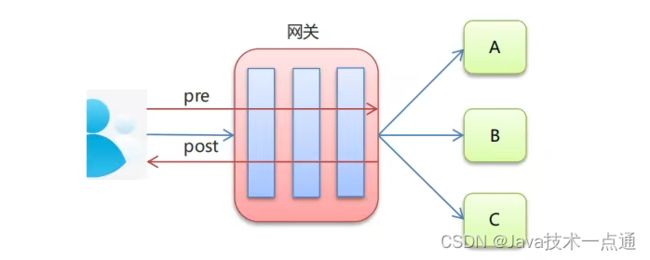
Gateway 提供两种过滤器方式:“pre”和“post”
pre 过滤器,在转发之前执行,可以做参数校验、权限校验、流量监控、日志输出、协议转换等。 post 过滤器,在响应之前执行,可以做响应内容、响应头的修改,日志的输出,流量监控等。 -
Gateway 还提供了两种类型过滤器
GatewayFilter:局部过滤器,针对单个路由
GlobalFilter :全局过滤器,针对所有路由
内置过滤器 局部过滤器:
- id: gateway-provider
     #uri: http://localhost:8001/
     uri: lb://GATEWAY-PROVIDER
     predicates:
     - Path=/goods/**
        filters:
            - AddResponseHeader=foo, bar

内置过滤器 全局过滤器: route同级
  default-filters:
        - AddResponseHeader=yld,itlils

官方文档:
https://cloud.spring.io/spring-cloud-static/spring-cloud-gateway/2.1.0.RELEASE/single/spring-cloud-gateway.html#_gatewayfilter_factories
自定义过滤器
使用很少,可以不掌握自定义过滤器的写法。
创作不易,如果有帮助到你,请给文章点个赞和收藏,让更多的人看到!!!
关注博主不迷路,内容持续更新中。