Pytorch深度学习-----神经网络之线性层用法
系列文章目录
PyTorch深度学习——Anaconda和PyTorch安装
Pytorch深度学习-----数据模块Dataset类
Pytorch深度学习------TensorBoard的使用
Pytorch深度学习------Torchvision中Transforms的使用(ToTensor,Normalize,Resize ,Compose,RandomCrop)
Pytorch深度学习------torchvision中dataset数据集的使用(CIFAR10)
Pytorch深度学习-----DataLoader的用法
Pytorch深度学习-----神经网络的基本骨架-nn.Module的使用
Pytorch深度学习-----神经网络的卷积操作
Pytorch深度学习-----神经网络之卷积层用法详解
Pytorch深度学习-----神经网络之池化层用法详解及其最大池化的使用
Pytorch深度学习-----神经网络之非线性激活的使用(ReLu、Sigmoid)
文章目录
- 系列文章目录
- 一、线性层是什么?
-
- 1.官网解释
- 2.nn.Linear函数参数介绍
- 二、实战演示
-
- 1.将CIFAR10图片数据集进行线性变换
一、线性层是什么?
线性层是深度学习中常用的一种基本层类型。它也被称为全连接层或仿射层。线性层的作用是将输入数据与权重矩阵相乘,然后加上偏置向量,最后输出一个新的特征表示。
具体来说,线性层可以表示为 Y = XW + b,其中 X 是输入数据,W 是权重矩阵,b 是偏置向量,Y 是输出结果。这个过程可以看作是对输入数据进行线性变换的操作。
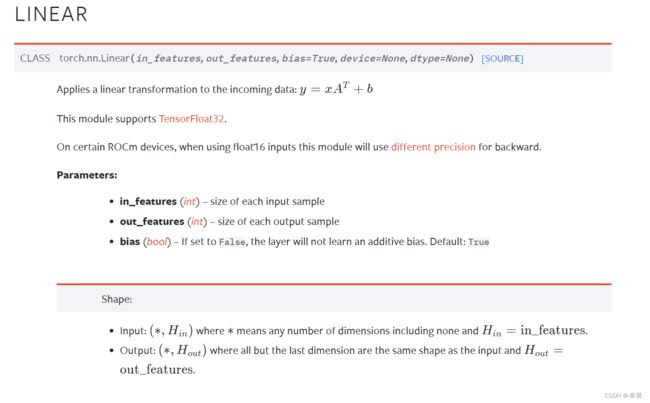
1.官网解释
官网访问:LINEAR
如下图所示
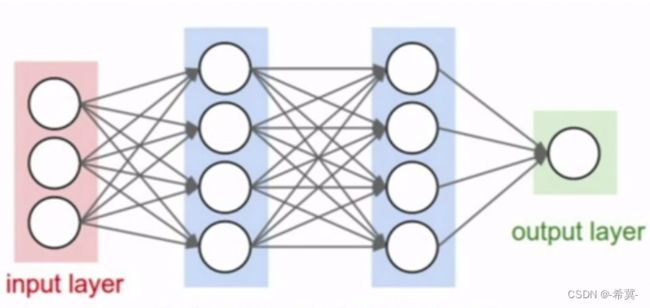
由此可见,每一层的某个神经元的值都为前一层所有神经元的值的总和。
2.nn.Linear函数参数介绍
torch.nn.Linear(in_features, out_features, bias=True, device=None, dtype=None)
其中最重要的三个参数为in_features, out_features, bias
in_features, 表示输入的特征值大小,即输入的神经元个数
out_features,表示输出的特征值大小,即经过线性变换后输出的神经元个数
bias,表示是否添加偏置
二、实战演示

预定要的in_features为1,1,x形式
out_features为1,1,y的形式
1.将CIFAR10图片数据集进行线性变换
代码如下:
import torch
import torchvision
from torch.utils.data import DataLoader

# 准备数据
test_set = torchvision.datasets.CIFAR10("dataset",
                                        train=False,
                                        transform=torchvision.transforms.ToTensor(),
                                        download=True)
# 加载数据集
dataloader = DataLoader(test_set,batch_size=64)

# 查看输入的通道数
# for data in dataloader:
#     imgs, target = data
#     print(imgs.shape)  # torch.Size([64, 3, 32, 32])
#     # 将img进行reshape成1,1,x的形式
#     input = torch.reshape(imgs,(1,1,1,-1)) # 每次一张图,1通道,1*自动计算x
#     print(input.shape) # torch.Size([1, 1, 1, 196608])

# 搭建神经网络,设置预定的输出特征值为10
class Lgl(torch.nn.Module):
    def __init__(self):
        super(Lgl, self).__init__()
        self.linear1 = torch.nn.Linear(196608,10)  # 输入数据的特征值196608,输出特征值10
    def forward(self, input):
        output = self.linear1(input)
        return output
# 实例化
l = Lgl()
# 进行线性操作

for data in dataloader:
    imgs, target = data
    print(imgs.shape)  # torch.Size([64, 3, 32, 32])
    # 将img进行reshape成1,1,x的形式
    input = torch.reshape(imgs,(1,1,1,-1)) # 每次一张图,1通道,1*自动计算x
    output = l(input)
    print(output.shape) # torch.Size([1, 1, 1, 10])
原先的图片shape:torch.Size([64, 3, 32, 32])
reshape后的图片shape:torch.Size([1, 1, 1, 196608])
经过线性后的图片shape:torch.Size([1, 1, 1, 10])
原先的图片shape:torch.Size([64, 3, 32, 32])
reshape后的图片shape:torch.Size([1, 1, 1, 196608])
经过线性后的图片shape:torch.Size([1, 1, 1, 10])
……
除了使用reshape后,还可以使用torch.flatten()进行修改尺寸,将其自动修改为一维。
torch.flatten(input, start_dim=0, end_dim=- 1)
将输入tensor的第start_dim维到end_dim维之间的数据“拉平”成一维tensor
修改成flatten后代码如下
import torch
import torchvision
from torch.utils.data import DataLoader

# 准备数据
test_set = torchvision.datasets.CIFAR10("dataset",
                                        train=False,
                                        transform=torchvision.transforms.ToTensor(),
                                        download=True)
# 加载数据集
dataloader = DataLoader(test_set,batch_size=64)

# 查看输入的通道数
# for data in dataloader:
#     imgs, target = data
#     print(imgs.shape)  # torch.Size([64, 3, 32, 32])
#     # 将img进行reshape成1,1,x的形式
#     input = torch.reshape(imgs,(1,1,1,-1)) # 每次一张图,1通道,1*自动计算x
#     print(input.shape) # torch.Size([1, 1, 1, 196608])

# 搭建神经网络,设置预定的输出特征值为10
class Lgl(torch.nn.Module):
    def __init__(self):
        super(Lgl, self).__init__()
        self.linear1 = torch.nn.Linear(196608,10)  # 输入数据的特征值196608,输出特征值10
    def forward(self, input):
        output = self.linear1(input)
        return output
# 实例化
l = Lgl()
# 进行线性操作

for data in dataloader:
    imgs, target = data
    print(f"原先的图片shape:{imgs.shape}")  # torch.Size([64, 3, 32, 32])
    # 将img进行reshape成1,1,x的形式
    input = torch.flatten(imgs) # 每次一张图,1通道,1*自动计算x
    print(f"flatten后的图片shape:{input.shape}")
    output = l(input)
    print(f"经过线性后的图片shape:{output.shape}") # torch.Size([1, 1, 1, 10])
原先的图片shape:torch.Size([64, 3, 32, 32])
flatten后的图片shape:torch.Size([196608])
经过线性后的图片shape:torch.Size([10])
原先的图片shape:torch.Size([64, 3, 32, 32])
flatten后的图片shape:torch.Size([196608])
经过线性后的图片shape:torch.Size([10])
……