CNN之图像识别
文章目录
- 1. 图像识别
-
- 1.1 模式识别
- 1.2 图像识别的过程
- 1.3 图像识别的应用
- 2. 深度学习发展
-
- 2.1 深度学习为何崛起
- 2.2 分类与检测
- 2.3 常见的卷积神经网络
- 3. VGG
-
- 3.1 VGG16
- 3.2 VGG16的结构:
- 3.3 使用卷积层代替全连接
- 3.4 1*1卷积的作用
- 3.5 VGG16代码示例
- 4. 残差模型-Resnet
-
- 4.1 Resnet
- 4.2 BatchNormalization
- 4.3 ResNet50代码示例
- 5. 迁移学习&Inception
-
- 5.1 卷积神经网络迁移学习-fine tuning
- 5.2 Inception
- 5.3 Inception module
- 5.4 InceptionV1--Googlenet
- 5.5 InceptionV2
- 5.6 InceptionV3-网络结构图
- 5.7 Inception V3
- 5.8 Inception V4
- 5.9 Inception结构总结
- 5.10 卷积神经网络迁移学习
- 5.11 InceptionV3示例
- 6. 模型轻量化-Mobilenet
-
- 6.1 Mobilenet—深度可分离卷积depthwise separable convolution
- 6.2 Mobilenet--depthwise separable convolution
- 6.3 Mobilenet
- 6.4 MobileNet代码示例
- 7. 卷积神经网络的设计技巧
1. 图像识别
- 图像识别技术是信息时代的一门重要的技术,其产生目的是为了让计算机代替人类去处理大量的物 理信息。随着计算机技术的发展,人类对图像识别技术的认识越来越深刻
- 图像识别技术的定义为利用计算机对图像进行处理、分析和理解,以识别不同模式的目标和对象的 技术。
- 图像识别技术的过程分为信息的获取、预处理、特征抽取和选择、分类器设计和分类决策。
1.1 模式识别
- 模式识别是人工智能和信息科学的重要组成部分。模式识别是指对表示事物或现象的不同 形式的信息做分析和处理从而得到一个对事物或现象做出描述、辨认和分类等的过程。
- 计算机的图像识别技术就是模拟人类的图像识别过程。在图像识别的过程中进行模式识别 是必不可少的。
- 模式识别原本是人类的一项基本智能。但随着计算机的发展和人工智能的兴起,人类本身 的模式识别已经满足不了生活的需要,于是人类就希望用计算机来代替或扩展人类的部分 脑力劳动。这样计算机的模式识别就产生了。
- 简单地说,模式识别就是对数据进行分类,它是一门与数学紧密结合的科学,其中所用的 思想大部分是概率与统计。
1.2 图像识别的过程
图像识别技术的过程分以下几步:
- 信息的获取:是指通过传感器,将光或声音等信息转化为电信息。也就是获取研究对象的基本信息并通过某种方法将其转变为机器能够认识的信息。
- 预处理:主要是指图像处理中的去噪、平滑、变换等的操作,从而加强图像的重要特征。图像增强。
- 特征抽取和选择:是指在模式识别中,需要进行特征的抽取和选择。特征抽取和选择在图像识别过程中是非常关键的技术之一。
- 分类器设计:是指通过训练而得到一种识别规则,通过此识别规则可以得到一种特征分类,使图像识别技术能够得到高识别率。分类决策是指在特征空间中对被识别对象进行分类,从而更好地识别所研究的对象具体属于哪一类。
1.3 图像识别的应用
- 图像分类
- 网络搜索
- 以图搜图
- 智能家居
- 电商购物:“相似款(拍照识别/扫描识别)”
- 农林业:森林调查。
- 金融
- 安防
- 医疗
- 娱乐监管
2. 深度学习发展
2.1 深度学习为何崛起
- 数据规模推动深度学习进步
2.2 分类与检测
- 当我们面对一张图片的时候,最基础的任务就是这张图片是什么,是风景图还是人物图、是描写建筑物的还是关于食物的,这就是分类。
- 当知道了图像的类别的时候,进一步的就是检测了,例如我知道这个图像是关于人脸的,那么这个人脸在哪里,能不能把它框出来。
- 物体分类与检测在很多领域得到广泛应用,包括安防领域的人脸识别、行人检测、智能视频分析、行人跟踪等,交通领域的交通场景物体识别、车辆计数、逆行检测、车牌检测与识别,以及互联网领域的基于内容的图像检索、相册自动归类等。
2.3 常见的卷积神经网络
3. VGG
VGG之所以经典,在于它首次将深度学习做得非常“深”,达到了16-19层,同时,它用了非常“小”的卷积核(3X3),
3.1 VGG16
VGG给我们的启发只是在于我们可以让网络变得更深,并在此基础上注意过拟合的问题。
3.2 VGG16的结构:
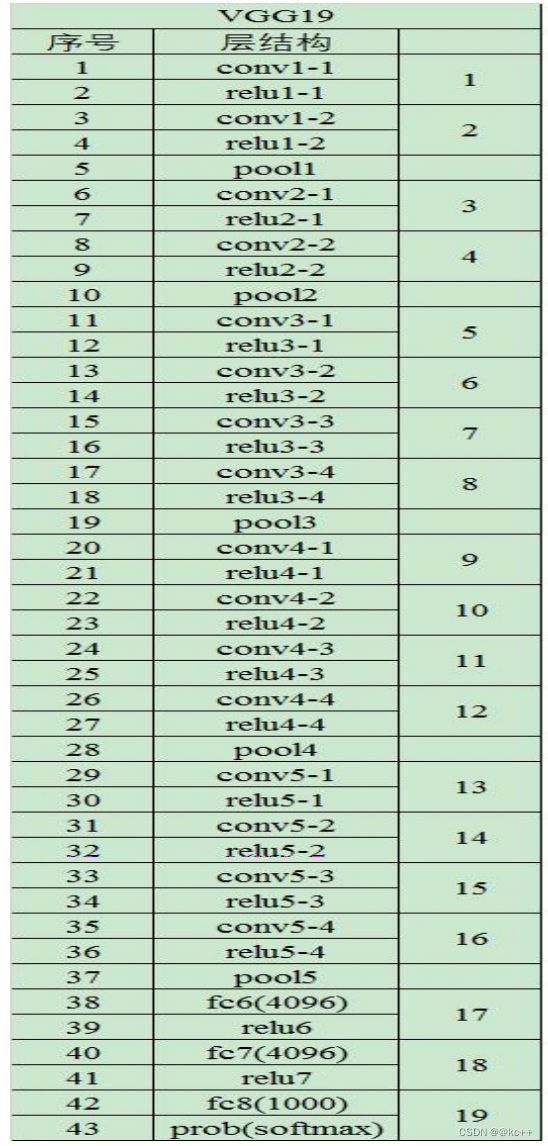
- 一张原始图片被resize到(224,224,3)。
- conv1两次[3,3]卷积网络,输出的特征层为64,输出为(224,224,64),再2X2最大池化,输出net为 (112,112,64)。
- conv2两次[3,3]卷积网络,输出的特征层为128,输出net为(112,112,128),再2X2最大池化,输出 net为(56,56,128)。
- conv3三次[3,3]卷积网络,输出的特征层为256,输出net为(56,56,256),再2X2最大池化,输出net 为(28,28,256)。
- conv3三次[3,3]卷积网络,输出的特征层为256,输出net为(28,28,512),再2X2最大池化,输出net 为(14,14,512)。
- conv3三次[3,3]卷积网络,输出的特征层为256,输出net为(14,14,512),再2X2最大池化,输出net 为(7,7,512)。
- 利用卷积的方式模拟全连接层,效果等同,输出net为(1,1,4096)。共进行两次。
- 利用卷积的方式模拟全连接层,效果等同,输出net为(1,1,1000)。 最后输出的就是每个类的预测。
VGG使用比较小的卷积核,如33的卷积核,而Alexnet使用了比较大的卷积核,如1111卷积核,使用小的卷积核的好处在于可以获得更加细节的信息。
3.3 使用卷积层代替全连接
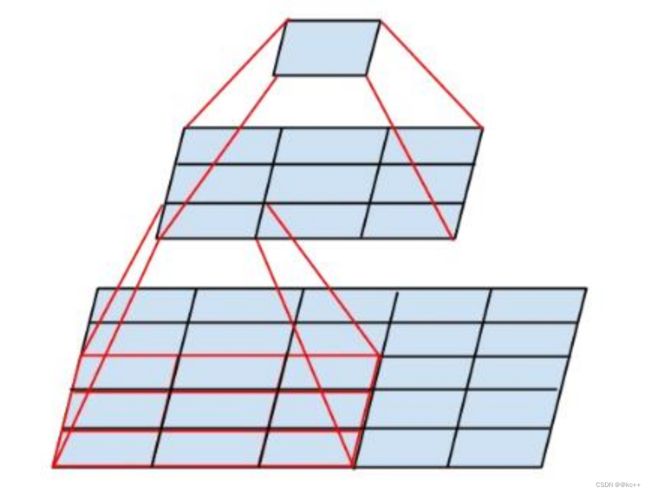
卷积层和全连接层的区别:卷积层为局部连接;而全连接层则使用图像的全局信息。可以想象一下,最大的局部是不是就等于全局了?这首先说明全连接层使用卷积层来替代的可行性。
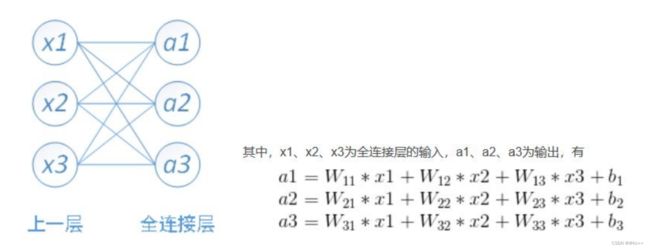
eg: 输入有[5044]个神经元结点,输出有500个节点,则一共需要5044*500=400000个权值参数W和 500个偏置参数b
卷积层和全连接层都是进行了一个点乘操作,它们的函数形式相同。因此全连接层可以转化为对应的卷积层。我们只需要把卷积核变成跟输入的一个feature map大小(h,w)一样就可以了,这样的话就相当于使得卷积跟全连接层的参数一样多。
比如VGG16中, 第一个全连接层的输入是77512, 输出是4096。这可以用一个卷积核大小77, 步长(stride)为1, 没有填补(padding),输出通道数4096的卷积层等效表示,其输出为11*4096,和全连接层等价。后续的全连接层可以用1x1卷积等效替代。
简而言之, 全连接层转化为卷积层的规则是:将卷积核大小设置为输入的空间大小。
3.4 1*1卷积的作用
实现特征通道的升维和降维
通过控制卷积核的数量达到通道数大小的放缩。而池化层只能改变高度和宽度,无法改变通道数。
3.5 VGG16代码示例
import torch.nn as nn

class VGG16(nn.Module):
    def __init__(self, num_classes=1000):
        super(VGG16, self).__init__()

        # VGG16 有五个卷积块
        # 下面我们定义每一个卷积块内部的卷积层结构
        # 其中,'M' 代表最大池化层

        self.features = nn.Sequential(
            # 第一个卷积块包含两个卷积层,每个都有 64 个 3x3 的卷积核
            nn.Conv2d(3, 64, kernel_size=3, padding=1),
            nn.ReLU(inplace=True),
            nn.Conv2d(64, 64, kernel_size=3, padding=1),
            nn.ReLU(inplace=True),
            nn.MaxPool2d(kernel_size=2, stride=2),

            # 第二个卷积块包含两个卷积层,每个都有 128 个 3x3 的卷积核
            nn.Conv2d(64, 128, kernel_size=3, padding=1),
            nn.ReLU(inplace=True),
            nn.Conv2d(128, 128, kernel_size=3, padding=1),
            nn.ReLU(inplace=True),
            nn.MaxPool2d(kernel_size=2, stride=2),

            # 第三个卷积块包含三个卷积层,每个都有 256 个 3x3 的卷积核
            nn.Conv2d(128, 256, kernel_size=3, padding=1),
            nn.ReLU(inplace=True),
            nn.Conv2d(256, 256, kernel_size=3, padding=1),
            nn.ReLU(inplace=True),
            nn.Conv2d(256, 256, kernel_size=3, padding=1),
            nn.ReLU(inplace=True),
            nn.MaxPool2d(kernel_size=2, stride=2),

            # 第四个卷积块包含三个卷积层,每个都有 512 个 3x3 的卷积核
            nn.Conv2d(256, 512, kernel_size=3, padding=1),
            nn.ReLU(inplace=True),
            nn.Conv2d(512, 512, kernel_size=3, padding=1),
            nn.ReLU(inplace=True),
            nn.Conv2d(512, 512, kernel_size=3, padding=1),
            nn.ReLU(inplace=True),
            nn.MaxPool2d(kernel_size=2, stride=2),

            # 第五个卷积块也包含三个卷积层,每个都有 512 个 3x3 的卷积核
            nn.Conv2d(512, 512, kernel_size=3, padding=1),
            nn.ReLU(inplace=True),
            nn.Conv2d(512, 512, kernel_size=3, padding=1),
            nn.ReLU(inplace=True),
            nn.Conv2d(512, 512, kernel_size=3, padding=1),
            nn.ReLU(inplace=True),
            nn.MaxPool2d(kernel_size=2, stride=2),
        )

        # VGG16 的三个全连接层
        self.classifier = nn.Sequential(
            nn.Linear(512 * 7 * 7, 4096), # 7x7 是特征图的大小(假设输入图像是 224x224)
            nn.ReLU(True),
            nn.Dropout(),
            nn.Linear(4096, 4096),
            nn.ReLU(True),
            nn.Dropout(),
            nn.Linear(4096, num_classes),
        )

    def forward(self, x):
        x = self.features(x)
        x = x.view(x.size(0), -1) # flatten the tensor
        x = self.classifier(x)
        return x

# 实例化 VGG16 模型
model = VGG16()
print(model)
4. 残差模型-Resnet
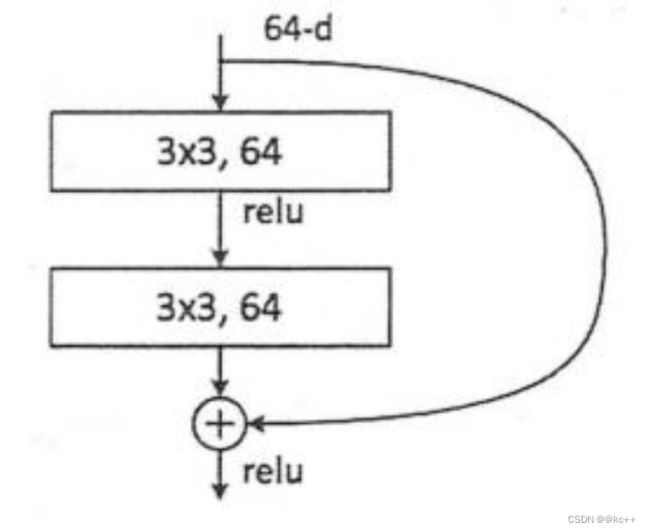
Residual net(残差网络):将靠前若干层的某一层数据输出直接跳过多层引入到后面数据层的输入 部分。
残差神经单元:假定某段神经网络的输入是x,期望输出是H(x),如果我们直接将输入x传到输出作为初始结果,那么我们需要学习的目标就是F(x) = H(x) - x,这就是一个残差神经单元,相当于将学习目标改变了,不再是学习一个完整的输出H(x),只是输出和输入的差别 H(x) - x ,即残差。
4.1 Resnet
- 普通的直连的卷积神经网络和ResNet的最大区别在于,ResNet有很多旁路的支线将输入直接连到后面的层,使得后面的层可以直接学习残差,这种结构也被称为shortcut或skip connections。
- 传统的卷积层或全连接层在信息传递时,或多或少会存在信息丢失、损耗等问题。ResNet在某种程度上解决了这个问题,通过直接将输入信息绕道传到输出,保护信息的完整性,整个网络只需要学习输入、输出差别的那一部分,简化了学习目标和难度。
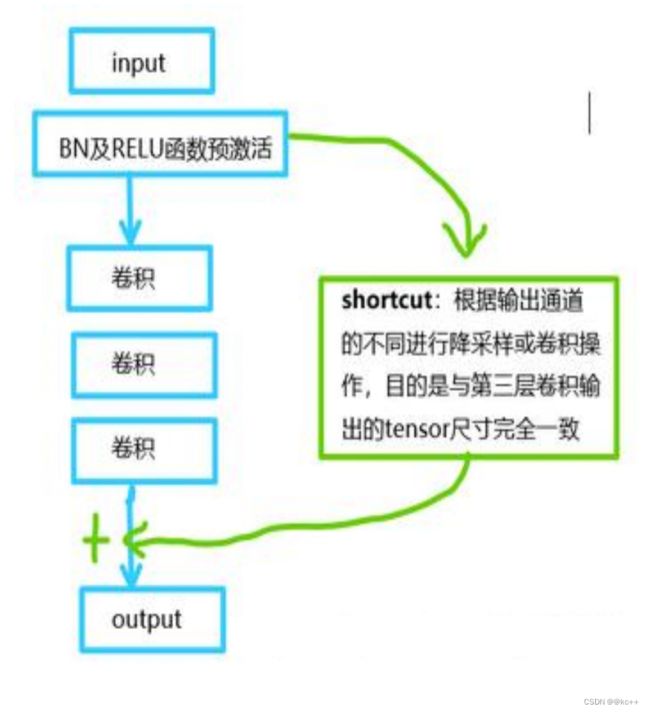
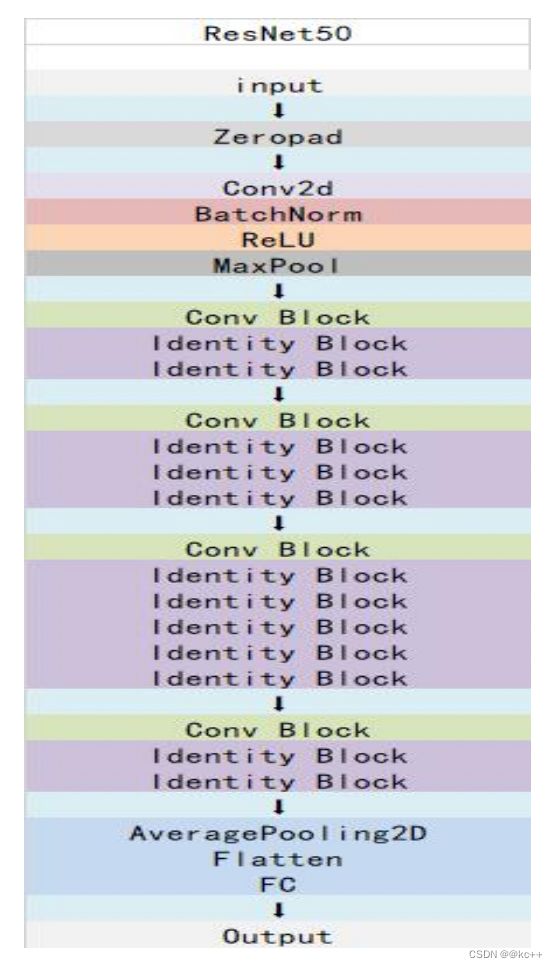
ResNet50有两个基本的块,分别名为Conv Block和Identity Block,其中Conv Block输入和输出的维度是不一样的,所以不能连续串联,它的作用是改变网络的维度;Identity Block输入维度和输出维度相同,可以串联,用于加深网络的。
4.2 BatchNormalization
BatchNormalization:
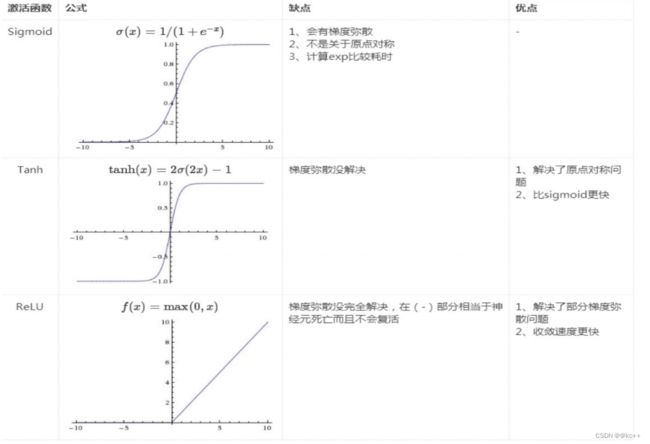
- 所有输出保证在0~1之间。
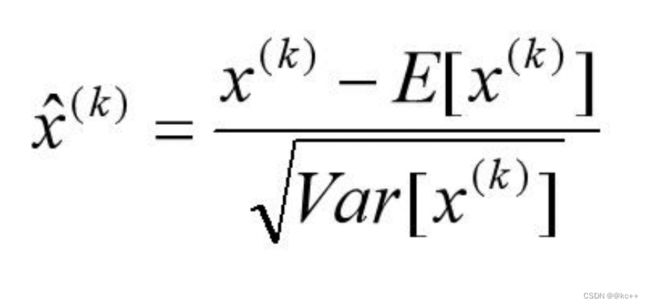
- 所有输出数据的均值接近0,标准差接近1的正太分布。使其落入激活函数的敏感区,避免梯度消失,加快收敛。
- 加快模型收敛速度,并且具有一定的泛化能力。
- 可以减少dropout的使用。
4.3 ResNet50代码示例
import torch
import torch.nn as nn

class IdentityBlock(nn.Module):
    def __init__(self, in_channels, filters, kernel_size, stride):
        super(IdentityBlock, self).__init__()

        filters1, filters2, filters3 = filters

        # 主路径的第一部分
        self.conv1 = nn.Conv2d(in_channels, filters1, (1, 1))
        self.bn1 = nn.BatchNorm2d(filters1)
        self.relu1 = nn.ReLU()

        # 主路径的第二部分
        self.conv2 = nn.Conv2d(filters1, filters2, kernel_size, stride=stride, padding=1)
        self.bn2 = nn.BatchNorm2d(filters2)
        self.relu2 = nn.ReLU()

        # 主路径的第三部分
        self.conv3 = nn.Conv2d(filters2, filters3, (1, 1))
        self.bn3 = nn.BatchNorm2d(filters3)

        self.relu = nn.ReLU()

    def forward(self, x):
        identity = x

        x = self.conv1(x)
        x = self.bn1(x)
        x = self.relu1(x)

        x = self.conv2(x)
        x = self.bn2(x)
        x = self.relu2(x)

        x = self.conv3(x)
        x = self.bn3(x)

        x += identity

        x = self.relu(x)
        return x

class ConvBlock(nn.Module):
    def __init__(self, in_channels, filters, kernel_size, stride):
        super(ConvBlock, self).__init__()

        filters1, filters2, filters3 = filters

        # 主路径的第一部分
        self.conv1 = nn.Conv2d(in_channels, filters1, (1, 1), stride=stride)
        self.bn1 = nn.BatchNorm2d(filters1)
        self.relu1 = nn.ReLU()

        # 主路径的第二部分
        self.conv2 = nn.Conv2d(filters1, filters2, kernel_size, padding=1)
        self.bn2 = nn.BatchNorm2d(filters2)
        self.relu2 = nn.ReLU()

        # 主路径的第三部分
        self.conv3 = nn.Conv2d(filters2, filters3, (1, 1))
        self.bn3 = nn.BatchNorm2d(filters3)

        # 快捷路径
        self.shortcut_conv = nn.Conv2d(in_channels, filters3, (1, 1), stride=stride)
        self.shortcut_bn = nn.BatchNorm2d(filters3)

        self.relu = nn.ReLU()

    def forward(self, x):
        identity = self.shortcut_conv(x)
        identity = self.shortcut_bn(identity)

        x = self.conv1(x)
        x = self.bn1(x)
        x = self.relu1(x)

        x = self.conv2(x)
        x = self.bn2(x)
        x = self.relu2(x)

        x = self.conv3(x)
        x = self.bn3(x)

        x += identity
        x = self.relu(x)
        return x

class ResNet50(nn.Module):
    def __init__(self, num_classes=1000):
        super(ResNet50, self).__init__()

        self.pad = nn.ZeroPad2d((3, 3, 3, 3))
        self.conv1 = nn.Conv2d(3, 64, (7, 7), stride=(2, 2))
        self.bn1 = nn.BatchNorm2d(64)
        self.relu = nn.ReLU()
        self.maxpool = nn.MaxPool2d((3, 3), stride=(2, 2))

        # 第一阶段
        self.stage2a = ConvBlock(64, [64, 64, 256], 3, stride=(1, 1))
        self.stage2b = IdentityBlock(256, [64, 64, 256], 3, stride=(1, 1))
        self.stage2c = IdentityBlock(256, [64, 64, 256], 3, stride=(1, 1))

        # 第二阶段
        self.stage3a = ConvBlock(256, [128, 128, 512], 3, stride=(2, 2))
        self.stage3b = IdentityBlock(512, [128, 128, 512], 3, stride=(1, 1))
        # ... 继续其余的阶段

        self.avgpool = nn.AdaptiveAvgPool2d((1, 1))
        self.fc = nn.Linear(2048, num_classes)

    def forward(self, x):
        x = self.pad(x)
        x = self.conv1(x)
        x = self.bn1(x)
        x = self.relu(x)
        x = self.maxpool(x)

        # 第一阶段
        x = self.stage2a(x)
        x = self.stage2b(x)
        x = self.stage2c(x)

        # 第二阶段
        x = self.stage3a(x)
        x = self.stage3b(x)
        # ... 继续其余的阶段

        x = self.avgpool(x)
        x = torch.flatten(x, 1)
        x = self.fc(x)

        return x

model = ResNet50()
print(model)
5. 迁移学习&Inception
5.1 卷积神经网络迁移学习-fine tuning
- 在实践中,由于数据集不够大,很少有人从头开始训练网络。常见的做法是使用预训练的网络(例如在ImageNet上训练的分类1000类的网络)来重新fine-tuning(也叫微调),或者当做特征提取器。
- 迁移学习简单的讲就是将一个在数据集上训练好的卷积神经网络模型通过简单的调整快速移动到另外一个数据集上。
- 随着模型的层数及模型的复杂度的增加,模型的错误率也随着降低。但是要训练一个复杂的卷积神经网络需要非常多的标注信息,同时也需要几天甚至几周的时间,为了解决标注数据和训练时间的问题,就可以使用迁移学习。
常见的两类迁移学习场景:
- 卷积网络当做特征提取器。使用在ImageNet上预训练的网络,去掉最后的全连接层,剩余部分当做特征提取器(例如AlexNet在最后分类器前,是4096维的特征向量)。这样提取的特征叫做CNN codes。得到这样的特征后,可以使用线性分类器(Liner SVM、Softmax等)来分类图像。
- Fine-tuning卷积网络。替换掉网络的输入层(数据),使用新的数据继续训练。Fine-tune时可以选择fine-tune全部层或部分层。通常,前面的层提取的是图像的通用特征(generic features)(例如边缘检测,色彩检测),这些特征对许多任务都有用。后面的层提取的是与特定类别有关的特征,因此fine-tune时常只需要Fine-tuning后面的层。
- 有论文依据表明可以保留训练好的inception模型中所有卷积层的参数,只替换最后一层全连接层。在最后这一层全连接层之前的网络称为瓶颈层。
- 原理:在训练好的inception模型中,因为将瓶颈层的输出再通过一个单层的全连接层,神经网络可以很好的区分1000种类别的图像,所以可以认为瓶颈层输出的节点向量可以被作为任何图像的一个更具有表达能力的特征向量。于是在新的数据集上可以直接利用这个训练好的神经网络对图像进行特征提取,然后将提取得到的特征向量作为输入来训练一个全新的单层全连接神经网络处理新的分类问题。
- 一般来说在数据量足够的情况下,迁移学习的效果不如完全重新训练。但是迁移学习所需要的训练时间和训练样本要远远小于训练完整的模型。
- 这其中说到inception模型,其实它是和Alexnet结构完全不同的卷积神经网络。在Alexnet模型中,不同卷积层通过串联的方式连接在一起,而inception模型中的inception结构是将不同的卷积层通过并联的方式结合在一起
5.2 Inception
Inception 网络是 CNN 发展史上一个重要的里程碑。在 Inception 出现之前,大部分流行CNN 仅仅是把卷积层堆叠得越来越多,使网络越来越深,以此希望能够得到更好的性能。但是存在以下问题:
- 图像中突出部分的大小差别很大。
- 由于信息位置的巨大差异,为卷积操作选择合适的卷积核大小就比较困难。信息分布更全局性的图像偏好较大的卷积核,信息分布比较局部的图像偏好较小的卷积核。
- 非常深的网络更容易过拟合。将梯度更新传输到整个网络是很困难的。
- 简单地堆叠较大的卷积层非常消耗计算资源。
5.3 Inception module
解决方案:
为什么不在同一层级上运行具备多个尺寸的滤波器呢?网络本质上会变得稍微「宽一些」,而不是「更深」。作者因此设计了 Inception 模块。
Inception 模块( Inception module ):它使用 3 个不同大小的滤波器(1x1、3x3、5x5)对输入执行卷积操作,此外它还会执行最大池化。所有子层的输出最后会被级联起来,并传送至下一个Inception 模块。
一方面增加了网络的宽度,另一方面增加了网络对尺度的适应性
实现降维的 Inception 模块:
如前所述,深度神经网络需要耗费大量计算资源。为了降低算力成本,作者在 3x3 和 5x5 卷积层之前添加额外的 1x1 卷积层,来限制输入通道的数量。尽管添加额外的卷积操作似乎是反直觉的,但是 1x1 卷积比 5x5 卷积要廉价很多,而且输入通道数量减少也有利于降低算力成本。

5.4 InceptionV1–Googlenet
- GoogLeNet采用了Inception模块化(9个)的结构,共22层;
- 为了避免梯度消失,网络额外增加了2个辅助的softmax用于向前传导梯度。
5.5 InceptionV2
Inception V2 在输入的时候增加了BatchNormalization:
- 所有输出保证在0~1之间。
- 所有输出数据的均值接近0,标准差接近1的正太分布。使其落入激活函数的敏感区,避免梯度消失,加快收敛。
- 加快模型收敛速度,并且具有一定的泛化能力。
- 可以减少dropout的使用。
V2
此外,作者将 n*n 的卷积核尺寸分解为 1×n 和 n×1 两个卷积。
前面三个原则用来构建三种不同类型 的 Inception 模块
5.6 InceptionV3-网络结构图
InceptionV3 整合了前面 Inception v2 中提到的所有升级,还使用了7x7 卷积
5.7 Inception V3
Inception V3设计思想和Trick:
- 分解成小卷积很有效,可以降低参数量,减轻过拟合,增加网络非线性的表达能力。
- 卷积网络从输入到输出,应该让图片尺寸逐渐减小,输出通道数逐渐增加,即让空间结构化,将空间信息转化为高阶抽象的特征信息。
- Inception Module用多个分支提取不同抽象程度的高阶特征的思路很有效,可以丰富网络的表达能力
5.8 Inception V4
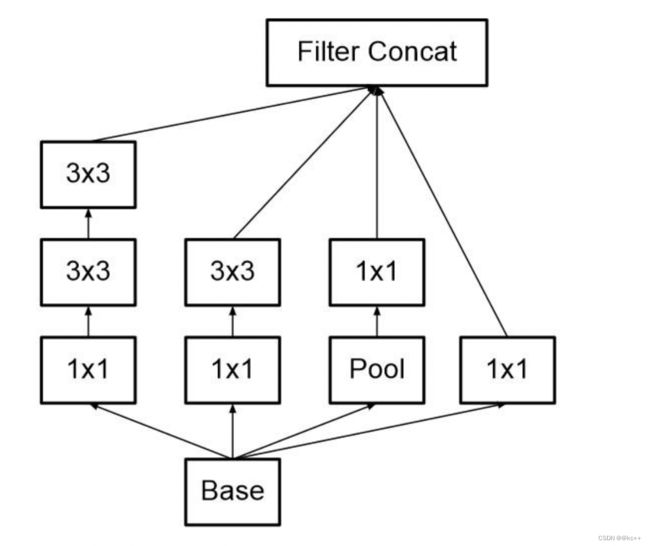
- 左图是基本的Inception v2/v3模块,使用两个3x3卷积代替5x5卷积,并且使用average pooling,该模块主要处理尺寸为35x35的feature map;
- 中图模块使用1xn和nx1卷积代替nxn卷积,同样使用average pooling,该模块主要处理尺寸为17x17的feature map;
- 右图将3x3卷积用1x3卷积和3x1卷积代替。
总的来说,Inception v4中基本的Inception module还是沿袭了Inception v2/v3的结构,只是结构看起来更加简洁统一,并且使用更多的Inception module,实验效果也更好。
5.9 Inception结构总结
Inception模型优势:
- 采用了1x1卷积核,性价比高,用很少的计算量既可以增加一层的特征变换和非线性变换。
- 提出Batch Normalization,通过一定的手段,把每层神经元的输入值分布拉到均值0方差1的正态分布,使其落入激活函数的敏感区,避免梯度消失,加快收敛。
- 引入Inception module,4个分支结合的结构。
5.10 卷积神经网络迁移学习
- 现在在工程中最为常用的还是vgg、resnet、inception这几种结构,设计者通常会先直接套用原版的模型对数据进行训练一次,然后选择效果较为好的模型进行微调与模型缩减。
- 工程上使用的模型必须在精度高的同时速度要快。
- 常用的模型缩减的方法是减少卷积的个数与减少resnet的模块数。
5.11 InceptionV3示例
#-------------------------------------------------------------#
#   InceptionV3的网络部分
#-------------------------------------------------------------#
from __future__ import print_function
from __future__ import absolute_import

import warnings
import numpy as np

from keras.models import Model
from keras import layers
from keras.layers import Activation,Dense,Input,BatchNormalization,Conv2D,MaxPooling2D,AveragePooling2D
from keras.layers import GlobalAveragePooling2D,GlobalMaxPooling2D
from keras.engine.topology import get_source_inputs
from keras.utils.layer_utils import convert_all_kernels_in_model
from keras.utils.data_utils import get_file
from keras import backend as K
from keras.applications.imagenet_utils import decode_predictions
from keras.preprocessing import image


def conv2d_bn(x,
              filters,
              num_row,
              num_col,
              strides=(1, 1),
              padding='same',
              name=None):
    if name is not None:
        bn_name = name + '_bn'
        conv_name = name + '_conv'
    else:
        bn_name = None
        conv_name = None
    x = Conv2D(
        filters, (num_row, num_col),
        strides=strides,
        padding=padding,
        use_bias=False,
        name=conv_name)(x)
    x = BatchNormalization(scale=False, name=bn_name)(x)
    x = Activation('relu', name=name)(x)
    return x


def InceptionV3(input_shape=[299,299,3],
                classes=1000):


    img_input = Input(shape=input_shape)

    x = conv2d_bn(img_input, 32, 3, 3, strides=(2, 2), padding='valid')
    x = conv2d_bn(x, 32, 3, 3, padding='valid')
    x = conv2d_bn(x, 64, 3, 3)
    x = MaxPooling2D((3, 3), strides=(2, 2))(x)

    x = conv2d_bn(x, 80, 1, 1, padding='valid')
    x = conv2d_bn(x, 192, 3, 3, padding='valid')
    x = MaxPooling2D((3, 3), strides=(2, 2))(x)

    #--------------------------------#
    #   Block1 35x35
    #--------------------------------#
    # Block1 part1
    # 35 x 35 x 192 -> 35 x 35 x 256
    branch1x1 = conv2d_bn(x, 64, 1, 1)

    branch5x5 = conv2d_bn(x, 48, 1, 1)
    branch5x5 = conv2d_bn(branch5x5, 64, 5, 5)

    branch3x3dbl = conv2d_bn(x, 64, 1, 1)
    branch3x3dbl = conv2d_bn(branch3x3dbl, 96, 3, 3)
    branch3x3dbl = conv2d_bn(branch3x3dbl, 96, 3, 3)

    branch_pool = AveragePooling2D((3, 3), strides=(1, 1), padding='same')(x)
    branch_pool = conv2d_bn(branch_pool, 32, 1, 1)

    # 64+64+96+32 = 256  nhwc-0123
    x = layers.concatenate(
        [branch1x1, branch5x5, branch3x3dbl, branch_pool],
        axis=3,
        name='mixed0')

    # Block1 part2
    # 35 x 35 x 256 -> 35 x 35 x 288
    branch1x1 = conv2d_bn(x, 64, 1, 1)

    branch5x5 = conv2d_bn(x, 48, 1, 1)
    branch5x5 = conv2d_bn(branch5x5, 64, 5, 5)

    branch3x3dbl = conv2d_bn(x, 64, 1, 1)
    branch3x3dbl = conv2d_bn(branch3x3dbl, 96, 3, 3)
    branch3x3dbl = conv2d_bn(branch3x3dbl, 96, 3, 3)

    branch_pool = AveragePooling2D((3, 3), strides=(1, 1), padding='same')(x)
    branch_pool = conv2d_bn(branch_pool, 64, 1, 1)

    # 64+64+96+64 = 288
    x = layers.concatenate(
        [branch1x1, branch5x5, branch3x3dbl, branch_pool],
        axis=3,
        name='mixed1')

    # Block1 part3
    # 35 x 35 x 288 -> 35 x 35 x 288
    branch1x1 = conv2d_bn(x, 64, 1, 1)

    branch5x5 = conv2d_bn(x, 48, 1, 1)
    branch5x5 = conv2d_bn(branch5x5, 64, 5, 5)

    branch3x3dbl = conv2d_bn(x, 64, 1, 1)
    branch3x3dbl = conv2d_bn(branch3x3dbl, 96, 3, 3)
    branch3x3dbl = conv2d_bn(branch3x3dbl, 96, 3, 3)

    branch_pool = AveragePooling2D((3, 3), strides=(1, 1), padding='same')(x)
    branch_pool = conv2d_bn(branch_pool, 64, 1, 1)

    # 64+64+96+64 = 288
    x = layers.concatenate(
        [branch1x1, branch5x5, branch3x3dbl, branch_pool],
        axis=3,
        name='mixed2')

    #--------------------------------#
    #   Block2 17x17
    #--------------------------------#
    # Block2 part1
    # 35 x 35 x 288 -> 17 x 17 x 768
    branch3x3 = conv2d_bn(x, 384, 3, 3, strides=(2, 2), padding='valid')

    branch3x3dbl = conv2d_bn(x, 64, 1, 1)
    branch3x3dbl = conv2d_bn(branch3x3dbl, 96, 3, 3)
    branch3x3dbl = conv2d_bn(
        branch3x3dbl, 96, 3, 3, strides=(2, 2), padding='valid')

    branch_pool = MaxPooling2D((3, 3), strides=(2, 2))(x)
    x = layers.concatenate(
        [branch3x3, branch3x3dbl, branch_pool], axis=3, name='mixed3')

    # Block2 part2
    # 17 x 17 x 768 -> 17 x 17 x 768
    branch1x1 = conv2d_bn(x, 192, 1, 1)

    branch7x7 = conv2d_bn(x, 128, 1, 1)
    branch7x7 = conv2d_bn(branch7x7, 128, 1, 7)
    branch7x7 = conv2d_bn(branch7x7, 192, 7, 1)

    branch7x7dbl = conv2d_bn(x, 128, 1, 1)
    branch7x7dbl = conv2d_bn(branch7x7dbl, 128, 7, 1)
    branch7x7dbl = conv2d_bn(branch7x7dbl, 128, 1, 7)
    branch7x7dbl = conv2d_bn(branch7x7dbl, 128, 7, 1)
    branch7x7dbl = conv2d_bn(branch7x7dbl, 192, 1, 7)

    branch_pool = AveragePooling2D((3, 3), strides=(1, 1), padding='same')(x)
    branch_pool = conv2d_bn(branch_pool, 192, 1, 1)
    x = layers.concatenate(
        [branch1x1, branch7x7, branch7x7dbl, branch_pool],
        axis=3,
        name='mixed4')

    # Block2 part3 and part4
    # 17 x 17 x 768 -> 17 x 17 x 768 -> 17 x 17 x 768
    for i in range(2):
        branch1x1 = conv2d_bn(x, 192, 1, 1)

        branch7x7 = conv2d_bn(x, 160, 1, 1)
        branch7x7 = conv2d_bn(branch7x7, 160, 1, 7)
        branch7x7 = conv2d_bn(branch7x7, 192, 7, 1)

        branch7x7dbl = conv2d_bn(x, 160, 1, 1)
        branch7x7dbl = conv2d_bn(branch7x7dbl, 160, 7, 1)
        branch7x7dbl = conv2d_bn(branch7x7dbl, 160, 1, 7)
        branch7x7dbl = conv2d_bn(branch7x7dbl, 160, 7, 1)
        branch7x7dbl = conv2d_bn(branch7x7dbl, 192, 1, 7)

        branch_pool = AveragePooling2D(
            (3, 3), strides=(1, 1), padding='same')(x)
        branch_pool = conv2d_bn(branch_pool, 192, 1, 1)
        x = layers.concatenate(
            [branch1x1, branch7x7, branch7x7dbl, branch_pool],
            axis=3,
            name='mixed' + str(5 + i))

    # Block2 part5
    # 17 x 17 x 768 -> 17 x 17 x 768
    branch1x1 = conv2d_bn(x, 192, 1, 1)

    branch7x7 = conv2d_bn(x, 192, 1, 1)
    branch7x7 = conv2d_bn(branch7x7, 192, 1, 7)
    branch7x7 = conv2d_bn(branch7x7, 192, 7, 1)

    branch7x7dbl = conv2d_bn(x, 192, 1, 1)
    branch7x7dbl = conv2d_bn(branch7x7dbl, 192, 7, 1)
    branch7x7dbl = conv2d_bn(branch7x7dbl, 192, 1, 7)
    branch7x7dbl = conv2d_bn(branch7x7dbl, 192, 7, 1)
    branch7x7dbl = conv2d_bn(branch7x7dbl, 192, 1, 7)

    branch_pool = AveragePooling2D((3, 3), strides=(1, 1), padding='same')(x)
    branch_pool = conv2d_bn(branch_pool, 192, 1, 1)
    x = layers.concatenate(
        [branch1x1, branch7x7, branch7x7dbl, branch_pool],
        axis=3,
        name='mixed7')

    #--------------------------------#
    #   Block3 8x8
    #--------------------------------#
    # Block3 part1
    # 17 x 17 x 768 -> 8 x 8 x 1280
    branch3x3 = conv2d_bn(x, 192, 1, 1)
    branch3x3 = conv2d_bn(branch3x3, 320, 3, 3,
                          strides=(2, 2), padding='valid')

    branch7x7x3 = conv2d_bn(x, 192, 1, 1)
    branch7x7x3 = conv2d_bn(branch7x7x3, 192, 1, 7)
    branch7x7x3 = conv2d_bn(branch7x7x3, 192, 7, 1)
    branch7x7x3 = conv2d_bn(
        branch7x7x3, 192, 3, 3, strides=(2, 2), padding='valid')

    branch_pool = MaxPooling2D((3, 3), strides=(2, 2))(x)
    x = layers.concatenate(
        [branch3x3, branch7x7x3, branch_pool], axis=3, name='mixed8')

    # Block3 part2 part3
    # 8 x 8 x 1280 -> 8 x 8 x 2048 -> 8 x 8 x 2048
    for i in range(2):
        branch1x1 = conv2d_bn(x, 320, 1, 1)

        branch3x3 = conv2d_bn(x, 384, 1, 1)
        branch3x3_1 = conv2d_bn(branch3x3, 384, 1, 3)
        branch3x3_2 = conv2d_bn(branch3x3, 384, 3, 1)
        branch3x3 = layers.concatenate(
            [branch3x3_1, branch3x3_2], axis=3, name='mixed9_' + str(i))

        branch3x3dbl = conv2d_bn(x, 448, 1, 1)
        branch3x3dbl = conv2d_bn(branch3x3dbl, 384, 3, 3)
        branch3x3dbl_1 = conv2d_bn(branch3x3dbl, 384, 1, 3)
        branch3x3dbl_2 = conv2d_bn(branch3x3dbl, 384, 3, 1)
        branch3x3dbl = layers.concatenate(
            [branch3x3dbl_1, branch3x3dbl_2], axis=3)

        branch_pool = AveragePooling2D(
            (3, 3), strides=(1, 1), padding='same')(x)
        branch_pool = conv2d_bn(branch_pool, 192, 1, 1)
        x = layers.concatenate(
            [branch1x1, branch3x3, branch3x3dbl, branch_pool],
            axis=3,
            name='mixed' + str(9 + i))
    # 平均池化后全连接。
    x = GlobalAveragePooling2D(name='avg_pool')(x)
    x = Dense(classes, activation='softmax', name='predictions')(x)


    inputs = img_input

    model = Model(inputs, x, name='inception_v3')

    return model

def preprocess_input(x):
    x /= 255.
    x -= 0.5
    x *= 2.
    return x

if __name__ == '__main__':
    model = InceptionV3()

    model.load_weights("inception_v3_weights_tf_dim_ordering_tf_kernels.h5")

    img_path = 'elephant.jpg'
    img = image.load_img(img_path, target_size=(299, 299))
    x = image.img_to_array(img)
    x = np.expand_dims(x, axis=0)

    x = preprocess_input(x)

    preds = model.predict(x)
    print('Predicted:', decode_predictions(preds))
6. 模型轻量化-Mobilenet
MobileNet模型是Google针对手机等嵌入式设备提出的一种轻量级的深层神经网络,其使用的核心思想便是深度可分离卷积 depthwise separable convolution。
6.1 Mobilenet—深度可分离卷积depthwise separable convolution
6.2 Mobilenet–depthwise separable convolution
对于一个卷积点而言:
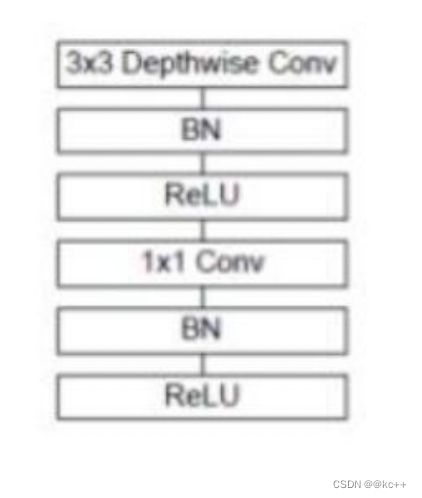
假设有一个3×3大小的卷积层,其输入通道为16、输出通道为32。具体为,32个3×3大小的卷积核会遍历16个通道中的每个数据,最后可得到所需的32个输出通道,所需参数为16×32×3×3=4608个。
应用深度可分离卷积,用16个3×3大小的卷积核分别遍历16通道的数据,得到了16个特征图谱,接着用32个1×1大小的卷积核遍历这16个特征图谱,所需参数为16×3×3+16×32×1×1=656个。
可以看出来depthwise separable convolution可以减少模型的参数。

6.3 Mobilenet
6.4 MobileNet代码示例
#-------------------------------------------------------------#
#   MobileNet的网络部分
#-------------------------------------------------------------#
import warnings
import numpy as np

from keras.preprocessing import image

from keras.models import Model
from keras.layers import DepthwiseConv2D,Input,Activation,Dropout,Reshape,BatchNormalization,GlobalAveragePooling2D,GlobalMaxPooling2D,Conv2D
from keras.applications.imagenet_utils import decode_predictions
from keras import backend as K


def MobileNet(input_shape=[224,224,3],
              depth_multiplier=1,
              dropout=1e-3,
              classes=1000):


    img_input = Input(shape=input_shape)

    # 224,224,3 -> 112,112,32
    x = _conv_block(img_input, 32, strides=(2, 2))

    # 112,112,32 -> 112,112,64
    x = _depthwise_conv_block(x, 64, depth_multiplier, block_id=1)

    # 112,112,64 -> 56,56,128
    x = _depthwise_conv_block(x, 128, depth_multiplier,
                              strides=(2, 2), block_id=2)
    # 56,56,128 -> 56,56,128
    x = _depthwise_conv_block(x, 128, depth_multiplier, block_id=3)

    # 56,56,128 -> 28,28,256
    x = _depthwise_conv_block(x, 256, depth_multiplier,
                              strides=(2, 2), block_id=4)

    # 28,28,256 -> 28,28,256
    x = _depthwise_conv_block(x, 256, depth_multiplier, block_id=5)

    # 28,28,256 -> 14,14,512
    x = _depthwise_conv_block(x, 512, depth_multiplier,
                              strides=(2, 2), block_id=6)

    # 14,14,512 -> 14,14,512
    x = _depthwise_conv_block(x, 512, depth_multiplier, block_id=7)
    x = _depthwise_conv_block(x, 512, depth_multiplier, block_id=8)
    x = _depthwise_conv_block(x, 512, depth_multiplier, block_id=9)
    x = _depthwise_conv_block(x, 512, depth_multiplier, block_id=10)
    x = _depthwise_conv_block(x, 512, depth_multiplier, block_id=11)

    # 14,14,512 -> 7,7,1024
    x = _depthwise_conv_block(x, 1024, depth_multiplier,
                              strides=(2, 2), block_id=12)
    x = _depthwise_conv_block(x, 1024, depth_multiplier, block_id=13)

    # 7,7,1024 -> 1,1,1024
    x = GlobalAveragePooling2D()(x)
    x = Reshape((1, 1, 1024), name='reshape_1')(x)
    x = Dropout(dropout, name='dropout')(x)
    x = Conv2D(classes, (1, 1),padding='same', name='conv_preds')(x)
    x = Activation('softmax', name='act_softmax')(x)
    x = Reshape((classes,), name='reshape_2')(x)

    inputs = img_input

    model = Model(inputs, x, name='mobilenet_1_0_224_tf')
    model_name = 'mobilenet_1_0_224_tf.h5'
    model.load_weights(model_name)

    return model

def _conv_block(inputs, filters, kernel=(3, 3), strides=(1, 1)):
    x = Conv2D(filters, kernel,
               padding='same',
               use_bias=False,
               strides=strides,
               name='conv1')(inputs)
    x = BatchNormalization(name='conv1_bn')(x)
    return Activation(relu6, name='conv1_relu')(x)


def _depthwise_conv_block(inputs, pointwise_conv_filters,
                          depth_multiplier=1, strides=(1, 1), block_id=1):

    x = DepthwiseConv2D((3, 3),
                        padding='same',
                        depth_multiplier=depth_multiplier,
                        strides=strides,
                        use_bias=False,
                        name='conv_dw_%d' % block_id)(inputs)

    x = BatchNormalization(name='conv_dw_%d_bn' % block_id)(x)
    x = Activation(relu6, name='conv_dw_%d_relu' % block_id)(x)

    x = Conv2D(pointwise_conv_filters, (1, 1),
               padding='same',
               use_bias=False,
               strides=(1, 1),
               name='conv_pw_%d' % block_id)(x)
    x = BatchNormalization(name='conv_pw_%d_bn' % block_id)(x)
    return Activation(relu6, name='conv_pw_%d_relu' % block_id)(x)

def relu6(x):
    return K.relu(x, max_value=6)

def preprocess_input(x):
    x /= 255.
    x -= 0.5
    x *= 2.
    return x

if __name__ == '__main__':
    model = MobileNet(input_shape=(224, 224, 3))

    img_path = 'elephant.jpg'
    img = image.load_img(img_path, target_size=(224, 224))
    x = image.img_to_array(img)
    x = np.expand_dims(x, axis=0)
    x = preprocess_input(x)
    print('Input image shape:', x.shape)

    preds = model.predict(x)
    print(np.argmax(preds))
    print('Predicted:', decode_predictions(preds,1))  # 只显示top1
7. 卷积神经网络的设计技巧
问题背景:
- 想要熟练掌握训练神经网络的能力并不是那么容易。与先前的机器学习思维一样,细节决定成败。但是,训练神经网络有更多的细节需要处理。你的数据和硬件有什么限制?你应该从何种网络开始?你应该建立多少卷积层?你的激励函数怎样去设置?
- 学习速率是调整神经网络训练最重要的超参数,也是最难优化的参数之一。太小,你可能永远不会得到一个解决方案;太大,你可能刚好错过最优解。如果用自适应的学习速率的方法,这就意味着你要花很多钱在硬件资源上,以此来满足对计算的需求。
- 设计选择和超参数的设置极大地影响了CNN的训练和性能,但对于深度学习领域新进入者来说,设计架构直觉的培养可能就需要资源的稀缺性和分散性。
1) 架构遵循应用
你也许会被 Google Brain 或者 Deep Mind 这些有想象力的实验室所发明的那些耀眼的新模型所吸引,但是其中许多要么是不可能实现的,要么是不实用的对于你的需求。或许你应该使用对你的特定应用最有意义的模型,这种模型或许非常简单,但是仍然很强大,例如 VGG。
2) 路径的激增
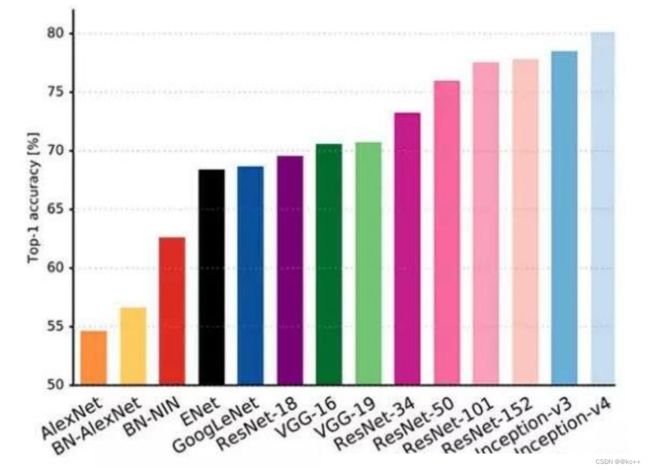
每年ImageNet Challenge的赢家都比上一年的冠军使用更加深层的网络。从AlexNet 到Inception到Resnets,有”网络的路径数量成倍增长”的趋势。
3) 追求简约
更大的并不一定是更好的。
4)增加对称性
无论是在建筑上,还是在生物上,对称性被认为是质量和工艺的标志。
5) 金字塔形状
你总是在表征能力和减少冗余或者无用信息之间权衡。CNNs通常会降低激活函数的采样,并会增加从输入层到最终层之间的连接通道。
6) 过渡训练
另一个权衡是训练准确度和泛化能力。用正则化的方法类似 drop-out 或 drop-path进行提升泛化能力,这是神经网络的重要优势。用比实际用例更难的问题训练网络,以提高泛化性能。
7) 覆盖问题的空间
为了扩大训练数据和提升泛化能力,要使用噪声和人工增加训练集的大小。例如随机旋转、裁剪和一些图像增强操作。
8) 递增的功能结构
当架构变得成功时,它们会简化每一层的“工作”。在非常深的神经网络中,每个层只会递增地修改输入。在ResNets中,每一层的输出可能类似于输入。所以,在实践中,请在ResNet中使用短的跳过长度。
9) 标准化层的输入
标准化是可以使计算层的工作变得更加容易的一条捷径,并且在实际中可以提升训练的准确性。标准化把所有层的输入样本放在了一个平等的基础上(类似于单位转换),这允许反向传播可以更有效地训练。
10)使用微调过的预训练网络(fine tuning)
机器学习公司 Diffbot 的 CEO Mike Tung 说,“如果你的视觉数据和 ImageNet 相似,那么用预训练网络会帮助你学习得更快”。低水平的CNN通常可以被重复使用,因为它们大多能够检测到像线条和边缘这些常见的模式。比如,用自己设计的层替换分类层,并且用你特定的数据去训练最后的几个层。
11)使用循环的学习率
学习率的实验会消耗大量的时间,并且会让你遇到错误。自适应学习率在计算上可能是非常昂贵的,但是循环学习率不会。使用循环学习率时,你可以设置一组最大最小边界,并且在这个范围改变它。
