菜鸟nginx源代码剖析 框架篇(一) 从main函数看nginx启动流程
菜鸟nginx源代码剖析 框架篇(一) 从main函数看nginx启动流程
https://www.cnblogs.com/brucemengbm/p/6868298.html
Author:Echo Chen(陈斌)
Email:[email protected]
Blog:Blog.csdn.net/chen19870707
Date:Nov 9th, 2014
俗话说的好。牵牛要牵牛鼻子 驾车顶牛,处理复杂的东西,仅仅要抓住重点,才干理清脉络。不至于深陷当中,不能自拔。对复杂的nginx而言,main函数就是“牛之鼻”,仅仅要能理清main函数。就一定能理解当中的奥秘,以下我们就一起来研究一下nginx的main函数。
1.nginx的main函数解读
nginx启动显然是由main函数驱动的,main函数在在core/nginx.c文件里,其源码解析例如以下。涉及到的数据结构在本节仅指出其作用,将在第二节中详解。
nginx main函数的流程图例如以下:

须要说明的:
1) 初始化错误提示列表,以errno为下标,元素就是相应的错误提示信息。
1: if (ngx_strerror_init() != NGX_OK) {
2: return 1;
3: }
2)获取命令行參数,保存在全局变量中。能够设置的命令行參数例如以下表所看到的:
1: if (ngx_get_options(argc, argv) != NGX_OK) {
2: return 1;
3: }
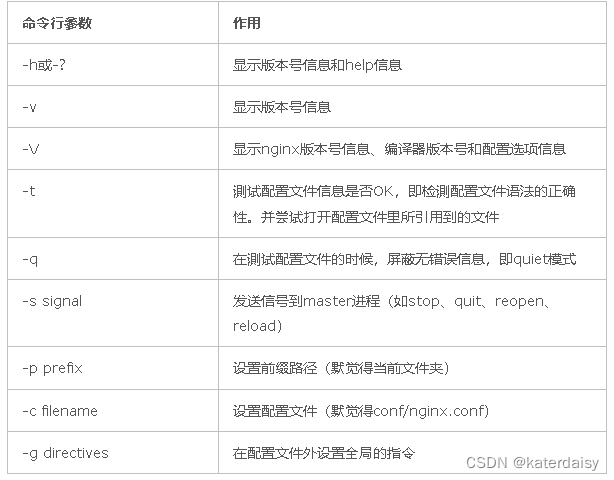
命令行參数 作用
-h或-? 显示版本号信息和help信息
-v 显示版本号信息
-V 显示nginx版本号信息、编译器版本号和配置选项信息
-t 測试配置文件信息是否OK,即检測配置文件语法的正确性。并尝试打开配置文件里所引用到的文件
-q 在測试配置文件的时候,屏蔽无错误信息,即quiet模式
-s signal 发送信号到master进程(如stop、quit、reopen、reload)
-p prefix 设置前缀路径(默觉得当前文件夹)
-c filename 设置配置文件(默觉得conf/nginx.conf)
-g directives 在配置文件外设置全局的指令
3)时间、正則表達式和log的初始化。
1: ngx_time_init();
2:
3: (NGX_PCRE)
4: ngx_regex_init();
5: if
6:
7: ngx_pid = ngx_getpid();
8:
9: log = ngx_log_init(ngx_prefix);
10: if (log == NULL) {
11: return 1;
12: }
4) 初始化cycle结构,并创建内存块大小为1024的内存池,内存池创建已经在《菜鸟nginx源代码剖析数据结构篇(九) 内存池ngx_pool_t》讨论过了,nginx框架就是环绕着ngx_cycle_t结构体来控制执行的。其定义详情请參考下一节。
1: ngx_memzero(&init_cycle, sizeof(ngx_cycle_t));
2: init_cycle.log = log;
3: ngx_cycle = &init_cycle;
4:
5: init_cycle.pool = ngx_create_pool(1024, log);
6: if (init_cycle.pool == NULL) {
7: return 1;
8: }
-
将命令行參数保存到ngx_os_argv、ngx_argc以及ngx_argv这几个全局的变量中。这算是一个备份存储。方便以后master进程做热代码替换之用。
1: if (ngx_save_argv(&init_cycle, argc, argv) != NGX_OK) {
2: return 1;
3: }
6)用命令行參数得来的全局变量初始化cycle的conf_prefix(配置文件所在路径的前缀)、prefix(nginx可运行文件所在路径)、conf_file(配置文件名称)和conf_param(通过命令行-g选项指定的全局配置信息)。
1: if (ngx_process_options(&init_cycle) != NGX_OK) {
2: return 1;
3: }
7) 依据操作系统确定一些參数,信息会被保存到一些全局变量中。如页大小ngx_pagesize, CPU cacheline
1: if (ngx_os_init(log) != NGX_OK) {
2: return 1;
3: } -
初始化一个做循环冗余校验的表,由此能够看出兴许的循环冗余校验将採用高效的查表法
1: if (ngx_crc32_table_init() != NGX_OK) {
2: return 1;
3: }
9)通过环境变量NGINX完毕socket的继承。继承来的socket将会放到init_cycle的listening数组中。
同一时候能够读取master进程传递的平滑升级信息等等1: if (ngx_add_inherited_sockets(&init_cycle) != NGX_OK) {
2: return 1;
3: }
10)初始化全部模块的index信息,即对全部模块进行编号,ngx_modules数却是在自己主动编译的时候生成的,位于objs/ngx_modules.c文件里1: ngx_max_module = 0;
2: for (i = 0; ngx_modules[i]; i++) {
3: ngx_modules[i]->index = ngx_max_module++;
4: }
11) 用上面收集的init_cycle信息初始化ngx_cycle,这行代码是nginx启动过程中最重要的一个步骤,在第3节将具体展开。1: cycle = ngx_init_cycle(&init_cycle);
2: if (cycle == NULL) {
3: if (ngx_test_config) {
4: ngx_log_stderr(0, “configuration file %s test failed”,
5: init_cycle.conf_file.data);
6: }
7:
8: return 1;
9: }
12)ccf 为ngx_core_conf_t 将在第2节给出具体定义,这个地方须要解释下。ccf->master是从配置文件里解析master_process配置项所得的值。初始化为NGX_CONF_UNSET(-1)。在配置项中。假设flag类型的配置项master_process被设置为on。则其值为1。假设为off,则其值为0,ngx_process为全局变量,用于记录要採用的工作模式。未被初始化,因此初始值是0(uint型全局变量会被系统默认初始化为0),相关宏定义例如以下:
#define NGX_PROCESS_SINGLE 0
#define NGX_PROCESS_MASTER 1
#define NGX_PROCESS_SIGNALLER 2
#define NGX_PROCESS_WORKER 3
#define NGX_PROCESS_HELPER 4
因此,以下的if推断语句的含义就是:用来处理一种特殊情况,即假设在配置项中未设置master_process配置项或者是设置为打开,ngx_process未被设置,採用默认值0。这个时候要採用master工作模式。
由于master_process优先级高,且nginx默认採用master模式假设在配置项中设置master_process为off,那么if根据不会运行。终于nginx工作模式取决于ngx_proces的初值0。即採用单进程模式。
1: ccf = (ngx_core_conf_t *) ngx_get_conf(cycle->conf_ctx, ngx_core_module);
2:
3: if (ccf->master && ngx_process == NGX_PROCESS_SINGLE) {
4: ngx_process = NGX_PROCESS_MASTER;
5: }
13)初始化信号。主要完毕信号处理程序的注冊
1: if (ngx_init_signals(cycle->log) != NGX_OK) {
2: return 1;
3: }
14)若无继承sockets,且设置了守护进程表示,则创建守护进程
1: if (!ngx_inherited && ccf->daemon) {
2: if (ngx_daemon(cycle->log) != NGX_OK) {
3: return 1;
4: }
5:
6: ngx_daemonized = 1;
7: }
8:
9: if (ngx_inherited) {
10: ngx_daemonized = 1;
11: }
15) 创建进程记录文件。(非NGX_PROCESS_MASTER=1进程,不创建该文件)
1: if (ngx_create_pidfile(&ccf->pid, cycle->log) != NGX_OK) {
2: return 1;
3: }
16) 进入进程主循环。依据ngx_process确定启动单进程模式还是多进程模式。
1: if (ngx_process == NGX_PROCESS_SINGLE) {
2: ngx_single_process_cycle(cycle);
3:
4: } else {
5: ngx_master_process_cycle(cycle);
6: }
2.相关结构体
2.1. ngx_module_t
nginx中全部模块的类型都是ngx_module_t类型的,定义了模块的一些属性。
nginx是全然模块化的,全部的组件都是模块。从而实现了nginx的高度松耦合。同一时候。我们在进行nginx模块开发时。也离不开这个数据结构。
在上面初始化过程中的第10步就是初始化这个结构。
1: struct ngx_module_s {
2: /**
3: * 在详细类型模块(http、event等)的全局配置结构数组的下标。以http module模块为例,
4: * nginx把全部的http module的config信息存放在ngx_http_conf_ctx_t类型的变量中,
5: * 这个变量仅仅有3个属性,各自是全部http module的main、srv、loc的config信息的数组。
6: * 假设该模块是http module,则ctx_index是该模块的config信息(main、srv、loc)
7: * 在ngx_http_conf_ctx_t中的下标。
8: /
9: ngx_uint_t ctx_index;
10:
11: /*
12: * nginx把全部模块(ngx_module_t)存放到ngx_modules数组中,这个数组在nginx源代码路
13: * 径的objs/ngx_modules.c中,是在执行configure脚本后生成的。index属性就是该模块
14: * 在ngx_modules数组中的下标。同一时候nginx把全部的core module的配置结构存放到ngx_cycle的
15: * conf_ctx数组中。index也是该模块的配置结构在ngx_cycle->conf_ctx数组中的下标。
16: /
17: ngx_uint_t index;
18:
19: ……
20:
21: /*
22: * 模块的上下文属性,同一类型的模块的属性是同样的,比方core module的ctx是ngx_core_module_t类型。
23: * 而http module的ctx是ngx_http_moduel_t类型。event module的ctx是ngx_event_module_t类型等等。
24: * 对应类型的模块由分开处理的,比方全部的http module由ngx_http_module解析处理。而全部的event module
25: * 由ngx_events_module解析处理。
26: /
27: void ctx;
28:
29: /
30: * 该模块支持的指令的数组,最后以一个空指令结尾。ngx_commond_t的分析见下文。
31: /
32: ngx_command_t commands;
33:
34: /
35: * 模块的类型,nginx全部的模块类型:
36: * NGX_CORE_MODULE
37: * NGX_CONF_MODULE
38: * NGX_HTTP_MODULE
39: * NGX_EVENT_MODULE
40: * NGX_MAIL_MODULE
41: * 这些不同的类型也指定了不同的ctx。
42: /
43: ngx_uint_t type;
44:
45: / 接下来都是一些回调函数,在nginx初始化过程的特定时间点调用 */
46: ngx_int_t (*init_master)(ngx_log_t log);
47:
48: / 初始化全然部模块后调用,在ngx_int_cycle函数(ngx_cycle.c)中 */
49: ngx_int_t (*init_module)(ngx_cycle_t cycle);
50:
51: / 初始化完worker进程后调用。在ngx_worker_process_init函数(ngx_process_cycle.c)中 */
52: ngx_int_t (*init_process)(ngx_cycle_t *cycle);
53: ngx_int_t (*init_thread)(ngx_cycle_t *cycle);
54: void (*exit_thread)(ngx_cycle_t *cycle);
55: void (*exit_process)(ngx_cycle_t *cycle);
56:
57: void (*exit_master)(ngx_cycle_t *cycle);
58: ……
59: };
模块类型和上下文属性的关系例如以下:

经常使用的模块图例如以下图所看到的:

2.2 ngx_commond_t
ngx_commond_t描写叙述的是模块的配置指令,也就是出如今配置文件的指令。nginx模块支持多个配置指令。所以是以ngx_commond_t数组形式存储的。这个结构在配置文件解析和模块的配置结构信息初始化时会用到。
1: struct ngx_command_s {
2: /**
3: * 指令名。与配置文件里一致
4: /
5: ngx_str_t name;
6:
7: /*
8: * 指令的类型,以及參数的个数。这个属性有两个作用:
9: * 1. 实现仅仅解析某个类型的指令,比方当前这个指令是event module类型的,而正在解析的是
10: * http module,所以会跳过全部不是http module类型的指令。
11: * 2. 实现指令參数个数的校验。
12: /
13: ngx_uint_t type;
14:
15: /
16: * 回调函数,在解析配置文件时,遇到这个指令时调用。
17: * cf: 包含配置參数信息cf->args(ngx_array_t类型)。以及指令相应的模块上下文cf->ctx
18: * 在解析不同模块的指令时。这个上下文信息不同。
比方在解析core module时,cf->ctx
19: * 是ngx_cycle->conf_ctx也就是全部core module的配置结构数组,而在解析http module
20: * 时cf->ctx是ngx_http_conf_ctx_t类型的,当中包括全部http module的main、srv、loc
21: * 的配置结构数组。
22: * cmd: 指令相应的ngx_command_t结构。
23: * conf:指令相应的模块的配置信息。
24: */
25: char *(set)(ngx_conf_t cf, ngx_command_t cmd, void conf);
26:
27: /
28: * 对http module有效,http module的配置结构信息(main、srv、loc)都存放在ngx_http_conf_ctx_t
29: * 中相应的数组。conf属性指示这个指令的配置结构是main、srv还是loc。
30: /
31: ngx_uint_t conf;
32:
33: /
34: * 指令相应属性在模块配置结构中的偏移量。
35: /
36: ngx_uint_t offset;
37:
38: /
39: * 通常是函数指针,在set回调函数中调用。
40: */
41: void *post;
42: };
2.3 ngx_cycle_t
ngx_cycle_t是nginx中最重要的数据结构。包括了全局的配置信息、全部监听的套接字、连接池、读写事件等。ngx_cycle_t相当于nginx的一个生命周期,从nginx启动后直到向nginx发送stop或者reload信号。nginx中有一个全局变量ngx_cycle指向当前的cycle。
1: struct ngx_cycle_s {
2: /保存着全部模块存储配置项的结构体的指针,它首先是一个数组。每一个数组成员又是一个指针,这个指针指向还有一个存储着指针的数组/
3: void ****conf_ctx;
4: //内存池
5: ngx_pool_t *pool;
6:
7: /日志模块中提供了生成基本ngx_log_t日志对象的功能,这里的log实际上在还没有运行ngx_init_cycle方法前,也就是还没有解析配置前,假设有信息输出日志
8: 就会临时使用log对象,它会输出到屏幕。在调用ngx_int_cycle后,将会依据nginx.comfg配置文件里的配置项构造出正确的日志,此时会对log进行又一次赋值/
9: ngx_log_t log;
10: /由nginx.conf配置文件读取到日志文件路径后。将開始初始化error_log日志文件,因为log对象还在用于输出日志屏幕。这时会用new_log临时性地替代log日志
11: 待初始化成功后,会用new_log的地址覆盖上面的log指针/
12: ngx_log_t new_log;
13:
14: ngx_uint_t log_use_stderr; / unsigned log_use_stderr:1; */
15: //files文件数组的个数
16: ngx_uint_t files_n;
17: /对于poll、rtsig这种事件模块,会以有效文件句柄来预先建立这些ngx_connection_t结构体,以加速时间的收集分发。这时files就会保存全部ngx_connection_t
18: 的指针成员数组。files_n就是指针的总数,而文件句柄的值用于訪问files数组成员/
19: ngx_connection_t **files;
20: //可用连接池
21: ngx_connection_t *free_connections;
22: //可用连接池中连接总数
23: ngx_uint_t free_connection_n;
24:
25: /双向链表容器。元素是ngx_connection_t结构体。表示可反复使用的连接队列/
26: ngx_queue_t reusable_connections_queue;
27: //动态数组,每一个数组元素存储着ngx_listening_t成员,表示监听port及相关參数
28: ngx_array_t listening;
29: //动态数组。存储着nginx全部要操作的文件夹,假设文件夹不存在。则试图创建,创建失败会导致nginx启动失败
30: ngx_array_t paths;
31: /单链表容器。元素类型是nginx_open_file_t,表示已打开的全部文件。/
32: ngx_list_t open_files;
33: /单链表容器。元素是ngx_shm_zone_t。每一个元素表示一块共享内存/
34: ngx_list_t shared_memory;
35: //当前连接对象的总数
36: ngx_uint_t connection_n;
37:
38: //指向当前进程中全部连接对象
39: ngx_connection_t *connections;
40: //指向当前进程中的全部读事件对象。connection_n同一时候表示全部读事件总数
41: ngx_event_t *read_events;
42: //指向当前进程中的全部写事件对象,connection_n同一时候表示全部写事件总数
43: ngx_event_t *write_events;
44: //旧的ngx_cycle_t对象用于引用上一个ngx_cycle_t对象中的成员
45: ngx_cycle_t *old_cycle;
46:
47: ngx_str_t conf_file; // 配置文件名称
48: ngx_str_t conf_param; // 由命令行-g提供配置參数
49: ngx_str_t conf_prefix; // 配置前缀
50: ngx_str_t prefix; // nginx所在路径
51: ngx_str_t lock_file;
52: ngx_str_t hostname; // 主机名
53: };
3.ngx_init_cycle函数
ngx_init_cycle 初始化步骤 有下面操作,这里涉及到ngx_list_t和ngx_array_t。假设有不懂的同学请參考我之前对于这两个结构分析的文章,同一时候这个函数比較复杂,希望大家耐心点。
1) 更新时区和时间。
1: ngx_timezone_update();
2:
3: /* force localtime update with a new timezone */
4:
5: tp = ngx_timeofday();
6: tp->sec = 0;
7:
8: ngx_time_update();
2) 创建内存池,并从内存池中创建ngx_cycle_t结构。然后给cycle日志和old_cycle赋值
1: log = old_cycle->log;
2:
3: pool = ngx_create_pool(NGX_CYCLE_POOL_SIZE, log);
4: if (pool == NULL) {
5: return NULL;
6: }
7: pool->log = log;
8:
9: cycle = ngx_pcalloc(pool, sizeof(ngx_cycle_t));
10: if (cycle == NULL) {
11: ngx_destroy_pool(pool);
12: return NULL;
13: }
14:
15: cycle->pool = pool;
16: cycle->log = log;
17: cycle->old_cycle = old_cycle;
3)依据old_cycle初始化cycle中的conf_file、conf_prefix、prefix和conf_param。
1: cycle->conf_prefix.len = old_cycle->conf_prefix.len;
2: cycle->conf_prefix.data = ngx_pstrdup(pool, &old_cycle->conf_prefix);
3: if (cycle->conf_prefix.data == NULL) {
4: ngx_destroy_pool(pool);
5: return NULL;
6: }
7:
8: cycle->prefix.len = old_cycle->prefix.len;
9: cycle->prefix.data = ngx_pstrdup(pool, &old_cycle->prefix);
10: if (cycle->prefix.data == NULL) {
11: ngx_destroy_pool(pool);
12: return NULL;
13: }
14:
15: cycle->conf_file.len = old_cycle->conf_file.len;
16: cycle->conf_file.data = ngx_pnalloc(pool, old_cycle->conf_file.len + 1);
17: if (cycle->conf_file.data == NULL) {
18: ngx_destroy_pool(pool);
19: return NULL;
20: }
21: ngx_cpystrn(cycle->conf_file.data, old_cycle->conf_file.data,
22: old_cycle->conf_file.len + 1);
23:
24: cycle->conf_param.len = old_cycle->conf_param.len;
25: cycle->conf_param.data = ngx_pstrdup(pool, &old_cycle->conf_param);
26: if (cycle->conf_param.data == NULL) {
27: ngx_destroy_pool(pool);
28: return NULL;
29: }
4)初始化pathes。pathes是一个ngx_array_t结构
1: n = old_cycle->paths.nelts ? old_cycle->paths.nelts : 10;
2:
3: cycle->paths.elts = ngx_pcalloc(pool, n * sizeof(ngx_path_t *));
4: if (cycle->paths.elts == NULL) {
5: ngx_destroy_pool(pool);
6: return NULL;
7: }
8:
9: cycle->paths.nelts = 0;
10: cycle->paths.size = sizeof(ngx_path_t *);
11: cycle->paths.nalloc = n;
12: cycle->paths.pool = pool;
5) 依据old_cycle的open_files的大小,初始化openfiles , openfiles为ngx_list_t
1: if (old_cycle->open_files.part.nelts) {
2: n = old_cycle->open_files.part.nelts;
3: for (part = old_cycle->open_files.part.next; part; part = part->next) {
4: n += part->nelts;
5: }
6:
7: } else {
8: n = 20;
9: }
10:
11: if (ngx_list_init(&cycle->open_files, pool, n, sizeof(ngx_open_file_t))
12: != NGX_OK)
13: {
14: ngx_destroy_pool(pool);
15: return NULL;
16: }
6) 依据old_cycle的shared_memory的大小初始化shared_memory(ngx_list_t)。
1: if (old_cycle->shared_memory.part.nelts) {
2: n = old_cycle->shared_memory.part.nelts;
3: for (part = old_cycle->shared_memory.part.next; part; part = part->next)
4: {
5: n += part->nelts;
6: }
7:
8: } else {
9: n = 1;
10: }
11:
12: if (ngx_list_init(&cycle->shared_memory, pool, n, sizeof(ngx_shm_zone_t))
13: != NGX_OK)
14: {
15: ngx_destroy_pool(pool);
16: return NULL;
17: }
7) 依据old_cycle的listenning大小初始化listening(ngx_array_t)。
1: n = old_cycle->listening.nelts ? old_cycle->listening.nelts : 10;
2:
3: cycle->listening.elts = ngx_pcalloc(pool, n * sizeof(ngx_listening_t));
4: if (cycle->listening.elts == NULL) {
5: ngx_destroy_pool(pool);
6: return NULL;
7: }
8:
9: cycle->listening.nelts = 0;
10: cycle->listening.size = sizeof(ngx_listening_t);
11: cycle->listening.nalloc = n;
12: cycle->listening.pool = pool;
8) 初始化conf_ctx(void ****)数组。大小是ngx_max_module,用于存储全部core module的配置结构信息。
1: cycle->conf_ctx = ngx_pcalloc(pool, ngx_max_module * sizeof(void *));
2: if (cycle->conf_ctx == NULL) {
3: ngx_destroy_pool(pool);
4: return NULL;
5: }
9) 调用系统调用gethostname获取主机名。初始化hostname。
1: if (gethostname(hostname, NGX_MAXHOSTNAMELEN) == -1) {
2: ngx_log_error(NGX_LOG_EMERG, log, ngx_errno, “gethostname() failed”);
3: ngx_destroy_pool(pool);
4: return NULL;
5: }
6:
7: /* on Linux gethostname() silently truncates name that does not fit */
8:
9: hostname[NGX_MAXHOSTNAMELEN - 1] = ‘\0’;
10: cycle->hostname.len = ngx_strlen(hostname);
11:
12: cycle->hostname.data = ngx_pnalloc(pool, cycle->hostname.len);
13: if (cycle->hostname.data == NULL) {
14: ngx_destroy_pool(pool);
15: return NULL;
16: }
17:
18: ngx_strlow(cycle->hostname.data, (u_char *) hostname, cycle->hostname.len);
     10)调用全部core module的create_conf回调函数创建该core module的配置信息结构,而且更新cycle->conf_ctx数组。
     nginx的core module主要有:

            ngx_core_module(core/nginx.c)

            ngx_http_module(http/ngx_http.c)

            ngx_events_module(event/ngx_event.c)

            ngx_errlog_module(core/ngx_log.c)

            ngx_mail_module(mail/ngx_mail.c)

            ngx_openssl_module(event/ngx_event_openssl.c)

            ngx_google_perftools_module(misc/ngx_google_perftools_module.c)

    仅仅有ngx_core_module和ngx_google_perftools_module两个模块有定义create_conf。而ngx_google_perftools_module仅用于性能測试,所以真正使用时仅仅有ngx_core_module有create_conf回调函数。这个会调用函数会创建ngx_core_conf_t结构,用于存储整个配置文件main scope范围内的信息,比方worker_processes,worker_cpu_affinity等。
1: for (i = 0; ngx_modules[i]; i++) {
2: if (ngx_modules[i]->type != NGX_CORE_MODULE) {
3: continue;
4: }
5:
6: module = ngx_modules[i]->ctx;
7:
8: if (module->create_conf) {
9: rv = module->create_conf(cycle);
10: if (rv == NULL) {
11: ngx_destroy_pool(pool);
12: return NULL;
13: }
14: cycle->conf_ctx[ngx_modules[i]->index] = rv;
15: }
16: }
11)初始化ngx_conf_t,用于解析配置文件并保存解析出来的信息。
args是配置文件里指令的信息的数组,args[0]是指令名,args[1] - args[n]是指令的參数,參数个数须要依据ngx_commond_t的type属性做校验。ngx_conf_t中的module_type和cmd_type用于控制解析什么类型的指令,module_type表示仅仅解析该类型模块包括的指令,cmd_type表示将要解析的指令的类型。也就是说仅仅有符合module_type和cmd_type的指令才会被解析。比方module_type取NGX_HTTP_MODULE,而cmd_type取NGX_HTTP_SRV_CONF,那么在一次配置文件解析中。仅仅会对http module的server块的指令进行解析。
1: ngx_memzero(&conf, sizeof(ngx_conf_t));
2: /* STUB: init array ?
*/
3: conf.args = ngx_array_create(pool, 10, sizeof(ngx_str_t));
4: if (conf.args == NULL) {
5: ngx_destroy_pool(pool);
6: return NULL;
7: }
8:
9: conf.temp_pool = ngx_create_pool(NGX_CYCLE_POOL_SIZE, log);
10: if (conf.temp_pool == NULL) {
11: ngx_destroy_pool(pool);
12: return NULL;
13: }
14:
15:
16: conf.ctx = cycle->conf_ctx;
17: conf.cycle = cycle;
18: conf.pool = pool;
19: conf.log = log;
20: conf.module_type = NGX_CORE_MODULE;
21: conf.cmd_type = NGX_MAIN_CONF;
12) 对通过nginx -g xxx 设置的全局配置指令初始化、解析。
1: if (ngx_conf_param(&conf) != NGX_CONF_OK) {
2: environ = senv;
3: ngx_destroy_cycle_pools(&conf);
4: return NULL;
5: }
13)解析配置文件。配置文件的解析类似一棵树的遍历,nginx中的指令分为块指令和普通指令,每一个块指令相应一棵子树,比方http块和event块。由这些块指令负责调用ngx_conf_parse函数解析块内部的指令。
配置文件的具体分析会另开一片文章,这里忽略这些细节。在ngx_conf_parse函数返回后,整个配置文件解析完成。全部模块的指令已经初始化。也就意味着全部模块基本上都初始化完,实际上ngx_conf_parse函数后面隐藏了大量的信息。包含http模块的初始化和事件模块的初始化。关于http的初始化我们后面再具体描写叙述。这里接着讲述ngx_init_cycle。
1: if (ngx_conf_parse(&conf, &cycle->conf_file) != NGX_CONF_OK) {
2: environ = senv;
3: ngx_destroy_cycle_pools(&conf);
4: return NULL;
5: }
14)初始化全部core module模块的config结构调用ngx_core_module_t的init_conf 。在全部core module中,仅仅有ngx_core_module有init_conf回调,用于对ngx_core_conf_t中没有配置的字段设置默认值。
1: for (i = 0; ngx_modules[i]; i++) {
2: if (ngx_modules[i]->type != NGX_CORE_MODULE) {
3: continue;
4: }
5:
6: module = ngx_modules[i]->ctx;
7:
8: if (module->init_conf) {
9: if (module->init_conf(cycle, cycle->conf_ctx[ngx_modules[i]->index])
10: == NGX_CONF_ERROR)
11: {
12: environ = senv;
13: ngx_destroy_cycle_pools(&conf);
14: return NULL;
15: }
16: }
17: }
15) 创建nginx的pid文件。
创建全部的文件路径、打开文件描写叙述符以及创建共享内存。
1: if (ngx_test_config) {
2:
3: if (ngx_create_pidfile(&ccf->pid, log) != NGX_OK) {
4: goto failed;
5: }
6:
7: } else if (!ngx_is_init_cycle(old_cycle)) {
8:
9: /*
10: * we do not create the pid file in the first ngx_init_cycle() call
11: * because we need to write the demonized process pid
12: */
13:
14: old_ccf = (ngx_core_conf_t ) ngx_get_conf(old_cycle->conf_ctx,
15: ngx_core_module);
16: if (ccf->pid.len != old_ccf->pid.len
17: || ngx_strcmp(ccf->pid.data, old_ccf->pid.data) != 0)
18: {
19: / new pid file name /
20:
21: if (ngx_create_pidfile(&ccf->pid, log) != NGX_OK) {
22: goto failed;
23: }
24:
25: ngx_delete_pidfile(old_cycle);
26: }
27: }
28:
29:
30: if (ngx_test_lockfile(cycle->lock_file.data, log) != NGX_OK) {
31: goto failed;
32: }
33:
34:
35: if (ngx_create_paths(cycle, ccf->user) != NGX_OK) {
36: goto failed;
37: }
38:
39:
40: if (ngx_log_open_default(cycle) != NGX_OK) {
41: goto failed;
42: }
43:
44: / open the new files /
45:
46: part = &cycle->open_files.part;
47: file = part->elts;
48:
49: for (i = 0; / void / ; i++) {
50:
51: if (i >= part->nelts) {
52: if (part->next == NULL) {
53: break;
54: }
55: part = part->next;
56: file = part->elts;
57: i = 0;
58: }
59:
60: if (file[i].name.len == 0) {
61: continue;
62: }
63:
64: file[i].fd = ngx_open_file(file[i].name.data,
65: NGX_FILE_APPEND,
66: NGX_FILE_CREATE_OR_OPEN,
67: NGX_FILE_DEFAULT_ACCESS);
68:
69: ngx_log_debug3(NGX_LOG_DEBUG_CORE, log, 0,
70: “log: %p %d “%s””,
71: &file[i], file[i].fd, file[i].name.data);
72:
73: if (file[i].fd == NGX_INVALID_FILE) {
74: ngx_log_error(NGX_LOG_EMERG, log, ngx_errno,
75: ngx_open_file_n " “%s” failed",
76: file[i].name.data);
77: goto failed;
78: }
79:
80: !(NGX_WIN32)
81: if (fcntl(file[i].fd, F_SETFD, FD_CLOEXEC) == -1) {
82: ngx_log_error(NGX_LOG_EMERG, log, ngx_errno,
83: “fcntl(FD_CLOEXEC) “%s” failed”,
84: file[i].name.data);
85: goto failed;
86: }
87: dif
88: }
89:
90: cycle->log = &cycle->new_log;
91: pool->log = &cycle->new_log;
92:
93:
94: / create shared memory /
95:
96: part = &cycle->shared_memory.part;
97: shm_zone = part->elts;
98:
99: for (i = 0; / void / ; i++) {
100:
101: if (i >= part->nelts) {
102: if (part->next == NULL) {
103: break;
104: }
105: part = part->next;
106: shm_zone = part->elts;
107: i = 0;
108: }
109:
110: if (shm_zone[i].shm.size == 0) {
111: ngx_log_error(NGX_LOG_EMERG, log, 0,
112: “zero size shared memory zone “%V””,
113: &shm_zone[i].shm.name);
114: goto failed;
115: }
116:
117: shm_zone[i].shm.log = cycle->log;
118:
119: opart = &old_cycle->shared_memory.part;
120: oshm_zone = opart->elts;
121:
122: for (n = 0; / void */ ; n++) {
123:
124: if (n >= opart->nelts) {
125: if (opart->next == NULL) {
126: break;
127: }
128: opart = opart->next;
129: oshm_zone = opart->elts;
130: n = 0;
131: }
132:
133: if (shm_zone[i].shm.name.len != oshm_zone[n].shm.name.len) {
134: continue;
135: }
136:
137: if (ngx_strncmp(shm_zone[i].shm.name.data,
138: oshm_zone[n].shm.name.data,
139: shm_zone[i].shm.name.len)
140: != 0)
141: {
142: continue;
143: }
144:
145: if (shm_zone[i].tag == oshm_zone[n].tag
146: && shm_zone[i].shm.size == oshm_zone[n].shm.size)
147: {
148: shm_zone[i].shm.addr = oshm_zone[n].shm.addr;
149:
150: if (shm_zone[i].init(&shm_zone[i], oshm_zone[n].data)
151: != NGX_OK)
152: {
153: goto failed;
154: }
155:
156: goto shm_zone_found;
157: }
158:
159: ngx_shm_free(&oshm_zone[n].shm);
160:
161: break;
162: }
163:
164: if (ngx_shm_alloc(&shm_zone[i].shm) != NGX_OK) {
165: goto failed;
166: }
167:
168: if (ngx_init_zone_pool(cycle, &shm_zone[i]) != NGX_OK) {
169: goto failed;
170: }
171:
172: if (shm_zone[i].init(&shm_zone[i], NULL) != NGX_OK) {
173: goto failed;
174: }
175:
176: shm_zone_found:
177:
178: continue;
179: }
16)处理监听socket的,假设监听地址同样的话,则把新、旧cycle的监听socket合并
1: if (old_cycle->listening.nelts) {
2: ls = old_cycle->listening.elts;
3: for (i = 0; i < old_cycle->listening.nelts; i++) {
4: ls[i].remain = 0;
5: }
6:
7: nls = cycle->listening.elts;
8: for (n = 0; n < cycle->listening.nelts; n++) {
9:
10: for (i = 0; i < old_cycle->listening.nelts; i++) {
11: if (ls[i].ignore) {
12: continue;
13: }
14:
15: if (ngx_cmp_sockaddr(nls[n].sockaddr, nls[n].socklen,
16: ls[i].sockaddr, ls[i].socklen, 1)
17: == NGX_OK)
18: {
19: nls[n].fd = ls[i].fd;
20: nls[n].previous = &ls[i];
21: ls[i].remain = 1;
22:
23: if (ls[i].backlog != nls[n].backlog) {
24: nls[n].listen = 1;
25: }
26: break;
27: }
28: }
29:
30: if (nls[n].fd == (ngx_socket_t) -1) {
31: nls[n].open = 1;
32:
33: }
34: }
35:
36: } else {
37: ls = cycle->listening.elts;
38: for (i = 0; i < cycle->listening.nelts; i++) {
39: ls[i].open = 1;
40:
41: }
42: }
17)打开全部的监听socket。详细过程和用socket编程时是一样的,调用socket创建套接字 -> 调用setsockopt设置成可重用socket -> 设置成非堵塞socket -> 调用bind绑定要监听的socket地址 -> 调用listen转化成监听socket。
1: if (ngx_open_listening_sockets(cycle) != NGX_OK) {
2: goto failed;
3: }
18) 依据cycle配置全部的监听socket,包含设置监听socket的接收缓冲区大小、发送缓冲区大小以及accept filter等
1: if (!ngx_test_config) {
2: ngx_configure_listening_sockets(cycle);
3: }
19) 调用全部模块的init_module回调函数。进行模块的初始化动作。
1: for (i = 0; ngx_modules[i]; i++) {
2: if (ngx_modules[i]->init_module) {
3: if (ngx_modules[i]->init_module(cycle) != NGX_OK) {
4: /* fatal */
5: exit(1);
6: }
7: }
8: }
20) ngx_init_cycle最后部分代码主要就是释放多余的资源,包含关闭共享内存、监听socket已经打开的文件等,然后ngx_init_cycle正常返回
1: /* close and delete stuff that lefts from an old cycle /
2:
3: / free the unnecessary shared memory /
4:
5: opart = &old_cycle->shared_memory.part;
6: oshm_zone = opart->elts;
7:
8: for (i = 0; / void / ; i++) {
9:
10: if (i >= opart->nelts) {
11: if (opart->next == NULL) {
12: goto old_shm_zone_done;
13: }
14: opart = opart->next;
15: oshm_zone = opart->elts;
16: i = 0;
17: }
18:
19: part = &cycle->shared_memory.part;
20: shm_zone = part->elts;
21:
22: for (n = 0; / void / ; n++) {
23:
24: if (n >= part->nelts) {
25: if (part->next == NULL) {
26: break;
27: }
28: part = part->next;
29: shm_zone = part->elts;
30: n = 0;
31: }
32:
33: if (oshm_zone[i].shm.name.len == shm_zone[n].shm.name.len
34: && ngx_strncmp(oshm_zone[i].shm.name.data,
35: shm_zone[n].shm.name.data,
36: oshm_zone[i].shm.name.len)
37: == 0)
38: {
39: goto live_shm_zone;
40: }
41: }
42:
43: ngx_shm_free(&oshm_zone[i].shm);
44:
45: live_shm_zone:
46:
47: continue;
48: }
49:
50: ld_shm_zone_done:
51:
52:
53: / close the unnecessary listening sockets /
54:
55: ls = old_cycle->listening.elts;
56: for (i = 0; i < old_cycle->listening.nelts; i++) {
57:
58: if (ls[i].remain || ls[i].fd == (ngx_socket_t) -1) {
59: continue;
60: }
61:
62: if (ngx_close_socket(ls[i].fd) == -1) {
63: ngx_log_error(NGX_LOG_EMERG, log, ngx_socket_errno,
64: ngx_close_socket_n " listening socket on %V failed",
65: &ls[i].addr_text);
66: }
67: }
68:
69:
70: / close the unnecessary open files /
71:
72: part = &old_cycle->open_files.part;
73: file = part->elts;
74:
75: for (i = 0; / void / ; i++) {
76:
77: if (i >= part->nelts) {
78: if (part->next == NULL) {
79: break;
80: }
81: part = part->next;
82: file = part->elts;
83: i = 0;
84: }
85:
86: if (file[i].fd == NGX_INVALID_FILE || file[i].fd == ngx_stderr) {
87: continue;
88: }
89:
90: if (ngx_close_file(file[i].fd) == NGX_FILE_ERROR) {
91: ngx_log_error(NGX_LOG_EMERG, log, ngx_errno,
92: ngx_close_file_n " “%s” failed",
93: file[i].name.data);
94: }
95: }
96:
97: ngx_destroy_pool(conf.temp_pool);
98:
99: if (ngx_process == NGX_PROCESS_MASTER || ngx_is_init_cycle(old_cycle)) {
100:
101: /
102: * perl_destruct() frees environ, if it is not the same as it was at
103: * perl_construct() time, therefore we save the previous cycle
104: * environment before ngx_conf_parse() where it will be changed.
105: */
106:
107: env = environ;
108: environ = senv;
109:
110: ngx_destroy_pool(old_cycle->pool);
111: cycle->old_cycle = NULL;
112:
113: environ = env;
114:
115: return cycle;
116: }
117:
118:
119: if (ngx_temp_pool == NULL) {
120: ngx_temp_pool = ngx_create_pool(128, cycle->log);
121: if (ngx_temp_pool == NULL) {
122: ngx_log_error(NGX_LOG_EMERG, cycle->log, 0,
123: “could not create ngx_temp_pool”);
124: exit(1);
125: }
126:
127: n = 10;
128: ngx_old_cycles.elts = ngx_pcalloc(ngx_temp_pool,
129: n * sizeof(ngx_cycle_t *));
130: if (ngx_old_cycles.elts == NULL) {
131: exit(1);
132: }
133: ngx_old_cycles.nelts = 0;
134: ngx_old_cycles.size = sizeof(ngx_cycle_t *);
135: ngx_old_cycles.nalloc = n;
136: ngx_old_cycles.pool = ngx_temp_pool;
137:
138: ngx_cleaner_event.handler = ngx_clean_old_cycles;
139: ngx_cleaner_event.log = cycle->log;
140: ngx_cleaner_event.data = &dumb;
141: dumb.fd = (ngx_socket_t) -1;
142: }
143:
144: ngx_temp_pool->log = cycle->log;
145:
146: old = ngx_array_push(&ngx_old_cycles);
147: if (old == NULL) {
148: exit(1);
149: }
150: *old = old_cycle;
151:
152: if (!ngx_cleaner_event.timer_set) {
153: ngx_add_timer(&ngx_cleaner_event, 30000);
154: ngx_cleaner_event.timer_set = 1;
155: }
156:
157: return cycle;
158:
159:
160: ailed:
161:
162: if (!ngx_is_init_cycle(old_cycle)) {
163: old_ccf = (ngx_core_conf_t ) ngx_get_conf(old_cycle->conf_ctx,
164: ngx_core_module);
165: if (old_ccf->environment) {
166: environ = old_ccf->environment;
167: }
168: }
169:
170: / rollback the new cycle configuration /
171:
172: part = &cycle->open_files.part;
173: file = part->elts;
174:
175: for (i = 0; / void */ ; i++) {
176:
177: if (i >= part->nelts) {
178: if (part->next == NULL) {
179: break;
180: }
181: part = part->next;
182: file = part->elts;
183: i = 0;
184: }
185:
186: if (file[i].fd == NGX_INVALID_FILE || file[i].fd == ngx_stderr) {
187: continue;
188: }
189:
190: if (ngx_close_file(file[i].fd) == NGX_FILE_ERROR) {
191: ngx_log_error(NGX_LOG_EMERG, log, ngx_errno,
192: ngx_close_file_n " “%s” failed",
193: file[i].name.data);
194: }
195: }
196:
197: if (ngx_test_config) {
198: ngx_destroy_cycle_pools(&conf);
199: return NULL;
200: }
201:
202: ls = cycle->listening.elts;
203: for (i = 0; i < cycle->listening.nelts; i++) {
204: if (ls[i].fd == (ngx_socket_t) -1 || !ls[i].open) {
205: continue;
206: }
207:
208: if (ngx_close_socket(ls[i].fd) == -1) {
209: ngx_log_error(NGX_LOG_EMERG, log, ngx_socket_errno,
210: ngx_close_socket_n " %V failed",
211: &ls[i].addr_text);
212: }
213: }
214:
215: ngx_destroy_cycle_pools(&conf);