Android 多渠道打包及VasDolly使用
目录
-
- 1.添加productFlavors的配置
-
- buildConfigField
- manifestPlaceholders
- resValue
- 2.设置apk文件的名称,便于识别
- 3.添加vasdolly、添加gradle脚本(windows)
作用:一次性可以打多个apk包,名字、包名、logo等可以不相同。解决了每次发版都要手动修改代码的问题,例如:名字、logo等。
配置build.gradle(app)
1.添加productFlavors的配置
android{
 .....
//设置风味的维度
 flavorDimensions = ["release"]

//productFlavors中有两套配置,huawei、oppo。
 productFlavors {

        huawei {
            versionCode 8
            versionName "1.7.33"
            dimension "release"
            applicationId "test.test.abc"
             resValue "string", "file_provider_name_personal", applicationId + ".provider"
            manifestPlaceholders = [
                    apkName: '语文',
                    apkIcon: '@drawable/yuwen'
            ]
            ndk {
                abiFilters "arm64-v8a"
                //"armeabi-v7a" , "arm64-v8a"
            }
            buildConfigField "int", "COMPANY", "1"
        }
        oppo {

            versionCode 7
            versionName "1.6.30"
            dimension "release"
            applicationId "test.test.abc"
            resValue "string", "file_provider_name_personal", applicationId + ".provider"
            manifestPlaceholders = [
                    apkName: '数学',
                    apkIcon: '@drawable/yuwen'
            ]
            ndk {
                abiFilters "arm64-v8a"
                //"armeabi-v7a" , "arm64-v8a"
            }
            buildConfigField "int", "COMPANY", "4"
        }
    }
}
buildConfigField "int", "COMPANY", "1"
buildConfigField
buildConfigField申明了一个常量,方便在代码中进行使用。
BuildConfig文件:
public final class BuildConfig {

  public static final int COMPANY = 1;
}
使用buildConfigField
public class MyApplication extends Application {

    @Override
    public void onCreate() {

   			Constant.URL_PROTOCOLUSE = "http://xxx.xxx.cn/api/pro.jsp?company=" + BuildConfig.COMPANY + "&apptype=" + getString(R.string.app_name);
	}
}
manifestPlaceholders
设置在manifest中数据
            manifestPlaceholders = [
                    apkName: '数学',
                    apkIcon: '@drawable/yuwen'
            ]
 <application
        android:name=".MainApplication"
        android:allowBackup="false"
        android:icon="${apkIcon}"
        android:label="${apkName}">
  </application>
resValue
声明一个在Strings.xml中的字符串。
resValue "string", "file_provider_name_personal", applicationId + ".provider"
声明后,会自动生成。
<resources>


    <string name="file_provider_name_personal" translatable="false">test.test.abcstring>

resources>
2.设置apk文件的名称,便于识别
static def releaseTime() {
    SimpleDateFormat formatter = new SimpleDateFormat("yyyy-MM-dd");
    return formatter.format(new Date())
}
android {

....

    applicationVariants.all { variant ->
        variant.outputs.all { output ->
            def outputFile = output.outputFile
            def fileName
            if (outputFile != null && outputFile.name.endsWith('.apk')) {
                if (variant.buildType.name.equals('release')) {//如果是release包
                    fileName = "${productFlavors.name}-${buildType.name}-${productFlavors.versionName}-" +
                            "${productFlavors.versionCode}-${releaseTime()}.apk"
                } else if (variant.buildType.name.equals('debug')) {//如果是debug包
                    fileName = "${productFlavors.name}-${buildType.name}-${productFlavors.versionName}-" +
                            "${productFlavors.versionCode}.apk"
                }
                outputFileName = fileName
            }
        }
    }
}
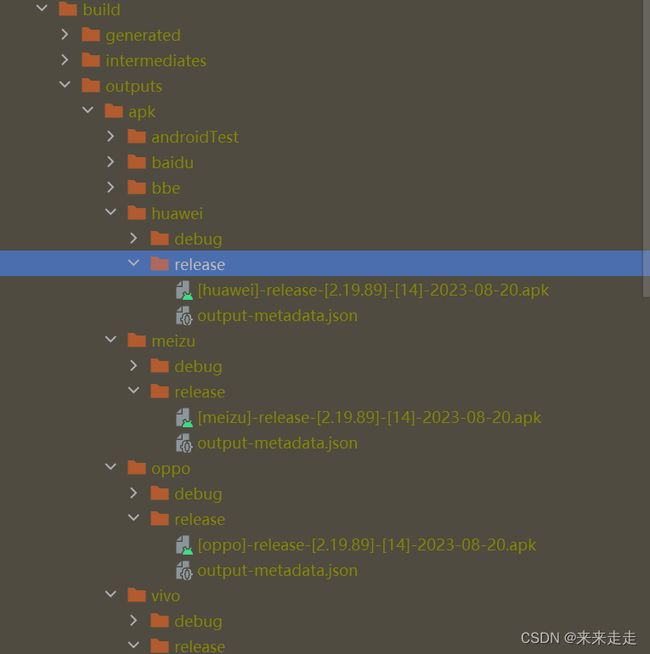
打出的apk,名字-包类型-版本名称-版本号

一次性打多个包,使用assemble

assemble执行完毕后,在app/build/outputs/apk中寻找。大致样子如下

3.添加vasdolly、添加gradle脚本(windows)
vasdolly使用
https://github.com/Tencent/VasDolly
在build.gradle(app)文件中加入如下
Properties properties = new Properties()
properties.load(project.rootProject.file('local.properties').newDataInputStream())
def sdkDir = properties.getProperty("sdk.dir")
def buildToolsVersion = '33.0.1'//工具版本
def consolidatePath = "./build/consolidate/"
def storePwd = " "//keystore文件密码
def alias = " "//keystore文件alias
def keyPwd = " "//keystore文件密码

def jksPath = "C:\\Users\\xxx\\Desktop\\资料\\app.keystore"//keystore文件路径
/**
 * 优化加签名
 */
task batchSign {

    doLast {
        File consolidateDir = new File(project.buildDir, "consolidate/")
        consolidateDir.eachFile { apkFile ->

            def unsignedFileName = apkFile.getName()
            def lastchar = unsignedFileName.indexOf(".apk")
            def fileName = unsignedFileName.substring(0, lastchar)
            def zipalignedFileName = "${fileName}_zipaligned.apk"
            def signedFileName = "${fileName}_signed.apk"
            def buildToolsPath = "${sdkDir}\\build-tools\\${buildToolsVersion}"

            def command = "${buildToolsPath}\\zipalign -f -p 4 ${consolidatePath}${unsignedFileName} ${consolidatePath}${zipalignedFileName} && " +
                    "del ${project.buildDir}\\consolidate\\${unsignedFileName} && " +
                    "${buildToolsPath}\\apksigner sign --ks ${jksPath} --ks-pass " +
                    "pass:${storePwd} --ks-key-alias ${alias} --key-pass pass:${keyPwd} --out " +
                    "${consolidatePath}${signedFileName} ${consolidatePath}${zipalignedFileName} && " +
                    "del ${project.buildDir}\\consolidate\\${zipalignedFileName} && " +
                    "del ${project.buildDir}\\consolidate\\${fileName}_signed.apk.idsig"

            println(command)
            exec {
                ExecSpec execSpec ->
                    executable 'cmd'
                    args '/c', command
            }
        }
    }
}
/*
将apk优化和签名后,添加渠道
打渠道包*/
task makeChannel {
    def publishPath = "./build/publish/"
    doLast {
        def channels = "./channels.txt"  //vasdolly的相关文件
        File consolidateDir = new File(project.buildDir, "consolidate/")
        consolidateDir.eachFile { apkFile ->

            def command = "java -jar D:\\android\\gitdown\\VasDolly.jar put -c ${channels} ${apkFile.getAbsolutePath()} ${publishPath}"

            try {
                exec {
                    commandLine 'cmd', '/c', command
                }
            } catch (Exception e) {
                e.printStackTrace()
            }
        }
    }
}
task bundleAndChannel {

    dependsOn(batchSign)
    dependsOn(makeChannel)
}
编译之后面,在gradle中就会出现bundleAndChannel

准备加固、签名、渠道
在app/build/目录下,创建consolidate和publish文件。
将360加固后的apk,复制到app/build/consolidate文件中。
双击bundleAndChannel ,等待编辑,就可以了。
